A hunter definitely needs a gun and a knife. If there are no questions about the application of the first, then there are different opinions regarding the second. Some believe that a knife is necessary for finishing and cutting up a shot animal, as well as for protecting against an attack by an animal.
Others use this item, first of all, to chop branches, cut bread, open cans of canned food and perform various household work, but cutting up game is an occasional task. Thus, it turns out that there is no universal blade. Any man can create hunting knives with his own hands.
What is the product
A hunting knife is a bladed weapon with a short blade. The blade and handle are its main elements. To protect the hunter's palm from damage at the moment of striking, the product has a utik, that is, a limiter. Homemade hunting knives look very stylish. The photos below clearly demonstrate this.
In order to make a weapon, you need to decide, first of all, on the shape of the blade and handle, select the necessary materials, and also establish a list of tools and equipment that will be required to perform specific operations. Making hunting knives is not accessible to everyone.
Preparation and independent production
For production, any durable wood is used (the best option is hazel, birch, oak) without knots and rot. It is recommended to soak a piece of suitable size for several days and then dry it slowly so that the wood does not crack. With this method of wood processing, the product will be durable and light.
Read also: Equipment for plastic molding
It is advisable to choose medium-density wood that is easy to process. Sawing the sword must be done strictly along the grain, otherwise it will instantly break.
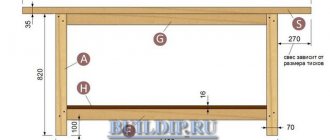
When starting to make a wooden sword with your own hands, you need to stock up on a suitable block of wood with a cross-section of 5x10 cm.
The following tools and items will be required:
- a hand saw or other tool designed for working with wood;
- pencil;
- sharp knife;
- ruler and measuring tape;
- sandpaper.
The work of making a simple wooden sword with your own hands is divided into several stages:
- A drawing of the sword is created and transferred to the block.
- The workpiece is cut using a saw or jigsaw.
- Using a knife, a layer of wood is removed from the blade to make it a little thinner than the guard.
- The handle is processed so that it becomes oval in cross-section. If the sword seems too heavy, you need to grind off some more wood from the blade and handle. If necessary, perform balancing, then carefully sand the surface of the product with sandpaper.
- Wrap the handle of the knife with electrical tape or sealing tape. This is necessary for several reasons - the sword will not slip out of your hands, the handle will not get dirty, and the product will take on a stylish, attractive look.
- Select the guard using a file or knife, making a depression in the place where it meets the blade. You can go the other way and not cut out the guard at all, but make it separately in the form of a wooden, plastic or metal circle with a slot for the handle.
- The guard fits tightly onto the handle and is secured with wire for additional fixation.
- At the last stage, you can decorate the sword with drawings or decorative carvings and varnish it.
If you have more complex tools and experience working with wood, you can try to make a sword using a different technology. It will consist of a separately machined blade with a handle and a guard, and will look more like the real thing. To make the blade and handle, a block of the required length is used, having a cross-section of 2.5 x 4.5.
The stages of work on how to make a sword from wood are as follows:
- Using a circular saw, make 4 cuts and give the workpiece a diamond shape. The tip is given the desired shape, for which a belt or disk grinder is used.
- The opposite end, which will be used as a handle, can be made thinner by additionally removing a layer of wood, or left the same thickness as the blade if its shape is comfortable for the hand. In order to subsequently connect the handle with the pommel, a hole is drilled in the end for the connecting rod. The workpiece is processed with sandpaper. To make a guard, you will need two 15 cm long strips with cross-sectional dimensions of 2 x 2.5. You should put them together and draw a rhombus in the middle, the size and shape of which coincides with the size and shape of the blade.
- It is necessary to cut out each of the parts and connect them with glue or nails.
- Round off the edges of the guard and sand it.
- Place the guard on the workpiece, moving it to the desired place, and fix it with glue.
- The pommel can be made semicircular or triangular, decorated with embossing or a pattern, and connected to the handle with a metal pin.
- Coat the product with varnish.
To prevent slipping, the handle is sometimes wrapped with electrical tape, tape, cloth, or notches are made on it.
Features of creating a blade
For this item, the ability to cut is more important than the ability to stab. For this purpose, the blade is made curved and bent upward. The curve of the cutting edge should be large enough to allow long cuts to be made in one movement. This greatly simplifies the process of cutting up prey. The shape of the blade of a hunting knife is of great importance.
Such bladed weapons have a handle shank made from a single metal blank. The sharp edge of the edge of the blade is called the blade. This is the cutting part of the knife. The opposite edge is always made blunt; it is often called the butt.
Knife hardness and length
To give the blade rigidity, special grooves are made in the metal part of the product. Such depressions are called valleys. They also reduce the weight of the item. The widespread belief that the lobes are intended to drain blood is deeply erroneous.
The blade length ranges from 12 to 15 cm, width – from 2.5 to 3 cm. It is better to make hunting knives with your own hands according to the drawings. But some hunters prefer to carry two types of bladed weapons. One blade is used for cutting prey, and the other for household needs. Not everyone knows how to make a hunting knife.
Selection of materials for manufacturing
The metal for the blade must be durable and not subject to corrosion. Tool steel grade R6M5 has proven itself very well. Blades for pendulum saws are made from it, and it’s not that difficult to get. Of the carbon steels, it is worth noting the 65 G grade. It has the necessary hardness, holds an edge well, and has high corrosion resistance. Below we will tell you how to make a hunting knife so that it lasts for a long time.
Even the most perfect blade can become ineffective and useless without a reliable and comfortable handle. It is this that ensures proper use of such weapons. Whether the knife blade will move in the right direction or go to the side, whether your hands will get tired or not - all this largely depends on this detail. The handle of a hunting knife should fit correctly and comfortably in the hand, but its beautiful finish is a secondary matter.
Advantages and disadvantages
The traditional form of karambit has many advantages:
- One of the positive properties of the blade is its invisibility in the hand and a comfortable, and most importantly, reliable grip. Thanks to this, the appearance of a blade in a fight will always be unexpected for the enemy.
- It is almost impossible to knock a karambit out of your hand.
- Blades intended for self-defense differ from classic military blades; they are smaller in size. The length of the blade is shorter, and the design itself is simplified.
- The blade can be used equally with a forward and reverse grip.
- During the battle, thanks to the ring, the karambit can be twisted as you like, thereby distracting the enemy and confusing him. Due to the increased maneuverability of the blade, the possibility of delivering damaging blows to the enemy increases.
Do not forget about some disadvantages, this product has them:
- The shape of the blade can be considered a disadvantage; it is inconvenient for urban residents. But now this flaw is being corrected by making folding - pocket models. Some manufacturers have developed a mechanism on the butt in the form of a hook for karambits. It creates an automatic opening of the blade when removed from the pocket.
- The utility blade is very difficult to sharpen.
- Direct piercing blows cannot be delivered with a karambit due to its curved contour.
- This design is difficult to remove and insert into the sheath, and this is important for self-defense.
The shape of the blade is well suited for use on the farm; thanks to the bend, the knife easily cuts branches, ropes, and surfaces.
Attaching the handle
The handle can simply be mounted on the shank or attached to it using rivets. The first option looks more attractive. The knife shank is made in the form of a narrow rod. Part of it may extend beyond the handle. A thread is cut on the protruding part, and the handle is secured to the shank using a nut, pressing it against the stop. With this method of fastening, the base can be made from a set of individual rings. The locking nut is often called a knob and is usually given an attractive appearance. The handle is simply pushed onto the short shank and glued.
The riveted part is made differently. The shank of the knife is made in the shape of a handle, that is, it is flat and wide. Holes are drilled in it. The linings on both sides are symmetrically applied to the shank, the rivets are inserted into the holes. The fastening is very durable.
Handle: material
The material for making the handle must be durable, comfortable to the touch, not cold on the hand, not soaked in blood and not freeze to the fingers from the cold. The main requirements also include light weight, ease of processing and availability of purchase. It is probably not advisable to obtain exotic materials for a hunting knife.
The best raw material for making a handle is wood. The blanks are made from dense varieties. Very good parts are obtained from maple, ash and apple. Coniferous trees are not used. So-called burls are taken from birch trees, that is, growths on the trunk. A hole is made in the workpiece for attachment to the shank. If it is planned that it will extend beyond the handle, then the hole is made through. Its diameter should allow the shank to fit inside the handle without splitting it.
Advantage of birch bark
Birch bark is considered the ideal material for the handle. To make the product softer, the raw materials are heat treated in hot water for 2 hours. You could say it is simply boiled in a large pot of water, then dried thoroughly. The finished birch bark sheet is cut into small rectangular plates. The size of the parts should be slightly larger than the size of the future handle. Next, the plates are put on the knife shank one by one.
Holes in rectangles must be made immediately before inserting them, since the transverse dimensions of the shank do not remain constant. The collected birch bark is compressed with a nut, which is screwed onto the thread at the end of the shank. If necessary, plates are added until all the birch bark is compressed into a single dense briquette, and several turns of thread remain under the nut. Using a sharp knife and file, the handle is given the desired shape. In the final version, the handle is sanded with fine sandpaper. No varnishes or paints are needed. It's always nice to make a hunting knife with your own hands. The drawings will help you decide on shapes and sizes.
The limiter prevents the hand from moving onto the blade. It is attached in front of the handle. Only a single limiter is installed. The crosspiece is used in military weapons. However, many hunters prefer not to install a special limiter at all, and protect their hand thanks to the protrusions on the handle. These knives are more convenient for skinning and butchering animals.
From the history
This unique weapon has a rich history. The earliest mentions of karambit date back to the 12th century. But it is impossible to know the true history; it is shrouded in legends.
According to one of them, in parts of Indonesia, the local people had a cult of the tiger. People considered him a formidable jungle dweller. They thought that when they died, the souls of their kings transmigrated into the tiger. And the local population began to make combat knives, copying the appearance of a tiger claw. According to other versions, the blade originated either from the demon Bima, whose main weapon was claws, or from the king of the monkeys, who had a magical claw in his palm.
Most likely, the actual prototype of the blade was an ordinary sickle, and the hole was a necessity so that the object would not accidentally fall out of the hand. In these areas, the most common work was in the rice fields - in the water.
In ancient times, it was common on the Indonesian islands to smear the blade with strong poison. As a result of a small, lacerated wound, the enemy died instantly.
Along with heavy types of karambits, there were small ones - for domestic needs and self-defense.
The blade was made like this:
- carbon steel;
- the handle was made of wood or from the horn of an animal;
- the scabbard was made of wood, decorated, but did not have pendants; the blade was intended to be worn in the belt.
Karambit became the prototype of the Bulang blades, which were tied to the legs of roosters in cockfights.
Basic operations for making knives
The manufacturing process includes several stages. Let's look at how to make hunting knives with your own hands (photos will help you evaluate the labor intensity of the process).
- A general drawing of a knife with a handle and a separate diagram of a blade with a shank are drawn up.
- According to the second drawing, a stencil is made from cardboard or thick paper, with its help a contour is drawn on a strip of metal with a pencil. Use a sharp object to scratch the metal of the workpiece along the pencil mark, in case it is erased.
- Using coarse-grained sandpaper, the metal is ground along the contour and a workpiece is obtained. To prevent the metal structure from being damaged due to overheating, it is lowered into a container of water to cool.
- The shank is preparing to seat the handle. If it extends beyond its limits, then a thread is cut at the end for a nut. If fastening with rivets is planned, then holes are drilled.
- Using fine-grained sandpaper, smooth out the slopes evenly from the blunt part of the blade to the sharp one. The workpiece is regularly cooled in water to prevent overheating.
- The surface of the blade is processed with a grinding wheel and then polished. To do this, you can use a felt disc and a special paste.
- A bushing is made from a thick brass plate and placed on the shank. The handle will rest against it. The sleeve can be made together with the limiter. For better fixation, it is soldered to the blade.
- A handle is made and placed on the shank or secured with rivets. DIY hunting knives can be made without it. Simply wrap the workpiece with cord or twine.
The knife is ready. All that remains is to place it in a reliable sheath. Making hunting knives can be a good business.
Knife drawings
Many men like to have a beautiful and at the same time reliable knife with them. An item that is made independently is a special source of pride. The process of creating such a product with your own hands can take a lot of time and effort, but at the same time it is fascinating. A person is given unlimited options for designing a handle and blade; it all depends on imagination. Drawings of knives can help you decide on your choice.
Knife drawings
It is important to understand that each knife is adapted for a specific area. A butcher, a fisherman or a hunter will use completely different tools. Therefore, when choosing a drawing, you should first decide on the purpose of use. It is also necessary to pay attention to the size so that the tool is convenient for its owner to use. You can borrow some part from the drawing or the whole element. The drawings will help turn your idea into reality and make you the happy owner of a new knife and delight your friends and acquaintances.
Types of knives
Based on their scope of application, they are divided into several categories:
- throwing;
- tourist;
- hunting;
- fishing;
For those who like to throw knives, one will not be enough, and buying a set can be quite expensive. Therefore, everyone can try to make it themselves. Let's describe a few examples that are popular.
Throwing knives
Cobra throwing knives are manufactured in the city of Zlatoust. Drawings of knives of various models are publicly available on the Internet, but at the moment only one is officially produced. The fact is that the developers chose to produce one, but well-designed and well-balanced knife. Factory-produced items are painted red to make them easier to find.
Throwing knife "Gadfly", drawings of which are also easy to find, are made of branded Zlatoust steel. An original discovery in design is the use of a regular cord as a handle. From the same manufacturer there is another throwing knife called “Udar”. The increased size and weight allow it to be thrown longer distances.
Throwing knife "Gadfly"
The requirements for knives for tourism, fishing and hunting recommend the use of stainless steel; finding a sketch is not difficult. The handles should be mounted, since the applied elements may crack under loads during operation. A camping knife may include several blades and tools that can be useful on a hike. Options for hunting and fishing must be sharp for a long time so that a person can use them to properly cut meat or fish.
Hunting knife
How to use drawings
The first step is to print the sketch onto cardboard or thick paper. The scale of the drawing and the knife should be one to one. If another person will make the workpiece, all requirements should be detailed and the dimensions indicated on the drawing. Cut out the stencil and lean it against a sheet of metal, outline it with a center punch or marker. Cut the workpiece with a margin of 1-2 mm and then remove the excess with a file or other tool.
VOX bowie knife drawing Throwing knife drawing Tracker knife drawing
Basic operations for making knives
Before you start creating the blade and handle according to the drawing, you should prepare all the necessary materials.
The blade is made of tool steels, for example, P6M5 steel, which has good hardness. A blade made of this steel will not wear down for a long time. You can also use some carbon steels or material from car springs that have not been corroded.
Knife making process
The handle is most often made of wood, which dries out little and has sufficient strength. Suitable for this:
- birch;
- oak;
- nut;
- ironwood;
- heather, etc.
If the handle is overhead, then small diameter rivets will be required. They can be made from brass rod.
Tools you will need:
- drills and countersinks;
- sandpaper for rough processing and zero;
- electric drill;
- vice;
- files;
- hammer.
The technological process of making a hunting knife with your own hands consists of several stages.
- It is necessary to transfer the drawing with all dimensions to a metal plate.
- Cut the blank along the contour, grind off the excess and drill holes for the rivets.
- Make the cutting edge of the blade. Secure the future knife in a vice and grind off the metal with a file at a certain angle. Repeat the process on the reverse side if necessary. After filing, finish the process with sandpaper.
- Temper the blade in an oven or over a fire for 15 minutes. To do this, place the metal workpiece in close proximity to coals or another heat source. As soon as the metal turns red, you need to pull out the workpiece for a few seconds. The heating should be checked using a regular magnet. The heated metal stops being attracted to the magnet. In this case, heating must be stopped.
- Lower the hot workpiece into the oil with the cutting part facing down. The immersion should not be carried out completely, but only 2/3. Hold in this position for about a minute, and then slowly immerse completely in the oil.
- Temper in an oven at 400 °C for 45 minutes.
- Finish with sandpaper or other means.
- Make a handle from wood according to the sketch, drill holes for rivets.
- Impregnate the handle with special solutions to increase its service life.
- Assemble all parts.
- Polish the handle.
At this point the manufacturing process is completed and we have a beautiful and reliable homemade knife.
If you find an error, please select a piece of text and press Ctrl+Enter.