Material selection
Having decided on a place for a workbench and drawn a drawing, the question of choosing materials for the product logically arises. Much here will depend on what is more accessible to you - metal or wood. As a base, you can use a wooden beam or a 40 mm board, or you can make a frame from a metal corner, from a profile pipe or from an aluminum profile. For the countertop, you can use chipboard, MDF, but you can also build it from scrap materials, for example, from the same pallets or pallets.
Working with metal often involves treating with oils or other chemical liquids that are well absorbed into wood, so to prevent saturation of the countertop and possible fire, you need to equip a mechanic's corner. Plywood or perforated metal strip is perfect for an apron. We will also need self-tapping screws, screws, studs, glue and other small consumables.
Base
The base of the structure when placed permanently is best made from a wooden beam with a size of no less than 150*50, so the workbench can easily withstand a static load of up to 200 kg/cm and a dynamic load of up to 750 kg/cm. Among other things, wood is more ductile than metal and perfectly absorbs vibration. Of course, such legs must be made of dry hardwood or softwood and treated with impregnation.
If for some reason you don’t want to make a wooden base, you can weld it from metal. This has its pros and cons, for example, you can make adjustable supports - this is a plus. It is impossible, without losing the ability to bear a dynamic load, to make an opening for the legs in the frame - this is already a minus. Boxes for such a base are made of galvanized metal.
What to make the countertop from?
The workbench top must be durable. The best option would be a glued panel made of dry boards with a thickness of at least 25 mm. However, chipboard or MDF sheets covered with steel sheet or hardboard are also suitable. Instead of purchased boards, you can also use waste materials at hand, such as timber from pallets (pallets). The table can also be divided into two sections: one made of wood, and the second made of a rectangular metal pipe (instead of a thick metal plate). The boards will need to be treated with drying oil and a fire retardant to prevent fire.
Protective screen
Making a tabletop protective screen is very simple - just cover the entire tabletop or part of it with metal.
Such a screen allows you to significantly increase the usable area, because thanks to the holes you can make a good storage system for tools or various small items, leaving shelves and drawers for larger things.
Optional equipment
A universal workbench should be equipped not only with a vice, but also with clamps and various clamps. In addition, various equipment is additionally installed, for example, a jigsaw, a milling machine, additional power and lighting points, grinding equipment, and a dust extraction system.
Purpose
The bench is used for processing parts made of metals and alloys. The design is designed to perform a wide range of operations:
- carving;
- engraving;
- trimming parts;
- riveting;
- drilling holes;
- bending and cutting;
- assembly of mechanisms.
To work on a workbench, special tools are required. One of the most necessary devices is a vice. Using a tool mounted on a table, parts or workpieces are fixed.
Height and dimensions of the bench
Before manufacturing, it is necessary to determine the height of the workbench, since it affects the creation of optimal working conditions. The height is determined as follows: take the height from the floor to the worker’s elbow. The optimal height for metalworking work is the height when the worker’s elbow and the plane of the file are at the same level.
It is very important to decide on the size of the tabletop. It’s more convenient to work on a wide tabletop, so if conditions allow you, you shouldn’t skimp
The optimal width of the tabletop should be such that you can reach the tools located at the opposite end.
If the workbench design is made by hand, then you need to carefully think through the smallest details, determine how the tools will be arranged, and what work will be performed. The model of your future product depends on this.
The design of a metalworking workbench should consist of a rigid metal frame (angles or square pipes). To make a tabletop, it is better to use a beam 50 mm thick, on which a steel sheet up to 6 mm thick is stuffed on top. Welding is used to connect all metal elements to each other, but they can be connected with bolts.
It is definitely worth strengthening the structure with stiffening ribs from the corner, which are welded at a height of 10 cm from the floor and 10 cm down from the tabletop. Do the same in the center of the future desktop. To ensure stability of the frame, weld square-shaped metal plates onto the future legs of the metal table.
If desired and necessary, you can make drawers and shelves under the table top, and for convenience you can place a mesh to secure the tool. The mesh also prevents sawdust from flying in different directions.
When creating a structure for drawers, square-shaped frames are formed from steel pipes, which are welded to the tabletop. To strengthen the frames, longitudinal stiffeners are used.
With two cabinets, the workbench will be more bulky, but its stability will be maximum. In addition, the number of shelves or drawers that can be mounted will increase.
Check out the drawings of the cabinets and protective screen (SE) for the workbench:
Design Features
A workbench is a multifunctional table on which various work is carried out on the manufacture and repair of any metal, wood or other products. It is complemented by various drawers and shelves for power tools, spare parts, small parts, fastening and construction items. The universal table is useful for both welders and motorists, and thanks to its simple design it is quite easy to assemble.
You can make a workbench with your own hands in other sizes, taking into account your individual characteristics. Making a workbench is not difficult; materials that can be found in any hardware store, in the country house or in the garage are suitable for this. You can set up a work area in an apartment on a balcony or loggia, in a private house in the basement (if there is no garage or separate workshop) or under a canopy (outdoor option). The unpretentiousness of the design allows you to install workbenches not only for the home, but also in a home car service.
You need to choose not only a suitable workbench model, you also need to take into account its location in the room. The table should be located near a window or other source of lighting and be equipped with additional lighting. The drawing must be drawn up taking into account whether you are right-handed or left-handed.
You need to think through the design down to the smallest detail: what the base materials will be, whether the table will be roll-out or stationary, the number of sockets that may be needed, and much more. The more detailed you are about your ideal workplace, the easier it will be to bring your idea to life. There is no need to use industrial workbenches as a basis; it is labor-intensive and requires a lot of financial investment.
Features of the models
Mass-produced workbenches are convenient in that their characteristics are set during production and correspond to their purpose. Depending on the technical conditions under which a particular workbench will operate, different models may have the following parameters:
Table top material. Moisture-resistant plywood or MDF coated with galvanized metal. The thickness of the tabletop varies between 24-30 mm.
Professional approachSource extxe.com
- Permissible load on the tabletop. Serial models allow a load of 300-350 kg. The reinforced series workbench is designed for 400 kg or more.
- The permissible load on a shelf in a cabinet is 20-30 kg, on a bench shelf - up to 40-50 kg.
- Protection. A lock, key or high security (pin) can be installed on the cabinet.
- Accessories. A variety of shelves, holders, screens and hooks.
Factory-made workbenches are supplied unassembled; By design they can be divided into three groups:
Without pedestals. The ideal small workbench for a modest sized garage. The easy-to-assemble design is characterized by a sufficient size of the working surface, which can be folded if necessary (folding workbench). Stability is provided by adjustable legs. Baseless models can be additionally equipped with drawers on bearing guides.
The structure of a universal workbench
A workbench, like any other specialized furniture, has several options that differ in shape, size, type of construction and purpose. But traditionally, the workbench model has several components:
- The tabletop is the right size.
- An underframe with compartments for storing tools and drawers.
Directly on the tabletop itself there are vices (clamps), carpentry tools, planes, and wood processing machines.
Other types of tools can be installed on the surface of the workbench, depending on the purpose of the structure and the professional occupation of the owner of the workshop or garage.
Video description
About the organization of the workplace in the following video:
- Single pedestal. Reliable prefabricated structure with a reinforced table top and a weight of 96-105 kg. This workbench is equipped with both a comfortable work surface and a cabinet with drivers (drawers on ball guides of different heights) or adjustable shelves. The drawers are locked with a central lock. Some models are equipped with a dashboard.
- Double-pedestal. The weight of such models is 100-115 kg; They are equipped with two drivers with drawers of different heights. The maximum permissible load on each drawer (if evenly distributed) is 30 kg. The kit may include a perforated screen - a panel designed to accommodate holders and hooks.
Combination workbenchSource searsoutlet.com
Where to order and buy a workbench in Moscow inexpensively
- Order by phone number;
- Come to us: 141280, Russia, Moscow region, Ivanteevka city, Studenchesky proezd, 5;
- Write by email;
- Place an order through the online store cart - Sclad.Ru;
- Order a pick-up by a transport company from our warehouse;
- Order delivery using any of the above methods both in our region and throughout Russia. We work with all transport companies.
Other cities where you can buy our workbenches at low prices from the manufacturer in bulk
Arzamas, Arkhangelsk, Astrakhan, Barnaul, Belgorod, Bryansk, Veliky Novgorod, Vladivostok, Vladimir, Volgograd, Vologda, Voronezh, Dzerzhinsk, Yekaterinburg, Ivanovo, Izhevsk, Irkutsk, Kazan, Kaluga, Kirov, Klin, Krasnodar, Krasnoyarsk, Crimea, Kurgan , Kursk, Labytnangi, Lipetsk, Lugansk, Murmansk, Naberezhnye Chelny, Nizhny Novgorod, Novosibirsk, Orel, Orenburg, Penza, Perm, Petrozavodsk, Pskov, Pyatigorsk, Rostov-on-Don, Ryazan, Samara, St. Petersburg, Saratov, Smolensk , Sosnovy Bor, Stavropol, Stary Oskol, Surgut, Syktyvkar, Tambov, Tver, Togliatti, Tomsk, Tula, Tyumen, Ulyanovsk, Ufa, Ukhta, Khabarovsk, Cheboksary, Chelyabinsk, Yaroslavl.
We offer our customers delivery and installation services.
Still have questions? Call us and we will share our experience to improve your workshop when choosing the right workbench.
Bed: metal or wood?
A stationary wooden workbench has advantages over one on a steel frame not only in lower cost and labor intensity. Wood, firstly, is not plastic. A workbench on a wooden base can be broken, but if the wood used is seasoned and treated, it will never bend. Secondly, wood perfectly dampens vibrations. The foundations of your buildings are not reinforced vibration-absorbing ones, like workshops in a factory? And the overall strength and stability of the home workbench frame will be fully ensured by commercial coniferous wood of ordinary quality.
Wooden workbench frames
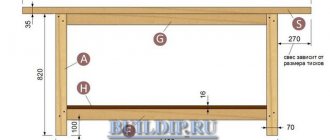
The design of a wooden workbench frame made from 120x40 boards is shown on the left in Fig. Permissible static load – 150 kgf; dynamic vertically downward for 1 s – 600 kgf. Corner posts (legs) are assembled on 6x70 self-tapping screws in a zigzag (snake) pattern with a distance from the edge of 30 mm and a pitch of 100-120 mm. Double-sided fastening; the snakes on both sides of the package are made in mirror image. Intermediate support beams are fastened with steel angles on self-tapping screws; the edge ones - with pairs of self-tapping screws at the tenons of the posts and, on the outside, with corners.
If timber 150x50 or (180...200)x60 is available, the design can be simplified, as shown in the center in Fig. The load-bearing capacity will increase to 200/750 kgf. And from timber 150x150, 150x75 and (180...200)x60 you can build a frame capable of bearing 450 kgf in statics and 1200 in dynamics, on the right in Fig.
Note: any of these beds is suitable for both carpentry and metalworking workbenches. Under the joinery, a box-shaped lid is placed on it (see below), and under the fitter, a tray from a 60x60x4 angle with welded 4-mm strips above the intermediate beams is placed. A wooden cushion is placed in the tray and covered with steel, also see below.
If there is no welding
An all-wood workbench, without the need for welding work for its manufacture, can be made according to the following scheme. rice. The “trick” here is the tabletop, glued together from 75x50 lumber and fastened with ties. If the beam is oak, then the permissible load is 400/1300 kgf. Corner posts – timber 150x150; the rest is timber 150x75.
All-wood workbench design
It happens the other way around: metal is more accessible than wood, and welding is available. Then the workbench table for a load of 100/300 kgf can be assembled according to the drawing on the left in Fig. Materials – corner 35x35x3 and 20x20x2. Boxes are made of galvanized steel. Disadvantage - it is impossible to make an opening at the bottom for the legs; the structure will lose its ability to bear dynamic loads.
Metal workbench frames
For a load of 200/600, a more convenient metal workbench according to the diagram at the top right, made of corrugated pipe 50x50 (corner posts), 30x30 (other vertical parts) and a corner 30x30x3, is suitable. The plank cushion of both workbenches is laid only across (bottom right) from tongue-and-groove boards (120...150)x40.
Shelf – steel 2 mm. The shelf is attached to the pillow with 4x(30...35) self-tapping screws, a pair at each edge of each board, and along the outer boards - in increments of (60...70) mm. Only in this design will the workbench show the specified load-bearing capacity.
These workbenches are already universal: for carpentry, the lid is turned over with the wooden side up or adjusted as described below. A bench vise is mounted on a wooden pad, but is not secured with a clamp. A collet anchor for an M10-M14 bolt is driven into the vice pad from below, and a through hole is drilled in the cover for it. A 60x2 washer is placed under the bolt head. This solution is convenient because it is possible to use inexpensive non-rotating vices.
How to make a metal workbench with your own hands
It is better to divide any work into several stages. This way you can avoid unnecessary actions and do everything as clearly and efficiently as possible. Let's look at the step-by-step process of making a metal workbench with drawers for tools with your own hands.
- The first step is drawing up a diagram. It is required, at a minimum, to determine the dimensions and outline of the bench, make a sketch and a rough drawing. This will allow you to decide on the materials that need to be purchased. If the drawing of the metalworking bench is ready, the materials have been purchased, and the place for the future metalworking surface has been cleared and ready for installation, then you can begin. The main thing to keep in mind is that for greater strength, the frame is attached to the floor. We'll talk about how to do this correctly a little later. The main thing is that the place for metalwork work is not suddenly needed in one or two weeks. It is extremely difficult to move such a massive structure.
- If everything is ready to begin work, then you can begin making the frame. There are two possible installation options for the frame: welding and metal bolts. It is preferable, safer and more aesthetically correct to choose bolts. But even in this case, you can’t do without welding. It is recommended to use iron angles to create the frame of the metalwork surface. The sheet thickness must be at least 5 mm. The side size is suitable at 35-40 mm. But keep in mind that the thickness of the future tabletop depends on the depth of the corner. It should fit perfectly into the prepared nest. Any protrusions will add unnecessary work on surface processing, and it will not be possible to securely fasten the cleaver to a curved plane. It is better to choose the height of the workbench at arm's length. This will make it more convenient to work. For an average male height of 178-180 cm, the ideal height would be 120 cm. Metal squares with a sheet thickness of about 3-5 m should be welded onto the lower part of the corners. This is the future base of a metalworking workbench. The squares are attached to the floor with anchor bolts, after which it will be difficult to move the legs. The tabletop nest is welded onto the legs. The corners of the tabletop are positioned in such a way that the future working surface will lie in them, like in the nest of some part. This completes the manufacturing of the frame and begins the next stage.
- To increase rigidity, we make two large metal boxes. The height of the box starts from the foot of the tabletop and ends approximately 20 cm to the floor level. This will make it more convenient if there is a great need to move the workbench to another place or dismantle it. The boxes are made from iron sheets 3 mm thick; the sheets are connected by welding. Corners are welded or bolted under the boxes, to which the boxes are bolted. Supports for the drawers are welded into the boxes themselves. It is more practical to make each of the locksmith boxes from not very thick plywood: a sheet of 5 mm will be enough.
- After the installation of the drawers is completed, it is time to take care of the countertop. It is highly recommended not to use metal for these purposes. The most practical option would be wood impregnated with a fire-resistant composition. A slab made of natural or artificial stone would be better, but it is much more expensive, so the decision is entirely up to the future owner.
- The shield can be a sheet of plastic or iron secured with bolts. Plastic is more practical in terms of fastening, and a steel screen is more reliable. You can attach the shield to the base using the same anchor bolts. It is not difficult to make and secure a workbench screen with your own hands, but this will increase safety, and therefore you should not neglect the shields.
As you can see, making a metal workbench for metalwork is not such an impossible task: it’s more like putting together puzzles. The main thing is to think through each stage and work out an action plan in advance, find out what types of fasteners and materials there are in order to choose the right one.
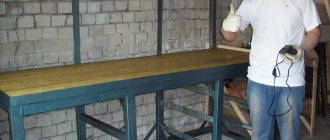
Making a wooden workbench
If you lack experience, it is better to choose a model of a wooden workbench for your garage to make with your own hands. Making a structure from timber using a drill and a jigsaw is much easier than welding a steel corner.
To assemble a wooden workbench for the garage you will need:
- Wooden beam. Pine and oak blanks are particularly durable. Depending on the design of the workbench, a length of 15 m should be sufficient. The cross section depends on the planned loads.
- Edged board for workbench table top. Select specimens 2-3 cm thick, without surface defects and knots.
- An additional shelf is often placed between the desktop cabinets in the garage. Sheet plywood with a thickness of 6-8 mm is suitable. It is better to take 3 sheets of 0.6x2 m.
- Self-tapping screws for woodworking and steel angles for assembling individual workbench elements.
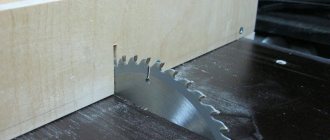
To obtain straight lines of workpieces after cutting, use a stationary circular saw; in extreme cases, turn to a manual analogue. The edges of the boards or timber are cut with a jigsaw.
First you need to make a frame for a desktop in the garage, taking into account the dimensions included in the drawing. The timber is cut into pieces, it should look like this:
- 4 leg stands;
- 4 beams that will be located horizontally;
- 5 cross braces.
If the length of the workbench in the garage is no more than 2 m, a beam with 7 cm edges is suitable for work. As a result of cutting the vertical posts, you should get 2 blanks of 0.9 m each and 2 parts of 1.5 m each, which will be located near the wall of the garage. The difference of 0.6 m is intended for further fixation to the plywood screen supports for storing tools.
Horizontal beams connect the legs of a workbench in a garage. For fastening the support posts in the lower part, the length is 1.5 m. The tabletop is fixed with a beam 2.0 m long (according to the size of the workbench indicated in the drawing). Spacers 0.6 m long are prepared from the remaining timber. All parts are connected with steel angles and self-tapping screws.
When the frame of the desktop for the garage is ready, we begin to design the tabletop. For a carpentry-type workbench, it is assembled from boards and plywood sheets. The aligned and adjusted canvas is coated with wood glue, the two workpieces are clamped with clamps and held until the glue is completely dry and the canvas gains strength. Finally, the tabletop is fixed along the contour with self-tapping screws.
The wooden canvas is connected to the workbench frame with self-tapping screws, the surface is sanded using an electric drill equipped with an emery attachment. At the final stage, the screen is mounted and the structure is varnished. High humidity in a garage is a common occurrence; a protective film of varnish will prevent deformation of the wooden structure.
Comment! Fixing the rear pillars to the garage walls using anchor bolts will help add additional rigidity to the desktop.
Build errors
It is important to have a good understanding of what not to do when designing and building a metal workbench. The first thing you should pay attention to is the place where the bench will be installed. Often when pouring a floor in a garage, they are guided by the rule “it will do.” But this leads to large differences in the plane, which negatively affects the metalworking workbench. For example, some craftsmen who decide to make a workbench for themselves with eight or six supports are faced with the fact that after installation, half of the supports are in the air, and the workbench itself is thrown from side to side.
Working at such a bench is very inconvenient, and small parts are constantly lost. A way out of this situation could be the construction of adjustable supports. In this case, powerful bolts are installed in the lower part, which will allow you to level the bench in a horizontal position. Another option would be to pre-prepare the surface. To do this, remove part of the screed that has already been poured and pour in a new one, which is clearly leveled along the horizon. In this case, there will be no need to manufacture additional parts for the metalwork table supports.
Another solution to this error is to reduce the number of supports to 4 pieces. This will make it easier to achieve the correct position even on an uneven surface. With proper design and construction of the frame, there should be no problems with the stability of the entire structure. Additionally, a shelf or several shelves are built at the bottom of the bench for storing consumables and tools. One of them should be as close to the floor surface as possible. In this case, a heavy tool that can be placed on it will act as a balancer for the entire frame.
Mechanic's workbench
This device is distinguished by its functionality and durability.
On the working surface of the bench, you can fix workpieces intended for processing, and the pull-out shelves are very practical for storing technical equipment.
Mechanic's workbench
The height of the structure is adjustable.
The main elements of a workbench of this type include the bench (its base) and the lid (working surface).
Components of a carpentry workbench
The benchtop of a bench is usually made from hardwood. However, pine is used for the underlayment.
The thickness of the cover measures approximately 60–80 mm and 500 mm in width. The parameters of the workbench depend on the main purposes of making the workbench.
The understand can be collapsible or stationary. Since the device is easy to assemble and disassemble, it is convenient to use during transportation.
Collapsible workbench
If the workbench base is made of metal, then planks are additionally attached to its base to protect it from various defects. For this purpose, the tabletop is covered with linoleum. This method will prevent small elements from falling into the cracks on the desktop.
It is recommended to install high sides on the workbench lid so that small parts being processed do not roll off the surface. A protective partition will isolate the workplace and prevent chips from flying out during metalworking.
The sides will prevent small parts from rolling off
A workbench for your home requires at least several shelves and drawers.
You can fill the space under the countertop of the device with a variety of cabinets in which it will be convenient to store building materials.
For the convenience of working at the workbench, you will need to install sockets, especially if you frequently use power tools.
In large production, it is better to use roller workbenches. This will allow you to freely move them to the desired place.
Workbench on wheels
Types of workbenches
There are carpentry and metal workbenches. The former are used for working with wood, the latter are intended for metals and other complex materials. There are options for dividing according to other criteria, for example, into single-seat and multi-seat, but they are not so important.
Next, we will consider the manufacture of an outdoor workbench. Its specificity is that it should not be placed in a workshop, but directly in the fresh air - for example, on a plot. Often such workbenches are placed on wheels so that they can be rolled into a dry place in bad weather, or they have a folding table top. The examples will examine the creation of a single-seat carpentry workbench.
Folding carpentry workbench
You can make a variety of designs for your workshop table with your own hands. The previously presented step-by-step instructions allow you to get a rather massive structure, the installation of which will require a lot of free space. If desired, you can also create a structure that will fold and unfold if necessary.
The folding carpentry workbench for the workshop is characterized as follows:
- When connecting all elements, bolts and other detachable elements are used. Due to this, you can quickly disassemble the structure. Welding is practically not used in this case. The use of bolts and screws significantly reduces the rigidity of the structure. Therefore, folding workbenches are used when performing minor work.
- As a rule, lightweight materials are used to increase the mobility of the workbench. An example is various thin-walled profiles. It is best to choose a metal that does not react to exposure to high humidity. That is why the workbench will last quite a long time.
- Some schemes provide for the creation of movable elements that significantly increase the functionality of the device. An example is the case when the tabletop should be placed at a certain angle to the load-bearing element. Due to this, a fairly large number of guides are placed.
These points should be taken into account when creating a homemade folding workbench.
In conclusion, we note that a purchased workbench has a fairly high cost. That is why many decide to make the structure with their own hands. Of course, this will require metal and other elements that can only be purchased.
Materials and tools
In order to assemble a workbench in the garage with your own hands, you will need the following tools:
- welding machine with electrodes;
- level;
- screwdriver;
- drill;
- grinder equipped with a grinding disc and a wheel for cutting metal;
- roulette;
- electric jigsaw designed for cutting plywood sheets.
Protective equipment and protective clothing should also be used. To complete the procedure you will need the following materials:
- square pipe 6X4 cm, 24 m long and 2 mm thick;
- a strip of steel 4 mm wide, 8 m long, 4 mm thick;
- steel sheet for drawer holders 2 mm thick;
- plywood sheet 1.5 cm thick;
- screws;
- anchor bolts;
- corners 5X5 cm, 6.4 m long and 4 mm thick;
- corners 4X4 cm, 6.75 m long and 4 mm thick;
- sheet of steel for the countertop 2.2X0.75 m, 2 mm thick;
- wooden boards 5 cm thick;
- guides for drawers in the table;
- metal screws;
- paint for metal and wood.
Manufacturing instructions
- To make the tabletop, cut two pieces with a circular saw. If you managed to purchase a plywood sheet of maximum length, then you need to saw off one piece 1520 mm long from it. By cutting it in half, you will get two parts 1520x610 mm. After this, use the rule to check the concave and convex sides of each sheet. This will make it possible to correctly orient the sheets when gluing.
- Having laid one workpiece on three parallel boards, apply wood glue to its surface. To do this, use straight and notched spatulas. Remember that the work must be carried out very quickly, otherwise the composition will begin to set prematurely. recommends connecting the parts no later than two minutes after the start of applying the composition. Therefore, if you are not confident in the speed of your work, use wood glue, which has no time restrictions. Of course, the strength of the joint will be slightly reduced, but even a good quality PVA furniture mixture will provide an acceptable degree of adhesion.
- Having laid the second blank on top of the first, place support boards around the perimeter of the future table top and begin to tighten the table top with clamps. At the same time, do not forget to control the flatness of the part using a rule. It will not be possible to tighten the center of the workpiece with clamps, so in this part you can install a load weighing at least 15 - 20 kg.
- After the glue has dried, the clamps are removed and they begin to strengthen the side surfaces of the tabletop. To do this, strips of plywood 15 cm wide are glued along the entire perimeter of the lid in two layers. When performing this work, be sure to make sure that the top layer completely covers the joints.
- A circular saw is used to trim the side surfaces of the table. The parquet is driven smoothly, slowly. It is convenient to use the same rule as a guide. The tabletop is given a size of 1500x600 mm, observing right angles, for which they use a carpenter's square or a factory corner of a plywood sheet.
- The workbench supports are made of timber with a cross-section of 100x100 mm, connecting them with legs and drawers, for which lumber with a cross-section of at least 60x60 mm is used. In our case, the height of the machine is 900 mm, however, you can adjust this size to suit your height.
- The legs are assembled “in a tenon” or using dowels, making sure to apply wood glue to the parts to be joined.
- When assembling the upper and lower frames of the subframe, scrupulously maintain 90-degree angles between the parts. It will be easier to fulfill this requirement if, even at the stage of preparing the parts, their edges are trimmed correctly. The width of the frame of our structure is 900 mm, and the height of the frame is 830 mm, taking into account the distance from the floor to the bottom rung of 150 mm.
- To attach the table top to the bench, long drawers are drilled in three places, through which the workbench parts are secured with 8 mm self-tapping screws with a length of at least 100 mm.
- To prevent the head of the hardware and the washer from protruding beyond the support elements, a recess is made in them with a feather drill.
If desired, you can build a shelf in the bench. To do this, a plywood panel is cut to the size of the lower space, in the corners of which rectangular cutouts are made for the legs of the machine.
Requirements for a workbench in the garage: dimensions of the structure
In order not to lose sight of anything important, you must make a preliminary plan for the manufacture and assembly of a workbench with your own hands; a drawing with dimensions is one of its main points. This takes into account the area of the garage and the size of the vehicle.
On average, the length of a workbench in a garage is about 1.5-2 m.
The length of the table depends on the amount of free space in the garage, as well as on the intended types of work. On average, this figure is about 1.5-2 m. When choosing the width for a future workbench, you need to take into account the nature of the placement of tools and other objects around the table. Shelves on the wall must be freely accessible. For this reason, it is undesirable to make a tabletop more than 60 cm wide, otherwise you will not be able to reach the necessary tools with your hand. If the workbench is located in the center of the room, then the width of its working surface can be increased.
The height of the bench is selected individually. The dimensions of a desktop differ significantly from the dimensions of a dining table. They are calculated taking into account the height of the master, as well as the position in which he is used to working. The standard figure is 80 cm. However, working at such a table in a standing position will be inconvenient. To prevent your back from getting tired, it is recommended to increase the height to 100 cm.
There is an effective way to accurately determine the optimal height of the workbench. To do this, you need to take a position in which it will be comfortable to rest your elbows on the table while standing. All that remains is to measure the distance from the elbows to the floor.
On a note! If the design of the workbench is designed for work in a standing position, it is necessary to provide a wooden stand for the chair in case you want to sit at the table.
The standard height of a table in a garage is 80 cm.
On one side of the workbench a power tool is installed. This edge of the tabletop should protrude beyond the frame by about 20-30 cm. If the work surface is made of wood, it should be protected with a metal sheet. Stainless steel with a thickness of 1.5-2 mm is best suited for these purposes. Although a regular steel sheet 1.5 mm thick will be cheaper.
How to make a steel vice for a bench
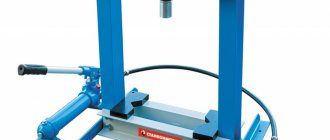
Bench vices are made from different materials, the most common being cast iron. They are well suited for various types of work and are relatively inexpensive; cast iron itself is a cheap material, has a relatively low melting point, good fluidity and castability. However, it is brittle and not as strong as most other iron alloys, such as steel for example. It's also very difficult to weld effectively, so cast iron vises generally don't last very long. Steel vices are quite rare, and their prices are, to put it mildly, steep. So you can settle for a cheap one and hope it doesn't break, or stretch your budget a bit to buy a good quality vise. There is also a third option, making a steel vice with your own hands. The version presented by the author was made by him in one day. All you need to do is cut out the parts and weld them together, even great precision is not required here. The costs are small: studs, nuts, welding wire and a square pipe. No matter how much money you save, now you will have your own metal vise, even if you break it, it's your job to easily repair it.
Several rules for setting up a workbench
You can purchase ready-made equipment in a retail chain, but you will have to pay a lot of money for it, and sometimes the functionality may not satisfy the owner. Therefore, many zealous garage owners prefer to make a metal workbench with their own hands.
When making a workbench, you will need to take into account some rules and advice from experienced mechanics:
- The equipment should be located close to an electrical outlet, since often during work you will need to use tools that require a connection to the network. The best option is to install a block of electrical outlets above the countertop.
- When manufacturing equipment, it is necessary to use materials with a sufficient margin of safety.
- It is recommended to provide several drawers and shelves for storing tools and additional accessories.
- The height dimensions of a metal workbench are determined individually. To calculate this parameter, you need to press your arms to your body and place your palms parallel to the floor. The gap from the palm to the floor will be the desired table height.
- The lid of a metal workbench must have a perfectly flat surface, the width of which is no more than 600 mm, so that the master can reach the tool at any point on the table.
- It is advisable to make one of the side parts of the table protruding by 250 mm in order to work with a cutting tool.
- To ensure stability of the entire structure, platforms are welded to the table legs, under which felt pads are placed to reduce noise during operation.
- The drawers are installed in such a way that it is impossible for them to fall out.
- The center of gravity of a metal workbench should be below the tabletop, so massive and heavy devices should be placed on the lower shelves.