Old Soviet and pre-revolutionary coins are quite expensive on the market. You can also find them in abandoned old villages and towns. However, searching for such small objects, in most cases already covered with earth, without a special tool, would, of course, be extremely difficult. Therefore, modern treasure hunters use special detectors for this purpose.
There are many types of such devices on the modern market. And the simplest one is “Butterfly”. A metal detector (photos of it are presented on the page) of this design is relatively inexpensive and at the same time quite convenient to use. Therefore, it has earned simply excellent consumer reviews.
P O P U L A R N O E:
The NE555 microcircuit (analogous to KR1006VI1) is a universal timer designed to generate single and repeating pulses with stable timing characteristics. It is not expensive and is widely used in various amateur radio circuits. It can be used to assemble various generators, modulators, converters, time relays, threshold devices and other electronic equipment components...
Multimeter-Frequency Meter-Generator GM328 for testing transistors, diodes, capacitors, inductance, resistance..., as well as for generating and measuring signal frequency...
In this article we will consider a multifunctional automatic device - an indispensable assistant for a radio amateur. It can be bought in China on well-known websites or via the link at the end of the article.
“Butterfly”, a metal detector with two transistors: reviews
Old Soviet and pre-revolutionary coins are quite expensive on the market. You can also find them in abandoned old villages and towns. However, searching for such small objects, in most cases already covered with earth, without a special tool, would, of course, be extremely difficult. Therefore, modern treasure hunters use special detectors for this purpose.
There are many types of such devices on the modern market. And the simplest one is “Butterfly”. A metal detector (photos of it are presented on the page) of this design is relatively inexpensive and at the same time quite convenient to use. Therefore, it has earned simply excellent consumer reviews.
Working with the Butterfly metal detector
We connect the headphones, thereby turning on the metal detector. We adjust the frequency to the point of losing synchronization. It is desirable that clicks be heard in the headphones; this is maximum sensitivity. When searching, by a sharp change in the signal frequency, we determine the presence of a metal object in the ground.
If the found object is small in size, iron, then the frequency will decrease until the signal disappears. If the object is made of non-ferrous metal, or iron with a large surface area, then the frequency will increase. When searching for large objects, we adjust the frequency before the breakdown so that there is no signal.
Old Soviet and pre-revolutionary coins are quite expensive on the market. You can also find them in abandoned old villages and towns. However, searching for such small objects, in most cases already covered with earth, without a special tool, would, of course, be extremely difficult. Therefore, modern treasure hunters use special detectors for this purpose.
There are many types of such devices on the modern market. And the simplest one is “Butterfly”. A metal detector (photos of it are presented on the page) of this design is relatively inexpensive and at the same time quite convenient to use. Therefore, it has earned simply excellent consumer reviews.
Design Features
This instrument got its name from the presence of two coils, reminiscent of butterfly wings and located in the same plane. This metal detector works on the principle of disrupting the synchronization of frequency generators. Its design elements are:
Microcircuits based on operational amplifiers. Two of them receive coil signals. The third amplifier calculates the difference.
Speaker. This is where the difference in signals is displayed.
Variable capacitor. This element is designed to prevent distortion of the capacitance during adjustment.
Dielectric box for the circuit. Can be made from different materials.
Base for reels and rods. Its length can be 30-45 cm.
A rod made of dielectric material.
PEL wire 0.3-0.35 mm.
As you can see, the design of this metal detector is really simple. This is also why it has earned good reviews from consumers.
If desired, today you can purchase a “Butterfly” metal detector with one coil. Such models, of course, work somewhat worse than usual. However, some coin hunters still consider them quite promising.
Butterfly metal detector parts list
1. 2 transistors BC546 or its analogues 5. crown battery. The power source can be 8 AAA batteries, but then the circuit will be large; 6.battery connector; 7.piezoelectric speaker; 8.case (can be cardboard); 9. base for coils (must be dielectric) and mount for rod (not less than 35 and not more than 40 centimeters in length); 10.The rod can be made of any dielectric material; 11.PETV wire 60 m long and 0.3-0.35 millimeters in diameter; 12.foil; 13. shielded cable with cores, the number of which must be at least 2; 14. electrical tape; 15.varnish; 16.threads.
2 capacitors 1 nF
2 capacitors 10 nF
2 resistors 100 KOHM
Metal detector "Butterfly": reviews
Of course, the Butterfly tools are inferior to most more complex and expensive models in terms of ease of use. However, with the help of this metal detector you can find objects in the ground quite effectively. For example, the “Butterfly” “sees” a five-kopeck coin from the times of the USSR at a distance of about 15 cm, lids from cans - 30 cm, hatches - 60 cm. Consumers have a good opinion about this device, partly because it can work under the water.
Many people also consider the advantages of this metal detector to be long-lasting operation. One charge of the Butterfly battery usually lasts for as long as 20-30 hours. According to most seekers, working with this device is also convenient because it does not weigh too much - only about 500 g.
Thus, there are many advantages of this device. However, it also has some disadvantages. For example, many coin hunters note the fact that the coils of the Butterfly device often break their ears. In addition, such devices sometimes fray the wires in the cable. In some cases, the standard coils themselves may malfunction in these metal detectors.
Another indirect disadvantage of this device, according to many consumers, is that if it breaks down, it can be difficult to find a technician to repair it. For people who have no experience working with radio electronics, this often becomes a problem. However, the device of this device is actually simple. And even if you have a minimum of skills in working with radio equipment, it will not be particularly difficult for a home craftsman to repair such a metal detector. Moreover, various kinds of parts for it are not too expensive and you can usually find them on sale without difficulty. They are sold both in specialized and simply in construction stores.
Simple DIY metal detector | Master Vintik. Everything with your own hands!
For beginners, a simple metal detector circuit with two coils is based on the principle of disrupting the synchronization of these same generators. There are many different metal detector circuits on the Internet, but it is quite difficult for a beginner radio amateur to properly configure and adjust the assembled circuit without an oscilloscope. We propose to assemble a simple metal detector with your own hands with simple settings.
Metal detector characteristics
- the USSR detects a coin the size of 5 kopecks up to 15 cm;
- metal lid from a jar - up to 30 cm;
- metal sewer hatch - up to 60 cm.
- can work in water.
- One battery charge is enough for 20 - 30 hours of operation.
- current consumption - 15 mA.
- Weight 500 grams.
It adapts to the appropriate soil and even with good sealing of the coils can work in water.
The type of metal can be determined by the specific sound in the headphones.
The circuit is not critical to power supply, number of turns and part ratings.
There is only one condition - the left and right parts of the diagram must be the same!
Interference is compensated, the ground has no effect. Sensitivity does not depend on the circuit, but on the physics of measurements itself. We accumulate a phase shift.
The symmetrically assembled circuit works immediately. But it's interesting to watch.
With a 4 V power supply on the coils, about 40 V can be applied directly to the tube. Signals from the generators are supplied to the X and Y plates
Frequencies are the same
These are the breakdowns. There were clicking noises in the headphones.
Generators are not synchronized.
We assemble the parts using any non-conductive glue.
If the battery is dead and runs out, then the setting will float away. The phone battery is fine.
For the construction we use a metal-plastic water pipe. The rod can be detachable; pipes with diameters 26 and 20 fit tightly into each other. Capacitors with good temperature stability, mica - this is important.
Coat the coils and circuit with oil varnish. There is 10 cm between the coils. We place the coils at a distance of 10 cm and glue them - no need to move
Parts List:
- Transistor - KT315 (VS182, VS546, VS547, etc.
) - 2 pcs.; - Capacitor - 1000 pF (1 nf or 102) - 2 pcs;
- Capacitor - 10000 pF (10 nf or 103) - 2 pcs;
- Resistance - 100 kOhm - 2 pcs;
- Regular stereo headphones - 1 piece;
- Power supply (from a cell phone) - 3.7 V - 1 pc.;
- Wire in varnish insulation PEV, PEL, PETV, etc. with a diameter of 0.4-0.7 mm.
If you do not have all the necessary parts and board,
You can order them from us
All necessary parts with printed circuit board.
Read more about radio dialing...
How to wind reels?
A detailed explanation of the manufacture of the coil: the 0th turn is the beginning of the coil (soldered to the bottom track in the circuit (minus the battery).
Next, wind the coil (for example, on a saucepan), as 10 turns , twist the loop, strip the insulation and solder it to the middle tap in the circuit, i.e. to the emitter of the transistor ( this will be a tap ).
Then you wind another 20 turns , cut it off and solder the end of the wire to the connection of two capacitors 1000 pF and 10000 pF ( this is the end of the coil ). The second coil is made in the same way.
Setting up a metal detector
When it beeps, it's good! But still, it is not always possible (for various reasons) to make identical generators, so it is necessary to adjust one of them to the frequency of the second.
Rough tuning with the last turn of the coils
Take a sheet of aluminum or a larger tin can. We bring them to the coils one by one. Above one the squeak is even higher, above the other it becomes silent.
On the coil where it goes silent, bend the last turn inward (or move the coils, reduce or increase the distance between them), achieve the quietest squeak or until the signal goes silent.
Ferrite tubes must be glued to the top of each coil. You can then adjust it with a ferrite rod until it is completely silent.
Ferrite rod tuning
To do this, we take a tube and a ferrite rod and attach it next to one of the coils. Move the ferrite rod in the tube until the generators are synchronized. A ferrite rod with a coil from an old radio (can be a tube one). Wind up all the wires and leave the frame with the ferrite rod.
instructions for setting up a metal detector
Can be adjusted with strips of aluminum by gluing them to the coil inside or outside. To tune, we put a strip of aluminum or just can lids on both coils and move them, achieving the lowest hum tone.
If clicks are clearly heard in the headphones, this means that the sensitivity of the device is at maximum.
Another option for adjusting the frequency is to install a variable capacitor in parallel with the 1000 pF capacitor, for example from an old radio.
Metal detector installation
In the absence of a board made of foil PCB or getinax, the boards can be made from cardboard.
Photo of manufacturing options for the printed circuit board of this metal detector
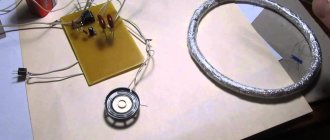
Photo of metal detector Vladimir Nosikov
Photo of metal detector Dmitry Kosnov
Metal detector device and circuit
So, there are good reviews about these devices, including because of their simple design. What kind of device does the Butterfly metal detector have? Let's look at this in more detail.
In order for the tool to work effectively, the diameter of its coils must be at least 21 cm. There must be 30 turns of wire on them. The tap usually starts from the 10th. A rod is attached to the base of the device. The sensitivity adjustment system is also fixed here. There is a cable running inside the rod along with the headphone outputs. The power source for metal detectors of this type is sometimes even a simple battery from a mobile phone (in homemade models).
Selection of parts and material
Thanks to the TL074 chip, which carries out the entire process of the metal detector, we do not need many parts. Let's describe each of them and the necessary material:
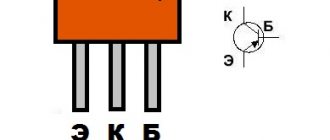
- Chip MC1 TL074CN. The contacts are numbered from the key on the body counterclockwise, when viewed from above (Fig. 2).
- Variable capacitor C1 100 pF with a dielectric cap - to eliminate distortion of the capacitance during adjustment. When purchasing, try to purchase heat-resistant types.
- Any toggle switch or microswitch can be used as switch SA1.
- Battery crown G1. You can also use a more powerful power source, for example 8 AA batteries, which will give a total of 12 V. But this will significantly increase the size of the circuit.
- Contact connector for battery (Fig. 3). We find in unnecessary equipment powered by crown or 8 AA batteries.
What else has the device earned good reviews for?
Searching for coins using this device is actually not too difficult. Consumers also have a good opinion about Butterfly devices because they can automatically adjust to any soil. Also, a coin detector can determine the type of metal located underground by the sound of the signal. In addition, due to the simplicity of the design of this device, it can be easily improved if desired. For this, of course, it also earned excellent reviews from consumers.
In some cases, home craftsmen do not even purchase parts for the Butterfly metal detector, but simply take them from old equipment. For example, a cable from a deflecting system and a TV demagnetization loop is suitable for the coils of this device. The only thing is that such devices usually use high-impedance headphones. And, unfortunately, they are quite difficult to find. Ordinary audio headphones from old equipment cannot be used with this device. The sound on them simply will not be heard during the search process.
The main disadvantage of the device
Thus, according to many consumers, the inexpensive Butterfly metal detector has virtually no downsides. This is especially true for operational efficiency and ease of use. This device finds coins at the same depth as most fairly expensive, including imported, models.
However, in terms of ease of use, this device still has one rather serious drawback. When using the Butterfly metal detector, it is often inconvenient to adjust the operating frequency of the generator. Finding the desired position of the rod within a fraction of a millimeter in the steppe or forest is, of course, quite difficult.
Manufacturing nuances
Making a Butterfly metal detector with your own hands, as already mentioned, is quite simple. The circuitry of this device is not particularly complicated. The only thing is that when assembling it, you should make sure that its left and right parts are the same. The device board is placed in a plastic box. Glue it to the reel frame. The second board is usually supplemented with an amplifier with contact pads for three batteries and a headphone jack. Petals are cut from a tin can.
If you have an amplifier, the Butterfly metal detector can also be used with regular 30-60 Ohm headphones. This, among other things, ensures economical operation of the device.
The advantages of this device, many consumers also include the fact that, as already mentioned, it can be easily improved. In addition to headphones, if you wish, it will be easy to make a “Butterfly” metal detector with your own hands and more convenient in terms of fine-tuning the frequency. To do this, on the board to which the petals are soldered, a variable resistor with a resistance of 100.150 Ohms should be placed. Next, this board, like the first one, is placed in a box, and then the latter is attached to a rod near the handle.
The so-called "butterfly"
This nickname was received due to the characteristic shape of the platform on which the inductors are located.
The arrangement of the elements is related to the operating principle. The circuit is made in the form of two generators operating at the same frequency. When identical coils are connected to them, an induction balance is created. As soon as a foreign object with electrical conductivity gets into the electromagnetic field, the balance of the field is destroyed.
Generators are implemented on NE555 chips. The illustration shows a typical diagram of such a device.
The coil for the metal detector (there are two of them, in the diagram: L1 and L2) is made by hand from wire with a cross section of 0.5–0.7 mm². The ideal option is a transformer winding copper core in varnish insulation (removed from any unnecessary transformer). The characteristics do not have to be maintained with pinpoint precision, under one condition: the coils must be identical.
Approximate parameters: diameter 190 mm, each coil has exactly 30 turns. The assembled product must be monolithic. To do this, the turns are grabbed with a mounting thread and filled with transformer varnish. If this is not done, vibration of the turns will throw the circuit off balance.
Electrical diagram
There are two manufacturing options:
- given the small number of elements, you can assemble it on a breadboard by connecting the legs of the parts using conductors;
- For accuracy and reliability, it is better to etch the board according to the proposed drawing.
Any “snot-based” soldering can fail in the field, and you will be offended for wasting your time.
Just like a transistor metal detector, the NE555 device needs fine tuning before use. The diagram shows three variable resistors:
- R1 is designed to adjust the frequency of the generator and achieve that same balance;
- R2 coarsely adjusts sensitivity;
- Using resistor R3, you can set the sensitivity with an accuracy of 1 cm.
The power supply is quite universal: 9–12 volts. You can select a battery from an uninterruptible power supply, or assemble a power supply from AAA batteries. A good option is 18650 batteries (they are also used for vaping).
Butterfly setting
The principle of operation is described above, so let’s just look at the technology. We set all resistors to the middle position, and ensure that the synchronization of the generators is disrupted. To do this, we fold the coils in a figure eight and move them relative to each other until the squeaking turns into crackling. This is a synchronization failure.
We fix the rings and rotate the resistor R1 until a steady crackling sound appears at even intervals.
By bringing metal objects to the place where the coils overlap (this is the search point), achieve a steady squeak. The sensitivity is adjusted by resistor R2.
All that remains is adjustment with resistor R3, which is used rather to correct the voltage drop in the power source.
Mechanical part
A do-it-yourself metal detector rod is made from a lightweight plastic pipe or wood. The use of aluminum is undesirable as it will interfere with operation. The circuit and controls can be hidden in a sealed housing (for example, a junction box for wiring).
The butterfly finder is ready to go.
How to make a “Butterfly” metal detector with your own hands: detailed instructions
This device is actually assembled as follows:
The rod is made, for example, from a 26 mm plastic pipe.
a bicycle handlebar is attached to one of its ends;
the base is made from plywood, polycarbonate, etc.;
the assembled circuit along with the coils is attached to the base;
a rod and a sensitivity adjustment unit are also fixed on the base;
a wire is pulled inside the rod;
the mobile phone battery is glued to the base;
the power wires of the generators and the charging connector are soldered to its contacts;
the coil and circuit are coated with furniture varnish, and then with silicone;
an adjustment unit is glued next to the coil;
An armrest is made from a water pipe.
To adjust the metal detector during operation, a plastic nut and screw with a piece of aluminum are used. The threads of this assembly are lubricated with thick lubricant.
Construction and details
Most parts and materials can be borrowed from used equipment; for example, for coils, you can take wire from a deflection system, or demagnetization loops of an old TV. You can also find almost all the other parts for the circuit there.
Click to enlarge
As a rod for a metal detector, the author uses a piece of metal-plastic water pipe one meter long with an outer diameter of 26 mm. A bicycle handlebar handle is placed on top of the bar.
The circuit is assembled by hanging installation and, together with the coils (the distance between the coils is 10 cm), is glued with oil varnish to a base made of cellular polycarbonate or plywood 8 mm thick, measuring 20 by 45 cm.
The diameter of the coils for a metal detector is approximately 20 cm, the diameter of the wire is 0.3-0.6 mm, 30 turns, from 10 turns - a tap. Be sure to mark the coil leads so you can solder them correctly later. The coils must be exactly the same.
A rod and a maximum sensitivity adjustment unit are attached to the base. The wire with the headphone jack is pulled up inside the rod. The metal detector is turned on and off using the headphone jack. When the connector is inserted, the metal detector works; when the connector is removed, the power is turned off.
A mobile phone battery is used as power; it is glued together with the entire circuit to the base. The power wires for the generators and from the charging connector are soldered to the battery contacts. Charger - from any mobile phone, connector - any suitable one.
The rod is attached to the base using plastic screws from glue tubes; you can also use metal screws with wing nuts.
We coat the coils and the circuit with furniture or parquet oil varnish. After the varnish has dried, cover everything with silicone.
To adjust the metal detector during searching, use a plastic nut and screw with a piece of ferrite or aluminum (you can take the frame from an inductor). Lubricate the threads with thick lubricant to ensure smooth rotation. The adjustment unit is glued next to the coil.