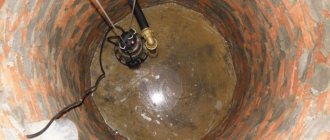
DIY manual water pump
Many people want to make a manual water pump with their own hands. After all, if you don’t need constant water, then you don’t have to incur additional costs. After all, for example, it is perfect for watering.
Today we will look at several options on how to make a manual water pump with your own hands. The models are all made entirely by hand. They differ in materials of manufacture and volumes of water pumping. Let's directly figure out how to make a water hand pump with your own hands.
Winter or summer water supply
Plumbing in a dacha is not always used all year round. In some cases, it is needed only from spring to autumn, so a simplified summer version is arranged. There is no point in spending money on an expensive capital system when no one lives in the house in winter. The summer water supply will provide watering, a shower is connected to it, and it is used for other household purposes. It can be permanent or collapsible, but in both cases it is not used in winter.
The hoses used are silicone or rubber, which have thick walls reinforced with nylon. Plastic is cheap, but short-lived under the sun. Rubber is more expensive, but will last at least 15 years. At the end of the season, the hoses are disconnected, twisted, pouring out the remaining water, and sent for winter storage.
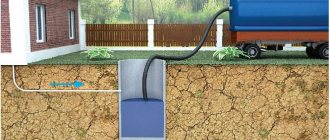
Permanent summer water supply is laid in shallow trenches so as not to interfere and so that no one is tempted to steal. Only water taps lead to the surface. The difficulty of the construction is that it requires maintaining a constant slope. It goes from the connection point to the lowest point where the drain valve is installed. Water is drained through it before frost.
Installing a winter water supply is more difficult
They take into account the slope of the relief, soil freezing and other factors that are taken into account when constructing a capital water supply system. In this regard, the dacha option is no different from what is done in private homes with permanent residence
Drilling process sequence of actions
If you prepare the necessary equipment and follow the sequence of steps, there will be no questions about how to properly make a well. The finished drilling rig is equipped with a head and a mechanism in the form of a winch. The bar is passed down through both holes, if necessary, it is extended and the collar is secured. Usually two people rotate the gate, and a third person is needed to correct the position of the bar.
If the well is shallow, then only a drill column is used, directing it down strictly vertically. A tripod with a lift is necessary for deep wells
A mark is placed on the column, retreating 60-70 cm from the top flooring. Having lowered the column to the designated distance, it is removed back, removing the rock raised along with the drill. The cleaned column is immersed in the same way several times. Greater depth requires extension of the bar. To do this, another pipe is connected using a coupling.
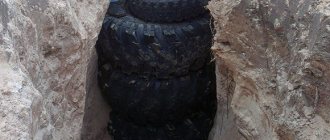
Depending on the stability of the soil, the drilling method is chosen - with or without casing pipes. With stable, dense soil, you can drill the entire well without using casing pipes. Crumbling rocks indicate that after 2-3 meters a pipe equipped with a shoe should be installed. The diameter of the pipe is wider than the diameter of the couplings, so the pipe enters the shaft with difficulty. Sometimes, to place it there, they use a screw or a sledgehammer.
Products for laying water pipes are used as casing pipes - metal or polypropylene pipes of the required diameter for external work.
If rocks are crumbling, collapse should be avoided. For this purpose, the drill is not lowered too low - below the end of the casing by a certain distance. Usually it is equal to half the length of the drill. Thus, the process consists of alternating drilling and installation of casing pipes, which are built up as they go deeper.
Option #5 – supercharger made from a plastic bottle
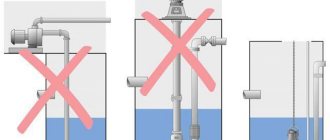
If the water is in a barrel or other container, then using a watering hose in this case seems problematic. It's actually not that complicated. You can literally use scrap materials to construct a homemade pump for pumping out water, which will work on the principle of compensating the level of liquid in communicating vessels.
Water injection occurs as a result of several translational movements. The valve, which is located under the lid, does not allow water to return to the barrel, which forces it to flow out when its volume increases. This seemingly insignificant structure is a great help in dacha work.
For a hand pump you need:
- a plastic bottle, the lid of which must have a plastic membrane gasket;
- hose of suitable length;
- a standard tube whose diameter corresponds to the size of the bottle neck.
How exactly such a pump can be assembled and how it will function, look at the video, where everything is explained in detail.
Types of devices for pumping water
Physical force alone used to lift water upward is not enough, since the process becomes difficult and labor-intensive. Therefore, mankind has long ago invented many devices that facilitate the rise of liquid from a well or natural reservoir to the surface.
All devices are united by a common operating principle, which is based on the interaction of the valve system.
There are many varieties of hand pumps, but four main types can be distinguished:
- piston;
- rod deep (varieties of piston);
- winged;
- membrane
For manufacturing at home, they usually choose the first type if it is necessary to service a well of shallow depth (3-6 m), or the second if it is necessary to lift water from a well from a depth of 10-12 m.
These models are considered to be the most productive, easy to assemble and install, and reliable. The rest have significant shortcomings, the biggest of which is considered to be insufficient productivity.
It is piston devices that have occupied the main niche among factory manual equipment; they are popular among home craftsmen.
Image gallery
The advantage of piston column pumps is their ease of assembly and installation. All the parts necessary for the manufacture of the body and dynamic parts can be found on the farm or purchased in addition.
And to connect the elements into a single device, home tools are usually enough: a drill, a circular saw, a hacksaw, pliers, and keys. If you need a welding machine, you can rent it or borrow it from your neighbors.
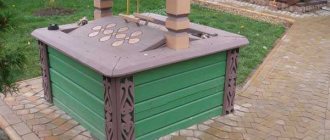
Furnace pump
You can assemble a pump that runs on fire draft using a 200-liter metal barrel.
This design is assembled as follows.
- Build a simple stove out of bricks. If desired, it can be equipped with grates.
- The outlet valve must be secured at the bottom of the barrel.
- Pour several liters of water through the hole in the lid of the barrel. The tap must be closed.
- Next, tightly secure the rubber hose into the hole in the top cover. It is very important that no air is sucked in around the hose.
- Install a strainer at the other end of the hose.
- Lower the hose with the filter into the pond.
- Light the wood under the barrel (the tap should be closed). As the barrel heats up, the air in it will begin to expand and flow through the hose into the reservoir.
- When air stops coming out of the barrel, extinguish the fire. As the barrel cools, a vacuum will form in it, and water will begin to be sucked into it from the reservoir.
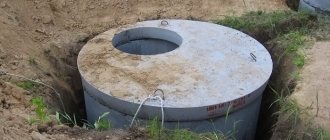
Mechanisms for self-construction of wells
Usually, special drilling equipment is used to construct a well, so a completely logical question arises: how to drill a well in a country house without using it? It turns out that there is a simple manual mechanism consisting of a drilling rig and a column suspended from it. Let's take a closer look at the individual pieces of equipment.
The base is a tower resembling a tripod. The material for the supports is either metal pipes or logs connected at the top with a pin. The drill column lifting block is also located there. The two legs of the tower are connected by a winch (gate).
The design of drilling equipment may vary. In some cases, if the impermeable layer lies close to the surface of the earth, a hand drill is sufficient
The drilling column is the main functional element. It consists of several three-meter rods connected by couplings. Sometimes a length of one and a half meters is enough. It is the column that is immersed in the ground, and its length is adjusted using rods. Replacement of special equipment are water pipes equipped with steel couplings.
Drilling heads must be selected depending on the nature of the soil. Here are the most commonly used: 1 - “spoon”, 2 - “snake”, 3 - “chisel”, 4 - “bailer”
The impact or soil-cutting element is the drill head. It is screwed onto the column using a threaded adapter. As the head is lowered into the soil, soil fills the drill cavities. For different types of rocks, different attachments are used: a “spoon” is suitable for soft soil, a “coil” for dense soil, and a “chisel” for hard rocks. Use a bailer to lift the loosened soil up.
To prevent the walls of the well from crumbling, casing pipes are used - as a rule, these are ordinary plastic plumbing products, lightweight and easy to install. The bottom of the pipe is a kind of shoe, with a smooth or jagged edge at the bottom.
There are two main types of casing shoes: a – toothed (mill), b – smooth. Cutting area: 1 – teeth, 2 – smooth edge
Thus, the construction of a well takes place using special equipment, some of which can be purchased at the store, some of which you can make yourself.
Repair
First, carefully inspect the device itself and its components. There is a very small gap between the disk and the pump body and the cause of the breakdown may be clogging of this gap. Especially if the station stood idle for a long time.
The reason for replacing the supercharger is the partial or complete destruction of its blades. The impellers installed in the pump have their own series and number, which corresponds to a specific type of unit. If the engine was previously equipped with an impeller with blades made of steel or cast iron, it cannot be replaced with a plastic spare part.
How to remove
The disc assembled or separately can be found in any store that sells pumping equipment and tools. When choosing a wheel, we independently measure all the parameters of the old one, as well as the seat on the shaft and its diameter.
- We remove the broken part.
- We unscrew the bolts securing the upper part of the rotation wheel chamber (four or six bolts) and remove the cover to the side. The wheel and its mounting location will become visible.
- A nut or bolt in the center of the circle secures the impeller to the pump shaft. It's not easy to unscrew. The hub rotates constantly, there is no locking ring and therefore the disk rotates with it. The shaft can only be clamped by unscrewing the rear cover of the pump. The element then becomes available.
- First, the impeller is clamped and, if it does not rotate, the nut will unscrew; if not, remove the back part.
- After unscrewing the clamping nut or bolt, the impeller is still difficult to remove. The shaft must be held with a gas wrench or a clamp, while simultaneously loosening the disk from side to side, gradually pulling it towards you.
- Pulling the wheel out will reveal the inner seal and bearings. They must be checked. The rubber seal protects the motor from moisture. Every time you replace the supercharger, it is also advisable to change the seal.