0
8646
16.11.2015
When designing and installing internal sewerage for a private home, no one is immune from mistakes that can lead to unpredictable consequences, from the appearance of an unpleasant odor to complete inoperability of the system. Let's consider in this article the concept of internal sewerage in a private house: design and installation rules + analysis of common errors that arise in the process of all this.
Connection to sewer networks, what documents are required
Complete house plan. It is mandatory that a sewer pipeline laying diagram be presented on paper. This process is carried out with the help of a company that conducts geodetic examination.
All technical conditions for sewerage connection. All these issues are considered by the organization.
The diagram on which the plan will be indicated is exactly according to which the sewerage connection must be made. This document must be provided by the specialist who designs and installs the technical functions. It relies on the basis of technical conditions, thus producing a new plan.
The project, which was prepared by the water utility, with their approval. This process is handled by architectural management.
It is also necessary to remember one main nuance. Before starting construction work, you must obtain permission from your neighboring residents. They are required to sign their consent. If additional questions arise about pipelines that will pass through places where other electrical or heating networks have already been installed, then in this case, it is necessary to take another permit. It is necessary to request a special document from the organization. If the owner does not pursue certain requirements, he will have to pay a huge fine.
To lay a pipeline to the central highway, you must obtain a permit. In the event that there is a well nearby. The pipe that will run through the area to the well will be directed at a certain inclination and angle. To accurately determine the laying depth, you must use the special values provided by the data in the SNiP.
There is also one main piece of advice to consider. This question concerns the presence of existing turns on the highway. As shown in practice, turns on the highway should not exist, but if such a problem suddenly arises, then it is necessary to turn the highway a few degrees, about 90. It is also recommended to install an inspection well. Since, in this case, the well performs the function of controlling this system.
The correct selection of the trench digging height plays a significant role. Certain elements need to be taken into account. The diameter of the pipe must be larger than the internal one. The usual size is up to 250 mm. Basically, pipes with a diameter of 150 to 250 mm are used. After the specialist determines the size of the pipes, it is necessary to dig the bottom of the trench. Once the process is completed, the cushion can be provided for laying the pipeline.
Internal wiring
The indoor sewage system is assembled in such a way that its lowest point is where the pipeline exits to the outside. In order not to make a mistake with the angle of inclination, you can start assembly from this point.
If you have a project, the connection order is not important, but you must strictly follow the rules for performing internal wiring:
- Each device and functional section of the pipeline requires a pipe of the appropriate diameter: for the riser and toilet - 11 cm, for showers, bathtubs, kitchen sink - 5 cm, for everything else 3.2 cm is enough, but if several devices are connected to one pipe at the same time , its diameter must be at least 7.5 cm.
- Since wastewater moves through the pipes by gravity, a pipeline slope of 2-3 cm per linear meter is required.
- The connection of the pipes must be sealed and not impede the free flow of liquid: the pipes are connected along the flow, and there should be no roughness or burrs at the junction.
- Right angles should be avoided, as this is where blockages most often form. To perform a turn, it is better to use several elbows with smaller angles.
- It is necessary to prevent backflow from the sewer and the penetration of unpleasant odors into the house. To do this, a siphon or an S-shaped bent pipe is installed on the pipe of each plumbing fixture, which acts as a water seal.
- If the house has several floors and each of them has plumbing, a common riser should be installed.
- Toilets are installed closer to other household and plumbing fixtures to the riser.
- Pipeline units cannot be installed in areas where walls or ceilings pass through.
- Holes for passing pipes through walls and ceilings are cut with a margin; it is advisable to insert special sleeves or sections of wider pipes into them.
- The connection points to the riser and pipeline turns are equipped with a tee with an inspection window closed with a plug. Through these windows, pipes will be cleaned in the future if they become clogged.
- The riser is located as close as possible to the place where the sewage system is discharged to the outside.
We recommend that you read: How to install a ventilation duct in the kitchen with your own hands?
The pipe is removed from the house as follows:
- Firstly, a hole with a diameter of 13-16 cm is made or left during construction in the foundation or basement of the house.
- Secondly, a sleeve is inserted into this hole, along the walls of which insulation is laid.
- Thirdly, a pipe is pulled through the insulated sleeve, which is connected inside the house to the rest of the internal sewerage system.
Fan pipe
In a house with several bathrooms or a swimming pool, the volume of wastewater entering the sewer at the same time can be so large that a vacuum occurs in the pipeline - a decrease in pressure. As a result, the water plug located in the siphons will go into the pipeline. Accordingly, the water seal in the toilet, bathtub, sink and other plumbing will disappear and sewer odors will enter the house.
To avoid such unpleasant incidents, the sewerage system is equipped with a drain pipe - a special sewer ventilation system. It ensures the removal of gases from the pipeline and air intake in case of vacuum formation in the pipes.
If the house is equipped with a riser, it is enough to extend it upward and extend it 30 cm above the roof. The fan pipe can also be routed through the wall by making a branch from the riser or the bottom of the pipeline upward and then towards the wall using two 135-degree elbows or a corrugated pipe. In this case, the street part of the sewer pipe is mounted vertically upward as high as possible so that gases from the sewer network escape into the atmosphere. The top of the fan pipe is partially covered with an umbrella nozzle.
Note! The sewer pipe must not be routed into the ventilation system, as in this case sewer odors will enter the house through the ventilation.
Where to go to get sewerage installed?
Vodokanal or gardening association
First you need to contact the local administration, from there you will have to go to the geodetic service (order a situational plan for the site), to the Vodokanal and SES. An application is submitted to the water utility to obtain technical conditions for connection. You need to have a copy of your passport and a document confirming ownership of the house and land with you. If the pipeline has to be installed under the roadway, permission from the road service will be required.
Once the technical specifications have been received, you can order a sewerage project. If it is created by third-party specialists, the finished document still needs to be approved by the water utility and the companies whose communications run near the house (gas service, distribution network, telephone service). Final approval takes place in the architecture department of the local municipality.
For installation, you can also hire a contractor who has the appropriate permits. But in any case, the connection to the general network is made by a specialist from the company servicing the municipal sewerage system.
install an autonomous sewer system.
Private sewer network project
Laying a sewer system in a private house begins with the development of a project and estimate documentation.
Domestic sewerage project
A domestic sewerage project is a diagram that details where and how the main parts of the sewer network should be installed.
Private sewer network project
When designing a domestic sewer system, it is necessary to take into account:
placement of plumbing products inside the house. It is desirable that all sewerage distribution in a private house be located as close as possible to the previously installed central riser. This will avoid the use of additional equipment, significantly reduce the cost of purchasing and laying pipelines, reduce the risk of blockages and unpleasant odors;
Typical diagram of an internal sewer network
- sewer slope in a private house. If it is possible to build a gravity sewer system, there is no need to resort to the pressure type. Installing a gravity-flow sewer system in a private house is much simpler and cheaper than a pressure-flow one;
- sewer depth in a private house. It is required that all pipelines and additional structures be reliably protected from freezing, which can lead to complete failure of the system.
Basic rules for laying a sewer pipeline
Storm drainage project
The design of a private storm sewer system, as well as a domestic one, includes the location of the main elements and recommendations for installing the system.
Typical design of a storm sewer system
For high-quality and uninterrupted operation of private sewerage, it is better to develop all necessary projects in collaboration with qualified specialists.
Clogged sewer pipes
The sewer system is often subject to blockages, no matter how high quality it is.
Problems arise for a variety of reasons: incorrect technology for laying sewer pipes or other elements, poor quality of materials used, or incorrect operation. However, all these problems can be avoided if you use generally accepted rules and know some aspects of sewerage operation. For example, blockages in the system often occur due to too sharp angles of rotation or bending. It becomes much more difficult for drains to move in such places, so they require additional force, after which deposits remain on the inner surface of the pipeline. In addition, sometimes residents throw various garbage into the sewer, which is strictly prohibited: in the vast majority of cases, solid objects get stuck at the first turn and cause clogging.
Conclusion
Before laying sewer pipes correctly, you need to understand the building codes, rules and standards. If everything was done correctly, then there will be no problems with the sewer system, and it will be able to perform its functions with maximum efficiency.
Installation stages
Gray pipes are used for internal sewerage.
You need to install the home sewerage system from the inside. In all rooms with plumbing equipment (kitchen, bathroom, swimming pool, sauna), pipes are installed towards the riser. The wiring is made from tubes with a diameter of 50 mm. A pipe with a cross-section of 110 mm is connected to the toilet.
All joints and connections must be treated with sealant. Plugs are installed at the outlets for household washing equipment.
The riser is brought to the foundation, in which a hole with a diameter of 130-160 mm has been punched in advance. A metal sleeve must be inserted into it. The collector pipe is led out through it. The exit point of the outer pipe is insulated with high quality, the gaps between the sleeve and the foundation are concreted.
External sewerage
Orange pipes are for external sewerage
Initially, you will have to dig trenches for the collector. They are dug from the very exit of the pipe from the house all the way to the intended location of the septic tank. The digging depth depends on the level of soil freezing in the region, as a rule, it is at least 70-90 cm. The upper edge of the laid pipe should be at this mark from the soil surface.
When digging trenches, the slope specified by SNiP is observed. The final wastewater receiver should be located below the sewer pipe exiting the house. Then it works like this:
- A sand cushion is poured onto the bottom of the trenches and compacted well.
- Pipes are laid on the base, connecting them securely.
- The fully assembled system is checked for leaks. If there are no leaks and water leaves the house freely, the collector can be backfilled. The soil is not compacted much. He will sit down on his own over time. If necessary, then add more soil on top.
Septic tank installation
At the final stage of work when installing a private sewer system, you need to build a homemade septic tank.
The simplest option is to use a reservoir in the form of a plastic barrel. Some build a sewage receptacle from car tires or concrete rings. Plastic is easier to work with. The principle of installing a two-chamber septic tank looks like this: They dig holes under the tanks in accordance with the parameters of the barrels. At the same time, the depth and width of the pit is increased by 30-40 cm for the base and backfill. The bottom of the pit is carefully compacted. Pour a sand cushion of moistened sand. It is well compacted. Wooden formwork is placed on the sand under the first chamber and a concrete solution 20-30 cm thick is poured. The bottom of the second tank is made drainage. A layer of fine crushed stone is poured onto the sand bed, and broken brick or cobblestones are placed on top. After the solution has dried, install both tanks next to each other
It is important that there are no distortions. Both chambers are connected by an overflow pipe at a level of 40 cm from the bottom of the barrels. A drain/waste pipe is connected to the first receiver in its upper part. All joints are well sealed. The tanks are filled with water and only after that they are backfilled with careful compaction of the soil.
If the barrels are not filled with water, they may subsequently burst in the soil. The top of the septic tank chambers is covered with hatches.
Basic rules for determining depth
When choosing depth, they are guided by a number of factors:
- the depth of soil freezing is the most important criterion;
- temperature of water pumped by the sewer;
- pipe diameter;
- the material from which the pipes are made;
- the presence or absence of additional insulation;
- schedule according to which the sewerage system is operated;
- precipitation regime in the cold season.
The depth of soil freezing is a fundamental factor. For example, in warm regions where the temperature never drops below zero, the depth of laying pipes can be any, depending on other conditions.
Now let's take a closer look at each of the factors.
Soil freezing depth
The depth of the sewer primarily depends on this factor. To calculate it, indicators such as the depth of snow cover, soil composition or the height of groundwater are used. There is no need to carry out calculations yourself - ready-made standards have long been published in every region of Russia and the CIS.
Map of soil freezing in the Russian Federation and the CIS Source wp.com
So, in Moscow, the depth of soil freezing is 1.4 m, in St. Petersburg it is less - 1.2 m. As you move east and north, this depth increases - for example, in Naryan-Mar it will be as much as 2.4 m.
If the material from which the pipes are made or any other factor does not cause problems with laying to greater depths, then another 0.5 m must be added to the freezing depth.
It is advisable to add 0.5 m to the minimum pipe laying depth Source wire.rf
If for some reason it is not possible to hide the pipes deeply, then they will have to be insulated with insulation or additionally wrapped with thermal cables for heating in cold weather.
See also: Catalog of companies that specialize in the design and installation of sewerage and water supply
Pipe material
Modern sewage systems are usually made not of cast iron or steel, but of synthetic materials. Although the advantages of the latter are obvious, one has to take into account their main drawback - the low level of mechanical strength.
Synthetic sewer pipes Source bauland.pl
The markings of the pipes indicate the maximum pressure for which they are designed. The marking itself is divided into many sections, but basically an inscription like “PN number” will indicate the maximum pressure in bars that the pipe can withstand. However, for sewerage this parameter is secondary, since there is usually no pressure in such pipes.
A more pressing problem related to the strength of the sewer system is that if the sewer pipes are laid too deep into the ground, they quickly become deformed. This point must also be taken into account, for example, if the sewerage system is located under a highway. This problem can be solved in two ways:
- increasing the depth of the pipes instead of decreasing it - the soil will distribute the pressure;
- covering pipes with a protective casing - usually concrete.
However, when laying sewerage for a private home, you usually don’t have to deal with highways, but you just need to take into account the pressure of the soil itself. An exception is if the sewer pipe is laid under the road in the yard, on which, for example, a truck may sometimes stand.
Pipe diameter
The minimum depth for laying a pipe for an autonomous sewer system is also affected by its diameter. A pipe with a cross-section of 50 cm or more must lie at a depth of at least 50 cm. The maximum depth does not depend on the diameter of the sewer pipes.
Even if the house is connected to the central sewer, the rules of arrangement will be the same Source yandex.net
The minimum depth may decrease if the distance from the pipe exit from the internal sewer system of a private house to the collector is short. It should not exceed 10 m - in this case, the sewer can be laid 30-35 cm underground.
Connecting a house to a sewer system, where to start?
Sewage connections are divided into two types. They are separate and mixed. Separate is used in cases of stormwater and domestic connections. But mixed ones are used only for mixed-type pipelines.
It is worth noting that the developer himself finances the sewerage installation. This process involves large sums. But if the home owner does not have that kind of money, then there is an opportunity to save. In this case, it will be necessary to modernize the centralized branch. First of all, the owner is obliged to contact the water utility and offer his cooperation, that is, a certain payment for the work. If the institution confirms your application, then part of the amount of money will be paid by the organization itself. However, you can pay money in agreement with your neighbors. If they are satisfied with this method, then it will be much easier for you to complete the task.
Many people do not like to do troublesome things and prefer not to go to various institutions. There is an optimal solution. You can contact the company that handles these matters, provide all the documents and draw up an agreement. They will do everything for you. Just before you trust the company, you need to clarify whether they are ready to cope with the task. Do not forget that all services are quite expensive. Therefore, if you do not have sufficient funds, then you should not apply.
We connect the sewer system to a private house
Before starting the construction of their own residential building, each owner is always faced with a number of different problems. First of all, it is necessary to create the correct design of the facility and subsequent installation work. If the residential plot is located in an area where centralized communication networks have not been built, then you will have to take measures and build an autonomous option. Connecting an autonomous sewer system will require money and time. If the owner builds his house near centralized networks, then there is an excellent opportunity to connect the system to the city sewerage system. This is the most advantageous option.
Design and carrying out the necessary calculations
Before starting construction of the system, you need to draw a preliminary sewerage installation diagram.
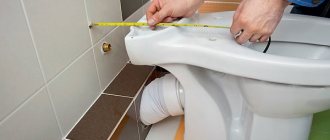
The drawing marks all the locations of plumbing in the house and the location of the septic tank on the site. In addition, the location of the pipeline exit through the foundation into the ground under the first floor is indicated on the diagram. All collector lines are drawn on the drawing from each plumbing point up to the entrance to the septic tank. The length of each section of the pipeline is measured. Thanks to the measurements, the total amount of required footage of external and internal pipes is obtained. It is extremely important to mark on the drawing all the bends, connections, branches and turns of the manifold. This way the master will be able to purchase the required number of adapters, fittings, etc.
Stages of sewerage installation in a private house
If you would like to independently install a sewer system in a private house by connecting to the central system, then you should take the following steps:
- it is necessary to use the services of a surveyor to draw up a situational plan of your site, including a plan of the house itself and marking the path along which the sewer line will be laid;
- submit an application to the relevant organization for the development of technical conditions for wastewater disposal on your site;
- These technical specifications must be transferred to design specialists who will develop a project for entry into the central sewerage system. The finished project must be submitted to the architect and the water utility service for approval;
- the architect must issue permission for the work to be carried out by a specific organization;
- it is also necessary to obtain the consent of your neighbors to carry out work near their homes to connect to the central sewerage system;
- if the work involves destruction of the road surface (if the highway passes through it), then it is necessary to obtain the appropriate permits from the traffic police, as well as from the road maintenance service;
- before putting the line into operation, it is necessary to notify the water utility service;
- upon completion of the sewerage installation work, the operating organization must accept the finished project and sign an agreement with you regulating the acceptance of wastewater from you.
When laying sewer pipes, it should be remembered that the pipe should lie at a depth of 1200 mm from the house, and the slope should be approximately 5 mm per linear meter.
Storm sewer - connection to the city storm network
Many owners of private cottages would like to drain rainwater from their plots together with domestic wastewater. Technically, this is not at all difficult, but directing rainwater into sewer wells is strictly prohibited.
This method can easily lead to the well overflowing, causing a large amount of sewage to come out. Therefore, to free the area from accumulated rainwater, it is necessary not only to install a sewer system in a private house, but also to connect it to a central or city storm sewer. Since storm sewerage has a much greater capacity, rainwater flows will not create excessive load on it. The rainwater pipe can lead directly to the collector.
Keep in mind that during heavy rainfall, water can flow back through the drain pipe, so when connecting to the central storm sewer system, it is necessary to install a return valve.
Installation of an autonomous storm sewer in a private house
The most practical way is to install a special pit on the site with a reservoir for draining rainwater. A similar system can also be used as a local sewage system for a summer residence. The reservoir is located in the soil, and therefore natural cooling occurs, preventing the growth of bacteria. Then a drain is laid through which rainwater from the roof of the house will flow into the reservoir. It is also advisable to install a special grill that will act as a filter and keep leaves, branches and other debris out of the tank.
The water accumulated in the tank can then be used, for example, for irrigation.
Details
Rules for laying pipes during the construction of internal sewage systems
The riser serves as the central outlet channel for the system as a whole in the house. It can be one for the whole house. If it is very large or sanitary facilities are located at a great distance from each other, then there should be 2 or more such pipes. They are pipes installed vertically and they start in the basement and end on the roof. The lower part of the riser is connected to an inclined pipe of the same or even larger diameter, which is led out into a container for accumulating wastewater or into a station for purifying wastewater. The upper riser part will rise above the roof by no less than ½ meter. It is open or even has a check valve. Why this is required – we will consider below. All inlets that come from plumbing fixtures are connected to risers.
Hydrodynamics of fluid in pipes
The pipe is a cylinder with water inside. When the pipe is filled to 100%, a piston effect appears. This means that on top of a water-type plug the pressure will quickly drop, and on the bottom, on the contrary, it will increase. In a situation where there is an explosive flush from the toilet tank, the resulting vacuum can suck all the water out of the siphon. This can lead to the formation of an unpleasant odor in the room. But as the liquid moves, excess pressure appears, which can push sewage out of devices that are located below the toilet.
If you ignore the laws of hydrodynamics, this will lead to two common mistakes when designing and installing sewer systems. The first mistake is failure to use a ventilation device. The background pipe, which runs from the riser to the roof, not only removes the unpleasant odor, but also serves as a pressure compensator inside the system. If it is present, the reduced pressure above the water-type piston does not suck water out of the siphon, but ensures that air from the atmosphere enters the system, which again levels the pressure.
The second popular mistake is that all plumbing-type devices are connected through outlet pipes to the riser, lower than the toilet itself. This should not be allowed, because it will certainly become the root cause of the drain pouring into the sink or shower stall when flushing. Similar problems can arise when the supply pipes are longer than allowed. To avoid such troubles, it is necessary to formulate certain important rules for installing sewerage inside the house.
Rules for the arrangement of sewerage systems that must not be violated
Do-it-yourself internal sewerage in a private house is possible. Violation of the rules set out above can lead to a noticeable disruption in the functioning of the internal sewer system or the occurrence of an emergency.
- The connection of the toilet to the riser pipe must be carried out separately from other plumbing-type devices.
- The remaining plumbing elements will be connected to the system above the toilet connection point. There can be several devices on one underwater pipe if productivity allows.
- All underwater pipes must be no less in diameter than the connection from the device, which has the largest diameter.
- The drain pipe from the toilet has a diameter of 10 cm, which means the riser should not be thinner than it.
- The toilet is mounted at a distance of no more than 1 meter from the riser, and other devices no further than 3 meters.
- If the house has an underwater pipe longer than 3 meters, then it should not be thinner than 7 cm. An underwater pipe that is longer than 5 meters is made from a pipe with a diameter of 10 cm.
If the diametrical increase in underwater pipes is not possible for some reason, then there is a method to circumvent this rule. To do this, you need to bring the end of the pipe to the roof and equip it with a vacuum-type valve or ring it to a riser above other devices.
Characteristics of laying pipes for sewerage
There are scrupulous nuances, the implementation of which ensures the operation of the sewage system in an improved mode:
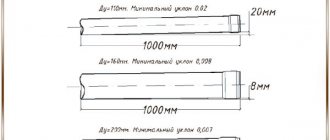
The inclination of all horizontal pipes depends on the cross-section diameter. The standards say that pipes with a diameter of 5 cm should be lowered by 3 cm for each linear meter of length, and with a diameter of 10 to 11 - by 2 cm for each linear meter. Pipes with a diameter greater than 16 cm can be tilted, but not more than 0.8 cm per linear meter.- The indicator in the form of a height difference for the toilet should be 1 meter, and for other devices 4 meters. Exceeding the parameters must be accompanied by the organization of a ventilation system at the ends of the inlets.
Another popular mistake is incorrect design of corners. If you make right angles, then as a result of the rebound, a waste blockage will appear in such a place, and the pipe will quickly become clogged. For this reason, it is necessary to create a smooth water flow at the corners, and for this they use shaped parts that have an inclination angle of 135 degrees. Another mistake is venting the fan-type pipe not to the roof, but to the general ventilation of the house. This device creates an unforgettable smell throughout the entire house, and you can only get rid of it by redoing the entire system.
In order to prevent the sounds of moving water from being heard, it is necessary to make noise insulation. To do this, wrap the pipes with mineral wool and place them in a box made of plasterboard sheets. For convenient and timely carrying out preventive work, the pipes are equipped with an inspection every 15 meters, and this can be applied to all turns. And one more thing. The pipe that connects the house sewer system and the septic tank does not have a check valve installed. In this case, if the outdoor units are overfilled, water may rise up through the pipes and flood the basement for disposal.
What calculations are carried out when planning sewerage
Work on the design and installation of internal sewerage in a private house with your own hands must be carried out strictly according to the rules set out above. Moreover, to comply with them, you need to carry out certain calculations:
- Designated on the general diagram of the place where this or that device will be located. Its distance to the riser, the diameter of the underwater pipe, fastening and connection to the sewer need to be thought out in advance. In this case, you need to calculate the amount of materials.
- Decide on the type of sewer system. They can be gravity and pressure. Typically, due to simplicity, a system is used in which water will flow under the influence of Earth's gravity. The main thing here is to calculate the slope of the pipes according to the rules outlined above.
- Based on the technical parameters of each sanitary device, calculate its instantaneous flow. The thickness of the underwater pipe will depend on this indicator. In a large number of cases, a pipe 5 cm in diameter is suitable for all devices other than the toilet.
- Calculate the most optimal place to install the riser. Usually these are toilets. If there are 2 or more of them in the cottage, in different vertical planes, then there should be two risers.
- It is necessary to calculate the sewerage scheme in such a way as to reduce the number of available turning angles to the maximum. This greatly reduces the risk of blockages.
The calculations indicated above, when performed correctly, make it possible to make the sewage system well-functioning and efficient even when overload occurs.
What is required to build an in-house sewer system
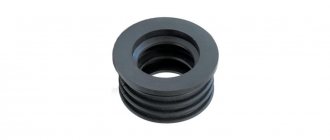
As mentioned above, the main thing when arranging a sewer system inside a house will be to draw up its detailed drawings indicating all devices and sizes of elements. For installation, sewer pipes made of polyvinyl chloride are used. Their design is such that two pipes can be fastened by placing the end of one into the socket of the other. For risers, pipes with a diameter of 10 cm are used, and for other devices only 5 cm. To connect to an external type of sewer, a corrugated pipe is used, since it has better resistance to ground movements. Tools usually include a saw for cutting plastic pipes, a sharp knife and rubber mounting seals. The pipes are cut with a saw, the cuts are aligned with a knife and chamfers are made. The seals are inserted into the sockets.
To fasten pipes into a system, different shaped components are used:
- Bends or bends that are required to form corners. They are produced with a bend of 90 and 45 degrees, and their ends are equipped with sockets with seals to create tight-type connections.
- If it is necessary to connect pipe pieces of the same diameter, special transition bends are used.
- Tees of different types are fittings for organizing pipe branches.
- Transition couplings are required to make transitions between pipes of different thicknesses.
A popular mistake when installing plastic sewer pipes is ignoring their heating. In order for the pipes to fit more tightly and easily into each other and into the shaped connecting parts, and the sockets must be heated in hot water.
Sequence of work during installation
Installation is carried out in a certain order. First you need to install risers, leading their ends to the roof and into the basement. They should pass near the toilets, and in the basement they are connected to an inclined pipe, which goes out into the septic tank, and the upper ends are left open or equipped with a check valve. Next, toilet connections are brought to the riser. They must be separate. Then connect the supply lines from the other devices above the entrance to the toilet to the risers. The fourth step is to install siphons on all devices. Then the siphons are connected to the connections. At this point, the installation of the internal system can be considered complete. The main thing is that all joints are tight, and the pipes are well attached to the ceilings or walls, and divergence is excluded.
Types of sewer systems for a private home
The easiest way is to install a plastic pipeline.
Taking into account the fact that the pipeline will not be connected to the city central highway, the owners of private plots are constructing one of the types of sewerage systems near the house:
- A single-chamber septic tank is a cesspool with a sealed bottom and walls. If the tank is completely filled, it is necessary to pump out sewage using sewage equipment. You can make a drainage/filter bottom for a single-chamber septic tank. This way the water will go into the ground. But you should be careful here: if the groundwater level is high in the area, there is a risk of contaminating nearby drinking wells. By law, such actions are punishable.
- Two-chamber septic tank. It consists of two adjacent reservoirs. The first one has a larger volume than the second one. Sewage flows through the collector into the main receiver, where it settles. Large particles of debris (feces, paper) settle at the bottom. The clarified water is poured into a second tank and drains into the ground there. The bottom of the second storage tank is made of sand and crushed stone for filtering. To avoid silting, it is better to change the fill every 4-5 years. The first tank is cleaned every 1-2 years.
- Biological treatment septic tank. Here, bacterial preparations are used to process sewage into organic matter - sludge and water. Such a tank must be connected to electricity, since bacteria only work in positive temperatures.
What is the required diameter of sewer pipes for a home?
Building codes allow the construction of a main sewage system from cast iron, asbestos-cement, ceramic, and plastic pipes. The latter variety is the most popular due to its inert qualities and durability. Pipe sizes are calculated at the planning stage. Their diameter does not depend on the material of manufacture.
In the house, to ensure optimal fluid velocity, pipes with a minimum cross-section of 50 millimeters are used. In this case, the movement of masses can be by gravity, vacuum or forced. The same products are suitable for connecting to sink siphons. Sewer pipes with a diameter of 110 mm are used in risers, drain pipes and at points of connection to toilets.
When determining the size of pipes for the section connecting the internal riser with the treatment device, the terrain conditions are assessed: topography, groundwater level. Pipelines already existing in the area also have an impact. To draw a gravity line for one building with a slope of 3 degrees, the remaining pipe size is 110 mm. For a cottage village, the common pipeline must have a diameter of 150 mm.
Independent sewerage device
For the internal system you need:
- pipeline
- riser and drain pipe
- audits
- locking elements
- outlet (connection to external system).
the optimal location for the riser
The first step is to route the pipes from each device to the riser. The diameter of the pipe at the bathtub, shower, sinks and sinks is 50 mm, at the toilet - 100 mm. All plumbing fixtures have elbows installed to prevent unpleasant “odors” from the sewer from entering the premises. When installing and fastening the pipeline, it is necessary to take into account the slope (approximately 3 mm per meter). The riser is installed above the ridge and covered with a grill. The opening for the outlet to the external pipeline should not be smaller than 30x30 cm.
The external part of the sewer consists of:
- pipeline
- wells
- storage tank or septic tank.
It is best to install a pipeline located above the freezing level from cast iron. The use of plastic materials is allowed when buried below the freezing level. In a system without a pump, the pipeline is laid with a slope
It is important that the septic tank or septic tank is located no closer than 5 m from a residential building and 20 m (at least) from a well with drinking water. In addition, it is necessary to ensure free access for vacuum trucks.
The pipeline is installed and laid.
The size of the septic tank pit should be larger than the container (so that a concrete pad can be created at the bottom). In this case, the neck of the container at the end of the work should be located slightly above the ground level. The spaces between the septic tank and the walls of the pit are filled with a cement-sand mixture and compacted. After connecting the pipes to the septic tank and checking for tightness and functionality, all trenches are backfilled.
It is more convenient to install a system for collecting melt and storm water separately. This will avoid increasing the volume of the septic tank. In addition, melt and rain water is much cleaner than domestic wastewater, so it can be used for technical needs (for example, irrigation).
First you need to mark the surface and dig trenches for outlets and pipes (taking into account the slope), as well as holes for storm water inlets. The trenches for the outlets are concreted, and a 10 cm thick sand cushion is placed at the bottom of the trenches for the pipes. Catchment basins must be equipped with funnels that are covered with nets. All elements of the stormwater system are connected.
The cost of connecting the sewerage system of a private house to the general network depends on the cost of completing all the necessary documents, the volume of materials and their type, and the cost of the installation contractor. Depending on the region, the total amount varies between 50-150 thousand rubles. The cost of an autonomous system can range from 500 thousand to 1.5 million rubles. To save money, you can build one system for several houses.
https://youtube.com/watch?v=4IbYUyWsWV8
External sewer system
The laying of the external pipeline can be done both before assembling the internal pipeline and after. To begin installation, it is enough to have the outlet pipe of the home sewer installed, since installation begins precisely from there.
However, before assembly, it is necessary to decide on the method of laying the external pipeline. The outer part of the sewer can be installed in an open or hidden way.
We recommend that you read: Finishing the chimney pipe and the passage through the chimney roof
Open way
This method involves laying pipes in prepared trenches and backfilling. All necessary work on digging trenches and installing a pipeline can be done with your own hands. The only special equipment you may need is an excavator if the length and depth of the sewer system is large and you want to save your own effort. However, it is possible to install a drainage system using an open method only on a relatively empty area without trees or outbuildings.
The order of work in the presence of a project is as follows:
- Trenches are dug, cleared of stones and compacted. The depth should be below the freezing level so that wastewater does not freeze during the cold season. If the pipeline is planned to be insulated, the depth of the trenches should be at least half a meter. The width of the trenches is 40 cm greater than the diameter of the pipes used, the slope is 1-3 cm per linear meter.
- Sand is poured into the trench and compacted to create a shock-absorbing cushion that will support the pipe in the correct position.
- A pipeline is assembled from the outlet pipe of the home sewer to the installation site of the well.
- Cover the side shock-absorbing cushions in layers and compact them.
- Backfilling is carried out without compacting: first sand, then earth.
Hidden way
There may be obstacles on the plot that interfere with excavation work: trees, buildings and other landscape objects. In this case, it will not be possible to lay the sewer using an open method, so you have to turn to specialists who can lay the pipeline without disturbing the integrity of the soil.
The hidden method of laying sewers is otherwise called the puncture method.
- A special drilling rig is used to dig a pilot well underground from the location of the well to the home sewer pipe.
- The well is expanded to a diameter 1.5 times greater than the cross-section of the pipeline.
- The end of the pipeline is attached to the nozzle at the end of the drill and pulled into the well.
Note! The disadvantage of the hidden method is the possible error in the geometric shape of the pipeline. Since the drill is controlled remotely, the slope or straightness of the pipeline may be affected.
Types of sewerage for a private home
Any drainage system consists of two parts: internal and external. The first is designed to collect water from various plumbing fixtures. The second most often also consists of two parts: domestic and storm sewer. The first removes excess water from the roofs of residential buildings and other buildings, platforms and paths. The second collects wastewater from a residential building. It consists of:
- pipeline;
- pumps;
- filters;
- wells and drainage pit;
- filter wells or septic tank.
gravity or forced circulation.
depends on the supply of electricity, Stormwater and sanitary systems are sometimes combined into one and are called a common sewer system. But most often, storm and melt water is discharged separately from household wastewater. Such external sewerage is called separate.
What are septic tanks?
Different types of septic tanks differ in the material of manufacture (plastic, concrete, metal), installation (horizontal or vertical), location (above or in the ground), and method of cleaning. The last criterion allows you to classify septic tanks into storage tanks, with ground filtration and biological purification.
Single chamber
This is the simplest option available. It consists of one chamber to which sewer pipes from the house are connected. As a result of settling, heavy particles settle to the bottom of the container and form sludge. The fundamental difference from a cesspool is the complete sealing of the container. This ensures the environmental safety of the design. To remove accumulated masses, order a sewage disposal machine, which pumps out the contents.
Double chamber
The system consists of two interconnected cameras. The connecting pipe is positioned at a certain angle to ensure fluid flow. In the first compartment, which is larger in volume than the second, the mass settles. The water freed from heavy suspended matter passes into the second tank, in which purification by anaerobes occurs, as in a single-chamber septic tank.
To facilitate operation and solve the issue of water disposal, ground filtration is organized next to the septic tank. To do this, drainage filters are made, to which a pipe from the storage tank is connected. The liquid passes through the filtration field and enters the ground in a purified state.
Materials for sewerage installation
Internal sewerage consists of plumbing fixtures and pipelines, which are most often installed from plastic materials. Not only pipes are required, but also various fittings:
- bends;
- knee;
- tees;
- crosses.
All plumbing fixtures must be equipped with devices that prevent solid particles from entering the system. The pipeline is installed with a slope, that is, the entry into the riser must be located below the sections connected to the plumbing fixtures.
collection and cleaning system. drain hole in a special sealed container
On sandy soils, you can build filter wells from concrete rings by filling the bottom of the holes with a layer of crushed stone. Such structures do not fill very quickly, but they purify wastewater by only 60-70%. Much more effective are septic tanks, in which wastewater is purified using aerobic and anaerobic bacteria and enters a filtration well with a layer of gravel (crushed stone) at the bottom. When using a septic tank, household wastewater is treated almost completely and does not harm the environment.
The pipeline for the outer part can be mounted from cast iron or plastic (PVC, polypropylene, corrugated polyethylene). Cast iron is too expensive, heavy and requires the use of heavy equipment. Plastic materials are lightweight, very smooth on the inside, and resistant to rust. For household pipelines, the best option is PVC pipes or corrugated polyethylene. But the choice is made based on soil analysis, the level of soil freezing in winter, the area of the site and the type of treatment system.
DIY cesspool
Installing a sewer system through the construction of a cesspool is economically beneficial. But for the design to work effectively, all installation rules must be followed. Since the work is voluminous and requires not only compliance with the technological scheme, but also the use of special equipment, it is more advisable to seek help from professionals.
Builders make a cesspool from concrete rings, the diameter of which can be from one to two meters. One well is made up of 2-5 rings, depending on the planned volumes. Construction comes down to several sequential steps.
Digging a pit and shaping the bottom
In the selected area, a hole is dug that is 80-90 cm larger than the size of the concrete structure. The sheer walls of the pit are leveled and the bottom is compacted. Next, fine gravel, crushed stone, and broken brick are poured into the pit as a cushion. The thickness of the drainage layer should be 20-25 cm. Next, formwork is erected and concrete mortar is poured. Leave the base for 5-7 days for complete hardening. To simplify the work of organizing sewerage in a private house, done with your own hands, you should choose a lower ring with a finished bottom.
Structure of the walls of the structure
After the bottom is completely ready, begin laying the rings. Using special equipment or a winch, they are lowered into the shaft one by one. If, when digging a pit, a calculation error is made and the ring gets stuck in the hole, it is further expanded and the installation is repeated. To prevent the lower ring from cracking from being hit by the upper one, several boards are temporarily placed on it.
The verticality of the walls is checked using a building level. After alignment, the rings are fastened together with reinforcement, staples, steel plates or a special “lock”, which is found on some rings. The gaps are sealed with cement, and the well itself is covered with waterproofing rubber mastic.
If a cesspool is made in areas with deep freezing of the soil (more than one meter), then the structure must be additionally insulated, and the pipe must be laid below the freezing level.
A trench is dug into the hole and a pipe is laid through it, making a slight slope towards the tank. Next, they begin to strengthen the sewer well. To do this, it is lined with bricks, stones and covered with soil.
Installing the Cover and Vent Pipe
For the ventilation outlet, take a pipe with a diameter of 100 mm and a length of 100 cm. It is lowered into a concrete container so that the upper end rises 50 cm above the soil. Gases formed as a result of decay (methane, hydrogen sulfide) will exit the collector through this ventilation outlet. . The container is covered from above with a concrete slab and a plastic hatch. A hermetically sealed lid protects the well from precipitation and freezing in winter.