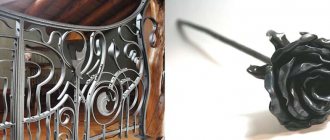
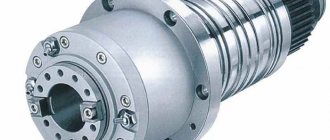
Metal products made using forging have long become very popular due to their beauty and sophistication. Such decorative elements are quite expensive and it is not always possible to order all the desired decorations for your interior or country house. But, in addition to the hot type of forging, which is needed in order to create metal decorative structures, there is a cold variety. The last option can be implemented independently; for this you will need to build a cold forging machine with your own hands, after which you can begin to implement all your plans and ideas.
DIY hodol forging machine
- 1 Types of machines 1.1 Video on making a machine for cold forging with your own hands.
- 2.1 Video review of a manual machine for forging metal
- 6.1 Video instructions
Types of machines
Basically, all devices that are intended for the manufacture of metal parts using cold forging are characterized by a manual drive. Few of them operate on the electric drive principle, although such a structure can be built with each of the devices. The only question regarding the drive is its feasibility, because the cost of the energy resource that powers the unit and the complexity of the installation process of the mechanism may not be justified if they are correlated with the amount of work performed and its regularity.
The table shows all the devices that operate using a manual drive and are related to the cold forging process.
| Device | Short description |
| Twister | With the help of such a device, the metal is twisted, spirals and curls with a narrow core are formed. |
| Torsion bar machines | With the help of such a machine, screw-type rods are twisted, and it is also possible to produce large spirals and filaments (baskets, lanterns and bulbs). |
| Inertial stamping machines | They are intended for making connecting parts with decorative components, making patterned tips and various small patterns and reliefs. |
| Bending machines | There are several types of such machines: push, broach and combined types. The first variety is needed in order to obtain wavy bends or to bend a rod in a zigzag manner. The extended variety is in demand when it is necessary to make a ring, curl or spiral with a wide core. Using the combined variety, you can build any of the listed elements. |
Help: very often in some sources you can find the name of machines designed for torsion as well as for machines that do winding - twisters. However, this is not entirely true; machines that twist metal are torsion bar machines.
Video on how to make a cold forging machine with your own hands.
Differences of cold forging
There is such a thing as “stamping”, which is sometimes confused with the cold type of forging. Cold forging itself has 2 principles according to which this process can occur. The table shows the differences between the processes.
| Process | Description |
| Stamping | The stamping process can be described as the extrusion of certain shapes using a punch that operates at a high level of pressure. An example of the stamping process is an aluminum can. Heating of the metal is not used in this case. The ability to apply such technology at home is hardly possible, since it is impossible to create the necessary conditions for this. |
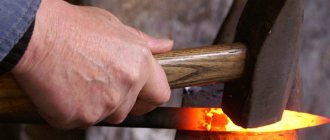
| Cold forging type (riveting) | This type of cold forging, in essence, is cold hardening, namely, a certain number of blows of very high force are carried out in the process, which allows the structure of the metal to change and become the required parameters in size and shape. This manipulation is carried out using a hammer, which you can also build with your own hands. |
| Cold forging type (bending) | Another type is bending. With this technology, the metal structure remains the same without changing its characteristics. This type of forging can be used at home; all you need to do is create a cold forging machine with your own hands. |
Cold forging, which is carried out on the principle of bending, is quite simple to do, especially if you have special stationary equipment that significantly facilitates the process. The advantage of this variety is that you can assemble almost any cold forging machine with your own hands without much expense.
Video review of a manual machine for forging metal
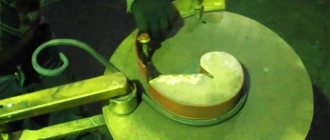
Types, structure and principle of operation of the “Snail”
A cold forging snail is a device for creating patterns in the form of curls from metal rods by deformation bending them along the contour of the template. Deformation occurs due to rigid fixation of the working rod to the template. To do this you need to apply force. This is ensured by manual force or electric drive. When making a device yourself, the feasibility of using an electric drive must be determined by the master himself. It is necessary in case of a large volume of work. Mostly manual force is used.
The cochlea (conductor) can have a different design. It can be done:
- in the form of a template stably welded to the working base;
- in the form of dismountable removable parts that are attached to the base.
Manual drive can be organized in different ways.
In the most primitive design, the rod is wound onto a template with simple manual effort or using any suitable device as a lever.
Also, the lever can be included in the structure of the machine and attached to the bed leg and driven by a movable bearing moving along the base of the scroll.
In more complex devices, the conductor itself rotates, which is attached to the shaft axis. It is driven by three levers.
You must determine the design of the machine in advance based on feasibility and ease of use.
A monolithic jig has a specific template shape that serves as the only curl option. This is a disadvantage of this design, but it is not difficult to do it yourself.
The removable design is convenient because this machine can be used to produce curly curls of different sizes and shapes. But the design of the machine itself is more complex. In addition, with a removable device, the reliability of fixing parts of the template is worse than with a monolithic type. You will need to constantly tighten the threaded connections, as they may become loose during operation.
Read also: Automat with protection against zero loss
Construction of cold forging machines
Each device for cold forging has its own characteristics and parameters. In order to easily make a cold forging machine with your own hands, you need to understand what each of them is.
| Machine | Device | |
| Bending machines | The design of this device is such that by changing the rollers and wedges, the size of the waves and bends changes. They can bend rods up to 16 mm. The only caveat of this device is that it cannot be made independently, because it requires processing and turning many parts of the exact size. The cost of such a device is low. | |
| Twister | The unit works by equipping it with a special template, onto which the piece of metal being processed is pressed. The pressure must be very high, so those who work on the twister must have sufficient strength to do this. In addition, the safety of the template itself is ensured by the presence of a persistent horn (end). As for the middle horn, which is otherwise called the encircling horn, it should be made in such a way that it can change its position and be fixed in it. The efficiency of work depends on this, especially for those who are starting the process for the first time. | |
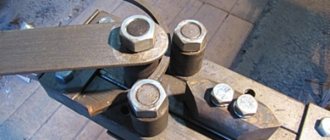
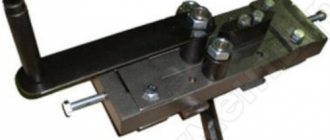
| Base with spacers | This unit will allow you to make patterns of absolutely any variation. The design itself is very simple and consists of a plate made of durable and reliable material into which spacers are screwed at a certain distance. For such purposes, you can use bolts with sizes from m8 to m24. The thickness of the metal depends only on the skill of the person working on the machine. Basically, this device is well suited for metal with a thickness of 6 mm. | |
| Snails Twister machine | With collar | This installation consists of a base plate on which a special coil is located. This coil is used as a template for the future product. The peculiarity of the machine is that the “snail” template is divided into several parts, which are secured to each other using special connecting elements, which allows the template to vary in shape during operation, which creates various kinds of waves and bends. There are also disadvantages to this design, since in order to make such a machine for cold forging with your own hands, you need to select a very durable material that will not bend over time. Also think over the connecting loops, which are quite vulnerable, given the amount of force with which the entire process of bending the metal occurs. |
| Lever type | In this type of snail machine, the template is attached very firmly to the base. Due to this fact, its productivity is lower, however, its reliability is greater. Using a special lever, the metal plate is pressed against the template; at the same time, the movable roller must be moved during the process. To make such a machine for cold forging with your own hands, you can use steel material, which is distinguished by its strength, and the roller can be made from a regular roller bearing. In general, the design is similar to a pipe bender. | |
| Torsion bar machine | Such a device will be good for screw twisting rods. Such a machine is made from a cylindrical metal base and two fastening and simultaneously twisting elements. It is advisable to equip such a structure with a special pair of paws that will not allow the metal being processed to bend in ways that are not necessary. The principle of operation of the machine is such that the rod is placed in the elements holding it, clamped at one end, and at the other end, using a rotating spindle, it is twisted to the desired size of the helical wave. | |
Regarding multitasking
Models can be highly specialized or multi-tasking. The second option always seems to be the most suitable, but this is not always true.
Some people only need a couple of features rather than full functionality. And then, universal units often use too many resources, so they quickly begin to fail.
It is much easier for novice blacksmiths to understand the features of a mechanism that does not perform many functions. The homemade cold forging machine was no exception.
Equipping a torsion bar cold forging machine with an electric drive
In order to increase not only the efficiency of work on a cold forging unit, twisting rods into a helical wave, but also to increase the speed, as well as ensure stability and not be subject to overfatigue, you can install an electric type drive.
Working by hand, it is quite difficult to make all the decorative elements made of metal rods the same, since the uniformity of the rotational moment in such a situation will vary greatly. In order to avoid errors in the manufacture of products, you can use:
- axle shaft from the car, which is installed on the drive axle;
- you will also need a differential gear pair;
- For protection it is worth using a casing.
From the listed devices you can build an electric drive for a torsion bar machine. It is better for such an engine not to exceed power ratings of 900 rpm and 3 kW.
Building a curl for the machine with your own hands
Before you start creating a cold forging machine with your own hands, you need to be able to calculate the parameters of a template spiral, because there are practically no special programs for such purposes. Such a template should not only be technically competent, but also have an attractive appearance.
The calculations for this pattern are based on a logarithmic spiral. Some nuances during construction can be highlighted in the following list:
- the beginning of the construction is taken at point R0;
- the turning radius will be equal to a fixed angle;
- the length of such an angle must be multiplied by the divergence of the coil;
- the discrepancy in the standard version is generally taken to be 1.2;
- for simplicity of calculations, as well as maintaining accuracy, the bending angle is best taken at an angle of 45 degrees;
- if there is a need to build a template that will have a denser spiral, then the 8th part (s) of the unit distance from the spiral should be added to the radius;
- As for r0, it must be equal in cross-sectional size to the diameter size of the workpiece for the spiral.
Important: r0 can take any value, it all depends on what characteristics the metal is used for the workpiece, namely its density.
Taking into account all the nuances, you can start making a “snail” template; for this, it is best to be able to solve equations that have a cubic degree and higher. There is no exact formula for calculating such a device, but there is one that allows you to achieve the optimal result. The sequence when constructing a spiral template can be like this:
- the initial point r0 is determined first;
- the turns that the template will have are taken arbitrarily, their number can be any;
- using tabular data, you should calculate the diameter (b), while ensuring that it is smaller in width in the opening for the template;
- using the formula, the radius R is calculated;
- the last step is to transfer all the obtained points in accordance with the scale, after which you can proceed directly to construction. In the process, let’s adjust the radius R in the final version using a similar formula.
Help: if it becomes necessary to calculate intermediate values, then this is done in accordance with the geometric proportion.
Drawings of a snail for forging
Beginning craftsmen often do without a drawing, drawing the contours of the snail on the base itself without any calculations. For the first time this is acceptable, but if you want to make a high-quality snail machine for cold forging, then you still need to use drawings in which all the parameters are calculated. Depending on the chosen type of snail design, there are different versions of their drawings, according to which these devices are made. For example, a diagram of the device of the snail shown in the photo is shown below.
The diagram also describes the operating principle of such a machine, which uses a drive using three levers that rotate the shaft and volute.
Bending is carried out after rigidly securing the end of the workpiece to the first curl of the template shape using a clamp and then winding the rod around the rotating spiral template while the shaft rotates.
After getting acquainted with the design of different types of “Snail” and the features of their use, as well as watching a video with examples of self-manufacturing of this device, you can begin to create the machine design of your choice. And if you have experience in making such devices, then you can share it in the comments to this article and give advice to novice craftsmen.
Construction of a cold forging machine
When drawing up a drawing to further create a template for the machine, it is best to make sure that it has the maximum number of different variations regarding bends and waves. Having such blanks, you can create a cold forging machine with many interchangeable attachments, which will make it possible to produce various patterns and monograms.
Sequence of actions when creating a device:
- Initially, you will need a metal sheet, the size of which will depend on the number of patterns placed on it. The templates themselves should be placed in such a way that there is room for the manufacture of products, because during the process the material from the nozzles may shift due to lack of space. Also, if the templates are not sufficiently spaced from each other, complications may arise in the work.
- As for the variations of the templates themselves, they can be either simple or contain more than one turn of the monogram. You can make a similar ploughshare-type snail and think through the design of the bends in the disassembled and assembled state. At the same time, you should be careful when selecting the material for fixing the sliding parts - it should be as durable as possible.
- The change of nozzles can be ensured by making a rectangular slot; replaceable templates for forging can be inserted into it. They should all be attached to metal plates shaped like a rectangle. Fastening of such nozzles will be ensured using bolts.
Video instruction
About the electric torsion bar drive
We have already indicated at what points it will be necessary. But how it all looks in practice, look at the presented video.
Wave and zigzag
Remember about the nut? This device allows you to easily create bends with almost any rotation. But they are always smooth. And sometimes in everyday life we need a part with a sharp bend at an acute angle. Or so intended by the decorator. In any case, on our bend, if you have foreseen this in advance, you can put wedges that, instead of disks, will bend the object. And create designated sharp corners.
Assembling the device
This version of the machine is used as an example because of its simplicity. Knowing the basic principles and sequence of equipment design, you can upgrade it at will. To assemble all parts of the equipment into a single whole, you will need to use:
- drill with carbide type drills;
- welding machine;
- a saw cutting metal or a hacksaw;
- metal sheet of the selected size;
- round metal pipe;
- metal rod;
- bearings of different sizes;
- bolts size M8.
To assemble a cold forging machine with your own hands, you need to use a proven sequence of actions:
- Initially, you need to assemble a stand that will serve as a support. To do this, all its components (pipe sections of the same size and the joints between them at the top and bottom edges) must be connected into a single whole. The design may resemble a stool in appearance. The connection is made using a welding machine, and the sections are cut with a saw.
- The next step is cutting the metal sheets. You should get circles of equal diameters and four triangles with equal sides. Triangular-shaped elements must be welded to the bottom of the connected pipe structure in such a way that something similar to a pyramid is formed. The base, which has a wider area, must be welded at the central point of the cut circle.
- Four strips that are located horizontally must be attached to a circle with an already welded element. This should be done using bolts; for this you will need a drill to make the holes.
- The next step is the construction of the handle. To do this you need to use two rods of different lengths. Their sizes can be determined by correlating them with the diameter of the circle. One rod should be commensurate with the diameter, the other should slightly exceed its size. When bending the first rod, you should maintain an angle of 30 degrees. Then weld both rods to each other, and then weld another rod into the lower part. There should also be a jumper between the first two sections, to which a lever is attached by welding, which should maintain the direction towards the structure made of rods.
- A bearing for future directional variability in the device must be attached to the end of the attached lever, as well as to the segment located at the bottom of the structure. The upper section serves as a mount for a metal coil, which must be installed horizontally - it makes it possible to bend the metal. On the lower side of the segment, where there is a free end, a hole should be made equal in diameter to the size of the pipe section.
- The last step in the algorithm of actions when constructing a machine for cold forging with your own hands will be the connection of the designed handle with a part of the device similar to a “pyramid”. These elements are fixed after putting on the handle with a wide-diameter nut, to which it is first necessary to weld a metal circle, which will allow the template itself to be attached to the machine. Next, the “snail” template is attached by welding.
Conclusion
Anyone who decides to take up forging seriously and make a cold forging machine with their own hands should be very scrupulous at the stage of creating drawings and calculations. Otherwise, the creation process is quite simple, and once you understand the principle of equipment design, you can come up with various variations of it that will help improve the product.