Most dental procedures related to the treatment of oral diseases are impossible without special instruments and equipment.
In addition to a variety of mirrors, forceps, probes and other small devices, high-quality treatment of some pathologies requires the use of multifunctional units.
This type of specialized equipment is a drill, familiar to every visitor to a dental office.
General information
A dental drill is a multifunctional device whose operating principle is based on a rotation mechanism.
With its help, certain attachments are set in motion, used for preparation and treatment of the tooth surface.
In various models of drills, the rotation speed of components can reach from 1000 to 60,000 rpm. This allows the device to be used for various manipulations related to the treatment of the patient’s dental surface or the manufacture of dental structures.
The principle of operation of the drill
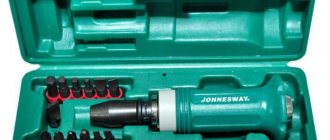
This homemade product will work using a 12-volt brushless electric motor.
Motor for drill
As a housing, we will use a 2-inch PVC pipe, the internal size of which coincides with the size of the engine. The whole thing will be powered by lithium polymer batteries with a total voltage of 7.4 volts.
Where is it used?
Thanks to the huge range of rotational movements, the drill can be used in various fields of dental science:
- For therapeutic purposes, the device is used for cleaning carious cavities, preparing and polishing the tooth surface, and processing filling material.
- In the periodontal field, the use of a drill allows you to quickly and effectively remove mineralized deposits from the tooth surface.
- The orthopedic field requires the use of a device for performing dissections of bone tissue, processing the dental bed when installing various prostheses, and preparing hard tissues of elements of the jaw row. In addition, the drill allows you to adjust, if necessary, manufactured crowns, bridges and other types of orthopedic products.
Main blocks
Modern drills allow you to perform many dental procedures, which is ensured by their design. Most often you can find installations consisting of the following functional blocks:
- A dental chair is a device for positioning a patient during a procedure.
The chair is softly upholstered and equipped with a massive, balanced base, headrest and footrest. Its position is adjusted using a pedal connected to an electric or mechanical drive, which allows the dentist to gain maximum access to the patient’s oral cavity. - The lighting unit in the installation is fixed in such a way that the light is directed onto the dentist’s working field, which is adjusted using a bracket.
Depending on the installation model, the illuminator can be equipped with LED or halogen lamps. Additional settings for this unit can include brightness and air cooling controls. - The dentist's block is designed to accommodate the basic devices used by the attending physician.
It must contain a drill and several tips for it, as well as a water-air gun. Elements designed to control the dental treatment machine are also located here. The complete set of the instrumentation unit may differ in different models of dental units and contain additional devices. - The assistant's unit includes two interconnected modules - a hydraulic unit equipped with a spittoon and cup filler, as well as a system for eliminating water, blood, saliva and aerosol mixture. In addition, a separate bracket may contain auxiliary tools and an additional control panel.
- Additional blocks include various auxiliary tools, the number of which depends on the type and model of the installation. This may include LED polymerization lamps, ultrasonic scalers, and electrodiathermocoagulators.
Indications for dental remineralization, cost of the procedure in the clinic and at home. Let's discuss here why fillings fall out of teeth.
At this address https://dr-zubov.ru/lechenie/zuby/chto-takoe-klinovidnyj-defekt-i-pochemu-on-voznikaet.html we will find out together the reasons for the development of a wedge-shaped tooth defect.
Assembling a homemade device
In order to be able to use an attachment from an old drill to perform minor work on items made of metal, plastic, wood and bone, it is necessary to make a device with which such an attachment will be driven by a small electric motor of the required power. As a drive motor for a homemade drill, you can use a small, but resourceful and powerful motor from an ordinary hair dryer or an old VCR.
Don't miss: DIY miter saw - making with drawings
To transfer the torque from the electric motor to the shaft of the engraver attachment, you can use plastic gears of various sizes. In particular, gearboxes of children's wind-up toys, as well as kinematic diagrams of household appliances for various purposes, are equipped with such gears. When choosing such gears, it is very important to ensure that they match each other in number, shape of teeth and outer diameter. To increase the power of the working attachment of a homemade drill, it is necessary to fix a gear of a larger diameter on its shaft, and a gear of a smaller diameter to fix it on the shaft of the drive motor.
Selecting the motor and gears
The diameters of the mounting holes in the gears that you select to equip the drive mechanism of your homemade drill will most likely not correspond to the dimensions of the electric motor shafts and the working attachment. This problem can be solved quite simply: by drilling mounting holes of the required diameter in the gears. To ensure a tight and reliable fit of the plastic gears on the motor shafts and the engraver attachment, holes should be drilled with a smaller diameter (0.1–0.2 mm) than the dimensions of the shafts themselves.
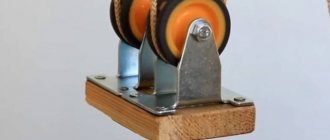
The drive unit of your homemade drill, consisting of an electric motor, two gears and the tail part of the attachment shaft, will work correctly and without failures if all elements of such a mechanism are securely fixed in the appropriate position. This problem can be solved by the simplest device, made from an aluminum plate 2 mm thick. Such a plate can be given absolutely any configuration (the main thing is that it does not create inconvenience when working with a homemade drill).
We calculate and manufacture the mounting plate
It is necessary to drill two holes in the mounting plate, one of which is intended to accommodate the electric motor, and the second is for fixing the working nozzle. It is very important to correctly calculate the distance between the centers of such holes, which should be equal to the distance between the axes of the two gears used that are in mesh with each other. If such a distance is calculated and maintained correctly during drilling, then the gears will rotate without jamming or slipping through the teeth while using a homemade drill. If the hole in the mounting plate, in which the working attachment of the drill will be fixed, is made in the shape of an ellipse, it is possible to level out the errors made when performing the calculations described above.
We fix the parts and check the operation of our gearbox
To make the mutual rotation of the drive gears easier, it is necessary to ensure that there is a small gap (0.1–0.2 mm) between their teeth in the meshed state. The strict perpendicularity of the axes of their mounting holes to their side surface helps to avoid horizontal runout of such gears during rotation.
Installing the attachment holder and power switch
Assembling a homemade drill and combining it with an engraver attachment is carried out in the following sequence:
- The tail part of the working nozzle is fixed to the mounting plate using a pre-prepared nut.
- The drive motor is secured with two screws connecting its housing to the mounting plate.
- After fixing the electric motor and the working attachment on the mounting plate, plastic gears are put on their shafts.
- To start using the assembled drill, you need to install the tool holder on the working attachment and connect the drive motor to the power supply.
- To make your homemade engraving machine more convenient to use, you can additionally equip it with a small switch and a power connector.
The drill is ready for work
If, when using such a homemade drill, you are not satisfied with the fact that it can only be used in conjunction with instruments whose shank diameter does not exceed 2.35 mm, then this problem can be solved. To do this, you need to purchase a collet chuck mounted on a mini-drill, the mounting hole in which has a diameter of 2.3 mm. You need to insert the shank of any high-quality bur with a broken working head into it: it is this shank that will be fixed in the clamping device of your homemade drill.
Can be used with collet or jaw mini chucks
The video below shows the capabilities of this portable drill, made with your own hands in a home workshop.
With your own hands you can make not only a drill of the design described above, but also a more convenient device with a flexible shaft. By purchasing such a convenient device as a flexible shaft, you can turn various technical devices for household use into a drill. This can be a drill from a blender, from a regular electric drill, or from a screwdriver. Many modern models of flexible shafts include a working attachment, and in many cases, a special stand. This stand, on which the tool is placed when not in use, allows it to be kept in working condition for a long time.
Thus, to the question of how to make a mini-drill with your own hands, there are many answers, most of which offer specialized Internet resources.
How to choose a drill
The key to success in this activity largely depends on the chosen tool. First of all, you must decide on the workload of the drill. It is recommended to pay attention to two aspects:
- The power of the micromotor, which will determine the duration of operation of the equipment under mechanical loads.
- The number of revolutions of the working body into which the nozzles will be fixed.
Those wishing to engage in this activity professionally should be aware that they will need to purchase two tools. To date, drills with high power and high speed have not been invented. For this reason, beginning craftsmen should purchase:
- A powerful drill with a reinforced tip design;
- Smaller tool for fine work.
Don't miss: Chisel - hand carpentry tool: device, types, application
The next step is to select a workpiece. Experts recommend giving preference to wood species with a dense, uniform structure. The best choice would be: linden, pear, beech or alder. Oak, spruce, and pine blanks will not be the best choice. The disadvantage is the poor quality reflection of the texture of the drawing.
Drill carving technology
Having decided on the workpiece, you need to create a sketch using thick paper and prepare your work area.
The latter must be equipped with a powerful electrical device, the light of which allows you to examine in detail any engraving elements.
To fix the stencil on the surface to be processed, you will need masking tape, and if parts of the sketch will be applied directly to the workpiece, a felt-tip pen or pencil, as well as alcohol to degrease its surface.
The process of working with the workpiece looks something like this:
- Transferring the stencil to the surface of the workpiece using carbon paper. If a paper template is not used, the surface is degreased with alcohol before applying the inscription or image. The areas to be selected are shaded with a black pencil.
- Trace the outline of the design with a small bur with a cutter having a star-shaped or needle-shaped section. At this stage, small drills can be used.
- Stroke with a large tip and select the background part. The sampling depth is pre-selected on an unnecessary piece of wood.
- Sanding the background with a piece of fine sandpaper.
- Performing small items.
- Polishing the surface with a felt roller to remove any burrs left by tools. Stain coating.
- Cleaning the finished product with fine sandpaper - the stain should remain only in its background part.
- Applying the base by rubbing in a neutral shade of paint. The finishing decor can be bronze powder, the excess of which should be removed with a flannel cloth.
This is approximately how engraving of small and not very complex designs occurs. You should start creating more complex products only after completing woodcarving training in courses or from a master.
- In this video, the master demonstrates carving with a drill.
- Any master wants to make a high-quality drawing with clear contours. To do this, you need to follow simple tips that will make your work much easier:
- Create a stencil, preferably using thick paper, for which thin cardboard is suitable.
- Using carbon paper, transfer the contours to the workpiece.
- Using small cutters, go through the marked areas.
In this way, a stencil will be created that will make the engraving process much easier, this will be especially noticeable if the pattern is repeating.
It is important to choose the right nozzle from many types:
- Abrasive. Designed for grinding;
- Wire brush. It is an indispensable thing in rough processing of workpieces;
- Steel cutters. These are the main attachments, thanks to which contours are cut and other preliminary operations are performed;
- Serrated blades. They are necessary for finishing workpieces with thin relief;
- Drill. The main purpose is to make holes;
- Sharoshki. Thanks to them you can do polishing;
- Felt circles. Necessary in the final stages of work.
Safety precautions
A drill, like other cutting power tools, requires compliance with safety precautions. Its requirements are as follows:
When working, it is important that the work surface is stable and clean.
- Work on a strong and stable table that remains in place while carving.
- Wear a robe or apron made of thick fabric, choose sleeveless clothing or roll them up as high as possible. Hair, if long, should be gathered in a ponytail and hidden under a headscarf or light headdress.
- Secure the workpieces with special devices so that the work process proceeds quickly and safely.
- The light should be bright. The lighting fixtures are positioned so that the craftsman does not cast a shadow on the work surface while carving.
- Wear safety glasses.
- Check the sharpness of sharpening points on a wooden block, not your fingers.
- Maintain order and cleanliness in the workplace so that you don’t stumble upon anything sharp among the sawdust that has accumulated on the table.
- Clean the work surface with brushes, not with your hands. From time to time, wipe the tables with a damp cloth to remove accumulated dust.
- After work, put tools and attachments in their places.
- Ensure that electrical tools and their cords are in good condition.
- Check how the tools are plugged into the outlet and untangle twisted cords.
- Turn off the tool, which does not have a ventilation system, every 10-15 minutes. for cooling.
- Remember about fire safety - dry shavings are flammable, so they should not come into contact with heating devices.
- Make sure there is a first aid kit in the work area.
Faulty parts are replaced only with similar ones, and the engraver’s ventilation holes are cleaned immediately after finishing work with it.
A drill used in a workshop or at home will last longer if you provide it with proper care.
Faulty parts are replaced only with similar ones, and the engraver’s ventilation holes are cleaned immediately after finishing work with it.
It is necessary to regularly check devices and tools used in parallel with carving equipment: the surface cannot have nicks, cracks or other defects.
It is necessary to start carving wood with a drill in a well-lit room, on a work table, where there are no unnecessary things. Lack of light and clutter are causes of injury while working. Make sure there are no explosive substances nearby.
When making adjustments, you should unplug the instrument from the outlet. Under no circumstances should you clean or change accessories while the equipment is powered on! The use of tools with defects is strictly prohibited.
Conclusion
Wood carving is a very difficult process, so before you begin, you need to pay attention to a number of nuances. The right tool, as well as suitable cutters for the job, will be the key to success. However, remember that safety comes first!
Don't miss: TOP 10 Best Electric Planers for the Home
By keeping these aspects in mind, you will achieve success in wood carving. The drill requires regular, appropriate care with cleaning and replacement of worn parts, as well as compliance with safety precautions during operation. These actions will help maintain the functionality of the equipment for a long time and make it work as efficiently as possible.
Design features and components
Despite the differences in the equipment of drills from many manufacturers, each of them has a standard set of elements that ensure the functioning of the installation.
These include the following components:
- A nozzle is a tool through which a specific dental procedure is performed on the patient’s teeth. A bur, different types of cutting discs, and a grinding device can be used as attachments. The choice of a specific device is made by a specialist depending on the result that needs to be achieved.
- The tip is designed to secure the working attachment. This structural element transmits torque from the product’s motor to the working tool. The shape distinguishes between straight and bent tips, which ensures maximum access to the most distant elements of the jaw row.
- The drive is a micromotor or turbine, which provides rotational movements of the nozzle and is the most important part of the drill. The number of rotations depends on the type of drive, which may differ in different device models.
- The lens is a structural element that connects the drill to the dental unit located in the specialist’s office. This design component allows the motor unit to be removed as far as possible from the dental chair, which can significantly reduce noise.
Watch the video to learn how a dental drill works.
Varieties
Several types of drills can be used in dental practice. Their key difference is the type of drive that drives the working attachment.
Electrical
There are two types of electromechanical machines - with a multi-link belt drive and with a micromotor:
- The first type of product is obsolete, but is still found in some dental offices. They have a low rotation speed - 30 thousand revolutions per minute, which limits the range of their application. Among the disadvantages of such devices are also high noise levels and strong vibration.
- Drills with a micromotor have high torque, facilitating the process of preparing the tooth surface. The rotation speed of the tip in these devices is 40 thousand movements per minute. In addition to grinding your own teeth, such devices are used to process installed dentures and crowns.
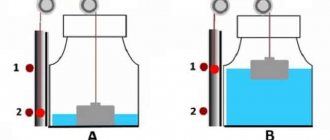
Pneumatic
Pneumatically driven devices are equipped with a compressor and a turbine tip, to which high-pressure compressed air is supplied through a hose. This operating mechanism is the most effective, since it allows you to increase the number of rotational movements to 300 thousand per minute.
The advantages of pneumatic machines include high speed of the procedure, precision of manipulation and significantly reduced pain, which is very important for the patient.
However, due to the low torque, the use of such installations is impractical when it is necessary to process certain filling materials.
Laser
The laser drill does not have a rotation mechanism. The principle of its operation is based on light radiation supplied to the tip of the product through a light guide. The power and frequency of the light are adjusted using the base unit, and turning on the unit requires pressing the foot lever.
The advantages of using a laser drill include the following:
- high precision of the procedure;
- painlessness;
- preventing the possibility of microcracks forming on the dental surface;
- reducing the risk of cross-infection.
When using a laser drill to prepare a carious cavity, further filling must be carried out using a light-curing material.
The manufacturing process of a solid crown and indications for its installation. This article is all about the benefits of laser dental treatment for children.
Go to this address https://dr-zubov.ru/lechenie/zuby/stomatologicheskie-rasxodnye-materialy.html and read about dental consumables.
Portable
Portable drills are smaller modifications of the classic units used in the dental office.
Such a device is placed in a portable case, so it can be used not only in a medical institution, but also if it is necessary to travel to unsuitable conditions.
Portable drills can operate either from a micromotor or using a mobile power source.
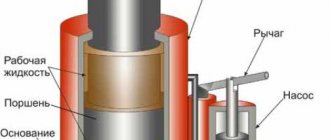
What equipment was used in Soviet times
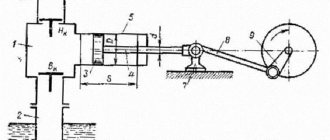
Dentistry has undergone many changes during the USSR, which also affected equipment. The mechanical drill was used from 1920 until about the 50s. It was a complex mechanism for transmitting muscle movement into the rotational action of the drill - the dentist needed to pump the pedal. However, there was no control of rotation speed and torque, which made treatment with such a device painful, and burns were also common.
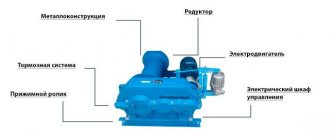
Electromechanical drive devices were introduced to replace mechanical variations. This type of equipment can still be found today - some public dentists have not yet had the opportunity to replace them. The basis for transmitting rotational motion is multi-link transmission via a cord on a rigid base.
Soviet equipment
This equipment has only disadvantages:
- low rotation speed;
- low mobility of the tip;
- presence of strong vibrations;
- noisy operation.
Some patients, after treatment with outdated equipment, have developed a fear of dentistry and it is almost impossible to get rid of it.
Popular models and prices
In modern dental centers there is a wide variety of drills, which differ in manufacturer, technical characteristics and have certain advantages.
BPK-02/01 (BPK-01M)
This model refers to stationary pneumatic devices that are used in a hospital setting. The rotation speed of the handpiece in the drill reaches 300 thousand revolutions per minute.
The installation provides cooling of the working tool using distilled water. Vibrations during manipulation are completely absent, which allows you to perform high-precision operations almost painlessly.
The drill is controlled using a pedal. The device comes with a compression unit, a dental unit with two instruments, and a handpiece.
The cost of installation ranges from 35 to 43 thousand rubles.
MARATHON K35
A portable dental drill from the South Korean manufacturer Saeyang can be used both in the dental office and outside it. The operation of the device is ensured by an electromechanical micromotor. A power pedal is included in the package.
The rotation speed of the working bur in this device reaches 30 thousand movements per minute. This indicator can be monitored by a specialist thanks to a digital display screen. The manufacturer notes that the device is protected from overloads and does not vibrate.
The cost of the product is 11-13 thousand rubles.
WATERLASE iPlus
The laser dental unit is equipped with two systems:
- iPlus – the purpose of which is operations on hard and soft tissue;
- iLase is used for autonomous manipulation of soft tissues of the oral cavity.
The light wavelength of the device is 2780 nm. The product can operate in three modes: constant pulse and two variations of ultra-short pulse.
Using a laser dental unit, a specialist can perform operations on hard tissue such as cavity preparation, osteoplasty, and sanitation of the equine canals.
The cost of a laser dental unit can reach from 1.5 to 2.8 million rubles.
Learn about the benefits of the Waterlase iPlus dental laser from the video.
Materials required for making a drill
To make a drill with your own hands, we will need the following parts and tools:
- 12 volt DC motor
- A section of PVC sewer pipe. Its diameter should be 32 mm, and the length is at your discretion.
- Two lithium polymer batteries
- Switch button.
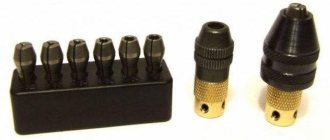
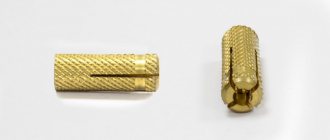
- Collet chuck for drills, working size 3 mm.
- Soldering iron, solder and wires for connecting the electrical part of the device.
Engine and collet chuck
The DC motor for our drill is really very cheap. You can find it on Aliexpress for only 300 rubles. Meanwhile, it consumes 1.4 A, which means its power will be equal to 16.8 W. This is quite enough for such equipment, considering that the engine can accelerate to 23,000 rpm. The motor shaft has a diameter of 3 mm, and it is necessary to select a collet chuck for it. It is secured to the shaft using a hexagon screw. The collet is clamped using an open-end wrench and a stopper of the chuck itself.
PVC pipe
Using a regular metal blade or a hacksaw, cut a 15 cm long piece from the PVC pipe. Clean the edges with sandpaper to remove burrs. The motor housing must fit tightly into the pipe. If gaps remain, they must be eliminated using spacers, for example, from a rubber bicycle inner tube.
End caps
We make end caps from a piece of plexiglass, plexiglass or fiberglass. The author used a cutter attachment to drill out the outer circles. They can also be cut out with a simple hacksaw, adjusted to size and sanded down the edges. In the center of both plugs there should be holes for a collet chuck and a connector for charging batteries. The circle of the plugs should overlap the PVC pipe.
Engine installation
We expand the hole for the cartridge to the required diameter with a round file or needle file. We attach the engine to one of the plugs, making holes to secure it with screws. They can be made with a small drill and a screwdriver. We attach the plugs with superglue for plastic.
Batteries
You can get sufficient voltage using two lithium-polymer batteries. Batteries from an old laptop will do. We connect them in series and wrap them with electrical tape. We bring contacts from insulated copper wire to the engine through a switch button.
Putting the elements together
First, we connect the engine, solder the wiring and insulate the contact group with heat shrink. We fix the motor with the collet chuck on the cover, and mount the switch button on the side of the body using glue, making a hole for it and leveling it with a file. The connected batteries must fit perfectly into the size of the PVC tube. The assembly is completed by a 5.5 mm jack for charging batteries. We attach it to the back cover using a clamping nut. We solder the contacts from the batteries to the connector, insulating them with heat-shrinkable casings. The joints of the plugs and the tube can be additionally covered with superglue and cleaned with sandpaper.
Reviews
Most patients have unpleasant memories of visiting dentists from childhood, which were reinforced by the pain of the procedure for cleaning carious cavities and the sharp sound of a working drill.
Modern installations are completely devoid of these disadvantages and allow the treatment process to be carried out quickly and effectively, without discomfort.
Tell us about your impressions of the impact of the drill on the tooth surface in the comments section.
If you find an error, please select a piece of text and press Ctrl+Enter.