Horseshoe stand
Two horseshoes facing in different directions are welded to each other. Another double pair of horseshoes is made. Another horseshoe is welded on top of each pair, with the free end up.
Both structures are welded into one - in this way. Place on the rib with the lower part. Then the upper horseshoes are connected with a metal rod, which is welded along the lower edge.
A horseshoe is welded on top of the upper horseshoe at a right angle, the free end of which will look back. To her second, third. And further. Until the end. Until the topmost one is welded to the side horseshoe on that side of the structure.
The result was a design that:
- convenient for boots;
- looks unusual.
And in addition, a novice welder was trained. Welding done many times in a short period of time reinforces the skill and brings practical benefits.
We recommend reading:
Crafts made from epoxy resin - stylish, original and beautiful products and decorations made from epoxy (110 photos)Crafts from seeds: step-by-step instructions and tips for choosing the most beautiful ideas for crafts
Crafts from airy plasticine - ideas for creating beautiful crafts, the main steps and a description of how to make a craft correctly (100 photos)
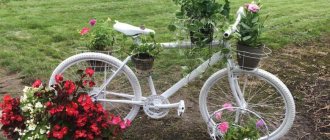
DIY garden crafts.
Owners of old Soviet chandeliers probably immediately recognized what the “water” in this original garden stream was made of.
So, if you have an old chandelier with transparent plastic or glass pendants, then you can make yourself such beautiful crafts for your garden. This option is made with a watering can - we attach beads or pendants to a wire, thread it through the spout of the watering can and attach a nail to the inner end of the wire - it will hold our flow of beads.
The number of beads depends on the size of the watering can - if the watering can is large, there should be a lot of them so that they can be seen from afar. The watering can can be hung on a tree, or attached to a rod in the middle of the flowerbed.
A water faucet can also be decorated with a bead - if the faucet is operational, then it is better to consider a cover for the spout that would be convenient to remove.
For those who do not have an old chandelier with pendants in stock, we offer another project: we concrete the metal rods on a small area, and attach a watering can to their upper ends.
You can leave our original craft in this form, or you can put a container with flowers below or create a flower bed.
Other eccentricities
To train a novice welder, here is another design that can be made. Deer. Made of metal rings. Metal rings with a diameter of 5–6 cm are taken and they begin to be welded to each other on the ground.
Here you need to have rich imaginative thinking. So that when creating one side of the elk, do not forget to start raising the body of the elk in time. It is better to use brick fragments for this. So weld the rings, gradually raising the body of the elk, which lies on its side on the soil.
As you go along, you can come up with new ways to support the rings before welding. Hundreds of rings will go into the entire craft.
But the result is amazing. When the moose is put on its feet. An openwork head, a three-dimensional model of the body, elk antlers - everything is clear and visible. Such a creation can even be taken to an exhibition.
Original crafts for the garden.
Look around - is there any metal mesh left in the barn after renovation? Excellent material for garden lamps.
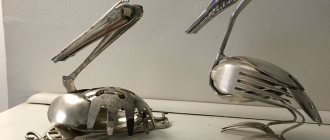
If you have old spoons lying around, teach your son how to solder, and he will be happy to remember the funny things he did as a child with his father.
After all, such crafts for the dacha show that we not only know how to work well, but are also able to have fun and relax from the heart.
Create your own mood - make your own version of original garden crafts at your dacha.
Introduction to metalworking
The school produces metal crafts, grade 5. Boys can do this. Tin rose. Cut petals from tin. A connecting ring of a suitable size will help to put them together.
We recommend reading:
- Can compulsory motor liability insurance be issued by someone other than the owner?
Stencils for crafts - beautiful stencils and a master class on making beautiful crafts (125 photos + video)
Crafts with a jigsaw - 85 photos and videos on how to cut beautiful jewelry and crafts with a jigsaw
Then coat all metal parts with appropriate paint. Paint the petals especially carefully with red paint. The result will be an excellent rose. So already in the 5th grade, children can get acquainted with metal work.
True, before such work, the labor teacher should remind you to be careful when working with metal and scissors for cutting metal.
Metal products with steel wire
The British National Academy of Sciences declared in 1856: “Everything that can be invented has long since been invented,” but time has shown a different outcome. So it is now. Every year new ways of decorating are invented.
Read here: Crafts from candy wrappers: master class and ideas for making various decorations with your own hands (75 photos)
For example, in recent years it has been fashionable to make a figure from wire or rod. Combinations and special weaves create an impression of indescribable beauty.
Everything has its time
Such crafts from thin sheet metal can be made as early as 5th grade. Boys learn everything else, crafts involving welding, as well as work related to drilling, in high school.
This is initial, basic knowledge about metal and working with it. Basically, children's metal crafts come down to gluing and joining ready-made products.
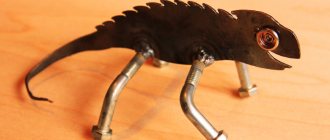
You can connect bolts, nuts, washers and twist them with wire. By collecting them in a certain way, you can get the figure of a horse, wolf, or man.
Working with wire gives children a lot of scope for creativity. Especially soft wire with braid. There will be no more wounds or injuries to children. Therefore, a safe way to create crafts is very important.
Starting from 1st grade, working with wire is encouraged. Unlike heavy and hard metals. Why should fragile, inexperienced children be allowed to work with blanks of metal? So they don't give it. And it is right.
Bench in the garden
DIY iron welding crafts for the garden include, first of all, a garden bench. At the dacha you should not only work, but also find time to relax. It is better to do this in the fresh air, sitting on your favorite bench, made independently and to your taste.
In this case, in addition to iron, you will need wooden boards, slats or beams, which will be laid on a durable metal frame. You can make a bench completely metal, but sitting on it will not be so comfortable.
The shape of the benches can be different:
- with or without backrest;
- narrow or wide;
- single or combined with a table.
The shape of the metal profile can also be different, for example, steel angles, fittings, thin pipes. In addition to the benches, you can make a table made in the same style. Such large metal crafts by welding require preliminary development of a drawing. All overall dimensions must be indicated on the drawing. This estimate will help to prepare the required amount of material, avoiding excess.
The drawing is preliminary. During production, it can be adjusted and changes made to it. The main requirement when making metal products with your own hands by welding in the form of a bench is that the frame must withstand the loads of people sitting on it, that is, be strong enough. In addition, it is necessary to take into account their height so that it is comfortable to lean on the back of the bench. It is necessary to prepare clamps for fixing large parts before starting to weld them.
First, markings are made and the parts from which the base of the bench is supposed to be made are cut into pieces. The cut end must be strictly perpendicular in order to connect the parts using the butt method. To ensure that the parallel parts are the same, one of them is made first, and then it is used as a template for the others. First, make long connections, and then proceed to shorter ones.
From the obtained parts, the sides of the frame are first made. Both sidewalls should be compared with each other to avoid distortion during installation. The products to be joined must be adjusted to each other and firmly secured with clamps. If the shape of the legs is bent, then you will have to use not only a ruler, but also your own eye.
Welding must be done according to preliminary markings made using a marker. To grab the metal parts to be joined, spot welding is first done, and then the main seams are made. To stabilize the bench, metal thrust bearings can be welded to the base of the legs.
After completing the manufacture of the frame for the bench, scale is knocked off the seams with a special light hammer. This must be done carefully so as not to damage the appearance of the product. If untidy deposits of metal appear, they are removed with a grinder. All surfaces are treated with a wire brush.
After this, all that remains is to cover the metal welded frame with wooden boards and you can sit on a bench made by yourself. Having gained this experience, you can begin building a gazebo on your site.
Makings of a metal sculptor
The time will come when children, especially boys, will bend nails and make crafts out of them, just like they once did out of matches. Cutting metal with a hacksaw. Chop with a chisel. Solder with a soldering iron.
And let not everyone understand metal sculpture. The main thing is that he will do it. A heavy structure, which is all made of metal. There is a horse on a metal pedestal. And on the horse there is a rider in the saddle.
Monument to the Horseman - this sculpture will be called. You just have to want it, the sculpture will be created. Because the boys in labor lessons in high school have already grasped the rudiments of knowledge of metalworking.
Beautiful crafts for the garden made of glass.
Do-it-yourself garden crafts are a simply inexhaustible topic! We will also use the leftover dishes and make a garden angel out of them.
It is not necessary to make your first experiment on unnecessary crystal dishes - you can easily start with ordinary bottles, old salt shakers and glass salad bowls. We connect everything using universal glue. If our base is a bottle, we will also need a metal rod on which we will place our figure.
Oddly enough, such crafts made from scrap materials can be quite functional, for example, a lampshade for a garden lantern.
If not every form of dishware is suitable for a garden angel, then almost everything that is not needed in the household is suitable for magic glass flowers - plates, saucers, vases, bowls, etc.
We select the shape of the flower from the availability of unnecessary dishes - it is not necessary to take only transparent ones; the basis for the flower can easily be an ordinary plate. Glue the dishes together with universal glue.
Think in advance about how you will attach this flower in the garden. There are two options: the first - on the back wall of the flower you glue a bottle (jar, vase, etc.) - a container that can be put on a rod.
The second option is to simply glue a piece of plastic pipe to the plate and put it on the rod.
There are simply a sea of options for such colors: different shapes, colors, combinations... try it!
Photos of metal crafts
1+
1
Example of work
The original idea is to create a metal owl. To do this you will need a stencil or template that can be made from paper. A drawing is applied to it. The design is cut out by applying it to a steel sheet.
An owl is trimmed with a grinder. Eyes are made by drilling holes. If the body is created, you can move on to the details:
- legs are made from a rod;
- any irregularities that appear are straightened with a grinder;
- the owl is treated with a special anti-rust agent;
- metal is painted.
Roses made of iron look great.
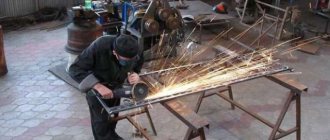
To make them you will need a welding machine, a hammer, a steel sheet, a grinder, and metal scissors. Welding work must be performed with gloves and a protective mask. Initially, 30 rose petals are cut out with metal scissors. During the cutting process, it is recommended to move from 15 to 80 mm. To keep the petals smooth, a sharpening stone is used. Since the base of the bud is ready, you will need to twist the steel cable into a spiral. To do this, use pliers. The petals are welded to the trunk one by one. If the flower is ready, the spikes are fixed with a welding machine. Seams and excess are cleaned with a grinder. The top of the rose is covered with protective paint.
Butterfly and patterns
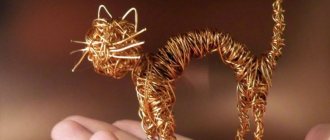
Steel wire allows you to make shapes of different sizes. For example, you can do a butterfly. Experts advise using medium-thick wire for this. This material bends without problems. The body is created through spiral turns. The wings are made separately from two ovals. The last elements are fixed to the body.
Step-by-step DIY crafts made from galvanized sheet metal using a welding machine:
- Making a sketch of the entire product and its elements.
- Transferring the pattern to raw materials.
- Tenderloin with a grinder.
- Edge protection.
- To create the image of feathers, a notch is applied with a hammer and chisel.
- Formation of the beak and remaining body parts.
- Connecting elements together.
- Cleaning the metal surface from rust.
- Varnish coating.
Flowers and leaves
Floral patterns decorate windows and fences in an original way. Using a bouquet of roses, you can decorate the room yourself. Hot and cold forging is used to make branches, flowers and leaves.
Stages of work using the latest technology:
- Cut out a cardboard pattern of a sheet of the desired shape.
- Transferring an image to metal.
- Cutting out the sketch and sanding the edges.
- Removing burrs, cleaning and grinding the surface.
- Application of veins to raw materials.
- Fine execution of petals by beating them with a hammer.
- Folding the edges with round pliers.
- Fixing the finished forms on the branch.
- Coloring of the finished product.
To make patterns and flowers durable, medium, soft and hard grade steel is used. Experts advise using raw materials with 0.25% carbon. Steel should not contain phosphorus, chromium and sulfur. Experts consider the following to be original ideas for products for a summer cottage made from scrap metal:
- The barrel is cut lengthwise. Shelves are installed inside, and wheels are installed at the bottom. The resulting cabinet can be used to store small items.
- To make a coffee table, it is recommended to cut the barrel crosswise.
- If you decorate the walls of the barrel with openwork carvings and build a dining set, you can make a table and chairs.
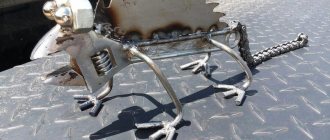
- To create fairy-tale characters, they use unnecessary garden tools and pipes.
- Furniture made from profile pipes is installed at the dacha. The raw material is considered practical and inexpensive. It allows you to create different things: a greenhouse, furniture. Pipes go well with plastic and wood.
The original solution is to make a bench from a profile pipe with a cross-section of 0.03x0.03 m and a length of 11 m. You will need boards 2.3 m long and 0.06 m wide. If possible, a greenhouse will be built.
To create toys or jewelry, you can use old things. Tin and aluminum are considered soft metals. It is convenient to use for making dragonflies and other animals.