Lighting for home comfort
Why is acrylic edge lighting convenient, and why is this technology used in interior solutions? Firstly, it is beautiful, as it creates a diffused stream of light that is pleasing to the eye. Secondly, it is practical. The use of solutions with this technology allows you to arrange lighting with minimal energy consumption. And thirdly, often only the edge lighting method allows one to achieve the desired decorative and practical effect.
Illumination of acrylic panels is used in home interiors in the following cases:
- for illuminating ceiling panels;
- to create a false window with backlight;
- for illuminating kitchen apron panels;
- for illuminating organic glass shelves;
- for illuminating staircase handrails made of acrylic;
- for creating framelights as decoration elements.
Framelight is a light panel where you can insert posters with images. Posters can depict a painting in any style, landscape or photograph. Its beauty is that the printed image can be replaced, and this is quite easy to do. If such a light panel is placed in a dimly lit area of an apartment or house, then, in addition to its aesthetic value, it also carries a very practical load, creating additional lighting.
Do-it-yourself illumination of plexiglass with LEDs - Metalist's Handbook
Plexiglas for edge lighting is a beautiful and practical solution for a home, apartment, or office.
Light spreads and refracts evenly through the canvas. Thus, a cozy atmosphere is created in the room.
The drawing on the wall looks organic, not only performing a decorative function, but also illuminating the space at any time of the day.
In the interior, edge lighting is used for several reasons. Firstly, it looks unusual, creating a diffused light flux. Secondly, this solution is practical: it is possible to organize high-quality lighting that consumes a minimum of electricity. And the final argument is the combination of aesthetics and functionality.
Edge lighting can provide a pleasant atmosphere in the home
Canvas lighting is used in tandem with the following designs:
- ceiling panels;
- false windows or framelights;
- kitchen apron panels;
- shelves;
- handrails of stairs, etc.
Read more: plexiglass apron for the kitchen.
In fact, you can turn any idea into reality.
: "Profile for edge lighting"
From this video you will learn how to make a profile for end lighting.
The design of end lighting in combination with a false window is popular today. Framelight is a panel where a poster with an illustration is placed. Any landscape, photo or painting takes on a new look. In addition to its decorative function, the unique panel creates additional lighting.
The design is delivered ready-made; the user needs to insert a poster with an image. Often, an imitation of the view from a window, different landscapes, or photos are used as a picture.
The poster can be easily replaced at any time. A summer street can easily be replaced by an autumn park or a winter forest. Framelights are easy to use, as they are equipped with a click profile.
Due to this, the upper part snaps off and the protective module is removed. A variant with a “Magnetic” design is also used. His system uses magnets to secure the canvas.
Using a false window, you can imitate any view from the window that you want
Step-by-step instruction
Designing glass for edge lighting is within the capabilities of any homeowner. About the features of the process in order:
- We cut out a light panel of the required size and shape from plexiglass. To do this, we use a hacksaw, jigsaw, etc.
- We process the edges and make a recess at the end for the LED components.
- We apply the design to self-adhesive paper and glue it to the canvas.
- Using a scalpel, cut out the outline.
- Using an electric drill, we engrave the glass along the marked line.
: DIY engraving on plexiglass.
Now you need to assemble the circuit. We take the LEDs and solder them to their positive terminals via a resistor. We insulate the contacts with heat shrink. Using acrylic glue, we attach the LEDs to the end holes of the canvas. To check the serviceability of the system, we connect the pluses and minuses along the wires and attach them to the battery holder.
The result is an excellent night lamp, assembled yourself.
You can make a beautiful lamp from plexiglass if you follow the instructions
Materials and tools
Have you decided to make your own edge lighting? Make sure you have everything you need at hand:
- acrylic canvas;
- aluminum profile;
- LED Strip Light;
- small 12V power supply.
If the panel is to be placed in a room with high humidity, a special tape is needed. Are you considering a false window as an auxiliary light source? Then you will need an LED strip with increased performance.
Tools usually include a hacksaw, electric jigsaw, drill, fastening components, etc.
To operate the plexiglass lamp you will need a 12V power supply.
Acrylic preparation
It is important to ensure uniform illumination of the panel. We will need high quality acrylic. A balanced, rich glow is guaranteed by diffuse components.
They appear in acrylic sheets during its special preparation. It is impossible to perform such processing at home, so you need to purchase a ready-made canvas that meets all the parameters.
The thickness of the plexiglass is determined taking into account the dimensions of the light panel.
The ends in acrylic fabric must be polished. In the piece where there are no LED components, we apply reflective material. During production, acrylic is covered with a protective film. It prevents damage to the canvas and redistribution of light. Remove the film before installing the structure in the profile.
Profile assembly
Aluminum profile components are at your disposal. We cut them to the required sizes at an angle of 45°. Then we connect the parts using the corners.
Three sides are ready, now we install LED components throughout the entire interior. We connect the wires in advance to ensure contact with the power supply. The 12V adapter is capable of providing energy to a tape up to 5 m long.
We screw at least 4 fasteners to the top of the profile for further installation on the wall.
Aluminum profiles for false windows must be mounted at an angle of 95°
Working with the light panel
Three sides of the profile are assembled and the LED components are secured, we begin the installation of the light panel. We need a reflector - a sheet that reflects light. Let's add it to your profile.
We also add an acrylic sheet, a film with an image, and a protective coating to the design. We install the canvas above the LED components. This promotes good light scattering.
At the end we attach the last side of the profile.
An important nuance: the poster must be printed on backlit film - this way good light transmission is achieved. To make the structure more rigid, a backdrop of sufficient thickness is inserted into it.
Wall mounting
The light panel is ready, now you need to secure it. Hooks are mounted to the wall using dowels. All that remains is to hang the false window and connect the power supply.
Using simple technologies, you will be able to create a modern design in any room on your own. Acrylic edge lighting will create a cozy atmosphere and, if necessary, perform a practical function.
Engraving on plexiglass: description of the process
Laser engraving on plexiglass is the application of an inscription or design and is considered one of the most popular technologies today. The images obtained during engraving are interesting, attractive and unique.
Beautiful engraving on plexiglass
Laser technology allows you to apply inscriptions even on small and very fragile products. Today, new technology is capable of creating vector drawings and raster photographs in any resolution on the surface of plexiglass.
All this has found application in advertising and trade structures, and in the production of souvenirs. Images look interesting if illumination of the engraving on plexiglass takes part in the design.
This decoration element is used in advertising signs.
Engraving technology
Images on plexiglass will look different on artificial glass, it all depends on the technology used to produce the glass.
If plastic glass is made using casting, then the surface of the engraving will be soft, similar to velvet, but on the surface of extruded acrylic the image will be rough and grainy in structure.
By using the depth of engraving and adjusting the angle of the beam, you can achieve quite different and delightful effects in the decoration. For example, inscriptions with shadows appear in images or images with a mirror image are obtained.
All this is successfully used when creating signs with three-dimensional letters or backlit signs.
Laser engraving process
Engraving on plexiglass is always applied from the back side of the acrylic plate product, since it is more convenient to view the entire front side, where the carved image is obtained.
The process begins by removing the protective layer from the side of the surface on which the image is planned to be applied. On the front side, the engraver leaves the protective layer intact so as not to accidentally damage the surface.
Removal of a layer from the workpiece material occurs with a focused laser beam at the highest power.
This process is what causes the planned image to appear; it is based on raster technology, when a laser beam burns not lines, but dots.
The image on the surface is obtained by correct control of all parameters of laser radiation. The quality of the image depends on the properties of the substance in the material on which the design is applied.
On organic glass, engraving should be done with low power, but at high speed. The quality of image application depends on the power. For example, to create notches on the surface, you need to select a small power; if you increase it, the product may be deformed.
Hand engraving of organic glass
Engraving cannot always be done on a machine; if you have a special tool, engraving can be done at home. To engrave with your own hands, you will need an “engraver” machine.
Before you begin the engraving process yourself, watch a video about the operation of the engraving machine. The process itself will be easier if you follow it step by step according to the instructions:
- Prepare a sketch; if you do not have the talent of an artist, then look at the pictures in the photo, maybe this will help your imagination.
- The prepared drawing will need to be copied onto the surface of the plexiglass. Everything is simple with this: plexiglass is placed on the image and the picture is drawn using a felt-tip pen.
- The device is operated using a flexible shaft; it regulates the cutting part of the mechanism.
- Engraving is carried out with the cutting part of the nozzle, which can be different, depending on the design.
- In order for the process to go well, you need to “rehearse” a little on the remains of plexiglass. This way you can choose the right nozzle for your drawing.
- Just like with machine engraving, you don’t need to work at high power, as you can damage the surface of the product.
- The whole process boils down to the fact that the nozzle is sunk to the planned depth.
- Of course, an experienced master will be able to keep the nozzle at the same level, but a beginner will have to make a limiter using adhesive tape or tape.
- During the engraving process, dust will accumulate on the surface; you should not remove it with a rag; you can scratch the surface, so use a vacuum cleaner.
How to make false windows using ready-made framelight profiles
Let's consider one of the options for an interior solution: acrylic end lighting when creating a false window. Sometimes in rooms without windows or where there are not enough of them, designers practice creating false windows. If previously photo wallpapers were used for these purposes, now ready-made light boxes - framelights - can be used as an imitation. They are supplied fully equipped, all that remains is to supply a poster with a suitable image. This can be an imitation of the view from a window with a drawn window profile or a landscape you like. For complete realism, the framelight can be supplemented with an overhead imitation of window sashes.
The ability to replace the poster without much difficulty allows you to change the “outside” picture from time to time. For example, change the view of a summer street to an autumn landscape. This is achieved by the fact that framelights are equipped with a click profile. It allows you to snap off the top panel of the profile and easily remove the protective module. There is another option: acrylic edge lighting, Magnetic profile. The peculiarity of this profile is that the upper part is attached to the lower part using a system of magnets.
Installation instructions for LED elements
- For the base we take a circuit board, which can be purchased at any radio-electronic goods store. You can disassemble some old electrical device that is unsuitable for use (in this case, the board needs to be cleaned of unnecessary elements).
- Important! We first check each board for functionality so that our work is not done in vain. Particular attention should be paid to the LED contacts; if necessary, we clean them additionally and then narrow them.
- Next, we assemble the constructor: we solder four pre-prepared boards to the capacitor, and insulate the entire structure with a special means. We check the quality of the connection between individual diodes.
- The boards must be located at the same distance from each other. This is necessary for uniform distribution of lighting during operation of the lighting device.
- We solder a 10 uF capacitor without additional wires, a 100 Ohm resistor (to any board). We insulate all contacts.
- The product is ready! We check the functionality.
Engineering thought that solves exclusively pragmatic problems sometimes leads to unique results in the aesthetics of our everyday life. One such solution is acrylic edge lighting. Initially, this technology was used to create optical fiber, then in the advertising field, and now it is actively used in home interiors.
Materials for self-assembly of the light panel
DIY acrylic edge lighting can be a fun project if you like to DIY at home. To install the light panel you will need:
- acrylic canvas;
- aluminum profile;
- LED line or strip;
- compact power supply (adapter) for 12V.
LED strip is a flexible printed circuit board on which LEDs are fixed on one side and an adhesive layer is applied on the other for attachment to an aluminum profile. If you intend to install an imitation window in a bathroom or other rooms with high humidity, then you should buy a special moisture-resistant tape. If you are using a false window as a light source, you must purchase a heavy-duty LED strip. You can calculate the power of the adapter using the formula: the power of the block is equal to the power of the LED strip multiplied by its length in meters.
Choose a one-sided profile for the light panel. Pay attention to the following characteristics: profile thickness and lighting system. Profiles can be designed for fluorescent lighting or for mounting LED strips. Since the thickness of the panel is important for a false window, LED lighting is considered. For edge lighting, the most important thing is the type and characteristics of the material, so we will consider its choice separately.
Effects based on glass backlight
An article about how to make glass-based lighting with your own hands.
Decorative glass lighting is used to achieve unusual effects: “sky” on the ceiling of a house, decorative “windows” in the walls, replacing a wall or part of it with a transparent luminous surface, etc. All this will help to visually expand the room, visually remove the boundaries between the interior and the rest of the surrounding space. Today, LEDs and LED strips are most often used to create decorative luminous panels. This is due to the large number of advantages characteristic of LEDs. First of all, LEDs and LED strips are very small in size and they do not emit thermal radiation. Thanks to this, LED light sources make it possible to illuminate places that are difficult to reach for other light sources without any problems, and, at the same time, they do not require leaving significant spaces behind the panels to accommodate lighting equipment and ventilation. The emission of LEDs covers the entire visible part of the spectrum, due to which it is capable of realizing a wide variety of light-dynamic effects. In this case, the emitted light can be colored in many colors. If you use frosted glass or acrylic to illuminate the elements, then the light from the LED strip is scattered very well, while highlighting the elements clearly. The use of converters with brightness changes (dimmers) will allow you to adjust the brightness of the light. Thus, the panel may look different at different times: for example, daylight will be replaced by a “starry sky”. Using LED strip to create decorative luminous panels, you will decorate the interior and make it unique. Let's look at the most popular options for using glass backlight. 1. Illumination of stained glass windows
Acrylic for edge lighting: description and application
The panel should be illuminated evenly. This requires a certain acrylic for edge lighting, the processing of which was carried out according to all the rules. A uniform bright glow is provided by colorless diffuse particles that appear in acrylic sheets during special preparation of the sheet. At home, it is impossible to achieve such a degree of uniformity and intensity of glow, so it is necessary to purchase plexiglass of the required thickness and suitable in other respects. The thickness is selected based on the size of the light panel.
| Panel width Backlight on one side | Panel width Illumination from two to four sides | Sheet thickness, mm |
| up to 150 mm | up to 300 mm | 4 |
| 150—300 mm | 300—600 mm | 4,6,8,10 |
| 300—600 mm | 600—1200 mm | 4,6,8,10 |
| 600—1200 mm | 1200—2000 mm | 8,10 |
As can be seen from the table, for a light panel imitating a window, an acrylic sheet with a thickness of at least 8 mm is suitable. You will find on the manufacturers’ websites not only the acrylic itself for edge lighting. The description and application of each type are given in detail, so it will not be difficult for you to navigate the thickness of the sheet and its parameters.
Separately, it should be clarified that the ends that will be illuminated must be well polished. The same sides where the LED strip will not be installed should be covered with reflective tape. If the acrylic sheet was cut using laser cutting, then additional polishing is not needed. Another important note is that any damage to the acrylic will lead to a redistribution of the light flux, which is why the sheets are covered with a protective film. It only needs to be removed immediately before installation in the profile.
Do-it-yourself plexiglass illumination with LEDs - Metals, equipment, instructions
Engineering thought that solves exclusively pragmatic problems sometimes leads to unique results in the aesthetics of our everyday life. One such solution is acrylic edge lighting. Initially, this technology was used to create optical fiber, then in the advertising field, and now it is actively used in home interiors.
New technologies in home interiors
The basis of the edge lighting method is the property of light rays to be refracted, or the effect of total internal reflection. The flow of light, entering the end part of the plexiglass, is scattered and illuminates its front surface. Photos of light panels in the interior of a house clearly demonstrate what acrylic end lighting looks like.
Lighting for home comfort
Why is acrylic edge lighting convenient, and why is this technology used in interior solutions? Firstly, it is beautiful, as it creates a diffused stream of light that is pleasing to the eye. Secondly, it is practical.
The use of solutions with this technology allows you to arrange lighting with minimal energy consumption.
And thirdly, often only the edge lighting method allows one to achieve the desired decorative and practical effect.
Illumination of acrylic panels is used in home interiors in the following cases:
- for illuminating ceiling panels;
- to create a false window with backlight;
- for illuminating kitchen apron panels;
- for illuminating organic glass shelves;
- for illuminating staircase handrails made of acrylic;
- for creating framelights as decoration elements.
Framelight is a light panel where you can insert posters with images. Posters can depict a painting in any style, landscape or photograph.
Its beauty is that the printed image can be replaced, and this is quite easy to do.
If such a light panel is placed in a dimly lit area of an apartment or house, then, in addition to its aesthetic value, it also carries a very practical load, creating additional lighting.
Let's consider one of the options for an interior solution: acrylic end lighting when creating a false window. Sometimes in rooms without windows or where there are not enough of them, designers practice creating false windows.
If previously photo wallpapers were used for these purposes, now ready-made light boxes - framelights - can be used as an imitation. They are supplied fully equipped, all that remains is to supply a poster with a suitable image.
This can be an imitation of the view from a window with a drawn window profile or a landscape you like. For complete realism, the framelight can be supplemented with an overhead imitation of window sashes.
The ability to replace the poster without much difficulty allows you to change the “outside” picture from time to time. For example, change the view of a summer street to an autumn landscape. This is achieved by the fact that framelights are equipped with a click profile.
It allows you to snap off the top panel of the profile and easily remove the protective module. There is another option: acrylic edge lighting, Magnetic profile.
The peculiarity of this profile is that the upper part is attached to the lower part using a system of magnets.
Materials for self-assembly of the light panel
DIY acrylic edge lighting can be a fun project if you like to DIY at home. To install the light panel you will need:
- acrylic canvas;
- aluminum profile;
- LED line or strip;
- compact power supply (adapter) for 12V.
LED strip is a flexible printed circuit board on which LEDs are fixed on one side and an adhesive layer is applied on the other for attachment to an aluminum profile.
If you intend to install an imitation window in a bathroom or other rooms with high humidity, then you should buy a special moisture-resistant tape. If you are using a false window as a light source, you must purchase a heavy-duty LED strip.
You can calculate the power of the adapter using the formula: the power of the block is equal to the power of the LED strip multiplied by its length in meters.
Choose a one-sided profile for the light panel. Pay attention to the following characteristics: profile thickness and lighting system.
Profiles can be designed for fluorescent lighting or for mounting LED strips. Since the thickness of the panel is important for a false window, LED lighting is considered.
For edge lighting, the most important thing is the type and characteristics of the material, so we will consider its choice separately.
Acrylic for edge lighting: description and application
The panel should be illuminated evenly. This requires a certain acrylic for edge lighting, the processing of which was carried out according to all the rules.
A uniform bright glow is provided by colorless diffuse particles that appear in acrylic sheets during special preparation of the sheet.
At home, it is impossible to achieve such a degree of uniformity and intensity of glow, so it is necessary to purchase plexiglass of the required thickness and suitable in other respects. The thickness is selected based on the size of the light panel.
| Panel widthLighting on one side | Panel widthIlluminated on two to four sides | Sheet thickness, mm |
| up to 150 mm | up to 300 mm | 4 |
| 150—300 mm | 300—600 mm | 4,6,8,10 |
| 300—600 mm | 600—1200 mm | 4,6,8,10 |
| 600—1200 mm | 1200—2000 mm | 8,10 |
As can be seen from the table, for a light panel imitating a window, an acrylic sheet with a thickness of at least 8 mm is suitable. You will find on the manufacturers’ websites not only the acrylic itself for edge lighting. The description and application of each type are given in detail, so it will not be difficult for you to navigate the thickness of the sheet and its parameters.
Separately, it should be clarified that the ends that will be illuminated must be well polished. The same sides where the LED strip will not be installed should be covered with reflective tape.
If the acrylic sheet was cut using laser cutting, then additional polishing is not needed. Another important note is that any damage to the acrylic will lead to a redistribution of the light flux, which is why the sheets are covered with a protective film.
It only needs to be removed immediately before installation in the profile.
Assembling the profile and connecting the backlight
Purchased whips (pieces of aluminum profile) are cut to the required sizes at an angle of 45º. After this, they are connected to each other using corners. When the three sides are assembled, you need to install an LED strip around the perimeter of the inner one.
First, wires are connected to the tape with which it will be connected to the power supply. There is an important point here: one 12V power supply is designed for no more than five meters of tape.
If there is more, you need to connect two power supplies. Each tape is connected separately; there is no need to connect them together.
There is another option - take a 24V adapter, then acrylic edge lighting is possible by connecting two LED strips in series.
Light panel installation
After the three sides of the profile have been assembled and the LED strip has been installed, you can proceed to the direct installation of the light panel. To do this, add the following to your profile:
- A reflector is a sheet that will reflect light.
- Cast acrylic sheet.
- Film with a printed image.
- Protective sheet.
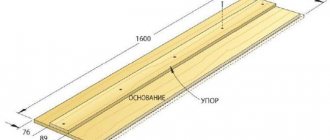
The installation procedure is clearly visible in the figure. The acrylic sheet must be installed so that it is located above the LED strip, because it is the main light-diffusing element. After installing all the components, the last side of the profile is fixed.
The role of a reflector can be performed by a special reflective sheet. It can be purchased together with light-diffusing acrylic. Companies that sell plexiglass (acrylic) for edge lighting will offer both a reflector and a protective coating. But any reflective fabric can act as a reflector.
For the protective fabric, you can use thin transparent acrylic or dense light-transmitting film. There are certain requirements for the poster. It must be printed on a special film with backlite coating.
To make the structure rigid, you can insert a backdrop into the profile, but you just need to remember to take this into account when purchasing the profile - its thickness should be sufficient for all layers of the panel.
The final stage
When assembling an aluminum profile, it is necessary to screw fasteners (hangers), at least 4 pieces, to its upper part. Once the lightbar is fully assembled, it's time to install it on the wall. To do this, hooks are attached to the wall using dowels. After this, all that remains is to hang the false window and power the power supply.
Thus, using technological innovations, you can independently create an ultra-modern design. Acrylic edge lighting is a bright representative of such technologies; with its help you can create many interesting interior solutions.
Assembling the profile and connecting the backlight
Purchased whips (pieces of aluminum profile) are cut to the required sizes at an angle of 45º. After this, they are connected to each other using corners. When the three sides are assembled, you need to install an LED strip around the perimeter of the inner one.
First, wires are connected to the tape with which it will be connected to the power supply. There is an important point here: one 12V power supply is designed for no more than five meters of tape. If there is more, you need to connect two power supplies. Each tape is connected separately; there is no need to connect them together. There is another option - take a 24V adapter, then acrylic edge lighting is possible by connecting two LED strips in series.
LED glass lighting
Decorative glass lighting is designed to create unusual effects in the interior: “sky” on the ceiling of an apartment, decorative “windows” in the walls, replacing a wall or part of it with a transparent luminous surface, etc. This allows you to visually expand the room and erase the boundaries between the interior and the surrounding space.
LEDs are most often used to illuminate panels.
. This is explained by the combination of LEDs with several properties that are important for lighting of this kind. LEDs are very small and do not emit infrared (thermal) radiation. This means that the LED strip allows you to easily illuminate places that are difficult to reach for other light sources, without requiring you to leave significant spaces behind the panels for lighting equipment and ventilation. The emission of LEDs covers the entire visible part of the spectrum, allowing for the implementation of various light-dynamic effects. In this case, the resulting light can be painted in many color shades (it is characterized by purity and a large number of shades). When used to illuminate elements made of frosted glass or acrylic, the light from the LED strip is very well diffused and brightly highlights these elements.
The use of converters with dimming (changing brightness) will allow you to adjust the brightness of the light. At the same time, you can control the glow of the panel either manually, using the remote control, or automatically. This means that the panel (for example, playing the role of a “window”) may look different at different times: daylight will be replaced by a “starry sky”. From now on, only you decide what is outside the window now: day or night! Using LED strip and glass panels you can decorate your interior and make it unique.
If you have any difficulties in choosing equipment, then you can contact our specialists to select the necessary equipment and calculate the cost of lighting.
Stained glass lighting
The use of LED strip allows you not to disassemble the stained glass window every time to replace a burnt-out lamp, because it lasts up to 10 years. Another big advantage is the absolutely even illumination of the stained glass window.
when laying the LED strip in a “spiral”.
Illuminated glass engraving
Glass can be engraved with a laser machine
. The light of an LED strip applied to the end of the glass panel will highlight the engraving and give it the desired color.
Uniform illumination of frosted glass
If the walls of the room are made of frosted glass and illuminated from the inside with LED strip
, then it will be possible to create a very interesting, colorful and dynamic atmosphere. And the lighting and dynamics modes can be simply switched using the RGB controller remote control.
Uniform illumination of the glass end
To obtain a uniform glow, it is recommended to make the front end of the shelf matte
, and the end adjacent to the LED strip must be transparent.
Frosted glass edge lighting
Frosted glass products can be very interesting interior design elements. For example, you can illuminate frosted glass shelves using an LED strip mounted in a metal profile
.
Source
Light panel installation
After the three sides of the profile have been assembled and the LED strip has been installed, you can proceed to the direct installation of the light panel. To do this, add the following to your profile:
- A reflector is a sheet that will reflect light.
- Cast acrylic sheet.
- Film with a printed image.
- Protective sheet.
The installation procedure is clearly visible in the figure. The acrylic sheet must be installed so that it is located above the LED strip, because it is the main light-diffusing element. After installing all the components, the last side of the profile is fixed.
The role of a reflector can be performed by a special reflective sheet. It can be purchased together with light-diffusing acrylic. Companies that sell plexiglass (acrylic) for edge lighting will offer both a reflector and a protective coating. But any reflective fabric can act as a reflector.
For the protective fabric, you can use thin transparent acrylic or dense light-transmitting film. There are certain requirements for the poster. It must be printed on a special film with backlite coating. This coating provides high light transmittance. To make the structure rigid, you can insert a backdrop into the profile, but you just need to remember to take this into account when purchasing the profile - its thickness should be sufficient for all layers of the panel.
Lighting for glass shelves
Glass end lighting can either be installed manually or purchased ready-made, already attached directly to the end of the shelf. It is quite simple to arrange the lighting yourself, and there is a great opportunity to realize a unique idea.
The LED strip is placed in the profile for edge lighting of the glass. This placement ensures even distribution of light.
Note. To make the glow as uniform as possible, you need to make the outer end of the shelf matte, and, on the contrary, leave the inner end transparent.
The frosted glass backlight has a special design. To do this, a strip of LEDs is installed in an aluminum profile, and then a frosted glass shelf is attached to the profile. The matte surface allows the light to create soft diffused illumination.
The final stage
When assembling an aluminum profile, it is necessary to screw fasteners (hangers), at least 4 pieces, to its upper part. Once the lightbar is fully assembled, it's time to install it on the wall. To do this, hooks are attached to the wall using dowels. After this, all that remains is to hang the false window and power the power supply.
Thus, using technological innovations, you can independently create an ultra-modern design. Acrylic edge lighting is a bright representative of such technologies; with its help you can create many interesting interior solutions.
Design features, operating principle of LED equipment
Before you start inventing an LED lighting device yourself, it is recommended to understand its design and operating principle.
- A diode is a semiconductor element that passes electric current through itself in one direction. In the process of electron recombination, energy is generated and photons are emitted, resulting in the release of light and heat.
In an LED device, the removal of thermal energy is the main nuance that you need to pay attention to when assembling the lamp yourself, since elevated temperatures can cause premature failure of the home-made structure. Therefore, a mandatory element of the design of such a lighting device is a cooling radiator.
The simplest design of a radiator is a substrate made of aluminum, on which LED elements are placed directly. But this is not enough for complete heat dissipation in equipment with more than three semiconductors. For such lighting devices, specialized steel radiator structures are provided. In household devices, this is the chandelier body itself.
The ice product is equipped not only with a radiator. Its design also includes a diffuser and a light flux reflector, which could well be a lens and a reflector. LED elements are most often produced in a ready-made assembly.
Important! To prevent the illuminator from irritating the organs of vision with sufficiently bright light emission, it is recommended to additionally cover the body of the product with a frosted bulb.