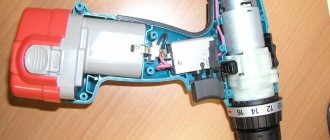
Electrical component of the angle grinder design
Over the entire period of its existence, the appearance of the instrument has remained virtually unchanged. The grinder has an oblong body in which an electric drive and gearbox are mounted. A handle is attached to the side surface of the tool to hold the tool in the working position; in addition, to protect the master, a protective casing is attached to the body of the tool to cover the working element.
The device of an ordinary grinder.
A grinder, like any tool, can fail during use. In most cases, to eliminate breakdowns, a simple repair of the working equipment, its electrical component, is required.
In order to carry out repairs, you need to know not only the structure of the mechanical part, but also the electrical circuit of the tool. To carry out high-quality repairs, you should study the principle of operation of the grinder. The electrical circuit of the grinder includes the following structural elements:
- anchor;
- collector;
- electric brushes;
- gearbox;
- stator;
- start and lock button;
- power cable with plug for connecting to a household network.
Each of the components is designed to perform certain functions in the electrical circuit, and a malfunction of any of them leads to a stop in the functioning of the device. For example, an armature is a rotating element of an electrical circuit. It ensures the transmission of rotational motion to the grinding disc. In order for the tool to function efficiently, the armature must rotate at high speed. The higher the rotation speed of this structural element, the higher the power of the device.
Operations that can be performed with a grinder
The shredder is a multifunctional tool. The driving mechanism in it is an electric motor, which through a gearbox transmits movement to a shaft with a replaceable nozzle installed on it. The general view of the device is shown in the photo below.
There are models on the market that differ in power and design:
Angle grinder (grinder) FT-1318
Professional large grinding machine 230 mm Stern AG230B
Powerful devices are powered by a three-phase voltage of 380 V, and household devices are powered by a single-phase 220 V network. There are also low-power battery models.
Angle grinder (angle grinder) can be made of different materials as follows the main types of work:
- cutting;
- Grinding;
- Polishing.
The angle grinder is designed to work with the following materials:
- Concrete;
- Metal;
- Tree;
- Glass;
- Ceramic tile;
- Stone;
- Brick;
- Plastic.
Grinding machines are widely used both in everyday life and in industrial settings. This is due to their wide functionality due to the following factors:
- A good selection of different attachments made of different materials to perform different operations;
- Possibility of fixed fixation using special fasteners;
- Some models have additional handles and several speed modes.
In this case, keep in mind that only special discs are used to process each material.
Speed controller and soft start for grinder
Both are necessary for reliable and convenient operation of the power tool.
What is a speed controller and what is it for?
This device is designed to control the power of an electric motor. With its help you can regulate the speed of rotation of the shaft. The numbers on the adjustment wheel indicate a change in the rotation speed of the disk.
Angler speed regulator
The regulator is not installed on all angle grinders.
Grinders with speed controller: examples in the photo
The lack of a regulator greatly limits the use of the grinder. The rotation speed of the disk affects the quality of the grinder and depends on the thickness and hardness of the material being processed.
If the speed is not regulated, then the speed is constantly kept at maximum. This mode is only suitable for hard and thick materials, such as corners, pipes or profiles. Reasons why a regulator is necessary:
- Thin metal or soft wood requires a lower rotation speed. Otherwise, the edge of the metal will melt, the working surface of the disk will become washed out, and the wood will turn black from the high temperature.
- To cut minerals, it is necessary to regulate the speed. Most of them break off small pieces at high speed and the cutting area becomes uneven.
- To polish cars, you do not need the highest speed, otherwise the paintwork will deteriorate.
- To change a disk from a smaller diameter to a larger one, you need to reduce the speed. It is almost impossible to hold a grinder with your hands with a large disk rotating at high speed.
- Diamond blades should not be overheated to avoid damaging the surface. To do this, the speed is reduced.
The nuances of cutting some materials
When cutting concrete, meet the following recommendations:
- Before starting work, check for the presence of pipes, fittings, and electrical wiring built into the concrete (using a metal detector or tools for searching for electrical wiring);
- To reduce dust, moisten the working surface with water (for example, from a spray bottle or brush);
- Periodically cool the cutting element with air or water.
In the absence of a tile cutter, the tile sander also cuts the tile. Experts cut uniform circles onto tiles. Cut stone and tiles in two ways:
- Wet (moisten the work area with water);
- Dry (no moisture).
In the first case, cooling improves, but the dirt remains, and in the second, a lot of dust is released. The wet method is used for large volumes of future work, and the dry method is used for one-time cutting.
Any material must be cut so that the disc sinks into it with little pressure, almost exclusively under the influence of its own weight. This is necessary to prevent disk deformation and reduce the likelihood of jamming. If the process slows down, it is necessary to replace the nozzle with a new one.
Use the sander in accordance with the operating instructions and safety instructions. The working part must rotate in the direction of movement of the tool. Be sure to turn on the device in standby mode before starting the process. In this case, there should be no vibration, heating of the grinding machine, as well as extraneous sounds from it. The circles must be used without damage. The most dangerous factor. This is a comeback. To avoid this, you should avoid jamming the wheels when cutting materials due to malfunction.
Source
Specifics of using an angle grinder
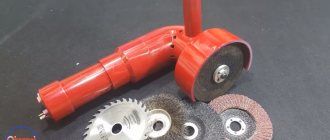
The tool has increased functionality. It can be used to clean surfaces. To do this, it is necessary to equip the grinder with special steel rods and sandpaper petals - such a circle will act as a cleaner.
How else can you use an angle grinder:
- for grinding - a concentric attachment with Velcro is screwed onto the tool. The abrasive is attached to the latter. Immediately before starting work, the functionality of the connection is checked;
- for grinding with abrasive wheels - the last component must be used extremely carefully. Overexposure may cause the abrasive to break.
By installing special cutting discs, the grinder can also be used for cutting concrete. Due to its versatility, the tool is in wide demand for any type of work.
The principle of operation of the "Bulgarian"
What is this machine, firstly, the main working part is the disk. Discs for sawing and grinding are different depending on the material you need to work with. The very process of working of the grinder is the movement of the disk attachment at enormous speed, the disk has notches, thanks to which you can saw the necessary material, and in a situation of violation of safety regulations you can get wounds and cuts.
How to Change Rotation on a Grinder
Schematic diagram of the grinder
Any craftsman who often works with metal knows the electrical circuit of an angle grinder. A grinder is a tool that is most often used for cutting metal. This tool is a source of increased danger, so you should check the serviceability of the electrical and mechanical components of the structure before each use.
Schematic diagram of the grinder.
An angle grinder, which in the post-Soviet territory is called “grinder”, was the dream of every home craftsman 3-4 decades ago. 30-40 years ago, this working tool was produced by one manufacturer, the Eltos-Bulgarka plant, located on the territory of Bulgaria in the city of Plovdiv. Currently, manufacturers offer consumers various models and modifications of this tool, but the main design components have remained virtually unchanged. Most of the structural elements on different models and modifications differ only in size.
Why do you need to change the disc on an angle grinder?
As practice shows, the problem rarely occurs at idle. This is also true when working with light wheels and grinders that have a soft start.
The problem immediately begins to appear at the moment of increasing speed and upon contact with an object that needs to be cut:
- material resistance provokes a sharp decrease in revolutions and rotation speed;
- by inertia, the angle grinder motor still rotates, engaging the gearbox and spindle;
- Often, the problem is aggravated by the high power of the grinder .
Due to the above-mentioned problems, it is not always possible to remove the disk using the usual methods. Therefore, we will consider all methods of dismantling the consumable.
How to unscrew a disc on an angle grinder when clamped with a nut
During intense cutting, the disc breaks and is clamped by the clamping nut. When such a situation arises, you can use the standard wrench that comes with the kit or a gas tool. But the mentioned means do not always provide the desired result.
The dismantling itself can be done much faster and easier. To do this, you need to perform the following operations:
- use pliers;
- use the above-mentioned tool to break the disk so that it completely disintegrates;
- You must first take care of personal protective equipment, namely a helmet or goggles.
Using protective equipment is a mandatory step. This will avoid injury due to fragments.
Next, using a metal plate (MP), grind off the remains that remain in the grinder. In this case, the metal plastic should be less than the disk in thickness.
How does stitching happen:
- The grinder turns on;
- the metal plate is clamped with pliers;
- then, the disc is carefully ground down using MP.
After completing the above steps, the nut on the angle grinder can be unscrewed without a special key.
The direction of rotation of the grinder disk. Which is correct?
Where should sparks fly from an angle grinder
?
Alex Dobry Hace 3 months
Thanks to the author of the video, everything worked as it should)))
Sasha Baloga Hace 2 meses
Most of the time it helps. but there are nuances. What a score
Rustem SHachmanov Hace 6 months
I changed the wires on the hammer drill and everything worked. Thanks to the author
maximus48ful Hace 7 months
asshole, why did you advertise like that?
Gumar Gabdrashitov Hace 8 months
spark pops and everything is as you said at the end of the video, but the direction of rotation becomes correct.
Gumar Gabdrashitov Hace 8 months
replaced the anchor on the grinder, turns it the other way, swapped the brushes, how did they start sparking wildly and getting red hot? Can you tell me what to do?
Yuri Fomichev Hace 8 meses
Hello, here’s a question for the author of the video, I turn on the grinder Bosch model is not known, it turns slowly (1 revolution per second) in the opposite direction , on itself, what is the reason, it has not yet been sorted out.
vitalik v Hace 9 months
same story, changed the stator, what should I do?
Zhenya ME Hace 9 meses
Good day! please tell me if there is a way to deliberately force the disk to rotate in the opposite direction
, and so that the brushes do not spark?
sergei z Hace 10 months
Drill IE 1035 after replacing the armature on the wrong side of the twist, the same option is possible.
Electronic device testing
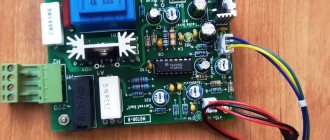
Before connecting the block to the angle grinder, let's check it. Take a surface-mounted electrical socket. Insert 2 wires into it, one of which is connected to the board, and the other to the network cable. Connect another wire to the network board. As you can see, the regulator is connected in series to the electrical circuit. Connect a light bulb to the electrical circuit and test the operation of the device.
How to cut a coffee grinder
Before you start cutting material, you need to understand which direction you want the sander to spin: spark away or spark away. There is no single answer among users; they work both ways. If the nozzle is rotated counterclockwise, the sparks (as well as the broken circle) fly out in the opposite direction from the operator, but the tool will return to the user when jammed. In the second case, the opposite happens. For safety purposes, proper rotation is considered to occur when the sparks are flying toward the operator, because when jammed, the tool will jerk in the opposite direction.
In any case, manufacturers recommend directing the movement of the angle grinder and the rotation of its wheel in one direction. This greatly reduces the chance of the drive slipping out of the slot during operation. But with this method, the markings on the material are often hidden by flying sparks.
Changing the rotation of the nozzle You can by moving the handle and cover on the other side. This is the simplest option (if possible). A more complex way is to make changes to the electrical circuit of the device. But this doesn't always help.
When cutting, it is necessary that the working plane does not change and there is no distortion. Discs must be used in accordance with the material being processed. Thus, concrete, tiles, and stone are cut with diamond-coated circles of different diameters.
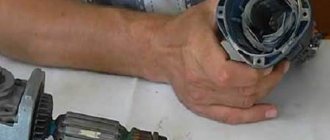
READ How to check the armature from an angle grinder with a multimeter
Minor repairs of an angle grinder
Reasons for the malfunction of the angle grinder.
If the tool does not start after pressing the start button, it is likely that the cause of the breakdown is a minor malfunction that can be fixed on your own. Diagnosis is best carried out according to the principle from simple to complex. Most often, the location of the break in the electrical circuit is the area from the power supply to the graphite brushes . During the repair process, you should remove the casing and test the circuit in the area where the electric current is supplied to the start button. If there is no current supply to the button terminals, the supply cable should be replaced.
If the electric current is supplied to the start button, but is not transported further, then the breakdown of the tool consists in the failure of the start button. If the button fails, it should be replaced. For this purpose, you should carefully disassemble the trigger mechanism and replace the start button. When connecting, you should pay special attention to the terminals, since incorrectly connecting them can lead to burnout of the tool windings.
DIY power regulator
The speed controller is installed mainly on professional angle grinders , the price of which is prohibitive for many users. In addition, many of the functional capabilities of professional grinders turn out to be unclaimed in everyday life. However, it is not uncommon for the nature of the work performed, even at home, to require the selection of the required speed of the working spindle. The option of installing a speed controller of your own production on an angle grinder is quite realistic.
The simplest regulator, based on voltage changes, is not at all difficult to assemble if you have some knowledge of work related to electrical technology. Components for the circuit : triacs, thyristors, capacitors, resistors are freely available in specialized stores. How to install such a block on an angle grinder is described in the following video. The speed control device is made as a separate unit located outside the grinder. The author installed a voltmeter on it for the convenience of monitoring the operating voltage , since with readings of about 50 V and below, the grinder may stop due to a lack of torque under load.
If you have doubts about making the regulator yourself, you can purchase a ready-made unit . This is what the author of the next video did. to mount the device in a separate box of suitable size from a housing with a lid, which already had holes for the wires to exit. Like any “Chinese” product, after careful inspection it had to be modified. For more reliable cooling, the contact points between the triac and the radiator are treated with a thermal conductive compound in order to eliminate gaps and better fit to each other. Still, 2 kW is quite a lot of power, requiring compliance with all technical standards. Testing carried out using stripping brushes (cord brushes) showed the effective operation of the working tool when selecting the optimal speed using the regulator.
Does not work
Failure of the speed controller is not a rare occurrence. The grinder may not respond to scrolling the mode setting wheel , as happens in the following video. In such cases, you should first of all inspect both the external contacts, connecting the regulator with the electrical circuit of the angle grinder, and the wiring of the internal components of the electronic circuit. In the absence of visible violations, the main cause of regulator malfunction is usually the failure of the triac . It operates in the most difficult conditions at elevated temperatures and violation of the cooling mode is the main cause of failure. To replace it, it is necessary to unsolder it from the board and install a new one with the same or similar characteristics.
Using a continuity test, the author, in addition to the triac, identified a breakdown of the capacitor plates and a burnt track of the variable resistor. Knowledge and ability to work with electronic circuits made it possible to repair the speed controller board by replacing all faulty elements.
The design of a speed controller with feedback , where a signal about the value of the rotation speed of the electric drive rotor is sent to the control microcircuit, takes place on one of the Makita models in the following video. a magnet attached to one of the ends of the rotor, using spring and retaining rings . Its absence paralyzes the work of the regulator. This defect was discovered by the author of the video, who corrected it by installing a new magnet.
How to check
Installing a hand-made speed controller, or a “Chinese” model, inside the body of an angle grinder requires considerable effort . Therefore, before assembly, you should check its functionality. Why are two wires inserted into a separate portable power socket? One of the wires is connected to the board pin, the other to one of the two wires of the network cable. The second power wire is connected to the regulator board to create a closed electrical circuit where the regulator is connected to the power load. To check the functionality of the regulator, it is enough to connect a test light and, based on the change or non-change in the degree of incandescence, draw conclusions about the possible installation of the regulator on the angle grinder.
Works jerkily
Instability of the electrical parameters of the angle grinder can cause jerky operation and spontaneous changes in shaft speed. The most common reason for such operation is a violation of the stator or rotor windings , the presence of breaks and interturn short circuits in them. Some violations of the contact group of an electrical circuit change its resistance during operation and cause deviations in current and voltage from the nominal values. Therefore, when searching for causes, you should call the entire electrical part of the angle grinder . Deviations in the operation of the components of electronic units, for example, in the speed controller, can also cause the grinder shaft to operate jerkily. The best option here is to replace the entire electronic board.
How to make a regulator from a dimmer?
A very effective and easy solution to this issue would be to create an external frequency converter. A dimmer can be used as a converter - a device for regulating the light level. When creating, you will need an electrical outlet and plug. It must be said that the implementation of such a device can be performed using different methods. Two are especially simple: with and without the use of a machine gun.
- Screw 2 wires to the ends of the electrical outlet so that one is longer. After this, connect the long end to one of the contacts on the plug. Fix the end of the 2nd wire to the dimmer contacts, and connect its other output to the 2nd contact of the plug.
- When using the 2nd option, it is necessary to make a number of modifications to the circuit, and specifically to place a machine on the cord between the plug and the dimmer. Basically, dimmers have ordinary switches, but we need an automatic one, which, if something goes wrong, will turn off our device from the mains.
So, the frequency converter of the angle grinder is ready, and for practicality it can be placed in a specialized housing or fixed on a wood panel. You just have to take into account that such a device is homemade, and when working with the electrical network, you need to be careful.
To learn how to make a speed controller for an angle grinder with your own hands, see the video below.
Do-it-yourself repair of grinder speeds
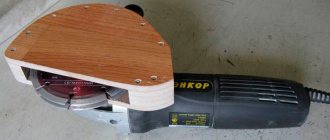
Angle grinder Fiolent MSHU2-9-125E with speed control. Photo VseInstruments.ru
There is always a use for an angle grinder at home, in the country, in the garage or as a professional tool in production workshops. The use of various working tools increases the functionality of the work performed . Compliance with operating rules increases the service life of the power tool. However, as with any mechanism, sooner or later malfunctions occur . Easy assembly/disassembly, availability of diagnostic and repair tools allow you to fix breakdowns yourself.