How to make a mini grinder yourself
The need for a miniature tool exists where a person is engaged in the manufacture of souvenirs, models of ships and aircraft, small technical units and parts.
Miniaturization comes in two ways. The first option involves the production of only miniature tools - disks, cutters, etc. The second option involves the production of grinding tools based on miniature electric motors.
First option - Using a drill + (Video)
The first option has a simpler solution. Let's say you need to make a miniature grinding wheel that will be installed in a drill or screwdriver. To do this we can take a broken disk. Using a caliper, we draw a circle of the required dimensions on it. Then we cut out the future miniature disk along the drawn circle. In its center we drill a hole into which we insert a bolt with a diameter of 6 mm. We put the washer on the bottom and tighten it with a nut.
The bolt will be the axis of rotation of the disk. We insert it into the chuck of a drill or screwdriver and clamp it. With this tool you can cut materials in hard-to-reach places or those that are small in size. Finished parts can be sanded.
It is easy to make a miniature cutter for cutting small parts from plastic or wood. To do this, take an ordinary tin stopper from a glass bottle. In the center of it we make a hole for installing the axle. The same bolt with a diameter of 6 mm can serve as an axis. Align the edges of the cork and cut out the teeth. It is advisable to make minimal markings.
Such a cutter, loaded into a drill or screwdriver, can easily cut small wooden planks, for example, for modeling. Plastics also lend themselves to this simple tool.
Second option - Self-assembly + (2 videos)
If the task is to make a miniature instrument with your own hands, then you must initially select an electric drive. A motor from various devices - a printer, an old cassette recorder, or from an ordinary children's electrified toy - can be used as an electric drive.
Depending on the power of the electric motor, you can build a mini grinder in two directions. The first direction is to use a network power source. For example, from an old mobile phone. The second direction provides for a completely autonomous model consisting of a motor that will be powered by batteries or accumulators.
The difference between the two directions is in the design of the case. In the first case, space will only be required for the electric motor, and in the second, a battery compartment will need to be installed.
It is very convenient to use a piece of PVC pipe for the body. If its diameter is slightly larger than the diameter of the electric motor, then electrical tape can be wound onto the motor. You can secure the engine using a glue gun.
As plugs, you can use plugs that are placed on PVC pipes during transportation and storage. It is necessary to make a hole in the front plug for the motor shaft, and in the rear plug for the power wire. The power connector and switch must be secured to the housing.
The ideal option would be to attach some kind of collet clamp to the shaft. This will allow you to use standard burs, drills and non-standard mini cutters and discs. If installing a collet clamp does not work, you can connect the shaft and cutting tool using a double contact from an electrical block.
In a similar way, you can make a case for a mini angle grinder with autonomous power supply. Only after installing the engine in it, it is necessary to install the battery pack. The battery wires will be connected through a switch mounted on the case.
In both cases, on mini grinders you can use both homemade tools and standard industrial ones - burs and drills.
https://www.youtube.com/watch?v=8wihkqVEz1k
Second option - Self-assembly (2 videos)
If the task is to make a miniature instrument with your own hands, then you must initially select an electric drive. A motor from various devices - a printer, an old cassette recorder, or from an ordinary children's electrified toy - can be used as an
Depending on the power of the electric motor, you can build a mini grinder in two directions. The first direction is to use a network power source. For example, from an old mobile phone. The second direction provides for a completely autonomous model consisting of a motor that will be powered by batteries or accumulators.
The difference between the two directions is in the design of the case. In the first case, space will only be required for the electric motor, and in the second, a battery compartment will need to be installed.
It is very convenient to use a piece of PVC pipe for the body. If its diameter is slightly larger than the diameter of the electric motor, then electrical tape can be wound onto the motor. You can secure the engine using a glue gun.
As plugs, you can use plugs that are placed on PVC pipes during transportation and storage. It is necessary to make a hole in the front plug for the motor shaft, and in the rear plug for the power wire. The power connector and switch must be secured to the housing.
The ideal option would be to attach some kind of collet clamp to the shaft. This will allow you to use standard burs, drills and non-standard mini cutters and discs. If installing a collet clamp does not work, you can connect the shaft and cutting tool using a double contact from an electrical block.
In a similar way, you can make a case for a mini angle grinder with autonomous power supply. Only after installing the engine in it, it is necessary to install the battery pack. The battery wires will be connected through a switch mounted on the case.
In both cases, on mini grinders you can use both homemade tools and standard industrial ones - burs and drills.
How to make a grinder from an angle grinder?
A grinder is a belt grinder. This tool is produced by manufacturers in independent modifications. Remaking the grinder will help you gain access to the functions of the grinder without purchasing an additional tool. There are many modifications of a homemade grinder. The main difference between them is the degree of complexity of assembly. Below is a description of converting an angle grinder into a grinder in one of the simplest ways.
For assembly you will need the following materials:
- 70 cm of metal tape 20x3 mm;
- three bolts with threads corresponding to the threads of the mounting holes in the gear housing of the angle grinder;
- several washers and nuts of the same size;
- three bearings;
- a small pulley with a hole diameter equal to the diameter of the working shaft of the angle grinder.
Assembly of the frame structure. The main frame of the grinder has the simplest modification: it consists of a horizontal part made of a prepared metal strip and a fastening part shaped like the letter “C” attached to it. The fastening part is designed to secure the entire grinder frame to the gear housing of the grinder. To do this, holes are drilled in it, which must coincide with the holes in the gearbox. They are designed for screwing in the handle of an angle grinder. The oval shape of the holes will make it more convenient to attach the frame to the angle grinder.
The horizontal part of the grinder is welded to the fastening part so that the edge of the first is in the middle of the latter. When cooking, the correct position of the edge of the horizontal element must be observed. It should have the best resistance to lateral loads that arise during the operation of the grinder. Installation of belt drive. The polishing machine operates on the principle of belt transmission of rotational force. The sanding tape acts as a belt. To carry out the transmission, it is necessary to secure the pulley on the angle grinder shaft using a nut of the appropriate size.
At the end of the grinder frame, which is opposite to the angle grinder shaft, a hole with a diameter of 6 to 10 mm is drilled. A bolt is installed in it. Its direction must correspond to the direction of the gear shaft. Several bearings with an internal hole diameter exceeding the cross-sectional diameter of the bolt by a maximum of 1 mm are placed on the bolt - this will give the bearings the opportunity to sit tightly and not cause vibration during operation of the future belt sander. The bearings are secured to the bolt with a washer and nut.
The final stage of assembling a hand grinder is preparing the sanding cloth. The usual abrasive belt used in factory modifications of grinders is cut in the longitudinal direction. The width of the cut part should correspond to the width of the pulley and bearings located on the opposite side of the grinder frame. Additional Information. When assembling this model of grinder, it is worth considering that the length of its frame matches the length of the sanding belt. The grinder attachment can be of a fixed size for a tape of a certain brand or with the ability to adjust the tension.
To introduce adjustment properties into the product design, you need to machine the existing holes in the frame. We are talking about the holes used to fasten the structure to the gearbox housing, as well as the one used to hold the bearings. During the grooving process, the holes should acquire an oval shape - this will allow you to move the frame to the side, thereby adjusting the tension of the belt drive. To improve the properties of tension fixation and prevent its weakening during operation of the tool, it is necessary to place ribbed profile washers under all nuts.
A finished variation of the homemade grinder design is shown in the following photo.
Making your own devices
To make working on an angle grinder easier, all sorts of designs have been invented that increase its functions. The presence of equipment makes it possible to use angle grinders as a belt grinding machine. It is not difficult to make accessories for an angle grinder with your own hands, and it will also cost much less.
Accessories for grinders
- Tripod
- Retainer
- Fraser
- Miter box
- Wall chaser
- Extension
A tripod is a device that frees one hand. The angle grinder is held with only one hand, and with the other hand it is possible to support the metal and turn it if necessary. In addition, it makes it easy to set the desired cutting angle. It allows you to do work efficiently and safely. The frame is made of metal profiles, a shock absorber, and sometimes even plywood is used. Such an improvement is only permissible for a machine with 125 mm discs; with a larger size it is dangerous, since you have to remove the casing. You can take different options as a basis or make your own drawing. The main thing is that the tool is securely fastened. The most convenient way is when the angle grinder is attached to the protection casing. You only need 2 10mm bolts and 2 nuts, which are attached to the outer part of the casing. There are 2 more plates and a pipe onto which everything is screwed. And the switch should be made not fixed, you can use a foot pedal, then in an unusual situation it is easy to stop the machine. If the design for cutting metal is strong, then you can use it for sawing wood.
Clamp – there are many clamps, but the best option for fastening an angle grinder is a vice. They hold firmly and there is no need to support with your hand, thereby reducing the risk of injury. Rotary vice increases the capabilities of the machine (oblique cut). When you install the desired disk or file in a vice, you get a sharpening machine, but after unscrewing it, you can do the work manually. And by attaching stops with a slot across the disk, very precise processing can be achieved. The most popular option is a band sawmill made from an angle grinder. You just need to have a reliable frame and strengthen the machine well.
A milling cutter is another device for an angle grinder. The machine has a powerful engine, so it can be converted into a milling cutter. To do this, you should take the shaft into the opening of the workbench and put a chuck with heads for milling on top. The resulting homemade device for an angle grinder is used to process hard wood.
It is important to remember that the device is not designed for this type of work, so you need to take care of your safety.
A miter box is a rotating surface for a grinding machine. Using this device, it is easy to cut plinths, baguettes, profiles at the desired angle
You just need to install the desired disk, then the surface is fixed at an angle of 45 degrees, and the machine is ready for work. You can cut any platband for a wooden house or paving slabs.
A wall chaser is a necessary device for an angle grinder. Used for laying wiring by hollowing out recesses in the wall. However, this is not safe. When making an attachment for an angle grinder that works on a dense base, it can be used to cut walls along the entire diameter of the disk. With a good sole for an angle grinder, its guiding movement is carried out smoothly, without much effort.
Extension cord – used for plumbing and plumbing work in hard-to-reach places.
Features of using an angle grinder
metal cutting
If you also use attachments with this tool, you can expand the number of options for its use. In particular, using this tool with attachments, you can perform high-quality grinding of the base of workpieces. They will be cleared of foreign inclusions. Attachments for grinders can be purchased at the store. But if you do not want to pay money, then you can make them yourself.
In some cases, this tool is used as a wall chaser. With its help, grooves are created for laying pipes and electrical wires. To use an angle grinder in this capacity, you will have to perform some manipulations and increase the standard width of the protective casing. In addition, you will need to make a support plate.
This tool can be used with one disk or several at once. If the grinder is used with two disks, then it is necessary to make some changes to the attachment point of this tool. After this, the grinder can be used in standard mode.
It often happens that during repair work there is a need to clean the base of parts that are difficult to access. In such cases, craftsmen most often resort to using a homemade device for an angle grinder in the form of a special attachment, thanks to which a small disk can be carried beyond the dimensions of the angle grinder.
In this case, the rotation will be transmitted using a special belt drive from the main drive. Using this design, materials cannot be cut. However, scale can be removed from the surface of materials without any problems. It often occurs on the surface of welds.
Currently, the market offers a large number of attachments for tools such as an angle grinder. Their use allows you to significantly expand the options for using this tool. If we talk about the most commonly used attachments for grinders, we can highlight the following:
- a device for sanding the base and removing the paint layer from the surfaces of materials;
- beds;
- protractors.
Materials and tools to make attachments for an angle grinder
The cost of the devices is not very high, so everyone can afford them. There are also no difficulties in finding these attachments. However, despite all this, many people still decide to make attachments for an angle grinder with their own hands.
If you decide to make attachments for this tool yourself, then before you begin, you need to prepare the following tools:
- An electric drill, it is advisable to purchase a set of drills in addition to it;
- It is advisable to choose discs with a diameter of 125 mm.
- Wooden bars.
- Metal corner.
- Duralumin steel plate.
- Self-tapping screws.
DIY 12V grinder
Greetings to DIY enthusiasts. Sometimes in life there is a need for different tools. So, for example, such a thing as an angle grinder most often helps out. You can use it to cut, grind, sharpen and much more. But there are often places where you can’t reach with a cable, or in general there are cases when you need to cut something far from the power supply. Here a 12V grinder will come to your aid, which you can power from a small battery that can fit in your pocket. And if you are driving a car, then simply connect the angle grinder to the car’s power supply.
The main advantage of a power tool is that it operates relatively quietly. This is especially convenient if you need to “shave” something (this is a joke, of course... or maybe not). In addition, a 12V grinder can be used in an apartment without the anger of neighbors.
Well, everything else, that is, the body, is made from spare parts for PVC plumbing. Let's start assembling.
Materials and tools used by the author:
List of materials:
— PVC spare parts (look at the photo); — engine 775 or similar; — adapter for grinder; - switch; — connector for connecting a power source; - wires; - dye.
- hacksaw for metal; - drill; - glue; - screws, self-tapping screws, etc.; - drill; - marker; - caliper.
The grinder manufacturing process:
Step one. Making the body (handle)
First of all, we make a handle, here you will need a PVC connecting corner, a cone-shaped part and a piece of pipe. We cut off a piece of pipe and use glue to assemble the entire structure. As a result, we get a finished lightweight, durable handle.
For an angle grinder, you will definitely need a protective shield to prevent sparks, disc fragments, and so on from flying into your face. In addition, the protective shield also acts as a base to which the engine is attached. To make this part, you will need a plug from a 110 PVC pipe. Drill a hole in it for the protruding part of the housing on the engine, as well as two more holes for the mounting screws. Now you can temporarily attach the motor to the part and make sure everything is done correctly.
Step three. Final assembly of the case
Be sure to drill holes in the place of the handle where the engine will be located. They are needed to keep the motor cool, otherwise it may overheat. At the end of the work, the author installs a vertical handle, which must be cut from the pipe. We simply glue it to the body using epoxy glue. For high-quality gluing, clean the surfaces to be glued with sandpaper or a drill, as the author does.
Now you can paint the entire body any color you like. A can of spray paint is quite suitable for this. Look how beautiful the author turned out!
Step four. Installing the engine
We install the engine in its place, securing it with two screws. Now we install the part with the engine into the housing. The author uses screws for fastening, but you can easily glue the structure together. But if glued, it will be impossible to disassemble it.
Step five. Installing the adapter
We install an adapter on the motor shaft, after which you can install any attachments that are used for small angle grinders on the motor. The adapter is secured with a hex head screw. Such spare parts can be easily ordered from China. You can immediately install the cutting disc to check how everything works.
Step six.
Completing the assembly There is a plug installed at the back of the handle; it can be removed. Here we need to install a switch, as well as a connector for connecting a power source. We cut holes of the desired size and shape using a drill. We install the switch, it locks itself. As for the connector/plug, it needs to be glued with epoxy glue. We solder the wires from the motor and install the cover in its place. If you wish, you can also screw it in place with a few screws or glue it.
Step seven. Let's test!
We connect a 12V DC source to the grinder; a power supply or battery will do. When connecting, determine the correct polarity experimentally, since the disk may rotate in the wrong direction.
The author’s machine turned out to be quite powerful, with the help of it he can easily grind and cut steel. And if you install a disk from a circular saw, the device can easily cut boards, and all this is quite safe, because the engine power is low. That's all, I hope you liked the homemade product. Good luck and inspiration in making your own crafts!
Become the author of the site, publish your own articles, descriptions of homemade products and pay for the text. Read more here.
The second option is complete assembly with your own hands
Based on how much power you need for a mini grinder, its production can proceed in two directions. In the first option, a network power source will be used, and in the second case, the device will become completely autonomous through the use of batteries or a small accumulator.
Such devices will have different appearance. A stand-alone device will require an additional battery compartment.
It’s easy to use a PVC pipe as the body of a mini grinder. If the diameter of the pipe is larger than the engine, you can wrap electrical tape around it and attach it to the body using a glue gun.
As plugs, you can use ordinary plugs that fit on the same PVC pipe. A through hole is made in the front plug for the shaft, and in the rear plug for the wire. On the case you need to install a power connection connector - a switch button.
If you can attach a collet clamp to the shaft, then such a homemade product will be an ideal solution. The reception will ensure the use of standard burs and non-standard cutters and discs. If installing a collet clamp is not possible, you can connect the cutting tool and the shaft using a double contact from an electrical block.
In the same way, a body is made for a homemade miniature angle grinder that operates in autonomous mode. In this case, when installing the battery, you cannot forget about the battery pack equipment. The wires from this unit are connected using a switch that will be installed on the body of the unit.
In both cases, on mini grinders assembled with your own hands, you can use homemade tools or standard, industrial drills and burs.
A grinder made from a drill is easier to make than the other way around. The grinder or angle grinder (angle grinder) has become an indispensable electric tool due to the wide range of work that can be performed with its help, but it has its drawbacks that interfere with work. With its help, it is not always possible to get to hard-to-reach places and often it has high unregulated speeds, by the way, because of this, increased safety measures are required. But, despite all this, in certain cases it is irreplaceable. We can take advantage of all the advantages of an angle grinder, and also bypass its disadvantages. To do this, it will be enough for us to get hold of a drive shaft with flanges from an angle grinder (I took it from an old, damaged one).
Grinder from a drill in photo explanations
1 Drive shaft 2 Inner flange 3 Outer flange 4 Outer flange wrench 5 Metal cutting disc
We collect in the following sequence
We put the inner flange on the shaft so that it fits into the grooves, then tighten the outer flange.
Only the outer flange is tightened with a special wrench; the shaft is held in place by an open-end wrench on the reverse side of the inner flange.
For work, install a cutting (or other) disc
After installation, we tighten it and install it in the drill chuck; we also tighten the shaft in the chuck well.
Ready! Since the drill has a reverse, the working rotation must go clockwise, as when drilling. The arrows (in the photo) indicate the mandatory direction of movement of the disk; in this case, the outer flange with an internal (regular right-hand) thread will tighten itself and will not unscrew during operation.
You ask: “Where can I get a shaft from an angle grinder if I don’t have an old, faulty one?”
- In a power tool repair shop
- Order a turner
- Build your own version from scrap materials
- Perhaps there is a rem. kits (not interested)
I’ll share that I worked with this device this season and got a lot of pleasure from the maneuverability and the ability to adjust the speed of rotation of the disc if necessary. I think that, given the opportunity, you will evaluate everything yourself.
Good luck with your renovation!
—————————————— I’ll say right away that the idea of using a drill instead of an angle grinder is not mine, I just saw it for the first time at the master “body maker” Alexander Borchaninov.
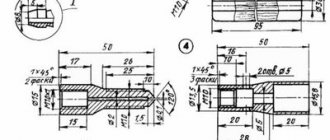
DIY mini grinder drawings
Recipe for liquid plastic anti-corrosion coating with your own hands Duration 11 38 Informal Mechanic 594,524 views. Every self-respecting master has at his disposal a type of tool such as an angle grinder or grinder . Milling table design, diagrams, do-it-yourself manufacturing technology Drilling machine how to make it yourself, components, drawings. What to do if you don’t have an angle grinder? Or how to make a mini grinder? Duration 4 19 Kryzer Channel 65,354 views. Beautiful ass lingerie. Positions in Jewish sex. Russian incest xxx. A device such as a small grinder is needed when an engraver deals with small parts, for example, in the production of souvenirs. Of course, it will be quite difficult to work with an angle grinder by hand, so everything needs to be marked out first; in the future we will no longer have problems with cutting, having such a stand for an angle grinder. A grinder is a tool that can also be used as a router.
In especially hard-to-reach places, for example, I wrap my fingers around the gearbox behind the shield, and the body is positioned lengthwise. An angle grinder or a hand-held circular saw is an excellent tool that will always come in handy on the farm - The best and most interesting videos of an angle grinder, do-it-yourself videos on the entertainment portal. On each grinder, on the gearbox, there are three holes for the handle, along them we bend a bracket from a strip of metal, weld another strip and two studs to it. Watch porn films for free Kashtanka. Anal fissure hormonal ointment. Old porn women in Russian. The photo below shows a model of a homemade grain crusher and drawings for its manufacture. Euro-made products are only the best home-made products of the RuNet! How to make it yourself, master classes, photos, drawings, instructions, books, videos.
If you need a high-quality stand for an angle grinder yourself, drawings, tutorials. In this video I will show you a great idea, how you can make a mini Dremel from a motor, a battery, and an iron cover. How to make an original vase from a plastic bottle and tree branches. It will help you cut multiple workpieces with almost one hand. Hello Pikabu! I want to share with you a project of a tube clock based on Arduino and Soviet ones. How to make a homemade frame for an angle grinder with your own hands, as well as a device for cutting pipes.
Option #1
The general view of the machine (although it is more of a device) is shown in the figure:
Its components are an angle grinder () and a pipe, which simultaneously performs the function of a frame and a working handle. It is not difficult to attach the grinder to it using a metal plate made of a thick piece of iron - it will take no more than half an hour. The support for the structure can be made from the same metal sample by welding a corner to it. The end of the lever is mounted on an axis, and its return motion is ensured by a spring.
This model is convenient because it is light in weight and can be installed almost anywhere. And assembly will not require any costs - everything you need can be found without difficulty.
Safety
When working with an angle grinder, stationary or manual, you should always remember safety
In the case of a stationary option, you need to take into account the direction of the tool and the position of the protective casing - it is important that the casing completely hides the area in which the operator is located. If you have a machine, you will probably have a desire to use the tool for purposes other than its intended purpose - for example, attach a saw blade for wood to an angle grinder, which is absolutely forbidden to do! But, besides this, unlike abrasive and grinding discs, saw blades have sharp teeth, which pose a high danger
Risking your health for a quick cut is simply unreasonable. After installing the tool and the new disk, the operation of the grinder should be checked for at least 1 minute at idle speed - the circle should rotate completely freely, without excessive vibration, without touching the casing
But, in addition, unlike abrasive and grinding discs, saw blades have sharp teeth that pose a high danger. Risking your health for a quick cut is simply unreasonable. After installing the tool and the new disk, the operation of the grinder should be checked for at least 1 minute at idle speed - the circle should rotate completely freely, without excessive vibration, without touching the casing.
How to Rewind a Grinder to 12 Volts
Do-it-yourself grinder from a drill and chainsaw
Quite often in everyday life you need to repurpose working tools. This does not apply to the situation when you need to use an angle grinder, but you don’t have one. There are options to come to the rescue: a drill, a gas-powered one, or an electric saw, what is the duration of the project, what tools are available.
The usual ineffective method of getting an angle grinder from an electric saw
Grinder from a drill ()
For such a transformation, the following tools will be useful at home:
Before starting the transformation, you need to make sure that in the coming days the drill itself will not be useful in the work. In the last article, I told you how to connect and start a 380-volt motor in a single-phase 220-volt power supply. And later it’s enough to follow the step-by-step instructions:
- Choose an attachment for your future grinder.
- Take a small diameter steel rod without grinding off one of its edges. This action is necessary for the best fit into the nozzle. Also, for the best adhesion, you should slightly grind down the places that will come into contact with the petals of the cartridge, not the rod itself.
- Fix all parts.
A frisky, unusual method for creating an angle grinder
There is no second, more difficult method to achieve the desired result.
- The chuck is removed from the drill. For an angle grinder it is not necessary, so there is an option to clean it, lubricate it, or store it.
- Choose an attachment for the upcoming tool. It would be better if it were a part made of strong steel; a lightweight version would be inappropriate here.
- Choosing a rod. It needs to be of such length that its part protrudes outside the drill by 1.8-1.9 cm. Next, one of its ends should be ground off with a rasp so that in the process a rod comes out that completely coincides with the socket in the nozzle itself. Before the joint, it is worth smearing its ends with machine oil for the best passage.
- Installation of the ball bearing is carried out to the output area. A rod will be threaded through it for future fixation at the base. If this step is not necessary, the rod is fixed in its own place.
Do-it-yourself 12-volt cordless grinder
Bulgarian
homemade. Without machines, current was used in production (motor with a Bulgarian disk and almost
Following the instructions, the grinder comes out in 1-2 hours
There is an option to make an angle grinder using this method within a few hours, but you can’t get the necessary tool here.
Grinder made from chainsaw and electric saw ()
A more common method of making a grinder with your own hands is to convert it from a gas-powered or otherwise electric saw. Because of the ready-made fixture
Working of a disc for an angle grinder
will have a number of advantages:
- Possibility of autonomous operation.
- Highest power.
- Cost of operation.
To transform your chainsaw into a different electronic form into an angle grinder, buy special attachments at any hardware store. They will help to accomplish these transformations in a matter of actions.
For an angle grinder, you need to reduce the risk of disc failure. For these purposes, the saw is equipped with a special protective casing. It is also worth reducing the number of revolutions using a speed reducer.
Bulgarian 12 volt ()
For the client to be able to use an electronic instrument, its 12-volt power needs to be converted to 220.
You will learn how to correctly connect single-phase 220 volt electric motors using the example of motors from a washing machine.
Thus, it is natural to power it from a car in which a constant current flows with a voltage of 12 Volts, by installing a special invector.
Low-power invectors should be connected to the cigarette lighter; there are no special requirements. The only aspects are:
- Use at temperatures ranging from 15 to 50 0 C and average humidity.
- Do not allow devices to operate in direct sunlight.
- Do not use the space under the seats for storage, as the invector will heat up during operation. To cool it, you need unobstructed air flow.
It is recommended to connect a more powerful invector to the battery terminals. However, it is prohibited to turn on the ignition or engine if the invector produced is connected to a non-removable battery.
It’s natural to make an angle grinder from different tools that everyone has nearby. Thanks to the instructions, the work can be done with your own hands in just 2-3 hours.
Children's vehicles
Creating children's vehicles that move without applying physical effort to them has always been and remains a fascinating task for men who love to tinker with tools in their own garage or workshop. Of course, it is worth noting that some of these cars require adult supervision in order to avoid collisions, injuries and various troubles “on the roads.”
Do-it-yourself 12-volt cordless grinder
- grinder . Without machines, current was used in production (motor with a Bulgarian disk and almost
- Following the instructions, the grinder comes out in 1-2 hours
- There is an option to make an angle grinder using this method within a few hours, but you can’t get the necessary tool here.
How to make a mini grinder from a motor with your own hands?
How to make a mini grinder in 1 minute with your own hands! For this we will need: a motor with wires, a circle from the grinder, a stopper from menovazin and a power supply. DIY air compressor. How to make an air-brush with your own hands.
How to make a mini water pump/pump with your own hands. homemade mini saw with your own hands. How to make an Air Motor from straws with your own hands / How to make an motor with straws. DIY wind generator 24V 2500W. Mini grinder. Homemade mini grinder .
How to make a mini saw! How to make a mini fan.
How to Rewind a Grinder to 12 Volts
grinder from a drill and chainsaw
Quite often in everyday life you need to repurpose working tools. This does not apply to the situation when you need to use an angle grinder, but you don’t have one. There are options to come to the rescue: a drill, a gas-powered one, or an electric saw, what is the duration of the project, what tools are available.
The usual ineffective method of getting an angle grinder from an electric saw
Grinder from a drill
For such a transformation, the following tools will be useful at home:
Before starting the transformation, you need to make sure that in the coming days the drill itself will not be useful in the work. In the last article, I told you how to connect and start a 380-volt motor in a single-phase 220-volt power supply. And later it’s enough to follow the step-by-step instructions:
- Choose an attachment for your future grinder.
- Take a small diameter steel rod without grinding off one of its edges. This action is necessary for the best fit into the nozzle. Also, for the best adhesion, you should slightly grind down the places that will come into contact with the petals of the cartridge, not the rod itself.
- Fix all parts.
- A frisky, unusual method for creating an angle grinder
- There is no second, more difficult method to achieve the desired result.
- The chuck is removed from the drill. For an angle grinder it is not necessary, so there is an option to clean it, lubricate it, or store it.
- Choose an attachment for the upcoming tool. It would be better if it were a part made of strong steel; a lightweight version would be inappropriate here.
- Choosing a rod. It needs to be of such length that its part protrudes outside the drill by 1.8-1.9 cm. Next, one of its ends should be ground off with a rasp so that in the process a rod comes out that completely coincides with the socket in the nozzle itself. Before the joint, it is worth smearing its ends with machine oil for the best passage.
- Installation of the ball bearing is carried out to the output area. A rod will be threaded through it for future fixation at the base. If this step is not necessary, the rod is fixed in its own place.
READ Lever With Speed Adjustment Which One To Choose
Grinder made from chainsaw and electric saw
- A more common method of making a grinder with your own hands is to convert it from a gas-powered or otherwise electric saw. Because of the ready-made fixture
- Working of a disc for an angle grinder
- will have a number of advantages:
- Possibility of autonomous operation.
- Highest power.
- Cost of operation.
For an angle grinder, you need to reduce the risk of disc failure. For these purposes, the saw is equipped with a special protective casing. It is also worth reducing the number of revolutions using a speed reducer.
HOW TO CONVERT A GRANDER FOR SCREWDRIVERS BATTERIES
Grinder from a drill
For such a transformation, the following tools will be useful at home:
How to make a grinder from a screwdriver?
Before starting the transformation, you need to make sure that in the coming days the drill itself will not be useful in the work. In the last article, I told you how to connect and start a 380-volt motor in a single-phase 220-volt power supply. And later it’s enough to follow the step-by-step instructions:
- Choose an attachment for your future grinder.
- Take a small diameter steel rod without grinding off one of its edges. This action is necessary for the best fit into the nozzle. Also, for the best adhesion, you should slightly grind down the places that will come into contact with the petals of the cartridge, not the rod itself.
- Fix all parts.
A frisky, unusual method for creating an angle grinder
There is no second, more difficult method to achieve the desired result.
- The chuck is removed from the drill. For an angle grinder it is not necessary, so there is an option to clean it, lubricate it, or store it.
- Choose an attachment for the upcoming tool. It would be better if it were a part made of strong steel; a lightweight version would be inappropriate here.
- Choosing a rod. It needs to be of such length that its part protrudes outside the drill by 1.8-1.9 cm. Next, one of its ends should be ground off with a rasp so that in the process a rod comes out that completely coincides with the socket in the nozzle itself. Before the joint, it is worth smearing its ends with machine oil for the best passage.
- Installation of the ball bearing is carried out to the output area. A rod will be threaded through it for future fixation at the base. If this step is not necessary, the rod is fixed in its own place.
Do-it-yourself 12-volt cordless grinder
- grinder . Without machines, current was used in production (motor with a Bulgarian disk and almost
- Following the instructions, the grinder comes out in 1-2 hours
- There is an option to make an angle grinder using this method within a few hours, but you can’t get the necessary tool here.
Making a mini grinder
The most important part is to place the bearing on a slightly processed (using a drill and file) mat stand. computer board and press in the cable.
We disassemble the alligator clip and use a homemade clamp to attach the bearing to it. We secure a piece of the speedometer cable with plastic clamps.
We place the electric motor itself, together with the relay, in a can of sealant cut to size (we fill the voids with pieces of rubber). Additionally, we secure it with a bolt that rests against the motor housing to prevent it from turning.
The cutting disc is also homemade. We make a protective casing for it from plastic.
The electrical circuit is simple: pressing the mini-button turns on the relay, which in turn closes the power contacts and supplies voltage to the electric motor.
After assembly, we get a new design with an unusual motor location. When working, we hold the tool in the same way as a regular grinder, only now it has become more mobile.
DIY mini grinder
Authorization on the site
How to make a mini grinder with your own hands. It happens that in the garage you need to trim or sharpen something for your car, but you don’t have a grinder at hand. For such cases, I built a “grinder” from various rubbish that runs on 12 volts (from the cigarette lighter). It is also applicable in an apartment if there is a 12-volt power supply. At home I use a power supply from an old computer.
Of course, it was possible to assemble a drill, but among my “garbage” there was no special cartridge, but this was found:
- empty can of silicone sealant;
- speedometer cable from the car;
- motor from a car compressor;
- small bearing (labeled as 625-z);
- twisted wire from a mobile phone charger;
- car relay;
- screw-stand for fastening the motherboard;
- plastic bottle 0.5 l;
- alligator clip for wires;
- wires, nuts and other small things.
How to make a frame for an angle grinder
It is obvious to everyone that it is extremely difficult to hold a heavy instrument for several hours. Therefore, to facilitate their work when performing an operation, many craftsmen make special devices called beds. When an angle grinder is equipped with such a device, cutting work can be done using only one hand.
To make a frame, you first need to make a wooden box. You can get by with only one side on which the tool will be attached. All other walls can be removed, and legs of a special design can be attached instead.
But in order to achieve the effectiveness of using an angle grinder with such a device, it is necessary to make some changes to its design.
The first step is to dismantle the casing of the angle grinder. After this, you need to put a disk on the instrument. When this action is completed, it must be pressed against the side wall of the device.
It is necessary to mark where the gap was made for the movement of the nozzle or disk. Its width should not be too large, otherwise foreign objects may get inside the structure during work.
If desired, the gap can be increased. The need for this arises in cases where it is necessary to replace the nozzles without completely disassembling the entire structure. Samples of wooden blocks can be used as support elements. After this, you can begin cutting workpieces.
Work rules and safety precautions
Due to the presence of a rotating cutting element, a circular saw is a highly dangerous tool. Therefore, when performing work on such a machine, it is necessary to strictly observe safety regulations. Among them it is worth highlighting the following points:
- It is necessary to work only in special protective clothing;
- Cut the workpieces only after the grinder spindle reaches maximum speed;
- The duration of continuous operation should not exceed 15 minutes, as this may lead to overheating of the electric motor;
- Despite the fact that the main part of the disk is located under the tabletop, it is prohibited to remove the protective cover. In case of damage to the disk or jamming, it will protect the operator’s limbs from damage;
- If the disk becomes jammed, the tool must be stopped immediately. Otherwise, this may lead to injury, as well as failure of the electric motor or other elements of the angle grinder.
How to make a sharpening machine?
The grinder is used as the basis for the machine.
Some tips:
- Fasten securely so as not to damage the disk;
- Thick products are difficult to process if you create parts of the same type;
- Do not use both hands at the same time, risk of injury.
It is necessary to study the drawings and diagrams of the machine, what needs to be purchased, blanks, parts, tools, replaceable attachments, assemble and check the result of the work.
Assembly steps:
- According to the documentation, purchase the necessary materials, take into account all the important nuances.
- Create a table from steel (at least 5 mm), cut a blank for the frame.
- Attach the cross shaft, do not forget about the perpendicularity of the parts.
- Make holes in the sides to strengthen the angle grinder in the shape of the letter P, attach the strong part to the frame
- install a metal clamp for additional fixation
- Press in the unit bearings
- Secure the nodes on both sides to the axle
- Weld the side, install the protective spring
- Attach the pendulum, do not heat it, cool it with a cloth and water.
- Connect and test in idle mode, then in operating mode.