Classification of axes
In practice, many types of axes are used, which are designed for working with wood. Conventionally, they can be divided into three types:
- cleavers;
- for logging;
- construction or universal.
Accordingly, there are various designs designed to solve specific problems, for example, a firefighter is equipped with a pick, with which you can pull beams and other structures away from the source of fire.
In addition to this classification, we can offer another one - according to the size of the blade, or more precisely, according to the size of the butt:
The first ones are used in logging, the second ones solve many problems in construction and in everyday life, and the third ones have found their application in carpentry. These tools are also distinguished by the length of the ax handle. That is, the larger it is, the stronger the swing and, accordingly, the blow. There is a difference between the width and shape of the blade. That is, if the tool has a direct sharpening, then it is intended for chopping blows. If the cutting part has a curved sharpening, then it can both chop and cut.
Steel, wood, and polymer materials are used to make ax handles. But as experience shows, nothing better than a wooden (birch) handle has yet been invented. Other materials do not always cope with vibration damping.
The list of existing and widely used tools can be listed for quite a long time, the following can be mentioned:
- Tourist, it has small overall and weight characteristics, its weight is just over half a kilogram, and its length is 350 mm. With its help, you can prepare dead wood and perform simple work, for example, put together a ladder or a raft.
- Hunting. It is used for cutting dead wood and butchering harvested carcasses.
- Scandinavian. This tool is intended for professional woodcutters. It weighs 1.2 kg, with a length of 640 mm.
- Cleaver-sledgehammer. Its use allows you to split any log.
GOST 18578-89 normalizes the main dimensions of the product, maximum tolerances, and roughness parameters of the cutting part. According to the requirements of this document, each product must be marked. This GOST defines the procedure for acceptance and shipment of finished products to the consumer.
Do-it-yourself ax (67 photos) - we create a combat, decorative and working tool
Those who live in their own home often need a tool such as a taiga ax at the dacha and on hikes. Good quality work tools are expensive and hard to find.
An ax from the market is not always of good quality. Therefore, we will make our own ax using improvised means.
Types of axes
Let's look at the variations of axes:
- A cleaver is a heavy cone-shaped axe. Due to its heavy weight, it is well suited for cutting large, hard wood.
- Carpenter's - light in weight and size, has a pointed blade. Used for careful, precise, careful work with wood.
- Taiga - suitable for cutting down trees, harvesting trees, building a hut, removing bark and branches.
- Tsalda – designed for clearing the area of bushes.
- Kitchen (cook's) - intended only for chopping bones. It is a small hatchet with a short handle and a large “blade”.
- Lumberjack - used only for cutting down trees. Consists of a long ax and a wide, sharp blade.
- Of all the above types, the taiga ax is the most necessary and useful.
- Distinctive features of the taiga ax:
- Light weight.
- Small piercing surface area (makes it possible to drive it as deep as possible into the wood).
- Specific sharpening of the blade (the back edge is much smaller, thinner than the front.
This feature is made in order to use this type of ax as a cleaver (if the blow is delivered correctly. A regular ax has a blade of the same shape for precise work with wood).
Making a taiga ax
Handle material
The functions of an ax are primarily influenced by its shape and length. The handle should be curved and the cross-section should be oval.
The best types of trees for the handle are maple, oak, ash, and birch. Since these types of wood withstand vibration well upon impact.
Wood harvesting begins in autumn
Dry in a dark place. Before use, wood must be stored for about one year, or better yet, five.
- It is not advisable to use felled wood as it will dry out over time and will not stay in the eye.
Making a Cardboard Template
On a large cardboard sheet we outline the shape of the handle and apply it to a wooden blank. The template will help us make a more accurate ax handle.
Preparing material for the handle
A block of one-year-old wood is hewn parallel to the grain. The blank for the handle should be longer than the template. We make the place that is inserted into the eyelet wider than the main part.
We outline the attached drawing on both sides, and do not forget to leave allowances. After inserting the upper part into the eyelet, we remove the excess wood.
Work on cutting out an ax handle
This tool is used in almost any household. It is in demand for housework, construction and many other tasks. But, you need to understand that not all tools of this type that are in use have decent reliability. And therefore, some craftsmen make an ax handle with their own hands.
Making an ax is a very responsible task. The comfort of performing work, and most importantly the safety of the worker and the people around him, depends on the parameters of this part.
A stick with a section of a certain shape is far from the best option. When using such a handle, a person quickly gets tired, and work can become unsafe. Therefore, a curved handle with an oval cross-section is used for the tool. The tail part must be widened and bent down. Such an ax handle holds it securely in the hand, even when delivering a sharp blow.
Useful tips
Professionals recommend taking special care when choosing materials for making a homemade axe. For example, it is better to harvest wood for making a handle in the fall and then dry it in a dark place throughout the year. But the future handle will become even more durable if it is dried for five years. Of course, if you don’t have that much time, you can easily wait a year, but then treating the finished pen with water-repellent compounds will become mandatory.
It is better to buy a blade in hardware stores or on the market, and preference should be given to products with GOST markings. This way you will be sure that the steel has undergone the necessary hardening and will not crumble or lose its sharpness when cutting down trees. In addition, when making an ax, you need to decide in advance for what purposes you will use it. The sharpening angle of the blade will depend on this, because axes for cutting wood, carpentry or hunting differ precisely in this parameter.
You can see what making an ax with your own hands looks like in practice in the video.
The process of making an ax looks like this:
Material selection
The following grades of wood are used for the handle:
In order for this part to be of high quality, the wood must be harvested before frost. After the workpieces are ready, they need to be dried. They should lie in a ventilated area for about a year. But, some craftsmen claim that the drying period should be about 5 years. In fairness, it must be said that in an emergency, you can use an undried workpiece, but this is a temporary option, the handle will quickly wear out.
Cutting out the template
To obtain an ax of the required size, you must use a template made from cardboard. As a sample, to obtain it, you can use the tool that is convenient to work with. That is, you need to put it on a sheet of thick cardboard and outline it with a pencil.
By the way, the size of the ax can be determined based on the height and physique of the person who will work with it.
Making a blank
A block is hewn out from a block that has been dried. Work must be carried out along the fibers. The size of the bar should be 100 mm larger than the size of the finished product. The size of the part where it will be installed, and the blade itself should be 2 - 3 mm larger than the size of the eye.
The template prepared in advance must be laid on the surface of the block. At the same time, leave allowances for processing. From the front its size is 10 mm, in the tail it is 90 mm. This allowance is necessary so that the handle does not crack when pulled onto the ax itself. Upon completion of work, this allowance is removed.
Read also: Press granulator for sawdust
Hewing out an ax
To bring the part to the required dimensions, two cuts must be made in the upper and lower parts of the workpiece, but their depth should not reach the contour of 2 mm. Excess material can be removed using a chisel. After this, using a file with a large notch, the corners, transitions and other surfaces of the handle are leveled. Abrasive sandpaper is used to finish the surface.
Impregnation with waterproof compound
To increase the resistance of the handle to moisture, special compounds are used. But it is permissible to use drying oil or linseed oil. The handle is covered with this liquid until it stops being absorbed into it.
The handle of the tool should not slip in the hand and therefore, it is not recommended to cover it with any paints or use any pads.
By the way, it wouldn’t hurt to add a coloring pigment, for example, orange, to the waterproof coating. Then the tool with a bright handle will not disappear on the site.
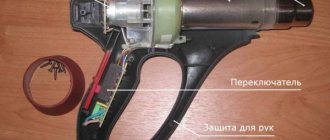
Piercing attachment for an ax
When choosing a piercing part, you must definitely find out what steel it is cast from. Our country has adopted GOST 18578-89. It defines the grades of steel from which it is permissible to make the blade parts of an ax. These are steels - 8ХФ, 9ХФ, 9ХС, ХВГ, У7А, У8, У8А, У8Га, У9, У9А and many others similar in properties to the named grades.
Piercing attachment for an ax
Sharpening an ax blade
After choosing a tool, the owner is faced with a new task - how to sharpen it. Yes, the manufacturer supplies this tool in a ready-made condition. But sooner or later, the sharpening done in the factory workshops will become dull and the need for independent editing will arise. Practice shows that it is better to spend some time on editing it than to do the work with a blunt instrument. It is advisable to perform turning of a product using a template. It is made independently. To do this you will need a small piece of tin. After choosing the sharpening angle, you need to mark it on the sheet metal and cut out the angle. After this, attach the template to the blade. The angle of deviation from the required one will be immediately visible. Using a marker, mark the cutting edge accordingly.
Sharpening an ax blade
When sharpening, the master must consider the following factors:
Characteristics of the wood he will have to work with. What kind of work will have to be done, harvesting lumber is one thing, cutting out locks on logs installed in a log house is another. Of course, the material from which the blade is made must also be taken into account.
Materials and tools for work
To create an ax similar to the one used by real Vikings, you will need the following materials:
- block (approximately 4x4 cm);
- paper;
- pencil;
- brush;
- wooden wedges;
- varnish (can be replaced with flax oil);
- a small piece of leather material or leatherette (for braiding);
- an ordinary ax (it’s okay if it’s rusty).
A properly selected handle should not subsequently become loose during the drying process if the degree of humidity in the environment changes. If such a need arises, the workpiece must be dried in warm and dry conditions.
It is important to approach the choice of wood for an ax with all responsibility. Only deciduous wood and only hardwood will do. It is also very important to pay attention to the level of drying. The humidity level should not exceed 12%.
The following breeds are best suited for making an ax handle:
- beech - has all the necessary qualities, but also has a disadvantage - it absorbs moisture from the air. Therefore, before you start making the handle, you need to further process it;
- oak is a hard, durable and very durable species;
- maple is a very elastic and durable material. The finished handle will have a beautiful texture;
- ash is the best option, since this particular species is known for its strength, durability, and most importantly, affordability. The handle will turn out very beautiful.
The following tools will be required for the job:
- welding machine;
- drill;
- Bulgarian;
- grinding machine.
Having decided on the materials and prepared the tools, you can begin to create a Viking ax.
How to make a battle ax
Not all axes can be purchased in the store; for example, it is impossible to buy a battle axe. And therefore, if you want to get such a product, it’s easier to make an ax with your own hands.
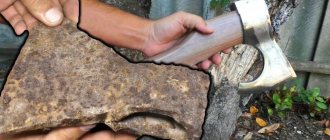
You can take an ordinary construction tool as a basis, see Fig. 2, and use it to make a combat blade.
It has certain disadvantages:
- It has an irrational form.
- It has excess mass, which will interfere with manipulations during the battle.
Viking battle ax
It should also be noted that the upper ledge will create difficulties during chopping and striking. That is, it gives the ax an unnecessary torque directed counterclockwise, thus causing increased wear on the ax handle. It won't hurt to grind off the protrusion located below. In addition, straight sharpening is not entirely suitable for a battle axe.
Making a Viking battle ax
All we need to make this ancient fighting tool is an old ax and a new handle. To make an ax, it is advisable to take a whole ax that has not burst, in order to bypass all the intricacies of welding cracks. I think that every household has an old grandfather’s ax of the same quality. If there is no such goodness, then you can always buy it at any metal collection point for three kopecks. To make a Viking ax with your own hands from an old ax we will need:
- The old ax itself.
- Material for making the handle.
- Pencil or marker.
- Angle grinder (grinder).
- Varnish and brush.
If you want to make an elegant wooden handle, then you will also need to find or come up with some kind of ornament, apply it to the wooden handle, and cut it out with a drill, or sweat and cut it out with a chisel.
Let's move on directly to the step-by-step instructions for making a Viking ax with your own hands.
STEP 1: old axe. We find an old ax and bring it to life. The first step is to knock the old handle off the axe. In most cases, this does not bring much effort - over the years the wood dries out, and the handle itself falls off the ax. Now you need to clean the ax itself from centuries-old rust. To clean an old ax from rough rust, we need an angle grinder with a cleaning wheel. We fix it in a vice, go through all the surfaces of the ax, and determine the integrity of the metal. If suspicious cracks were found on it, then they must be welded (or find a whole ax) because in the future our Viking ax may simply burst in that place. After welding, it is necessary to clean all welded seams to zero.
STEP 2: marking the axe . To make an exact copy of an ax from that time, we need to change the geometric shape of the entire tool. To make sure we don’t make a mistake with the shape of the future axe, we find a sketch of a Viking ax on the Internet, and from this image we begin to reproduce everything in real time. First of all, mark the heel of the ax. You can use a regular metal lid as a template or sketch an ax on paper. We fit it to the heel of the ax, as shown in the photo, mark the boundaries we need with a marker, and cut it. We put a cutting wheel on our grinder and cut out the unnecessary part of the old ax. We go through all the uneven places with a cleaning circle.
How to make an ax from wood
How to make an ax from wood? To do this, you need to prepare a wedge-shaped blank from which you will need to make a blade. On the surface of the workpiece, you need to draw the outline of the future toy with a marker. Excess material can be removed using an abrasive sharpener.
At the next stage, on the end surface of the workpiece it is necessary to mark the outline of the hole for the ax handle. The technology for obtaining the handle is described above, but it is necessary to correct the dimensions.
Children's wooden ax
Bringing the blade and handle to the required shape can be done using a sharpener or file. In a fairly short time, the children's ax will be ready.
Do-it-yourself ax from an ordinary one. DIY Viking ax
Dear visitors to the site “Visiting Samodelkin,” from the master class presented by the author, you will learn how you can independently make an ancient Viking ax with which they fought wars, robbed merchant ships and captured villages.
This ax has a rather interesting shape, and it is needed so that a warrior can use it in battle as a weapon, and in peacetime for building housing and cutting down trees for a fireplace to heat a Viking’s home.
Thus, it turns out that the ax was also used as a carpenter’s tool; by the way, they built their famous drakars (wooden sailing boats) with just such axes, and then engaged in robbery and robbery using the same ax.
Since childhood, the author has loved watching films and cartoons about Vikings; his dream was to get the same hatchet as the bearded Vikings, but since this weapon was only a dream for a little boy. But years passed and the boy grew up, learned to hold an instrument in his hands)) I decided to make myself a Viking ax no matter what.
I found my grandfather’s old hatchet in the barn and began to transform it, namely, I welded the existing cracks in the metal, the heel had to be changed a little, then the metal was ground.
Next, the author decided to harden his ax, heated it until red hot in a forge and cooled it in a bath of machine oil, then placed it in an oven preheated to 200 o C to relieve stress from the metal.
Then I carefully sanded it on a belt sander.
The ax handle is best made from hard wood (oak, maple, hornbeam). A Celtic pattern was also applied to the handle, pre-printed on a sheet of A-4 paper. The drawing was transferred to the pen and selected using a burr. And finally coated with linseed oil.
So, let's look at what exactly is needed to make an axe.
Materials
1. old ax 2. handle made of hard wood (oak, walnut, hornbeam, maple, cherry, etc., whatever you find))
3. wooden wedges
Tools
1. welding machine2. grinder (angle grinder)3. drill machine4. brush5. pencil
6. Belt sanding machine
Step-by-step instructions for making a Viking ax with your own hands.
First of all, the author got hold of an old grandfather’s ax that was stored in a shed on the street. The metal was rusty from time to time, had cracks and had not been used in business for a long time, but it made an excellent donor for creating a cool ax.
The ax had to be disassembled and the old ax handle, already dry and cracked from time, removed.
Then the master began to remove the rust, for which he uses an angle grinder.
- During the work to remove rust, it was discovered that there were cracks in the metal and it was decided to seal them by welding.
- We remove scale and excess metal.
- The heel of the ax is given a slightly different shape, a metal lid from a can is used as a template, we apply it and trace it with a marker.
- The metal of the ax is also selected using a grinder.
- Irregularities are sanded using a belt sander.
- After which it quenches in oil (machine oil)
- The hardening is carried out successfully, then the metal is tempered in a preheated oven to 200 degrees to relieve stress.
- Then it is sanded again on the machine.
- The Celtic pattern was printed onto a sheet of A-4 format.
- Then the pattern is transferred to the ax handle and selected along the contour using a burr.
- The ax handle is coated with linseed oil or varnish.
The ax turned out to be quite similar to a natural antique Viking battle axe. The author’s dream came true and he realized it himself, with his own hands, which doubles the happiness and joy from the work done. Today they practically no longer fight with axes, with the exception of the countries of the 3rd world)
An ax should be used for creative purposes, as a tool for peaceful labor, for construction and extraction of wood to heat your home. As you can see, if you wish, absolutely everything can be done with your own hands.
Step-by-step instructions have been provided to you, so let’s take it and do it. Be brave, friends!
That's all, thank you all for your attention! Come visit more often and don't miss out on new items in the world of homemade products!
Among the carpentry and gardening tools, the ax is always one of the most in demand. Most likely, you won’t find a more universal tool. Over the several hundred years since the transformation of the ax into a modern axe, a whole tradition has developed on how to make an ax with a special sharpening, how to prepare and adjust an ax for a certain type of work.
How to make an ax an effective and versatile tool
There are several modern versions:
For your information! Of particular note is the cleaver with a very strong massive butt and a short blade. It is difficult to perform a full blow with such a cutter, so it can be classified as an auxiliary type of tool.
How to make a universal ax for yourself
The main problem that needs to be solved when designing a tool to suit your tasks and needs is to make the right choice of blade when purchasing.
How to choose the right metal
It is believed that only good spring steel with a deeply hardened blade can produce such a sound.
In fact, what is important for a cutting edge is the toughness and elasticity of the steel, not the ability to sharpen the blade to a razor sharpness. It’s the latter that speaks of overheating and oversaturation of the metal with carbon.
You can make two or three demonstrative blows with this specimen to demonstrate its sharpness; on the fourth blow, the sharpened cutting edge will split.
An ax made of tough manganese steel 50HGA would be much more successful. Such a tool is more difficult to make, but it will last much longer and is much more convenient to work with.
Universal version of the ax
If you are not professionally engaged in the construction of log houses, where most of the planking needs to be done with a carpenter's axe, buy yourself a good quality product made in the Republic of Belarus.
Some of the enterprises still produce conversion samples of axes with excellent characteristics. All that remains is to decide how to make a handle for the axe. The best option would be a wooden handle, choose elm or old acacia.
You can use the scraps to make a wooden case for an ax.
A forged blade is considered the best, but finding a decent Soviet copy is not so easy. Most old blades have a lot of hidden cracks, so if you come across a suitable one, don't hesitate to give a few hard blows to the nearest stump. Traces of cracks will definitely appear on the cutting edge.
Homemade ax for hunting
What product does a hunter who spends a lot of time in the wild need? How can it be made? Yes, no one argues, in specialized stores you can buy a product for every taste. But not all of them meet the needs of hunters.
In order to make the cutting part of a product for hunting, you need to use a solid piece of metal. But somehow it’s more common to hold an ax with a wooden handle. For the manufacture of the blade, grade 1040 steel is used, this is a structural alloy steel, the Russian equivalent is 40G.
Homemade ax for hunting
You can make the cutting part by ordering it from the village smithy. The master is able to forge the necessary blank for the blade. He is also able to make and install a steel handle. If such a handle does not suit you, then you can install a wooden one. When making it, you need to take into account some simple rules:
The handle cannot be varnished - the hand will slip.
When choosing its shape, it is necessary to take into account the width of the grip of the palm; it is necessary to make stops that will allow you to hold the ax in your hand.
How to make a taiga ax
Before you make a taiga axe, you need to understand how it differs from a traditional one? It has a different blade shape and ax handle parameters. That is, you can take an ordinary ax as a basis. Change the shape of its sharpening, remove excess material in the upper part, by analogy with the combat one.
You can use an angle grinder to remove excess material.
Converting an ordinary ax into a taiga ax
Read also: How to glue glass and plastic
The ax handle can be made from birch. To secure it more securely in the blade, you can wrap a bandage impregnated with epoxy resin around its end. It makes sense to soak the handle itself with linseed oil.
If you find an error, please select a piece of text and press Ctrl+Enter.
Do not confuse a real taiga ax and a simple, familiar type of tool that is often found in the tools of the house. The taiga ax is a special type that will help out even in the harshest hiking or hunting conditions. Finding such a tool at an inexpensive price is quite difficult, but if you have the skills, you can try to make it yourself.
What types of axes are there?
The ax dates back to BC. But people still use it not as a weapon, but as an everyday tool. Today there are even several varieties of this instrument. It is used for a variety of needs. You can purchase it in a special store or create it yourself. Materials will be required of high quality and reliable.
But first, it’s worth taking a closer look at the types of axes:
- combat - refers to a type of edged weapon. These days you can only buy them as a collector's item;
- cleaver is a small hatchet that is excellent at splitting logs;
- kitchen - used not only at home, but also in catering establishments to cut meat, chop bones and make chops. Typically, such axes last a very long time;
- carpenter's - has a comfortable handle and a very sharp blade. But it is not used to chop wood;
- taiga - since it has to be used in rather harsh conditions, this type of ax differs in its parameters and even shape from any other;
- tourist - a brand new camping ax has a small length and weight: 35 centimeters and half a kilo, respectively. Suitable for simple work;
- household - mainly used for chopping firewood. Its blade is made of hardened steel and its handle is made of suitable wood. This is easy and comfortable to use.
Peculiarities
A good strong knife is an indispensable companion for any hunter, huntsman, hiker or forester. But in some cases, its power and size in the forest, and especially in the Taiga, are not enough, or it is not very convenient to use. In this case, an ax comes to the rescue. Here are a few examples of actions where it can definitely come in handy:
- Tree and firewood cutting;
- Processing logs, such as peeling bark. An ax is not suitable for fine woodwork;
- Making hunting traps from wood;
- Installation of huts or simple wooden structures.
As you can see, all rough work with wood can easily be done with a taiga ax. With it you can arrange shelter, light a fire, and get loot.
Components of an ax
It is better to consider the features of the taiga ax in more detail by familiarizing yourself with the characteristics of its components. These include: a metal head and an ax handle.
Metal head
The first striking difference between the metal part of the taiga ax and an ordinary carpentry tool is the absence of an upper part. The blade also has a rounded shape rather than a standard straight one. This helps it penetrate deeper into the wood. And also, if you have such a blade, you can use the tool to chop logs not along, but across the fibers.
The rounded blade of the hunting ax allows it to easily penetrate wood
The existing long beard firmly fixes the head with the ax handle, thereby reducing the risk of its fracture. It absorbs impact power up to 50-60%. This is a very important factor in the wild, where there is no way to quickly repair a broken weapon.
The taiga ax has a standard head. The head also has an eye where the ax handle is inserted. For tight fixation, a wooden wedge is additionally hammered in.
Toporische
This part of the tool should be longer than that of a regular carpenter's type. It is desirable that this figure be at least 50 cm. This will allow you to comfortably hold the weapon and carry out sweeping actions.
The handle of a hunting ax must be at least 50cm
When connecting two parts of the tool, it is necessary to take into account that the angle of inclination between them should not be the usual 90 degrees, but a smaller figure. You can roughly focus on 65-75 degrees. And another important criterion is that the ax handle, given its length, should be as light as possible. Otherwise, your hands will quickly get tired of working with the ax.
Characteristics of the taiga ax and what it should be like
Since the parameters of the ax and blade are very different from the usual sizes of “household” axes and will seem unusual to many, you first need to decide what problems can be solved with this miracle device:
- Tree cutting. Felling in a sawmill, sanitary felling or preparing firewood for a log house - this is exactly what this ax was made for.
- Rough work with logs (that's right, rough!). Suitable for removing branches, making grooves, removing thick bark and similar work.
- Ax for survival. A lightweight hunting tool, suitable for quickly creating bags and animal traps.
- Construction of huts, decking, wooden “instant” houses. A hut will not be built without an axe, but with its help you can do it 4 times faster than when working with a carpenter's ax blade.
- Working with firewood. If accuracy is a secondary concern, then this tool is perfect for the job.
If you want to make a tool for precision work, then it would be better to consider forged axes with a straight, long blade. They are of little use when cutting down trees, but the accuracy is very high. In addition to the quality of the “cut,” there are many differences between a taiga ax and a regular one.
Rounded blade of shorter length. The ax is much lighter than a regular ax, and the small working surface area allows it to be buried much deeper into the wood; it is suitable for cutting wood across the grain. The tool is much easier to carry (the ax and head together weigh no more than 1400 grams).
How to make a taiga ax
Unfortunately, not everyone can forge a new ax from steel. But if the desire to own a real taiga ax is great, and the prices in stores seem too high, you can try making it from ordinary carpentry tools.
Making the tool head
Before you start working with the metal head of a conventional axe, it should be inspected for corrosion. If it is available, then it is better to soak this part of the tool in a container with vinegar. This will take at least a day. Remaining substances are removed using a regular brush.
A semicircle is cut out on the inside of the metal head, this allows you to make the girth comfortable
The rest of the procedure proceeds as follows:
- The front protrusion of the metal part is cut off. This must be done flush with the butt. If there is a protrusion of 5-7 degrees left, then it’s okay, but ideally it’s better to remove it;
- Using a Bulgarian saw or an emery wheel, cut off the back of the blade, giving it a rounded shape;
- A semicircle is cut out on the inner or, one might say, lower part of the head. This will not only make the grip of the instrument comfortable, but also significantly reduce its initial weight;
- You can skip this step, but if you want to comply with all the conditions for the construction of a taiga ax, then it is better to comply with it. Both corners of the butt are cut off. This step increases the maneuverability of the gun;
The metal head of the ax is ready, all that remains is to sharpen it correctly.
Making an ax
It is necessary to pay attention to the manufacture of the ax no less than the metal part. After all, the ease of use of the tool will depend on the correct geometry.
This part of the weapon is made of wood. Pine is considered the simplest option due to its ability to be easily sanded and processed. But there is a risk of its rapid breakdown. You should also pay attention to types of trees such as birch, maple and ash. The length is chosen at personal discretion: from 50 to 80 cm. In some cases, a size of 100-120 cm may be more convenient.
The process of making an ax includes the following steps:
- The blank from which the ax handle will be made is determined. Its diameter must be at least 13 cm, and its length must be 20 cm longer than the final version;
- The workpiece is cleaned. Then they split it exactly in the middle and leave it to dry for a long time, preferably at least 8 weeks. It is important to consider that the humidity in the room should not be too high, and the desired temperature should be kept within 22-25 degrees;
- The dried workpiece is processed using a chisel. A small hammer can also come in handy for this matter. At this stage, it is important to maintain the correct shape of the ax handle, which means it is better to look at the drawings and diagrams.
Read also: Machine for bending reinforcing steel
If this is your first self-made ax, then it is better not to rush to avoid mistakes in the shape. Professionals in this field will need a minimum of time.
Assembling an ax
When both parts of the tool are ready, all that remains is to connect them. To do this, they usually use epoxy resin and a piece of regular gauze or medical bandage. For additional fixation of the metal head on the ax handle, wooden wedges are hammered in.
For additional fixation of the metal head on the ax handle, wooden wedges are hammered in
You won’t be able to use the tool right away; you need to wait at least 2 days. In order to protect the ax from corrosion, after sharpening and polishing it should be coated with a special agent. The taiga ax is ready for use.
Sharpening rules
A good hunter or forester always has a sharp ax, because there is nothing worse than being in the forest with a blunt weapon. As mentioned above, the blade sharpening of the taiga species is distinguished by its rounded, steep shape. This allows the blade not only to work on wood more efficiently, but also to become dull less often.
Manual method
It’s a rather labor-intensive process, but for those who like to take care of their tools, it may, on the contrary, come to their liking. To begin with, a special template is made according to the dimensions of the tool. It is made from a piece of tin, having determined the correct sharpening angle. The ax is applied to the finished template. And if there is a deviation angle, then they mark it and process it.
For manual sharpening, they often take a wooden block and cover it with sandpaper. It must be coarse and fine-grained. Sharpening is done with the blade facing away from you. It is noted that one such timber can be enough for the entire season.
Mechanical
If you have a special machine, the process will go much faster and easier. But there are also some nuances here.
Sharpening an ax mechanically
Mechanical sharpening is carried out as follows:
- Place the machine on a flat surface;
- Using a marker, marks are made to change the angle of the blade. This step is done when necessary;
- Sharpen at low speed, holding the ax with the blade away from you;
- At the end of the process, the grinding wheel of the device is lubricated with finishing paste. Then the tool is polished on it;
- The sharpened tool is treated with an anti-corrosion agent.
To prevent the ax from becoming dull quickly, it should be stored in a special protective case. You should never throw an ax on the ground. And in order to protect yourself from possible injuries, it is necessary to sharpen the tool while wearing protective gloves.
The ax will please you with its performance for a long time, if you do not try to chop stones and too hard objects with it. And also when cutting, it is best to place a little wood under the wood.
In this instruction we will look at how you can make an interesting hatchet from an old axe. You can take such a hatchet with you into nature and surprise your friends, especially girlfriends, with it. The weight of the ax is quite enough to chop thin logs, sharpen a log or chop branches. It is made very simply. The author welded a piece of spring as the cutting part. This steel is durable, it can be sharpened to the point of a blade and it will hold an edge for a long time. So, let's take a closer look at how to make such a hatchet!
Materials and tools used by the author:
List of materials:
- old axe; – a piece of spring; – ax handle (the author’s made from birch); – stain (oak).
List of tools:
– power supply, cotton wool, salt solution, varnish (for etching); – vice; – Bulgarian; - welding machine; – polishing machine; - sandpaper; – brush for cleaning metal and more.
Ax making process:
Step one. Preparing the ax
First, let's clean the ax from rust; for this, the author used a metal brush. And then we need to remove the ax handle; we won’t need it. We remove the wedges and then knock the ax off the ax handle. We inspect the ax for damage. After cleaning, the author discovered a weld on it that was of poor quality. Such defects need to be cleaned out and digested again.
When everything is ready, we begin cleaning the welds. We work with a grinder, on a sharpening machine, and so on. We need to hide all the irregularities, the metal should become homogeneous.
Step four. Sanding and polishing
Let's start sanding, the author does it manually using sandpaper. Of course, it’s a bit hard to work with, it would be nice to have a belt sander. At the end we use fine sandpaper, and as a result we polish the hatchet on a polishing machine. The author managed to bring it to the state of a mirror.
Step five. Assembling the hatchet
The author used a birch ax handle as a handle. Of course, an oak ax handle would look good, but this wood is fragile and not suitable. To disguise the snow-white birch and oak wood, the author impregnated it with stain. Everything turned out quite nicely. If you wish, you can also carve the handle or decorate it in some other way.
It is best to hammer the handle with PVA glue or any other carpentry glue. Experience shows that the handle lasts much longer this way. That's all, the project is finished, I hope you liked it. Good luck and creative inspiration if you want to repeat it. Don't forget to share your homemade creations with us.
New life for an old ax
Greetings, Samodelkins!
From this article you will learn how to revive and give a second chance to an old ax covered with rust, forgotten on the street.
While cleaning up his garden, the author of the YouTube channel “TEXaS TV” found this old ax:
Looking at the ax handle, one can assume that this object had clearly lain in the bush for more than one year. But the steel part is still in pretty good condition. Therefore, it was decided to try to revive this instrument and give it a second life, to make an ax for household needs.
We arm ourselves with a special attachment, a screwdriver and begin cleaning the ax from traces of corrosion.
In the process of cleaning the metal surface, it turned out that the ax was not that old. On the stamp you can clearly see the year of manufacture of the ax - 1990, which means that it is only 30 years old.
As you can see, the mark itself has been preserved simply perfectly. Now let's do the following, namely, get rid of the old axe.
The ax handle did not withstand the test of the street and is being scrapped. And we will continue to work with the iron part. First, let's modernize it a little. Take a white sheet of paper and trace the outline of the ax.
We put the ax aside, and on the sheet we draw what we want to see in the final result.
The author experimented a little and made several different sketches, but still decided to go with the first option.
Next, you need to cut out the template and then transfer it to the ax.
For convenience, the master used ordinary office glue such as a pencil. I glued the template and outlined it with a marker.
Now the ax is ready for further processing. It was decided to leave the factory mark with the date of production of the ax and try to preserve it as much as possible. Now we begin to remove excess metal. A long and rather routine work began. The author honestly admits that he is cutting an ax for the first time, and by the way, it is still a pleasure to cut high-carbon steel.
But still, little by little the ax gives in. Perhaps the most difficult thing in this project is cutting out the rounded part of the canvas. Here you will have to cut it in small segments.
Next, we replace the cutting disc with a cleaning disc and clean up what we couldn’t cut with the cutting disc.
And of course, it won’t do without a grinder, which the author also made with his own hands in one of his earlier projects. This machine is ideally suited for finer metal processing.
It turns out pretty good.
The petal circle can also speed up work quite well. I use it to remove all the remaining bumps and grooves.
Well, as mentioned earlier, we will do the finishing work on the grinder.
Then, using a gas burner, you need to heat the metal of the ax and use an iron to thoroughly iron the paper.
The excess paper can now be removed. Ordinary tap water copes with this task perfectly. We soak the paper until a clear outline of the logo remains.
Next, the remaining exposed metal must be protected from the chemical reaction. There are essentially two options: paint over it or cover it with film. The author chose the second option. Pour warm water into a bucket. Then add regular table salt to this water. For half a bucket you need about half a kilogram of salt.
Then mix everything thoroughly until the salt is completely dissolved in the water. Next, we take a battery charger (you can also use an ordinary power supply), hang a piece of metal on the minus (-) (it will serve as an electrode), and on the plus (+) the ax itself.
We provide food and the process begins.
Attention!
Don't overdo it with tension! If the voltage is too high, it can undermine the paint and the etching will not be of good quality, which is what you will actually see on this example a little later. After that, we can remove the film and see what we ended up with.
Any remaining paint can be removed using Scotch Brite.
Due to the fact that the author did not calculate the voltage, the etching turned out to be of poor quality. Although in this case it’s not scary, we’ll polish it a little and it’ll be fine. Plus, we’ll additionally go over the surface with a felt circle with paste.
Although it is worth saying that polishing was still unnecessary here, every scratch is immediately noticeable. Perhaps in the future it should be removed, but for now let’s continue.
Almost finished, all that remains is to finally sharpen the ax. Here the author decided to get a little creative and make the cutting edge of the ax on a knife sharpener.
While there is no ax handle, sharpening an ax in this way is quite simple. Plus, the edge will be perfectly smooth.
And now the main part is ready, all that remains is to adjust the ax handle. You can make it yourself, or you can take a ready-made one. The author had such a blank lying around for a long time and was waiting in the wings.
In this matter, the main thing is not to rush and adjust everything properly, otherwise all the work will go down the drain.
Well, the ax handle is adjusted, we saw off the excess.
In the end, these are the wedges we got.
Everything is ready, you can start assembling. We will place the ax handle on epoxy resin. Apply epoxy thoroughly to the landing site and connect the parts into one whole. We will place the wedges on wood glue. In the same way, we coat thoroughly, install everything in its place and nail it down properly.
In the end, this is what happened. The wedges must be hammered until they fall apart. Now all that remains is to remove the protruding part. This can all be done on the same grinder.
Everything is ready, and you can look at the result.
Plus, the oil additionally highlights and emphasizes the structure of the wood, while protecting the wood. Well, now it’s time to test the resulting hatchet.
Author's video:
Source
Become the author of the site, publish your own articles, descriptions of homemade products and pay for the text. Read more here.