Manual hiller for potatoes: purpose
A potato hiller is an indispensable household assistant for anyone who has a vegetable garden. With its help, you can hill up a large plot of several hundred square meters in a short time. Its main advantage is that you can do it yourself.
In regions with high temperatures and low humidity, this procedure, on the contrary, is carried out much less frequently. After all, this removes all the moisture from the soil, which may already be insufficient.
How to install a hiller on a walk-behind tractor?
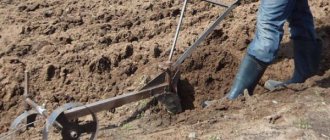
Installing and setting up a potato hiller for a walk-behind tractor is not a very complicated procedure. It is attached to the hitch using bolts and washers. When working with a simple hiller, you need to adjust its operating angle and depth of immersion into the ground. The plowing depth of the hiller is less than that of a plow, so for adjustment you do not need to place the walk-behind tractor on a hill. Simply adjust the hiller stand vertically. The required angle of attack is determined by how deep the hiller enters the ground in the working position. This depth should be about 15 cm.
If during the work you notice that the hiller is digging deep into the ground, tilt the stand forward. Otherwise, if the hiller does not deepen enough, the stand, on the contrary, is tilted back.
Setting up and installing a disc hiller is a little more complicated. First you need to set the distance between the lower points of the hiller disks. It will be 40-70 cm, depending on the upcoming work. Next, the angle of inclination of the disks relative to the horizontal axis is set.
The settings of both disks must be identical, otherwise the walk-behind tractor may skid to the side.
Helpful tips for proper hilling:
- The procedure must be done at a certain time. Ideally - 2 times in 1 season. The first time is when the potatoes grow by about 10 cm. The second time is already about 20 cm. The flowers should not be open.
- Give preference to cloudy weather. If this is a rare occurrence in your area, then choose early morning and late evening. Ideal after rain or watering.
- Forget about the rake and hoe. Trust a modern tool - a potato hiller.
So, without such a procedure you will not see a good result. And without the right device, you won’t be able to make it as easy and effective as possible.
Homemade lister hiller
To make a homemade manual or automated hiller for any type of potato, you first need to draw a scale drawing of the mechanism on paper and indicate the required dimensions of the device.
Manufacturing equipment
In order for the work to be done quickly and efficiently, you must first prepare the tool. For this you will need:
- Bulgarian;
- welding machine with electrodes;
- drill with a set of drills;
- hammer.
A grinder and a welding machine are needed to make a hiller
From the materials you need to prepare:
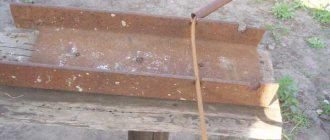
- metal sheet, 2-3 mm thick;
- iron pipe, with a cross section of 20mmx20mm or 30mmx30mm;
- if an adjustable device is being made, then you will additionally need to purchase 4 loops and metal strips (3 mm thick).
Progress
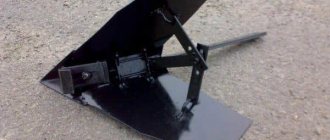
- We cut out the sides of the plow (ears) from a metal sheet. The wider the width of the sidewalls, the more land will be captured and, accordingly, more of it will be poured under the bush. In the narrower part, intended for cutting soil, the width of the ears should be 5-7 cm. For narrow row spacing, ears are made smaller in width than for wide ones;
- We bend the sides and give them the desired shape. The bend radius should be the same for both the left and right halves;
- We weld both halves and clean the welding area;
- We connect the ears together with metal strips. If the hiller is not adjustable, then the strips are welded to the ears; if it is adjustable, then we fix it with loops. It is desirable that the angle between the stripes be 90°, and between the ears – 120°. We weld the other ends of the strips together;
- We attach the nose to the narrow ends of the ears by welding. The angle between the metal strips and the spout should be 150°;
- After manufacturing the working part of the hiller, it is welded to the bracket. Using a bracket, the hiller is then connected to a mechanism, for example, a walk-behind tractor.
Types of hillers
First, you need to decide on the type of device. Most Popular:
- plow;
- disk type.
A manual disk hiller for potatoes is a frame on wheels to which disks are mounted. The device includes:
- leash;
- turnbuckles - regulate the mobility of the discs;
- racks;
- disk dumps.
This type of tool is suitable for planting potatoes or after harvesting them, and hilling the soil between the beds. The disc type of design allows you to change the distance of rotation of the discs so that you can work comfortably in small areas.
A manual plow for hilling potatoes is a fairly comfortable type of device. Allows you to process large areas in a short time. Used for walk-behind tractors; fix it in the furrow during operation. You can work quickly even if the winter is dry. You can adjust the depth and width of plowing.
Most summer residents prefer the disk type due to its easy control and even beds. But their price is appropriate. The plow type benefits from its cost, but is not inferior in functionality.
Do-it-yourself manual plow for planting potatoes. Planting plow
A hand plow will help you plant potatoes without a shovel. To make it yourself, you will have to put in some effort. But they are worth spending, since the device turns out to be universal - the plow is used not only for planting potato beds, but also for subsequent hilling of bushes and loosening row spacing.
Since hollow pipes and sheet metal are used in the manufacture of the structure, you will need welding equipment, a gas torch or blowtorch, and an angle grinder.
To create a universal method of planting potatoes, follow this algorithm:
- a meter pipe with a diameter of 2.5 cm is filled with sand and closed with plugs;
- bend at an angle of 10-15 degrees at a distance of 30 cm from the edge, using a blowtorch; a stand is obtained, indicated in the drawing by position 3;
- Having removed the plugs, pour out sand (it is only necessary for neat bending of the pipe);
- a double-blade working element with a trimming knife is formed from pieces of metal and secured from the bottom of the rack with bolts, for which holes are pre-drilled in the pipe;
- control handle 4 is inserted into the pipe from above and secured with bolt 12; there should be several holes on the handle to create a telescopic retractable system;
- the front link 5 is shaped as shown in the drawing and welded to the rack; positions 9, 10 indicate the presence of a horny handle;
- Using brackets 7 and 8, a lanyard 6 is attached to the rod and riser, allowing you to adjust the level of attack of the knife.
Manual plow with traction
For ease of control of the plow, a strong neck-axillary tape can be attached to the base of the draft handles (position 11). It will allow the lead worker to evenly distribute his efforts when walking with the plow across the site.
Other tool types:
- To the tractor - process automation. This design can immediately remove all weeds from the treated area. In practice, it has been proven that after working with this type, potato yield increases.
- for a walk-behind tractor - also for automation of work. In principle, this is not a separate type, but the tool can be installed on this vehicle.
Which device is better is up to you to decide. It depends on your goals, the desired speed of operation and the functionality of the devices.
Disc hiller parameters
This equipment has found wide application in agriculture. With its help, the ridges are smooth and high. Accordingly, the time spent processing row spacing is reduced, and working with the device is quite simple.
There are certain parameters that manufactured disc hillers must meet. You also need to do them yourself, remembering the following:
- about the thickness of the disks;
- their diameter;
- material for manufacturing;
- mechanism for regulating the operation of equipment.
Based on the drawing proposed in the article, you can make the inventory yourself and save a lot of money.
Operating principle
The operating mechanism of manual hillers is very easy to understand. Two people handle the instrument from the front and back. The one in front places emphasis on the handle and moves the device forward. The one at the back presses the discs into the ground using a handle.
At this time, the discs pass through the soil, hilling the plants nearby. The distance is also adjustable.
In the case of automated devices, it all depends on the type of transport. Standard - you just need to drive the car.
Preliminary actions
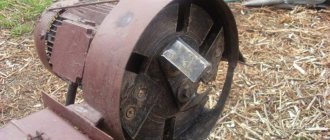
To begin with, prepare the bicycle frame: handlebars, saddle, pedals, and remove the rear wheel. The second wheel is disassembled and cleaned - only a metal rim is needed.
The metal rim penetrates the soil better, which is why the hiller will gain much greater stability and maneuverability than with rubber. Operating such a unit will become much easier.
Advantages and disadvantages of homemade structures
A homemade potato hiller has the following advantages:
- Availability. Almost every gardener can do it. This does not require special knowledge or any skills. It is enough to understand the basic tools and be able to use them.
- Saving. Ready-made solutions are always more expensive. And taking into account that a person does not pay himself for the work, then we get a free option.
- Performance. A self-made device is not inferior in efficiency to its automated counterparts.
The only drawback is that safety and quality depend only on you. Therefore, do not be lazy to pay due attention to each stage of work, even if it seems insignificant. To obtain a quality product, use the appropriate parts.
Creation of a cultivator section
If you were unable to find/buy/remove a cultivator, you can make it yourself.
Creating a basic cultivator is quite simple. In fact, this is the same plow. Two plates are attached near the base, which form an angle directed forward (towards the wheel). As the hiller moves, the plates will divide the soil into 2 parts and hill up the potato rows with the raised soil.
However, the following requirements for this part should be adhered to:
- the total width of the blades should be equal to 2/3 of the row spacing of the potato bushes;
- the cultivator should go 10-15 cm underground;
- The angle of the blades should be close to 90 degrees - this way they will perfectly pick up the soil.
After carrying out a full range of work, you should end up with a full-fledged manual hiller that does its job perfectly while growing potatoes.
To familiarize yourself with the device in more detail and understand how to properly make such a homemade hiller, you can watch the following video:
How to make a hiller with your own hands
How to make a potato hiller with your own hands? To do this we need the following tools:
- hollow water pipes: length - 10 cm, diameter 1 inch;
- another similar pipe, but with a diameter of 3/4 inch;
- sheet steel 1-2 mm;
- lanyard or steel plate;
- pipe bender or gas torch;
- welding tools;
- Bulgarians.
This is an approximate list of tools, depending on what type of hiller you want to make, it may change.
The device can be adjusted in several ways:
- By height. Due to the telescopic mechanism in the center. A smaller pipe will be mounted into the central pillar pipe, which will act as a rear linkage. This design is very comfortable to use, because it can adapt to any person’s height.
- We change the angle of attack by tilting the central post relative to the ground. We get this opportunity if we change the angle between the front link and the vertical post. If your design does not have a lanyard, then you can change the angle by changing the position of the plate.
We start making a homemade manual potato hiller with vertical stands
We take a 10 cm pipe and measure about 4 cm from the end. At this distance we should make a slight bend. Approximately - 15 degrees. The most comfortable and easiest way to do this is with a pipe bender - a tool specifically designed for this purpose. Of course, not everyone has such a device, so we’ll tell you about a more affordable way to complete this step.
We fill the pipe tightly with sand or earth - whatever is freely available. We insert plugs so that all the mixture does not spill out. Using a blowtorch or any other heating element, we make the bend we need. Due to the fact that there is a mixture of sand or earth inside the pipe, it will not bend and will maintain its ideal parameters.
Let's move on to making traction
A homemade manual potato hiller has a built-in rear pull. It has the shape of the letter "Pe". In our design it will be of the following dimensions: 5 cm wide and 2 cm long. Note that if you change this value for one engine, you must do the same for the others.
We attach a 3 cm long pipe to the center of the fork, vertically. Then we will insert it into the vertical rod.
We now need to bend a pipe with a diameter of 3/4. This can be done using the method already discussed above. If you have other options, you can use them. In this case, the main thing is one result.
Let's take care of the ability to change the height. We make a hole at the top and in the vertical part of the mechanism. And now, by changing the bolt, we can adjust the height. So, a person of any height will be comfortable working with the tool.
Read also: The simplest DIY battery charger
We have made the rear link, now we need to move on to making the front link. It is made in the form of a fork, like the rear link, differing only in size. The handles should be of such length that a person can comfortably stand between the handles.
For ease of use, we will also add an elastic belt that can be worn on the shoulders and chest. This design will reduce the load on the hands and preserve the strength of the person working with the tool.
Dimensions: handles - 6 cm, vertical part - 7 cm. On the vertical part of the fork at its end you need to make a hole with which it can be secured to the rack.
Let's move on to adjusting the angle of attack. The best option is a lanyard.
We count 3 cm from the bottom of the vertical post and mount a 25x25 cm corner in this place. We count 0.3 cm from the position of the fork and then do the same. And we repeat the procedure to the vertical post above our first corner.
The last step is the trimming knife.
It is this mechanism that takes the entire load and reduces resistance in the soil during operation.
For the knife, choose carbon steel. You need to cut the arrows and sharpen them at an angle of 45 degrees. Such parameters allow our mechanism to remain sharp and fully cope with its tasks.
Now you need to start welding the knife to the lower end of the vertical post. Our DIY potato hiller is now ready!
Manual plow hiller: instructions and drawings
Here you will need a set of materials. You should prepare:
- pipes with a diameter of 32 and a thickness of 2.5 (L 1000 millimeters and 700 millimeters);
- steel pipe with a diameter of 45, 6.5 (L 1000 millimeters);
- pipes with a diameter of 21, 2.5 (L 1000 mm and 1700 mm);
- sheet iron 3 millimeters thick, electrodes, bolts and nuts, lanyard.
Next you need to make a rack:
- bend a steel pipe with a diameter of 45 and a length of 1000 millimeters in half, while making an angle of 30 degrees;
- on one side, drill 5 through holes with a diameter of 12 and an interval of 50 millimeters;
- on the second side it is necessary to weld 2 brackets for the handle and lanyard.
After the stand, you need to start making the plow itself:
- make markings according to the drawing;
- cut out;
- start sharpening knives;
- weld two blades and weld everything with the stand.
Next comes the turn to the rear handle:
- bend a steel part with a diameter of 32 and a length of 1000 millimeters on both sides into a perpendicular, maintaining a distance from the edge of 150 millimeters;
- it is necessary to drill 5 through holes with a diameter of 12 with a distance of 50 millimeters from each other in a pipe with a diameter of 32 and a length of 700 millimeters;
- then cook it all.
Reviews
A device for hilling potatoes is very popular among summer residents, and especially if it is made with your own hands. Numerous reviews prove this. Let's present you some of them:
“A homemade potato hiller is probably the best thing we have among all the gardening devices. This design saves so much effort and time. Previously, they even wanted to give up having a vegetable garden, because it requires a lot of dedication. A neighbor recommended a hiller to us. Accordingly, they wanted to buy it, but my husband made it himself. They also added a special belt, so now it’s generally comfortable to work with. From practice: this year we got 2 times more harvest than last year, when we used a hoe and, accordingly, did this work in bad faith.”
“I never thought that a potato hiller would bring me so much joy! We discovered this device recently, which we regret: how much time we could have saved. Our vegetable garden is very large; we had to ask our children and grandchildren to do all the work, because we couldn’t do it ourselves. Now we have solved at least one problem - hilling potatoes, which was very difficult if you used a shovel or hoe. We looked at how to make a homemade potato hiller and the next day we tested our invention. It seems to me that our mechanism is even better than the store-bought one. We designed it taking into account our own characteristics.”
I can’t imagine how we managed before without such a structure. A manual plow for hilling potatoes significantly saves time and effort. Of course, there are many outstanding inventions in the world, but for summer residents and gardeners this mechanism is probably the best thing that has been invented in recent years. There is a lot of equipment on the market for professional use, which costs accordingly. And you can make a tool for hilling potatoes yourself, which is what we did. For the second season we can’t do without him. The last time I noticed good progression in increasing the yield.
Remember that a manual potato hiller must be of high quality. Therefore, carry out all stages of work conscientiously and do not forget to select good parts and materials.
Modern agriculture is a technological field of activity. Innovations and developments do not bypass even the simplest processes associated with potato processing. This crop cannot be grown without labor and energy costs. Hilling is very beneficial for the culture.
Meaning and working principle
Potatoes, which are commonly called the second bread, are considered one of the most important agricultural crops in Russia. Potato tubers are widely used in cooking, and potato starch is used in the textile, food and paper industries.
Growing this crop requires a lot of time, effort and energy. During the growing season, potatoes are hilled several times. Loosening the soil helps improve the air exchange process. Oxygen entering the soil has a beneficial effect on the growth and development of cultivated crops. According to reviews from experienced farmers, yields can increase by 40–60%.
The first hilling is carried out with the appearance of the first shoots. The average height of sprouts is 5–7 cm. The procedure must be repeated when the potato bushes grow to 20–23 cm. After each rain and watering, you need to loosen the soil. The earthen crust formed by water prevents oxygen from reaching root crops growing in the soil.
Many gardeners operate the old fashioned way, using a hoe to hill up potato bushes. In order to speed up the process of loosening the soil, it is recommended to use a manual hiller.
Characteristics
Any gardener who has potatoes on his plot will most likely need a hiller. This tool is characterized by versatility and helps to cope with complex work more effectively. The most common option is a manual hiller. The characteristic features of the product allow you to cut ridges of earth into ridges and carry out pre-emergence and post-emergence treatment. The dimensions of the standard tool are suitable for simultaneous harrowing and hilling of rows in a potato field. Depending on the characteristics of the tool, it is possible to process several rows with plantings at once.
In addition to loosening the soil between the rows, the hiller simultaneously removes weeds. A high-quality tool purchased from the manufacturer has a special device that promotes self-cleaning of adhering dirt. Hillers successfully cope with the task on any type of soil.
The main condition for successful loosening of the soil is the absence of stones and humidity not exceeding 20%. Modern hillers allow you to apply mineral fertilizers simultaneously with soil cultivation. The features of the hillers allow one person to handle the tool.
Other hiller options
You can buy a hiller ready-made, but making it yourself is cheaper and easier (without leaving home). There are also many options for homemade hillers: from a wheelbarrow, from a stroller, from a tricycle, from a bicycle wheel and pipe, etc. For a manual hiller from a wheelbarrow, a frame with a wheel is taken as the basis. The cultivator section is attached to it. It is controlled by wheelbarrow handles.
You can make a hiller from a children's tricycle by removing the seat and front wheel. A ready-made tractor cultivator will not work here. It is necessary to weld the blades on the inside of the frame next to the wheels at a certain angle. This design will move along the row, and not along the row spacing. The hiller from the stroller is made according to the same principle.
We showed one of the options for how to make a manual hiller with your own hands in this article. With such a homemade unit, you can perform a variety of work on the site, especially if you change the nozzle: weeding, loosening, cultivating, etc. Moreover, one person can easily perform these works.
Principle of operation
Gardeners know that hilling potatoes should be carried out several times a season. If the soil on the site is well-cultivated and loose, this contributes to a better process of oxygen exchange. The air entering the soil has a positive effect on the development and growth of plants. Timely loosening increases yield by 30–60%. Thanks to the design of the working body of the hiller, furrows with the required depth are obtained. The loosened soil falls off on both sides of the resulting ditch. Tubers are placed in it, and then the grooves are filled with earth. As the potatoes grow, you need to add a thick layer on top. This contributes to the formation of a large number of tubers. This addition is again ensured by loosening with the formation of a groove along the planted seedlings. This is achieved by the fact that the working parts of the hiller, when moving between the rows, cut off the top layer of soil.
Thanks to the wing-shaped device, the dumps fall onto the crop row and lightly cover it. Weeds are removed along with the cut soil.
In addition to potatoes, other crops that are planted in rows and require hilling, for example, tomatoes, eggplants, peppers, can be processed with a hiller. Tool designs differ in grip width, manual or mechanized operating principle. The first option is quite primitive, requiring two operators, one of whom takes the front handle, and the other presses on the rear link. As a result of the efforts, the device goes deep into the ground, cuts the soil, and when moving inside the formation, leaves a noticeable trail of earth. The automated version is attached to a tractor or walk-behind tractor and is controlled by one operator.
Manual and automated hillers can be divided into the following types:
- disc is a simple tool suitable for one person;
- garden plow is a universal plow that requires the presence of two operators.
It is clear that disc options are easier to use; they are also often automated by coupling with motor vehicles. The ridges of the earth after the disc hillers are higher. There is also a negative point in these devices - the price. Compared to a plow hiller, it is four times higher. Externally, the tool looks like a frame with wheels on which disks are suspended. The distance between them can be changed in accordance with the width of the rows. The discs are set at a certain angle, which is not recommended to be adjusted relative to the vertical. Without a constant equal distance between the circles, the tool will pull sideways.
Automation of the hiller is possible if the farm has a walk-behind tractor or cultivator. To fasten the tool, a bracket, a stopper, two bolts and washers are enough. When moving, the discs will grip the soil, creating a roller. To increase traction, the walk-behind tractor must operate in first low gear. By rotating the discs, the earth is crushed and loosened, covering the plants in the rows.
The simplest type of hand plow has a predetermined working width, wings (ploughs) shifted relative to each other, which are motionless. This is convenient if the row spacing has already been determined and the tool fits them. Another advantage of hillers with a fixed working width is the ability to use them with light cultivators weighing up to 30 kg. The advantage lies in its compactness, and the negative side lies in the limited work in wet areas. Here the tool will stick in the soil.
Read also: 220 volt reverse circuit
A hiller with variable working width is the most common option. The adjustment mechanism is simple, but it allows you to move or extend the wings, adjusting them to the desired width to the row spacing. The tool can also be automated, but only with heavy walk-behind tractors. The wings of such a hiller push the earth in both directions at once. After the tool passes, the part falls back into the line that it cuts. For a more efficient harrowing process, a more powerful walk-behind tractor is required, otherwise pulling the hiller will seem harder than working with a hoe or hoe.
A Dutch-type hiller is more convenient in this regard. This species differs from the previous one in the ability to move the wings not only to the sides, but also upwards. As a result, the tool itself adapts to the soil conditions. The hiller is more convenient for cultivating furrows for planting potatoes. This option is simpler and cheaper to make yourself.
Purpose and principle of operation
A manual potato hiller (tiller, furrower, marker) is a relatively small and light agricultural implement driven by muscular human power.
The most common hand-held plowshare hiller consists of the following parts:
- working body – hiller body, consisting of a point (ploughshare) and a double-sided blade with “wings”;
- stand - a thick metal strip, welded at one end to the body of the hiller, and fixed to the frame at the other;
- frame made of metal round or profile pipe;
- support wheel.
In disk hillers, instead of the ploughshare body of the hiller, two spherical disks located at an angle to each other are installed on the frame.
When growing potatoes, this agricultural implement performs the following operations:
- cutting planting furrows;
- hilling and formation of ridges during inter-row cultivation;
- destruction of weeds and destruction of the soil crust formed after heavy rains or drought;
- spreading out rows when harvesting potatoes - for this operation, a special potato digger body is used, in which, instead of a solid double-sided blade, 2-3 rows of rods are used.
Expert opinion
Stanislav Pavlovich
Gardener with 17 years of experience and our expert
Ask a Question
Important! To fill the planting furrow with potato seeds, a special device is used - two rectangular blades welded to a vertical stand and located relative to each other at an angle of 15-200.
Variety of models
On the market for agricultural products you can find a manual hiller “Druzhba”. It is equipped with adjustable wings that allow you to change the working width, and the addition of a front iron support wheel. The equipment is controlled by two operators. The dimensions of the product are 55 cm width and 48 cm height. The weight of the unit is 17 kg. It is produced in the city of Cheboksary, and its cost varies from 3,000 to 4,000 rubles.
Another version of the hiller is “Pull-Push”, which is popularly called a hand plow. It is unregulated. The design of the tool allows it to cut furrows, weed weeds, and hill up planted potatoes. The width of the product is 45 cm, and the height is 90 cm (including the handle). The unit weighs 7 kg. It is lightweight due to rubberized handles. The price of the tool is from 1500 rubles. It was produced in Kyiv.
A popular hand-held tool is the “Phenom”. The design provides the ability to work with both two and one operator. The hiller is adjustable both in the height of the handles and in the width of the processed ridge. As an additional tool for the hiller, a flat cutter is offered, which is connected with a handle using ordinary bolts. The dimensions of the product are 16x40x40 cm, and the weight is 10 kg.
Important! The variety of models such as “Friendship” and “Pull-Push” is expanding due to the new generation rotary active hiller, which is also called a propeller hiller. It is believed that the tool not only loosens the soil, but also allows you to harrow plants with loosened soil, which is very useful for their roots.
Modern manufacturers offer flat cutters. This tool is a bent plate with sharpened edges. Using the equipment, you can remove weeds and loosen the soil. To weed several rows at the same time, several flat cutters are combined on a special hitch. On sale it is called a wide-row weeder.
Among the hand tools for loosening, the Tornado cultivator became famous. It has a simple design, which consists of curved teeth connected to the handle. In relation to the base they are turned counterclockwise. To work with the tool, it is enough to rotate it around its axis in a vertical position.
Various models of hillers
The hiller is the second most important tool after the plow and winch. With its help, you can first cut furrows for planting, and subsequently fill them with planting material.
When moving the hiller along the row-spacings of evenly planted rows of potatoes, you can observe how the wings of the tool quite quickly pour soil into the holes with tubers
On sale you can find several variants of models of this instrument.
This is the simplest type of tool that has a fixed working width. The design consists of two fixed wings connected and slightly extended. Since the wings of the tool are stationary, it is impossible to adjust the working width by adjusting the hiller to the row spacing. Therefore, when working with such a tool, the row spacing is adjusted to the capabilities of the hiller, and not vice versa. Traditionally, manufacturers produce products with a working width of 25-30 cm, which is also far from the most convenient option, because the technology for growing potatoes provides for a row spacing of 50-60 cm.
Such tools are designed to work with motor cultivators whose power does not exceed 3.5 hp, and the total weight of the unit is 25-30 kg
A design feature of lister hillers is also the presence of thin racks that prevent the motor cultivator from being overloaded when the hiller is buried in layers of dense soil.
Some models of lister hillers have a streamlined shape, which is more preferable, since when working with such a tool, the soil is less turned out and dried out.
Such tools are more convenient to use because they are equipped with an adjustment mechanism with which you can change the position of the wings. This allows you to adjust the tool to different row spacings.
Such hillers are designed to work with more powerful walk-behind tractors with an engine of 4.0 hp or more. or more, whose weight exceeds 30 kg
A significant disadvantage of such structures is their high energy consumption. The reason for this is that during operation, the wings of the tool push the soil to the side, part of which, after its passage, still crumbles back into the furrow. As a result, your back and arms get tired faster, and part of the engine power is wasted on useless work. But despite this, they are one of the most popular models among most gardeners.
Disc hillers are an order of magnitude more expensive than their traditional counterparts, but the efficiency of working with such tools is many times greater
The main advantages of disc hillers are:
- A successful combination of a walk-behind tractor with the tool itself. Using a disk hiller, when the speed of the motor cultivator decreases, its power increases. This not only increases the efficiency of cultivation, but also has a positive effect on the operation of the unit itself.
- Ease of use. To work with such a tool you need to put in a minimum of effort: it propels itself forward without requiring additional pushing from behind.
- Versatility of use. Using this tool, hilling can be done both after planting tubers and during the period of active growth of the above-ground part of the crop.
When choosing among the variety of assortments, it is advisable to give preference to models made of alloy steel, equipped with rolling bearings (rather than sliding bushings), with a large diameter and thickness of discs.
The principle of operation of the tool is the operation of special propellers, under the influence of which the soil is first crushed and weeds are combed out, and only then the beds are hilled with loose soil
Such hillers are designed for equipping walk-behind tractors and cultivators that have two forward gears. This is necessary so that in second gear, with the power increased to 180 rpm, using the tool you can not only loosen, but also transfer the soil into the beds from between the rows.
Latest entries In September, you can plant 8 varieties of currants that are resistant to powdery mildew10 beautiful flowers grow well in sandy soil and are not capricious7 common mistakes that prevent you from growing many eggplants
Self-production
The tool is simple to make yourself. To make a hiller yourself, you need drawings and skills in working with metal. It is advisable to have the following tools:
- welding machine;
- gas-burner;
- angle grinder;
- drill;
- sharpener
An alternative would be homemade hillers, which can be used with any walk-behind tractor and cultivator. To make a part, you need a steel sheet from which the base is made. The pipe will act as a bracket. The entire load will be borne by an element called a rack. For the wings you need two sheets of the same size. If the hiller is adjustable, then hinges are attached to the base of the wings. For better rigidity, the products are bent at a slight angle. A two-row hiller differs from a simple hiller in the increased size of the bracket. It should be sufficient to attach two pairs of plows (wings).
Manufacturing process
A homemade potato hiller must simultaneously perform several tasks, so it makes more sense to make it adjustable. To do this, take the main steel pipe and make a hole in the center. Equal distances are measured from it and more holes are drilled. Then the adapter tube is inserted, followed by the rear traction tube.
The moving part of a manual disk hiller for potatoes, made by yourself, is made as follows: the tube used for the front traction is attached to the main handle by means of a hinge or a welding unit. They also connect the rear struts and the discs to the strut. To make the angles of rotation adjustable, attach a lanyard.
Having decided on the angle of inclination of the front link, the lanyard is screwed onto bolts of a suitable diameter and length. With this assembly of a manual disk hiller, you get a completely reliable device for loosening the soil and forming high ridges. If necessary, bolts and nuts can be used in other places.
An important point is the manufacture of the main handle by which the hiller will be pulled. Throughout the entire process, it is recommended that all work be performed carefully and carefully, otherwise there is a high probability of damage to the material. For accuracy, it is recommended to use a protractor; the optimal angle is 15 degrees. They begin to bend the tube of the vertical frame, stepping back 40 cm from the end.
Having finished with the main handle, they proceed to welding another tube - the rear link, which is installed at the same point as the front link. Blades are welded to the rear link tube. The discs are made from metal sheets; the edges must be polished with a grinder. If this is not done, due to the unevenness of the discs, the device will often get stuck in the ground, thereby delaying the process of processing the garden plot. In addition, the tilt of the disk must be mandatory in order to improve the quality of plowing the soil.
The final step will be the installation of handles. Metal tubes with a minimum diameter are chosen as a suitable material. If possible and willing, install handles purchased from a specialized store. The fasteners used are screws, for which holes have already been made in advance in the main tube. But it is better to use a welding unit, which will be more reliable.
When making a hand-held device, it is recommended to immediately monitor the distance between the handles so that a person can fit freely between them. Otherwise, it will be difficult to operate such a hiller. Alternatively, two handles are replaced with one T-shaped handle of suitable length. This design does not require maintaining a specific distance; working with it is much more comfortable.
Adhering to accurate drawings, it is not difficult to make a potato hiller with your own hands
The main thing is to perform all stages of the process efficiently and according to technology, not forgetting about safety precautions
Choice
A correctly made choice will help in maximizing the mechanization of agricultural labor. For less effort when planting potatoes, cutting furrows will be easier with adjustable wings. To hill up plants, it is better to choose a disk option. To get the job done faster, rather than pulling the tool along each row, you need to consider a two-row classification of hillers. If the walk-behind tractor has sufficient power, you can choose four-row equipment.
To choose the right hiller, you also need to compare factors such as:
- soil type;
- type of walk-behind tractor;
- dimensions of the site;
- amount possible to spend.
For example, if you plan to process heavy soils, the quality of the steel will be an important parameter. However, a cultivator with low power is unlikely to pull a heavy tool. If you don’t have enough money to buy a quality tool, and you need to cultivate heavy soils, you can turn to craftsmen for help or make the necessary parts yourself. For homemade products, the characteristics of some popular models will be useful.
For example, a two-row hiller has the following parameters:
- dimensions – 450x130x45 mm;
- working width – 300 mm;
- weight – 4.4 kg.
The disc hiller with adjustable width, height and depth has the following maximum parameters:
- width – 70 cm;
- height – 62 cm;
- disc diameter – 37 cm;
- processing depth – 30 cm.
Making a hand plow
Plant potatoes without straining your back
Homemade manual plows are often used for planting potatoes in small gardens and dachas. The design of such a tool allows you to dig a hole using only one leg and arms, without bending your back.
The most popular option is the Vyatka Plowman plow (Monk Gennady’s shovel)
Such a device can be adjusted in height, which is important for user convenience. It has a wide lever for grasping with your hands and a regular blade, like a shovel
Advantages of the Vyatka plowman
Gennady's father's shovel has the following advantages:
- ease of performing work (the back always remains straight, all actions are performed with the hands);
- digging speed is 4 times higher than when using a conventional shovel;
- one use of the tool “pulls out” 2 times more earth than with conventional devices;
- With a slight turn of the lever, the earth is tilted to the side, which is convenient for such a task.
In addition, the advantage of such a tool is that it is suitable for any type of soil. The main thing is to avoid mistakes when assembling the plow, act step by step according to the instructions and drawings, and also use only high-quality materials during construction.
How to do
To make such a tool, you will need a handlebar from an old bicycle, a metal pipe, fittings and a sheet of cold-rolled stainless steel, 2 mm thick. The tools you will need are a welding machine, as well as a grinder or a metal file. The process of making a plow is as follows:
- The pipe is cut (along the ground). This is the basis of the shovel, its dimensions should be user-friendly. You can also take two pipes of different diameters and install a spring, which will allow you to adjust the height of the frame for several people.
- A bicycle handlebar is welded to one end of the pipe.
- A ploughshare is created. A part of the workpiece is cut out to known dimensions, bent and welded to the bottom of a metal pipe so that the end of the plow base protrudes 5-10 cm.
The process of planting potatoes with a hand plow takes only 10-20 seconds. Under pressure from the foot, the shovel digs into the ground and when the lever is turned, the soil is tilted to the side. For convenience, it is better to throw potatoes into the holes of another person. So, the process of planting potatoes with a plow will go faster.
As a hiller, such a tool is not used. His specialization is narrow. The shovel is carried manually. If you need to plant large areas, it is better to make a device with shares and a wheel. In addition, you can build a two-row tool.
Tips for use
Using a hiller on a handle is easy. There are a few steps to follow.
- The preparatory stage of cultivating a plot is loosening the soil. In loose soil, the furrows will be deeper, and the work of creating them will be easier. For greater accuracy, place marks on the ground. They must be equal to the width of the bracket on which the hiller is installed. Use a walk-behind tractor with attachments to make furrows and place the potatoes in them.
- Then it is recommended to expand the wings of the hiller to the maximum possible width. The tool is placed between the rows and driven along the furrow, covering the seed potatoes with soil.
- It is time to carry out the first harrowing simultaneously with the emergence of seedlings. The walk-behind tractor is installed so that the furrow to be processed is between the discs. The tool must be held smoothly, the discs will form a ridge, while simultaneously crushing clods of earth.
You can learn more about the manual hiller from the video below.
Potatoes are considered one of the main vegetables and the most common crop grown in gardens. And our own potatoes have always been of the best quality and taste. But to achieve a good result, you need to make every effort to care for it. And the hilling process is simply necessary for potatoes, since they grow just fine in loose soil. Traditionally, the hilling process is carried out using hoes.
Naturally, this method takes a lot of effort and time, especially if the area is huge. In order not to put in a lot of effort, you need to resort to the help of a device. Such a device is a manual hiller. With its help, in a short period of time, you can hill up a plot of, for example, 10 acres. And if you are interested in such an invention, then here we will tell you how to make a manual potato hiller with your own hands. Here we will provide useful information, as well as provide drawings and videos for our readers.
But what is this country tool, and can it be made with your own hands? In this article we will try to understand this question with you, whether it is possible to make a hiller at home with your own hands.
Why is the hilling process necessary?
Everyone knows that when potatoes are in the growing stage, they require regular hilling. But not everyone knows for what purpose they do this. Potatoes need to be hilled for the following reasons:
- Due to the loosened soil, the potato roots receive air, due to which it grows faster;
- Due to air penetration, the rate of tuber formation increases.
- Thanks to the hilling process, you get 20-30 percent more yield.
Note: In those regions of the country where it is cool and quite humid, the hilling process is carried out regularly. Due to this, unnecessary water leaves the soil, the heating process begins and the potatoes are enriched with air. And in the arid regions of Russia, hilling can negatively affect yields, as moisture is removed from the soil.
Here are the important points in the hilling process:
- Hilling must be carried out at a specific time. As a standard, potatoes are loosened twice a season. Initially, they hill up when the potatoes grow ten centimeters in length from the ground. They begin to loosen the soil again when the plant has reached twenty centimeters in length. A very important point is that the flowers are not open.
- Carry out the hilling process in cloudy weather, in the early or evening hours. It is ideal if this process is done after rain, watering or after dew.
- Do not hill up in hot weather. Since parts of the plant that are subsequently exposed to the sun will burn.
- Hilling is carried out using tools such as a hoe, rake or hoe. This is a very labor-intensive and lengthy process. We recommend that you use a manual hiller, which, after reading our article, you can assemble yourself.
Read also: Information about measuring instruments
Types of manual hiller
If you want to know how to make a manual potato hiller, then this article was created especially for you. After all, here we will talk about exactly this issue.
There are two popular types of manual hiller:
- Hiller in the form of a plow;
- Disc hiller.
When you look at a disc hiller, it is made in the form of a frame on wheels, and discs are attached to it.
This hiller is made from the following components:
- T-shaped leash;
- screw-type lanyards, two pieces. They are needed to adjust the mobility of disc blades.
- racks - 2 pieces;
- disc dumps – 2 pieces.
Note: This type of hiller is suitable when you need to plow the ground before planting or after you have harvested. It can also be used when plowing the soil between beds. You can change the turning distance of the discs, and accordingly you will change the distance between the beds (maximum adjustable distance 75 centimeters). Make sure that the angle of rotation is the same on all sides, otherwise the hiller will pull. The diameter of the wheel is 70 cm, the width ranges from 10 to 14 cm. These dimensions are considered the most acceptable for the plowing process.
A hiller in the form of a plow is also a fairly convenient invention to use, and thanks to it you will quickly hill your entire plot in a short period of time. Often it is installed on a walk-behind tractor, and during movement it is held in the furrow. This combined use will allow you to hill up a large area, even with dry soil. Here you can also adjust the plowing width and depth. The ideal plowing size ratio is a width of 20 centimeters and a depth of up to 15 centimeters.
Note: most gardeners prefer a disk hiller, as it is easier to use. And also with the help of it you get beautiful, even rows. But the price of such hillers is high, and we suggest you make it yourself. But get ready, this is not an easy task. First, carefully study the drawing of a homemade hiller. Well, then perform the following steps.
First, the first step is to make discs for our homemade potato hiller. Therefore, you must first prepare a drawing of all elements and parts. Let's look at an excellent visual drawing: when making disks, you should choose a very strong metal. Some craftsmen make discs from pot lids.
Then you should make a mount to the disks. For more convenient control, you should make two outlets for the manual hiller.
Scheme of a homemade hiller where:
Drawing: do-it-yourself manual hiller
- Bed for processing.
- Disks.
- Cam mechanism.
- Mounting bracket.
- Rack.
- Steel scrapers - 2 pieces.
- Bridge beam.
- Retaining bolt.
- Lever.
What you need for a homemade hiller:
So, let's start making a manual hiller; you need to prepare the following parts:
- Concave disks, you need two of them. As described above, lids from pots with a diameter of 40 to 60 cm are also suitable;
- Screw tarlaps, you also need two of them;
- A 1-meter hollow tube that will serve as a vertical stand should be 1 inch in diameter. Another hollow tube with a cross-section of ¾ inches, which will serve as the front and rear rods;
- T-shaped leash;
- Gas lamp or pipe bender;
- Adjustable adapters for connecting disks;
- Bolts and welding for fasteners.
Making a manual hiller with your own hands
You probably already understood that it is quite possible to make a potato hiller with your own hands, but here it is worth showing your skills and knowing some of the aspects of making this invention. And we will talk about the manufacturing features below.
The stages of work are as follows:
- Adjustment. It is best for a homemade hiller to be multifunctional. For this reason, it is worth taking regulatory functions seriously. The height is adjusted using a special telescopic device located in the central part. A smaller diameter tube is inserted into the larger tube and goes into the rear linkage. Thanks to this, the manual hiller can be adjusted to suit a person’s height.
- Control of the attacking angle is ensured by tilting the stance in the center. This effect can be obtained by changing the difference in angle between the vertical bed and the front link.
- The bed can then be set in motion. The front link should be attached with a hinge to the rack in the central part. Tarlepa will carry out regulation.
- We fasten the rear racks and disks to the rack using a welding machine.
- Next, we attach the front linkage. To do this, you will need a hinge tool and a long bolt.
- Thanks to these actions, you have a rear thrust in the form of the letter “P”, the width of which is a maximum of fifty centimeters. The minimum handle length is twenty centimeters.
- We attach a vertical pipe in the center of the fork (here again we use welding equipment). And thanks to the end of the tube, the entire structure made is attached to a vertical rod.
- So that you can adjust the stand, we make openings in its upper part. We drill the same openings in the vertical fork.
Note: Before you begin installing the discs, go through the process of stripping the discs from all edges. If you use covers instead of disks, then you should bend them so that one side is concave and the other is convex.
Finally
Now we have completed the manual assembly process. From this article you could learn how to make a manual potato hiller yourself. And if you have created a hiller, then you need to test it. This is a very convenient tool, it will make your work many times easier. Of course, many will think that it is impossible to assemble it, but we assure you that you can. Just study all the drawings carefully and use a little resourcefulness. Next, you can watch video instructions on how to make a manual hiller at your dacha.
Video of making a disk hiller for potatoes
Do-it-yourself manual potato hiller drawings
Do-it-yourself hillers for a walk-behind tractor
Vertical stand
Multifunctionality is a mandatory feature of any device, and therefore you need to pay attention to adjusting the device. The height can be adjusted using the telescopic device of the central part. The pipe needs to be inserted into a tube that is smaller in cross-section than the other, it goes into the rear link
If you use this method, you can easily adjust the hiller to the gardener’s height level
The pipe needs to be inserted into a tube that is smaller in cross-section than the other, it goes into the rear link. If you use this method, you can easily adjust the hiller to the gardener’s height level
The height can be adjusted using the telescopic device of the central part. The pipe needs to be inserted into a tube that is smaller in cross-section than the other, it goes into the rear link. If you use this method, you can easily adjust the hiller to the gardener’s height level.
Adjustment
Adjustment of the angle of inclination is carried out using a lanyard
The tool bed must be movable. To fulfill this condition, the front link is attached to the main post with a hinge; adjustment is made using a lanyard, which allows you to change the angle of inclination. In the case where there is no lanyard, a metal plate is used, it is fixed in the desired position and secured with bolts.
Welding
The rear link and blades need to be welded to the rack, then the front link is attached. The rear link width is 0.5 meters. Handles - 0.2 meters. A pipe 0.3 meters long is welded to the center of the fork; with this end the structure is inserted into the cavity of the vertical rod.
To adjust the height of the rack, you need to drill out the openings that are located at its upper end. Exactly the same manipulations must be done with a vertical fork. The front and rear links should be identical in width.
Manufacturing of a double moldboard plow
To make a double moldboard plow, you will need plates, each two millimeters thick. They need to be given semicircular bends. Then the process of welding the two halves to the stand is carried out.
Two important aspects of the work: the seam in the place where the parts are joined must be smooth, the plates must be sanded using a grinder.
Double shaft plow
Making a scoring knife
To make a pruning knife, you need to get steel with a high carbon concentration.
Then you should cut out a knife, which should be shaped like an arrowhead, and sharpen it carefully (the angle between the surface and the knife should be 45 degrees)
Why 45? If you grind a knife at this angle, it will not lose its sharpness for a long time. Next, you need to weld the trimming knife to the bottom of the post and grind it.
Discs
First you need to cut 2 plates from a steel sheet, then you should give them the shape of a semicircle. Both disks are fixed on the rack. The weld seam must be smooth.
First, all parts that are to be welded must be ground with a grinder, and the discs must be carefully sharpened. The cutting part takes on almost all the soil resistance.
Drawing of discs for a hiller There is no need to purchase store-bought discs, since the grinder is not capable of sharpening the metal from which they are made.
A hiller is an almost irreplaceable tool that every gardener who respects his time and energy must have.
As for gardening tools, hillers are quite an expensive pleasure that can really help in the household. In any case, even this expensive equipment can be made with your own hands, you only need to know how to use tools and use drawings.
The post How to make a potato hiller with your own hands first appeared About the farm.
Main types of devices
There are many models of homemade hillers. Depending on the type of working element, a manual hiller comes with a constant or adjustable working width.
According to the principle of operation, hillers can be divided into two groups.
Disk
A manual or disk-type hiller is designed for loosening and hilling the soil. Disc models are often used for automated processing of beds. A device for hilling beds is attached to a tractor.
The main advantage of a homemade disc cultivator lies in the ability to adjust the racks between the discs. The racks can be installed in accordance with the row spacing.
Plow type
In terms of its mechanism of action and configuration, the model in the form of a plow is similar to a disk cultivator. But this model of manual potato hiller is considered more convenient to use. For greater efficiency, a plow-type hiller can be attached to a walk-behind tractor.
A plow for hilling potato beds helps loosen the soil, hill up potato bushes, cut furrows and beds, and plant various crops.
Required materials and tools
To make such a homemade product, the following materials are needed:
- cold-rolled sheet steel 2.5 mm thick;
- steel corner 20×20×3 mm;
- a loosening pointed paw from a cultivator or a disc from a potato digger or disc harrow;
- steel blank for the stand, 10 mm thick and 20-30 mm wide;
- pipe (round or profile);
- a wheel from a folding bicycle, a garden wheelbarrow;
- 4 bearings.
Among the tools in the process of making a homemade hiller you will need:
- welding machine;
- Bulgarian;
- drill;
- compressor with spray gun;
- emery;
- vice.
Consumables you will need are metal cutting discs, electrodes, primer and oil paint, sandpaper, a sanding attachment for a drill, and solvent.
Disc hiller
Let's get started on how to make a potato hiller with your own hands. The drawing shows that the main tool is moldboard discs. They must be within 400 mm. This is optimal. Because we usually plant potatoes at a depth of 60-80 mm, and the roots then grow approximately 200 mm. It turns out that by walking between the rows with inclined disks of the specified size, we completely hill up the row of potatoes.
So, we make 2 disks from a steel sheet 2 mm thick, with a diameter of 400. Some are made from old pot lids. Let be. But it is advisable to make high-quality disks that will last a long time. Can be taken from scrapped agricultural machinery. But the best is alloyed stainless steel. We sharpen the edges of the disks, where the cutting edges will be. Now we are making a bridge with racks on which the disks will be attached. We calculate the sizes. We put a connecting fastener for pipes on both sides of a strong steel pipe (sold everywhere). The free ends of the fasteners are directed downwards. From above we drill the pipe through the holes in the mount. We drill each fastener from both sides. Secure with bolts and nuts.
If you want to make grips of different widths, then drill two more holes on both sides. To change the grip width, simply move the posts further or closer to the ends of the bridge and secure them through the holes. Then we insert the tubes - racks - into the fastenings from below. We also drill and fasten in the joint. Two bolts with nuts for each rack. Then at the bottom of each rack we make a mechanism for inclined movable disks. First we attach the bracket for the disk. Moreover, we also do 2 - 3 pipe drilling positions. To be able to change the inclination of the disks.
On the other side of the bracket we weld a short thick steel rod. At its other end - in the bushing ring - press a closed type sliding bearing. Pre-weld a wide washer with holes for fastening the disk to the inside of the bushing. Weld the same wide washers with holes in the center of each disk. We secure the disks with bolts and nuts. We ended up with two movable disks tilted at a certain angle, attached to racks on one bridge. You can come up with an additional device for tilting the disks to the right - to the left. To do this, you need to select a hinged mounting mechanism for the bracket. These are also on sale. Yes, you can find it in old parts of agricultural machinery.
We will not consider further the creation of a manual hiller. We don't need to make handles for our device.
Attaching the hiller
The hiller for the walk-behind tractor must be connected and hung to the unit in such a way as shown in this drawing:
Attaching the hiller to the walk-behind tractor
From the drawing you can see that we need to connect the device to the walk-behind tractor to the bridge through brackets and strong steel tubes. Reinforce the connection with a crossbar. Turn on the engine. The wheels are moving. You hold on to the handles of the walk-behind tractor. Carried away by the movement, the planting tool he created with his own hands comes into action. The discs just need to be made at symmetrical angles so that they don’t lead in one direction when hilling. The considered tool option is not the only one. There are others too. Let's look at them one by one.
Types of hillers
Manual
Manual hillers (disc) are designed for loosening and hilling. The use of such a tool can guarantee high-quality tillage.
This tool can help the gardener carry out hilling and will avoid energy-consuming and tedious work.
The cost depends on the configuration. On average, a device with two disks costs around 2,500 rubles. The cost of a manual hiller is about 2.5 thousand rubles
To the tractor
They are used for automated processing. The device is capable of immediately removing weeds from the cultivated area and, in fact, successfully hilling the tubers. After manipulating the tractor hiller, the potato yield level increases sharply.
They consist of: a metal frame, an attachment that is responsible for the coupling, two stamped wheels, iron pointed paws and dumps.
The load on the hiller is reduced by tractor wheels, in turn, the paws cut the soil (up to fifteen centimeters). A steel support attaches the legs to the frame. Lattice dumps are used for hilling.
Basically, tractor ones can be attached exclusively to the T-25 tractor, which has a rather small traction force, unlike the MTZ. It is not able to work with a device that has more than 3 cases.
If the gardener’s goal is to simply hill up the potatoes, then he needs to unscrew the pointed paws.
The cost of tractor potato hillers varies from 20,000 to 30,000 rubles. Hiller for tractor T-25
To the walk-behind tractor
The device is installed on the walk-behind tractor in place of the coulter.
How it works: during transitions between rows, the device pours soil with its wings directly onto the tubers. You can attach a disc hiller to the walk-behind tractor.
In fact, “hillers for walk-behind tractors” are not a separate species. We used this to let you know that the device can also be mounted on a tiller.
Disc hiller for walk-behind tractor
Plow
The potato hilling plow is designed to facilitate the work associated with growing potatoes. With the help of such a plow, furrows and beds are cut, the soil is loosened, crops are planted, and hilling is done.
In terms of its configuration and mechanism of action, the plow is similar to a disk hiller. At least their mechanism of action is absolutely identical.
Plow
Manufacturing
It is not at all necessary to buy this device in a store. We will tell you how to make different types of hillers for a walk-behind tractor with your own hands, including disk ones, based on drawings with dimensions and photos.
Lister hiller
To make a lister type of nozzle with non-adjustable width, we will use the following drawings and diagrams:
Diagram of a lister attachment.
Structural elements:
Lister hiller for walk-behind tractor.
To cut out the wings of the hiller, use the drawing in the picture below:
Template for cutting out halves of the product.
Step-by-step production:
- From sheets of metal 2 mm thick, you need to cut out two identical parts of the working tool using the template above. Next, the halves are bent and fastened together by welding in several approaches.
- The seams must be processed and cleaned.
- It is necessary to weld the base from three-millimeter sheets of metal.
- From sheets of metal 4-5 mm thick you need to make a bracket and a field board.
- You need to make a stand from a thick sheet of metal.
- For a double-row hiller, you can add a width adjustment function using hinge mechanisms. And to control the angle of inclination of the sheets, use rods.
Important! To make the stand, it is necessary to use metal with a thickness of 8 mm. This part of the structure must be very strong and reliable, since the heaviest loads fall on it. Design of a lister hiller
Design of a lister hiller.
Disc hiller
To create this type of attachment for a walk-behind tractor, you will need a drawing:
Drawing of a disk hiller.
Also prepare materials and tools for work:
- welding machine;
- Grinder;
- emery machine;
- electric drill with a set of drills;
- fasteners (bolts, etc.);
- two metal disks with a diameter of about 50-60 cm, steel thickness - about 3 mm;
- metal pipe 1 m long, 2.5 cm wide;
- adjustable adapters;
- screw lanyards – 2 pcs.;
- bracket;
- gas lamp.
Tip: to make discs, craftsmen often use metal lids from kitchen utensils, old discs from agricultural machinery, and even bottoms from gas cylinders.
Disc hiller at work.
Manufacturing process step by step:
- Sharpen the discs around the entire circumference.
- Using a hammer, the disks need to be given the correct shape - convex on one side and depressed on the opposite. It is due to this that they will be able to collect soil.
- It is necessary to make a T-shaped structure from the pipe. To do this, the elements can be fastened by welding or bolts.
- Using welding, it is necessary to connect the T-shaped leader, racks and tarlaps.
- To make a hiller with a fixed pitch, fasten the disks to a width equal to the row spacing. If it is a type with adjustable width, the discs must be secured using adjustable adapters.
- Secure the device to the walk-behind tractor using brackets, a leash, and bolts.
Important! The discs must be fixed strictly symmetrically. At the slightest deviation, the walk-behind tractor will move to the sides, working with it will be very problematic and ineffective. In this video you can watch how to make a disk hiller:
In this video you can watch about making a disk hiller:
Hilling up potatoes
How to hill potatoes using a disk
The mechanism of action of manual hillers is quite primitive. Two gardeners should grasp the device from both sides (front and back). One rests on the front linkage handle and sets the hiller in motion, the other presses the discs into the ground, pressing on the rear linkage handle.
The disc passes through the soil, leaving a noticeable trail behind it. Using such a device, you can hill up plants located in close proximity to each other. But you can also adjust the distance between the disks; you just need to install a few additional parts.
Why is it necessary?
If you are reading this article, then you definitely know that potatoes need to be hilled. But why?
Now we will explain everything in detail:
- When loosening the soil, air flows to the roots, thanks to which they grow much faster.
- Again, when air reaches the roots, potato tubers quickly form
- If you hill up potatoes, you can increase the yield by 20-30%
You also need to follow some rules:
- Loosening needs to be done in a timely manner
- You need to loosen in cloudy weather. The best option is after rain, watering or morning dew.
- You cannot hill up potatoes during hot weather, as the plant may simply burn out.
As a rule, hoes, hoes and rakes are used; their use is energy-intensive and time-consuming. Compared to the hillers, the above tools simply pale into insignificance.
Pros and cons of homemade devices
The list of advantages of homemade devices includes:
- accessibility - since anyone can make such a hiller
- - there are no cases where a person paid himself
- efficiency - as a rule, homemade devices are in no way inferior to market analogues, but this depends on the design
- raising self-esteem - it’s better to hill potatoes in a good mood
But the disadvantages include:
- safety of operation - but this depends on how well the hiller is designed
- quality - again, depends on how well the hiller is designed
How this tool works and works
The equipment is used together with cutters that are installed on the gearbox shaft. During the forward movements of the walk-behind tractor, the hiller goes deep into the ground and forms a furrow with a depression of a certain depth. The dimensions of the base of the depression allow the gardener to move along the ground without disturbing the furrow.
At the same time, the hiller moves the soil from the depression to the top, thereby forming “ridges” with a fixed location.
In addition to forming furrows for planting crops, the hiller is needed for the following purposes:
- loosen the soil between the rows and at the same time sprinkle the plants;
- weed the finished beds and get rid of weeds.
Most often it is used to plant potatoes, carrots, turnips or beets.