Here's how I made a small DIY tabletop anvil for my workshop. Below are drawings and instructions on how to make an anvil.
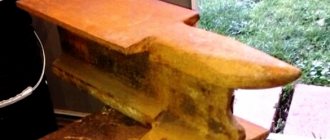
The homemade anvil was made from a piece of railroad tracks. Without the log base, the anvil weighs about 4.5 kg. I plan to use it for tapping hot and cold parts, installing gaskets, stamping leather, and any other kind of light beating or flattening I may want to do.
How to fix things
An anvil is used to repair objects, the process is performed in two ways:
- The first method is similar to the repair method without an anvil. Take 2 products and connect them together. If done on an anvil, the strength will add up and increase by 7%;
- The second option is available at the anvil. This is done using the raw materials used in the manufacture of the product. If iron armor or chain mail breaks, they should be repaired using iron ingots. One unit of iron ingots restores 25% strength. Repairing a diamond breastplate using this method will be more profitable than repairing a sword.
How to fix a fishing rod
Suitable for fishing rod repair. It can be combined with another fishing rod, this will increase the strength of the product by 7%. A method using the materials from which the fishing rod is made is also available. This option increases strength by up to 25%.
Requirements for a blacksmith's anvil
If your workshop requires making such a device, then you need to take into account some requirements.
- Dimensions and weight. For small-sized forgings, you can get by with relatively small anvils that can be installed on a table or workbench. However, serious forging work will require a massive, securely fastened device. Factory devices have standard weights of 5, 10, 30, 50 and 100 kg.
- Parameter matches. Simple forging can be done even on an ordinary piece of channel. But, if the work includes forging operations such as piercing, bending, and reaming, the parameters and dimensions must be observed. In this case, the edges of the anvil should be kept at right angles, and the holes should be located at convenient points. The horns should be appropriately evenly rounded, the rim should be an exact rectangle.
At home, it will be difficult to make an exact copy of a factory-made product, but some conditions can be met. So, how and from what is a homemade anvil made?
A basic set of tools needed for metal forging
The method of imparting plastic properties to metal by heating has been known to mankind since time immemorial. Unlike the so-called “cold forging”, in which the metal is not heated, during “hot” (and, as is considered, “real”) forging, the metal is heated in a forge.
A forge is an open-type furnace in which metal is heated to high temperatures for subsequent forging.
Due to its plasticity, heated metal can be given a wide variety of shapes, which is what masters of artistic forging use.
In addition to experience, which is accumulated over the years, forging requires the appropriate tool. These can be special pliers, mandrels, bending templates, etc., but the hammer and anvil remain the most important “assistants” of a blacksmith for many centuries.
Any person who is thinking about taking up blacksmithing is faced with the need to purchase the appropriate tools. A high-quality and heavy anvil weighing under 100 kg is not a cheap pleasure.
Vintik (FORUMHOUSE Member):
I bought my anvil by weight at a secondary metal shop.
From work experience, I can say: what I couldn’t flatten on a rail, I managed to do on a real anvil. Olger73 (FORUMHOUSE Member):
Although Vtorchermet is a “gold mine”, a lot depends on luck.
Our price for a used anvil is approaching the cost of a new one. Although I managed to acquire a powerful vice and anvil weighing about 30 kg in this way. Her “face” is, however, dented, but it can be fixed. So, what to do if you want to forge, but the family budget does not allow such expenses? Moreover, if it is unknown whether the business will be to your liking, or in a few months all the expensive equipment will begin to gather dust in the garage.
In this case, you should take advantage of the experience of FORUMHOUSE participants and acquire a mini-forge made from materials that are at hand. Moreover, even with this “dacha” option, you can make a lot of different things that are needed on the farm, and which you cannot buy in a store or on the construction market.
What can be done
In Minecraft, an anvil works not only to repair objects, but also to modify various effects applied through tools, armor, weapons, and enchanted books.
To do this, add components corresponding to the options to the control panel cells:
- Two items of a similar type (items must be made from the same base) that have an enchantment;
- Enchanted book and item;
- Two enchanted books.
When forging items with similar enchantments and identical levels, the effect indicator on the item becomes an order of magnitude higher. In practice, it looks like this: from 2 pickaxes with efficiency IV, we get 1 with efficiency V. Thanks to this method, it is possible to achieve indicators that were not possible.
An anvil can be used to repair various items - picks, shovels, armor, chain mail, weapons and other valuable items.
How to make a reliable anvil for your forge - device and tips
These two concepts are inseparable.
There is no point in explaining that without an anvil it is impossible to process metals using the forging method. It is an indispensable attribute of any, even the smallest, forge. The design of this device is so simple that you will not need any special knowledge or equipment (tools) to make it yourself. In essence, it is an iron “monolith” of a special shape, with planes that must meet certain requirements.
But is there any point in making an anvil if it is not a scarce commodity and is easy to buy? (The only problem is the delivery if it is massive). The price of the simplest mini-device starts at approximately 2,250 rubles. It is clear that it is clearly not suitable for blacksmithing. But more massive models are, accordingly, more expensive.
For example, weighing 35 kg - about 22,000, 75 kg - 43,000, 125 kg - 70,000 (in rubles).
So it turns out that if you need an anvil for home crafts, then it still makes sense to make it yourself (like a blacksmith’s hammer). Even if the business is put into production, the fact that the anvil is of its own production is unlikely to affect the quality of the work.
It is worth making this argument in favor of self-production. High demands are placed on the working surface of the anvil. This is especially true for its edges, which should not be deformed (uneven), which is often observed during intensive use. It turns out that from time to time the anvil will have to be replaced (or reanimated). And although a lot depends on how often it is used and what metals the master works with, it is still more advisable to make an anvil than to spend money on purchasing it again. If only because if you made it yourself, it will not be difficult to repair it.
Now we can move on to the issue of its manufacture. We will not give examples of any specific standard sizes, since there can be any number of options - each master prepares an anvil “for himself.” The main thing is to understand the technology and the main nuances, and everything else will be prompted by your own ingenuity. How it works, what options there may be, is easy to understand from the photographs.
Support
First you need to decide on the installation of the anvil. If it is stationary, then you can use a massive stump or a heavy metal frame dug into the ground as a base. For a portable type of device, a frame is selected that is welded from corners. It should be taken into account that the “stand” will have to withstand serious shock loads, so stiffening ribs must be installed. Although there are other ways to strengthen the structure.
By the way, about the stump. Firstly, it must be securely tightened with metal hoops. Secondly, if you just dig it into the ground, then such an anvil will not last long. Even after treatment with antiseptics, taking into account the loads during the work, the wood will begin to deteriorate.
Therefore, it is advisable to place the stump inside a metal barrel installed in a hole, into which sand is first poured. How much of it is needed, the level of “backfilling” is at the discretion of the master. Naturally, the tree must be a “strong” species. (But this is only suitable for outdoor use).
Experts recommend selecting the height of the “stand” in such a way that at the moment the tool (hammer, mallet) hits the workpiece, the person’s hands are in a horizontal plane. In this case, the master will be less tired.
Material
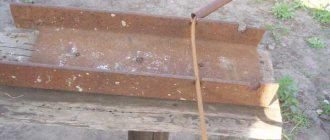
Industrial production technology involves the use of 35L (alloy) steel. When making it yourself, you can take a piece of rail (railway or crane, KR120 or 140), one side of which will be the working one. So you need to “weld” on it (you will need a welding machine) a steel plate of the appropriate size.
You can do without it. But then you will have to carefully polish the “working” part of the rail. Naturally, you will have to put in a lot of effort to achieve a completely smooth surface.
How to evaluate the suitability of an anvil? It is not difficult. When you hit its surface, the hammer (hammer) should bounce back like a ball. In this case, a characteristic ringing sound should be heard. If so, then everything is done correctly, and you can get to work.
A few notes
- You should not use a channel to make an anvil, although it is much easier to process. It does not have sufficient strength, so it will not last long - it will become deformed.
- If the anvil should have a “horn”, then it can be obtained by processing the elongated part of the “sole” of the rails. But this process is quite labor-intensive and will require quite a lot of time and consumables (circles for the grinder). It’s easier to weld it, after giving the workpiece the desired shape.
Before you start making an anvil, you should decide for what specific tasks it is needed and with what intensity it will be used. Then the optimal decision regarding the choice of installation location, materials and design will come by itself.
Currently reading:
A basic set of tools needed for metal forging
The method of imparting plastic properties to metal by heating has been known to mankind since time immemorial. Unlike the so-called “cold forging”, in which the metal is not heated, during “hot” (and, as is considered, “real”) forging, the metal is heated in a forge.
Due to its plasticity, heated metal can be given a wide variety of shapes, which is what masters of artistic forging use.
In addition to experience, which is accumulated over the years, forging requires the appropriate tool. These can be special pliers, mandrels, bending templates, etc., but the hammer and anvil remain the most important “assistants” of a blacksmith for many centuries.
Any person who is thinking about taking up blacksmithing is faced with the need to purchase the appropriate tools. A high-quality and heavy anvil weighing under 100 kg is not a cheap pleasure.
I bought my anvil by weight at a secondary metal shop. From work experience, I can say: what I couldn’t flatten on a rail, I managed to do on a real anvil.
Vtorchermet may be a “gold mine,” but a lot depends on luck. Our price for a used anvil is approaching the cost of a new one. Although I managed to acquire a powerful vice and anvil weighing about 30 kg in this way. Her “face” is, however, dented, but it can be fixed.
So, what to do if you want to forge, but the family budget does not allow such expenses? Moreover, if it is unknown whether the business will be to your liking, or in a few months all the expensive equipment will begin to gather dust in the garage.
In this case, you should take advantage of the experience of FORUMHOUSE participants and acquire a mini-forge made from materials that are at hand. Moreover, even with this “dacha” option, you can make a lot of different things that are needed on the farm, and which you cannot buy in a store or on the construction market.
There are few good blacksmiths and, as a rule, they are loaded with orders, and the farm often needs specific products, for example, a forged nail or some kind of “tricky” rivet. In order not to rack your brains with finding a specialist and ordering, and also to save money, it’s easier to do everything yourself. After all, you can’t just buy nails like the ones in the photo below.