DIY garage faucet step by step
A homemade garage crane is compact and does not take up much space, as it can be disassembled.
To make a crane, you will have to acquire a metal profile, two profiled pipes, a jack, four metal plates, studs, a hook, and six wheels. It is important that your homemade garage faucet is safe to use. One of the most popular types of cranes is the double post crane - it is easy to assemble and install.
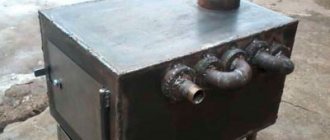
The crane will work thanks to an ordinary jack. First you need to make a shoe on which the jack will be attached. Metal and an iron rod are used to make it. It is important that the shoe moves freely. To do this, you need to be careful with its size.
Step-by-step manufacturing of the crane:
- Making the rear beam. To do this, use four corners. The elements should be assembled to resemble a square frame. Clamps are used to assemble the structure.
- Equipping a square with an iron rod. It is important to pay attention to its cross-section and length.
- Insertion of electric rivets. After this, the surface must be cleaned. The collapsible unit should be convenient.
- Production of a platform of heavy-duty iron sheets. To do this, the sides of the metal sheet are bent.
- The platform is equipped with guides, a jumper and stiffeners. The platform is placed on the upper beam.
The connecting unit is made of sheet metal. Metal corners are used to make the stand. The lower part of the structure is equipped with holes so that a metal rod can be welded there. After all welding work has been completed, it is necessary to allow the structure to cool.
Do-it-yourself crane beam in the garage: manufacturing advice
To make a beam crane yourself, you need to have some plumbing and welding skills. Only a garage with sufficient area is suitable for the location of the finished crane. To get started, you must first purchase a pipe with a rectangular cross-section, a metal corner, a metal C-profile and sliding wheels.
When installing posts and rails, it should be taken into account that the walls of the garage most often are not even.
The frame is welded from a corner along the entire width of the building. Particular attention should be paid to ensuring that all ribs are located strictly parallel and perpendicular. To make the trolley, a pipe with a rectangular cross-section is used. The frame must be placed on wheels, which must coincide with the ribs of the frame.
Making Tips:
- It is better to attach the rollers to a strip welded overlapping where the rods are connected to the supports.
- To make the crane movable, rollers are welded to the racks, which can be taken from containers used in warehouses.
- To manufacture the lifting mechanism, a manual worm winch equipped with a steel cable is used.
If there is no winch, it can be replaced with a hoist. But in this case, for the manufacture of the rod it is necessary to use a double tee. A crane beam, manufactured taking into account all the rules, will allow you to easily remove the engine and lift the car body.
How to remove the engine from a car in the garage with your own hands?
Basic maintenance of the motor is possible without dismantling it. Replacement of spark plugs, maintenance of intake and exhaust manifolds, and even replacement of the timing belt (chain) is carried out directly in the engine compartment of the car. However, work with valves, crankshaft, piston group, etc. is carried out only with the engine removed. Not to mention the overhaul procedure.
From our article you will learn how to remove the engine from a car in the garage, how you can remove the engine yourself and how to do it correctly.
The material was prepared by the site Auto-science.ru - whose specialists will help you check the mileage of your car efficiently and without errors.
How to remove the engine from a car in the garage without resorting to the help of a car service?
In fact, this is not such a complicated procedure as it might seem at first glance. The main task is to select tools for removing the motor.
Important! The engine weighs several hundred kilograms. Falling it can not only cause property damage, but also cause serious injury.
Before lifting the engine from the engine compartment, it is necessary to carry out the following procedures:
- Drain all technical fluids: oil, power steering fluid, brake fluid.
- Free the cooling system from antifreeze.
- Drain the gearbox (except when you remove the engine without removing the gearbox).
- Disconnect all hoses and pipes of the fuel, brake, lubrication and cooling systems.
- If possible, remove attachments: air conditioning compressor, generator, etc.
- Disconnect electrical cables, engine control unit, injector control cables, high-voltage ignition coil wires.
- Remove the connectors from all motor sensors. It is recommended to make a list (“based on” the maintenance and repair instructions), this will help you not to miss a hidden connector.
- In most cases, you will need to remove the hood cover.
If you plan to remove the engine without the transmission, you need to unscrew all the tightening bolts and make sure that after removal the gearbox will not fall under the car. That is, you need to take care of temporarily securing the unit.
How to remove the engine from a car?
At home, there is usually no professional lifting equipment, so you will have to rent it or make it yourself.
Do-it-yourself goose for removing the engine
This is a simple mechanism that resembles a gooseneck. It makes it possible to move the engine away from the engine compartment. It may have a rotating design that allows you to remove the engine without moving the machine.
The heavy internal combustion engine is simply transferred to a workbench located next to the car. In fact, it is a universal garage crane. The rack rests on long “legs” located under the engine compartment to prevent it from tipping over. A cable and a winch are used for lifting.
The gander is used both in garage conditions and in small services.
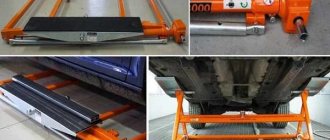
DIY engine removal lift
As a rule, this is a rolling crane, the lower part of which is placed under the front bumper. A smooth platform is required; on uneven ground, removing the engine using such a device is problematic. The lift operates using hydraulics or a tensioning mechanism like a winch. The device is simple: a stand with rolling supports, and a movable boom on which the motor is suspended. You can make a lift with your own hands from a channel or a square professional. pipes.
If there are strong wheels on supporting legs, you can quickly roll out the lift with the motor and move it to the repair area.
Do-it-yourself winch for removing the engine
Applicable if the car is being repaired in a solid stone garage. The most inexpensive tool that can be used to remove an engine. A chain or cable is used to pull it out.
There are two design options:
- A transmission mechanism with a drum that is suspended from the ceiling.
- The winch is fixed to the floor, and a pulley is fixed under the ceiling.
Features of removing various motor designs
Longitudinal arrangement. As a rule, such internal combustion engines are removed without a gearbox, although exceptions are possible. The radiator needs to be removed.
Transverse arrangement. The motors are compact and easy to lift vertically. The gearbox remains on the engine.
Hybrid systems and electric vehicles. Internal combustion engines in such machines take up little space or are absent altogether. Electric motors can be built into the wheel drive or integrated into the transmission. Due to their small size, their dismantling is not difficult.
All types of internal combustion engines are installed on supports. In frame structures, the attachment points are located on the frame; in cars with a monocoque body, there is usually a subframe.
block-mitsubishi.ru
Do-it-yourself telpher: technology
To make a hoist yourself, use improvised means. The gearbox is made from a two-meter threaded rod. Its ends are secured in bearings pre-mounted in the support.
To ensure that the nuts welded together are stationary, they are welded to a metal plate, which slides along the stop and prevents the nuts from turning over.
A cable is attached to the plate, which is thrown over a support and a block that is used to lift the load. The end of the cable is equipped with a hook or sling system. To make the pin rotate, a manual drive is used.
Manufacturing technology:
- Cut the pipe.
- Place the workpieces on a flat surface.
- Weld the winch frame.
- Sand the frame and coat with primer.
- Make a drum.
- Attach the drum to the shaft.
- Install the drum and shaft onto the frame and secure with hubs and bolts.
- Wind the cable onto the drum.
The design will be simple and reliable. If the load needs to be lifted to a greater height, you can additionally use a manual hoist. A hand hoist can be made from a brake lever.
Garage hoist: drive manufacturing
You can make a hoist for lifting loads yourself. It is based on a brake lever that used to be on a truck. In a car, such a lever helps to supply the pads and reduce the gap between them.
To make a hoist with your own hands, you need to have skills in electric welding and turning.
The expansion knuckle shaft is cut to the required size using a lathe. The shaft is equipped with two washers. The entire structure is called a winding drum. One washer is equipped with a ring on the inside so that it does not interfere with the free passage of the cable.
How to make a drive:
- The worm gear has the shape of a hexagon. A socket head should be installed on its protruding end.
- The socket head is secured with a thread secured with a bolt and washer.
- The head is equipped with a handle that will rotate the drum.
Before manufacturing the lift, it is necessary to prepare drawings. The finished device can be used to lift and lower a centrifugal pump and other types of loads. As an alternative to this type of crane, you can make a hydraulic “Goose” crane.
Design features and operating principle
The hydraulic valve is made of durable metal and has a stable design. The main principle of the mechanism structure: stable support with low dead weight. This helps you lift loads of up to three tons with ease, but a maximum of two meters above the ground.
Garage crane is used for:
- removing the engine;
- lifting beams, bridges;
- movement of dimensional units.
The crane contains a hydraulic drive and operates through a system of communicating vessels. The method allows you to make the rise smooth.
Stationary
The stationary crane is installed in large car repair shops and is securely attached to a monolithic foundation. The mechanism has a boom with a rotating system and is equipped with a manual drive. Allows you to work on only one vehicle at a time.
It is important to calculate the installation location in advance, since it will not be possible to dismantle the structure without loss.
An integral advantage of a stationary crane is its large lifting capacity. It is provided by a monolithic support, which creates rigidity of the system.
Portable
The hydraulic rolling crane has wheels on its base. The support is provided by the lower metal beams, which results in loss of load capacity readings. It is better to choose a faucet with a massive triangular support. By design they are divided:
- on cast solid supports with limited boom reach, but good load capacity;
- telescopic or folding - they have an increased boom reach, but reduce the load capacity by several times.
Important! Folding units need to strictly follow the instructions for lifting the permitted load. The arrow cannot withstand and, if the permitted standards are not observed, it breaks off.
Assembly instructions and drawings
The design was called “goose” because of its L-shaped shape. The mechanism is easy to use, because thanks to it you can bring the boom to the engine compartment. This reduces labor costs for tying the engine, which reduces the time required to complete repair work.
The design of the “goose” is simple. The mechanism consists of a collapsible support equipped with wheels. With their help, it is easy to move it from place to place and roll it under a car.
The garage device has a vertical stand, on which a jack is installed. “Goose” has a retractable boom, which is equipped with a chain and hook. When the jack is activated, the boom goes up, lifting the load.
A hydraulic crane is most often used to lift an engine. The device can be made according to ready-made drawings, but most often a hand-created crane diagram is used; even beginners can draw it with their own hands.
First, the collapsible part of the pore is made; it is a butt part. After this, the vertical stand is welded. A spacer must be installed at the bottom. After this, they proceed to installing the jack; it must be securely fastened. The boom is made to reach full reach; it is needed to remove the engine. All parts of the structure are welded. The result is a reliable yet maneuverable device.
When the product is ready, tests must be carried out.
To do this, hang a load that should be 20% heavier than the one that needs to be lifted. If the mechanism can withstand the load, it can be used for work. The goose crane is collapsible, so it will not take up much space in the garage.
Main types of equipment
The average garage has a reduced square footage and requires careful selection of equipment. Before installation, it is recommended to carefully study the need for individual mechanisms, their types, pros and cons. A hydraulic valve is determined by two criteria.
By type of drive
There are also two subtypes of hydraulic drive:
- automated design with hydraulic cylinders;
- combined, with hydraulic cylinders and manual winches.
A significant drawback of the first is oil cylinders. They need frequent regular replacement, so this design is considered extremely unprofitable for constant use. The combined system will last longer. However, some of the work with winches will have to be taken on by mechanics.
According to the design of the support
Hydraulic cranes are divided into mobile and stationary, they can be folding and prefabricated cast (goose). For ordinary garages, it is more rational to choose a mobile structure with folding parts.
DIY crane assembly technology
If you have certain skills, assembling the mechanism yourself will not be difficult. To do this, it is important to draw up a preliminary design drawing, choose materials wisely and strictly follow the assembly instructions.
Schemes and drawings
Below are sample drawings of a hydraulic crane. You need to make accurate calculations yourself, based on the parameters of a particular garage.
Material selection
To build a garage lift yourself, it is recommended to first purchase all the required materials:
- 3 steel corners with parameters 7.5x7.5x0.8 centimeters.
- “Worm” gearbox, the minimum load capacity of which starts from 300 kilograms, and the additional indicator is 60 kilograms.
- A strong steel plate one centimeter thick. If you have an old metal cutting machine, you can take it from it; you won’t need outside help for this.
- About 10 matching bolts.
- 2 dense metal chains with a diameter of two to three centimeters. The crane is designed to work with very heavy materials - you should carefully monitor the quality of the metal.
- Hook.
- Steel cable with a diameter of 5 millimeters.
- 2 keys with different parameters in the shape of an asterisk.
Step-by-step construction instructions
The process of assembling and installing a homemade garage crane does not look complicated:
- steel corners must be installed on parallel walls;
- fasten the steel plate to them using M8 bolts;
- fix the “worm” gearbox on the plate;
- install a larger key on the drive shaft;
- drill a hole in a pre-designated place, insert a chain into it and close it into a ring;
- fix a smaller key on the output shaft of the gearbox;
- drill 2 more holes in the plate;
- pass the second chain through the holes, where one end is on a small key, and a hook is installed on the second.
Installing a faucet yourself has a number of important advantages. For example, the cost of a homemade mechanism is almost two times lower than a purchased one.
DIY console crane
Today we will tell you how to build a jib crane with your own hands. But first, a few words about how this design differs. So, jib cranes are used to lift moderate loads and are ideal for servicing construction sites. Moreover, they are also used in other areas of industry - mechanical engineering, machining shops, etc. Such a wide range of operation is explained by the possibility of working in wall conditions, that is, in limited space.
Types of jib crane
There are two types of such cranes.
Mobile structures consist of a frame resting on two wheels and moving along special guides. The console itself is attached to the frame.
Stationary structures are mounted on walls or special columns. It is typical that the column can be installed on the base of the building. At the same time, cranes come in one- and two-arm types (depending on the type of support), and also have different lifting capacities.
The project described is non-standard, but to implement it you will only need two assistants. The procedure begins with drawing up a project.
Technical task
Installation, loading/unloading by four people.
Lifting height 5 meters.
Seven meter console.
Load capacity – from 0.6 tons.
Installation without the use of special equipment.
Drafting
The crane will rest on three legs of a “twentieth” I-beam, secured with flanges made of 1.4-centimeter steel and M-16 bolts. A thick-walled pipe is used as a shaft. The legs are equipped with additional spacers.
The arrow will sag by 5 cm, since the legs have a small margin of safety (three are used instead of six). More details can be found here https://chelny-kran.ru/catalog/kran-balki-kontsevye-balki-krana/kran-konsolnyj.
To create a drawing, use AutoCAD, but round off all dimensions. Finished files from the program go directly to the CNC.
Welding
To weld all the elements you will need the welding machine itself, a current of 220A and five electrodes. When aligning, use a mounting level. All this will take a maximum of one day.
Assembly of the structure
For convenience, dig pits for the legs; carry out the assembly while lying down (this will take about a few hours). To lift the crane you will need a truck, a cable and a beam. Attach one end of the cable to the truck, the other to the crane. Using a truck, pull the cable through the beam until the structure stands on its feet.
Next, secure the boom and tighten the guy ropes. Actually, that’s all: the do-it-yourself console crane is almost ready! Of course, its construction requires a lot of effort, money and time, but soon it will fully justify itself. If everything is done correctly, then using a crane it will be possible, for example, to pour up to twelve cubic meters of concrete solution (with several assistants and a pair of concrete mixers). Good luck with your work!
stroy-dom.info
How to make a hydraulic goose crane with your own hands
Dear visitors of the site “ Samadekin Friend ”, from the presented material you will learn how to independently assemble a garage hydraulic goose crane, look at the drawings, step-by-step photos of the assembly, as well as a video testing a homemade crane for dismantling the engine. Every motorist, in his or her practice of operating a car, has probably encountered engine breakdowns, and often its replacement or major repairs, but in order to remove the internal combustion engine from its seat, you will need a reliable winch or crane. Purchasing special equipment will cost at least 10 K, and not everyone has the opportunity to install a winch on the garage ceiling, because garage floors are quite weak.
It is quite possible to make a goose-type crane with a hydraulic boom lifting system yourself, for which you will need 7 meters of 80x80 mm profile and 3 mm wall thickness. A pair of pipes 89, 700 mm and 76-900 mm. Five-ton jack 5t, plates 8 mm thick 4 pcs. In this case, the author only bought 2 regular wheels, 2 swivel wheels, 1 m M-14 studs. During the tests, a homemade crane easily lifted 250-300 kg, concrete curbs with a total weight of 500 kg were also transported, everything was fine.
The design and principle of operation of the homemade hydraulic crane “Gus” is essentially quite simple, and the name speaks for itself) It consists of a support (collapsible) with wheels for moving around the garage and under the car, a vertical stand with a jack and the retractable boom itself with chain and hook.
The lifting height of the short boom at the bottom is 90 cm at the top. Long boom, bottom 80 cm, and at the top 1800 mm and with the jack rod unscrewed, the bottom is 1400 mm and the top is 2250 mm.
So, let's look at what exactly is needed to assemble a garage crane?
Materials
- professional pipe 80x80, 7 m long
- pipe 89 mm x 700 mm 2 pcs.
- pipe 76 length 900 mm
- wheels 6 pcs, 2 swivel, 2 regular and 2 with brake
- metal plates 8 mm 4 pcs
- jack 5 t
- chain and hook, M-14 pin, length 1000 mm
Tools
- welding inverter
- Angle grinder (grinder)
- drill
- set of wrenches
Step-by-step instructions for assembling a hydraulic goose crane with your own hands.
First, you should familiarize yourself with the drawings and diagrams, and then move on to assembly.
First, the butt part of the support is made; it will also be collapsible.
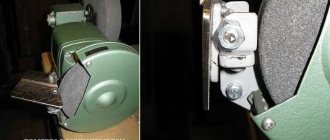
A vertical post with a spacer is welded in the lower support plane.
Installation and fastening of the jack.
Experiment in the garage, lifting the scooter)
Moped weight 120 kg
This kind of faucet can be made with your own hands at minimal cost. Simple, inexpensive and compact, because the crane is collapsible.
The author also made a short video of the tests.
Source
Necessary materials
The tap is made from a profile 7 m long. It is best to use a material whose wall thickness is 7 mm. The mechanism must be durable, so you should choose a profile with a cross section of 80x80 mm.
To make a lifting device, you will also need several pipes. Suitable products are 700 mm, the cross-section of which ranges from 76 to 99 mm.
To build a crane you will need a jack, you can take it from a VAZ. It is best to use a device that is designed to lift loads weighing up to 5 tons. To construct the mechanism, 4 plates with a thickness of 8 mm are required.
To assemble a crane yourself, you need to have the following set of tools:
- drill;
- inverter for welding;
- spanners;
- Bulgarian
Assembling the mechanism is not complicated, so it can be easily done on your own. A gantry crane or any other device can be painted after assembly.