Concrete tray: where to start assembling?
Volumetric concrete work involves the use of the following machines and equipment: a truck mixer with ready-made concrete or a concrete mixer, a concrete pump or a tray for supplying concrete to the pouring area.
At the same time, a car mixer or a concrete mixer are “constant” quantities, that is, equipment that you cannot do without. An expensive concrete pump to rent (rental costs start from 14,500 rubles per shift) is usually replaced with a disposable wooden tray (in private housing construction), which can be disassembled and the boards used for other purposes.
Materials, tools, procedure
The dimensions of the future product are taken based on the specific distances from the planned installation of the mixer or concrete mixer to the farthest point of the structure being poured.
In private low-rise housing construction, the length of the tray usually does not exceed 12 meters. The width of the tray is taken to be the “width” of a shovel plus 5 centimeters on each side (usually 300 millimeters), the height of the wall is the width of the existing edged board 150-200 millimeters.
The following materials and tools will be required:
- Edged board 25x150 or 25x200 of the maximum possible length for the tray box;
- Wooden block 40x40 or similar to strengthen the box;
- Wooden block 50x50 or similar for supports under the box;
- Galvanized or roofing iron for lining the bottom of the box;
- “Seventy”, “25”, “weaving” nails or wood screws;
- Hammer, wood saw, screwdriver, tape measure;
- Angle grinder with a metal disc or metal scissors. For cutting galvanized or roofing iron.
In order to save on expensive galvanized iron, you can independently plane the side of the boards along which the concrete will be transported as smoothly as possible. For these purposes you will need a plane or jointer.
Important! Some websites publish articles that suggest covering the bottom of the box with polyethylene or linoleum. This suggests that the authors have never made or used trays for concrete - polyethylene will very quickly be torn apart by filler and a shovel, and buying linoleum will be much more expensive than using iron or simply planing one side of the board.
Operating procedure
- Depending on the width of the existing boards, the bottom of the tray box is assembled - 4 (150 mm) or 3 (200 mm) boards in a row are connected into an “end” with an overlay from the same board nailed to the underside of the bottom of the box. For strength and reliability, also on the bottom side of the box with a step of 600-800 mm to the bottom of the box, reinforcing bars 40x40 mm are nailed across;
- The walls of the tray are nailed to the sides of the bottom of the box, and best of all, the walls of the tray are screwed with self-tapping screws, so as to form a U-shaped structure;
- The bottom of the tray is covered with galvanized (roofing) iron, or is not covered if the boards are carefully planed;
- For reliability and strength, the walls of the tray are “bandaged” with 40x40 bars in increments of 0.8-1 meter.
The concrete transport tray itself can be considered ready for use. But there is one caveat. In order for the material to move into the formwork from an automixer or concrete mixer as independently as possible, it must have a slope to the soil surface of 5-15 degrees (for “liquid” concrete) and 20-30 degrees (for thick concrete).
In addition, the concrete tray should not bend under its own weight and the weight of the concrete. This can be achieved in several ways: pin up available materials under the tray (foam blocks, boxes, bricks, etc.) or spend a little time and knock down special triangular trestle supports of different heights from 50x50 mm timber and lay the tray on them as if on a bed.
Also, for the convenience of “turning”, it is advisable to provide two handles in the part of the structure facing the formwork - a 50x50x1000 block nailed to the bottom of the tray, 250-300 mm away from the edge.
Useful practical tips! After you have poured the structure furthest from the mixer, you can cut off part of the tray with a hacksaw and grinder, break the handle for “turning” and continue working without moving the automixer or concrete mixer.
After completion of the work, the tray is disassembled into components that can be used for other construction or repair purposes.
Considering that some companies charge extra for the downtime of an automixer, to speed up the work of delivering concrete to the formwork, use two workers with shovels to stand on either side of the tray and shovel the concrete to the pouring point.
Do-it-yourself concrete tray: what is the best material to make from?
Building codes require that volumetric concrete structures be poured simultaneously, preferably during daylight hours. One of the components of the rapid pouring of a structure is a concrete tray, which you can quickly and easily make with your own hands.
Concrete tray: where to start assembling?
Volumetric concrete work involves the use of the following machines and equipment: a truck mixer with ready-made concrete or a concrete mixer, a concrete pump or a tray for supplying concrete to the pouring area.
At the same time, a car mixer or a concrete mixer are “constant” quantities, that is, equipment that you cannot do without. An expensive concrete pump to rent (rental costs start from 14,500 rubles per shift) is usually replaced with a disposable wooden tray (in private housing construction), which can be disassembled and the boards used for other purposes.
Materials, tools, procedure
The dimensions of the future product are taken based on the specific distances from the planned installation of the mixer or concrete mixer to the farthest point of the structure being poured.
In private low-rise housing construction, the length of the tray usually does not exceed 12 meters. The width of the tray is taken to be the “width” of a shovel plus 5 centimeters on each side (usually 300 millimeters), the height of the wall is the width of the existing edged board 150-200 millimeters.
The following materials and tools will be required:
- Edged board 25x150 or 25x200 of the maximum possible length for the tray box;
- Wooden block 40x40 or similar to strengthen the box;
- Wooden block 50x50 or similar for supports under the box;
- Galvanized or roofing iron for lining the bottom of the box;
- “Seventy”, “25”, “weaving” nails or wood screws;
- Hammer, wood saw, screwdriver, tape measure;
- Angle grinder with a metal disc or metal scissors. For cutting galvanized or roofing iron.
In order to save on expensive galvanized iron, you can independently plane the side of the boards along which the concrete will be transported as smoothly as possible. For these purposes you will need a plane or jointer.
Important! Some websites publish articles that suggest covering the bottom of the box with polyethylene or linoleum. This suggests that the authors have never made or used trays for concrete - polyethylene will very quickly be torn apart by filler and a shovel, and buying linoleum will be much more expensive than using iron or simply planing one side of the board.
Operating procedure
- Depending on the width of the existing boards, the bottom of the tray box is assembled - 4 (150 mm) or 3 (200 mm) boards in a row are connected into an “end” with an overlay from the same board nailed to the underside of the bottom of the box. For strength and reliability, also on the bottom side of the box with a step of 600-800 mm to the bottom of the box, reinforcing bars 40x40 mm are nailed across;
- The walls of the tray are nailed to the sides of the bottom of the box, and best of all, the walls of the tray are screwed with self-tapping screws, so as to form a U-shaped structure;
- The bottom of the tray is covered with galvanized (roofing) iron, or is not covered if the boards are carefully planed;
- For reliability and strength, the walls of the tray are “bandaged” with 40x40 bars in increments of 0.8-1 meter.
The concrete transport tray itself can be considered ready for use. But there is one caveat. In order for the material to move into the formwork from an automixer or concrete mixer as independently as possible, it must have a slope to the soil surface of 5-15 degrees (for “liquid” concrete) and 20-30 degrees (for thick concrete).
In addition, the concrete tray should not bend under its own weight and the weight of the concrete. This can be achieved in several ways: pin up available materials under the tray (foam blocks, boxes, bricks, etc.) or spend a little time and knock down special triangular trestle supports of different heights from 50x50 mm timber and lay the tray on them as if on a bed.
Also, for the convenience of “turning”, it is advisable to provide two handles in the part of the structure facing the formwork - a 50x50x1000 block nailed to the bottom of the tray, 250-300 mm away from the edge.
Useful practical tips! After you have poured the structure furthest from the mixer, you can cut off part of the tray with a hacksaw and grinder, break the handle for “turning” and continue working without moving the automixer or concrete mixer.
After completion of the work, the tray is disassembled into components that can be used for other construction or repair purposes.
Considering that some companies charge extra for the downtime of an automixer, to speed up the work of delivering concrete to the formwork, use two workers with shovels to stand on either side of the tray and shovel the concrete to the pouring point.
salecement.ru
Making a concrete gutter with your own hands
The technology for pouring a foundation of any type is not something very complicated and can be done independently, without the help of specialists. This is especially important when it comes to building a house on your own. Pouring any concrete product has its own specific features that must be taken into account.
Concrete gutter diagram.
A very important point is the process of supplying the concrete solution with a mixer to the right place, since, ultimately, it is necessary to obtain a monolithic surface. That is why the chute through which the concrete mass will be supplied by a concrete mixer to the pouring site is of particular importance. When building a foundation, it is advisable to make a concrete gutter with your own hands. Filling with a mixer will be much better.
DIY concrete tray
During the construction process, there is a need to transport a wide variety of materials. For transportation of concrete, its subsequent storage and pouring, a special tray or bucket for concrete is used. Manufacturers provide different models, but if you have some technical skills, you can make a concrete tray with your own hands.
Scheme of a tray for pouring concrete consistency.
Before starting work, you need to decide for what purpose the tray is needed (only for storage or for both storage and transportation). Depending on this, the design of the product may change.
If the tray is intended for transporting concrete, then it can be equipped with a rotating device.
If a one-time implementation of the design is intended for a small-scale construction project, the most common tray design will do.
Rules and tools
Jet chute diagram.
To build the structure you will need:
- roulette;
- hacksaw or chainsaw;
- hammer;
- Bulgarian;
- screwdriver;
- square
When pouring a foundation with your own hands, it is very important to follow some rules, the main ones of which are the following:
- concrete should be poured with a mixer in small portions, no more than 1.5 m in height, evenly distributing it over the entire surface area;
- the poured mixture must be compacted using a device such as a vibrator;
- pouring concrete using a mixer should proceed until it reaches the control mark, which is made on the surface of the formwork, i.e. then the filling stops;
- the concrete surface is well leveled, and after 3 hours, when the solution has set a little, it is covered with burlap;
- the foundation should not be poured from a mixer in small portions, which, in turn, will lead to the formation of joints that reduce the strength of the foundation, which can subsequently lead to the destruction of the structure;
- if the work is carried out in hot sunny weather, then the concrete surface is periodically moistened for several days.
The role of the pouring trough
Diagram of a trench for pouring concrete.
As mentioned above, concrete flows from the mixer into the gutter. The length of the element should be from 1.2 to 1.5 meters. If concrete is poured into the same place, then the mixture will not be evenly distributed over the surface of the formwork.
In addition, concrete delamination may occur, that is, the liquid part of the mixture from the mixer will penetrate into more distant areas, while the thick part will remain only in the pouring area. If the gutter is used incorrectly, the quality of the foundation will be poor and its service life will be short.
Therefore, it is very important to ensure free movement of the mixer to different areas of the future device (foundation). Where access by the mixer will not be possible, a longer chute should be used to convey concrete into hard-to-reach areas.
Making a gutter
The technology for making a concrete gutter with your own hands is not a particularly complicated process. The principle of its creation is exactly the same as when erecting formwork on a foundation.
Scheme of pouring a strip foundation.
- It is necessary to take an edged board measuring 25x150 mm and put together a “U-shaped” structure from it, the sides of which should be high enough so that the concrete mass does not stagnate.
- To make concrete flow easily, the inner surface of the gutter is lined with tin, linoleum or ordinary polyethylene, which will reduce the adhesion of the material.
- After the foundation gutter is made, it is installed in the desired location and supported by 4 support points. A good option would be to use gas silicate blocks for such purposes, which will prevent the structure from destruction.
In some cases, concrete is unloaded using a mixer into a special bunker and only then used for its intended purpose.
It is very important to remember that in open long structures the concrete mass loses a certain amount of moisture, which contributes to the disruption of its homogeneity. That is why such gutters are the worst way to supply material and are used only in private construction.
To construct a structure (foundation) on an industrial scale, gutters are used, which are designed in such a way that constant mixing of concrete is ensured at the lower end of the structure. This is achieved by passing the concrete mass through a special funnel-shaped trunk pipe.
How to make concrete drainage trays with your own hands ↑
There are many ways to make the water drain as quickly as possible. The simplest way is to simply dig trenches in the ground with a slope of 30. But they will be washed away by moisture and collapse.
Therefore, the best solution would be a drainage system assembled from drainage trays. You can purchase them or make them yourself. Although their manufacture is associated with certain difficulties, this method allows you to save quite an impressive amount of money.
The optimal shape of a concrete tray is semicircular. But making a concrete product of this shape is quite problematic. Therefore, most often they resort to the following method.
From smooth boards of the required overall dimensions, a structure in the shape of the letter “P” is knocked together. It is best to use wood with a thickness of at least 10 mm. Since it is on it that the entire load will fall when pouring concrete.
The design will look something like this. It is better to fasten individual panels together using metal corners, as this will significantly strengthen the structure.
Photo: formwork dimensions
After the formwork is ready, you can proceed to the second stage - preparing the molding part. It consists of a pipe of the required diameter sawn lengthwise. An important point is the smoothness of the outer surface. Since it is this that will form the inside of the tray.
You can also use a plastic pipe, which is more preferable. For example, a sewer pipe, the diameter of which can vary within a very wide range - from 50 mm or more. Its surface is almost perfectly smooth and has no pores.
Layout diagrams
Hanging system
It is used if the supply of concrete for pouring the structure (the foundation itself acts as it) is carried out over a short distance with an offset. To create such a structure, you will need a rope, from which the gutter is suspended using cables passing through two blocks.
One end of the rope is attached to a pole or column, and a load is hung on the opposite end and lowered to the ground. The load is also hung on the ends of the cables in such a way that they can be used to adjust the angle of inclination of the system.
If a system such as a foundation is to be erected for a large structure, then to maintain a constant angle of inclination it is necessary to install a taller rope tower or install additional pillars. It is the auxiliary pillars that will receive concrete from the main tower.
Gutters with jibs
This arrangement is appropriate if concrete for the foundation is supplied at a distance of no more than 60 meters.
The lower end of the gutter is suspended and attached to the jib.
The jib is a metal lattice truss, one side of which rests on the lower skid, and its upper edge is connected to the upper skid using a lifting cable.
In order for the slope of the gutter to remain unchanged while the concrete solution passes through it, its lower end is attached to the ground using cables.
Sprengel groove
The simplest design, which involves hanging the lower end of the gutter from a support.
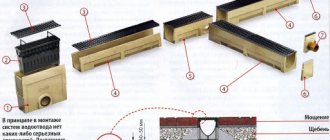
DIY drainage trays
After rapid melting of snow or heavy rains, it becomes necessary to protect against increased water levels by creating surface drainage with the help of drainage trays and grates, which serve to protect the trays from debris and create additional decor.
The unimpeded throughput of the industrial or storm water disposal system is ensured by the correct installation of the trays, namely, at a certain angle.
The principle of operation of these products is to collect wastewater and transfer it to special containers. Along the way, the water is also purified through sand traps.
Device requirements
Formwork diagram for the foundation.
In order for the supply of concrete mass during the construction of the foundation to be as uniform and homogeneous as possible, the gutters must meet certain requirements that apply to them:
The slope of the gutter must remain unchanged throughout the entire period of work during the construction of the foundation of the house. If this condition is not met and the angle of inclination, for example, decreases, then the speed of passage of the concrete mass will also decrease.
This, in turn, would lead to a buildup of solution and blockage of a certain area of the gutter. With an increase in the angle of inclination, and therefore the speed of passage of the mass, the concrete surface will be divided into separate parts, which is completely inconsistent with the existing technology. The foundation will be of poor quality.
The angle of inclination of the gutter relative to the horizon must have a certain size, an increase in which will lead to the concrete mass being divided into parts. The reason for the change in the size of the angle of inclination may be the consistency of the concrete and the degree of its delivery distance.
Solutions of a more liquid consistency, supplied over a short distance, allow gentle slopes; for longer distances, steeper gutters are appropriate.
Some features
Maintaining uniformity of concrete transportation directly depends on the shape of the gutter. A narrow and high chute makes it possible for individual particles to come closer together during the movement of the mixture. In addition, it is necessary to ensure that the concrete mass does not overflow over the sides of the device during feeding.
- A narrow-shaped accessory has one advantage, which is that it is the most durable and stable in a vertical position. This is very important, since its design must withstand not only its own weight, but also the load from the entire concrete mass.
- The very narrow element must be reinforced with horizontal bracing to prevent it from buckling in the event of a blockage.
- To increase rigidity, it is reinforced with corners in the transverse direction. The length in each specific case may be different and depends on the type of future structure.
- On an industrial scale, when creating a foundation, systems with a length of 3-15 meters can be used.
It should be remembered that the longer the gutter, the greater its mass should be in order to prevent it from bending during the supply of concrete solution. The connection of such products is determined by the peculiarities of pouring the concrete mass, more precisely, by whether the gutter is supposed to rotate in a certain direction or not.
In order for the movement to be circular, it is necessary to connect its parts with a rotating head. If there is no need to rotate the gutter in a horizontal plane, it is quite enough to use hinges that allow you to adjust the angle of inclination.
Setting up the mold for pouring
To figure out how to make cement water drainage trays, you need to understand the principle of their operation. In autumn and winter, a large amount of precipitation falls on the area near the house or cottage. Then they spread over the surrounding area, flooding low-lying areas, creating dampness in the basements and spoiling the finishing of the walls. If there are properly made cement trays near a private house, then the water will flow through them and then be drained away without creating trouble on the site.
How to make sure that water is drained through the tray quickly and without delay? There is a conclusion that a trench with a slope of 30° will allow water to drain quickly. Despite the fact that this is true, a trench with such a slope will soon be washed away and then collapse. Making cement trays is the best option because they are not afraid of liquids and will do their job perfectly. You can buy such trays in stores, or you can make them yourself. Let's look at how below. What are the advantages of cement trays made by you personally? Firstly, it's saving. Despite the fact that they are not very easy to make, it will be cheaper than buying such factory-made trays in a store. Secondly, these are personal dimensions, since some trays from the store will need to be cut if there is a turn in the drainage trench, but at home it is possible to fill trays of the required length and shape. By the way, about the shape. The optimal shape is considered to be a semicircular shape, through which water passes virtually without resistance. But, because such a shape is not easy to make, trays are much more often made according to the following scheme. A U-shaped structure is made from boards or pages of laminated plywood 10–15 mm thick. To give strength, the panels in the formwork are fastened with rolled metal corners.
At the time when the main part of the formwork is done, the molding part is prepared, which is made from a pipe sawn in half lengthwise. It is fundamentally important that the surface of the pipe used is smooth, because thanks to it a semicircular part of the tray will be formed, along which wastewater will flow. It’s best to make at least 10 of these formworks, otherwise the process of filling the trays for the entire water drainage may take an unknown amount of time. A sewer plastic pipe of suitable diameter is ideal for the molding part, because its surface is smooth. There are virtually no pores on such a pipe, which allows you to pour concrete much better.
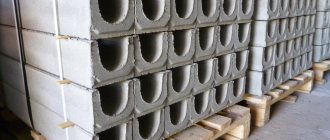
One of the options is concrete inter-track trays (MPL), used in railway construction, and this solution is, frankly speaking, radical: the reinforced concrete structure reliably forms the walls of the ditch (they have holes for water infiltration into the ditch), and the stable base is a reliable outlet chute . But - expensive!
Diary entry created by HeavyMetal, 07/04/17 .605,
Stage 5/1: ditch equipment: trays
A ditch is a must have. Firstly, it is a public engineering structure of the village, on the functioning of which the uninterrupted operation of general drainage depends. Secondly, a ditch is needed for constant drainage of your own site. This means that the ditch will always have to be maintained in working condition. In my case, the ditch was a ditch that was already beginning to lose its shape: the edges were crumbling, and the bottom silted up and rose with soil applied by spring flows of water. How to make it so as to at least return to cleaning the ditch in the future? But you need not only deepening, but and strengthening the walls!
One of the options is concrete inter-track trays (MPL), used in railway construction, and this solution is, frankly speaking, radical: the reinforced concrete structure reliably forms the walls of the ditch (they have holes for water infiltration into the ditch), and the stable base is a reliable outlet chute . But - expensive! I spent many evenings scouring the Internet looking for alternatives. Alas, I have not come across plastic trays for ditches in Russia, geogrid solves the problem only partially, and the rest was from the category of “garden finds”, such as “strengthening the walls of a ditch with slate.” Gabions were more or less suitable for solving the problem, but if made from There are two walls - the cost becomes exorbitant (plus the problem of silting of the bottom is not solved + long installation time + the ditch needs to be expanded three times for installation). In general, I decided that trays were the only option. I began to study the market. “Turnkey” offers from teams amount to 8 tr per tray (1.5 p/m). In my case, I need 45 trays (corner plot, that’s why there are so many), this 360 tr. How can this cost be reduced? I found trays with a depth of 0.75 m for 2.6 tr, and 1.00 m for 3.15 tr. Delivery - 2 scows of 7 tr each. Unloading - with a crane (12 tr shift), or with a manipulator - 8 tr. I settled on the manipulator, figuring that at the same time I could bring 3 concrete rings and a cover for the drainage well. Also, my plans included not only unloading the scows with the manipulator, but also laying the trays in the ditch with it (for an additional fee). Having ordered 45 trays, we marked and dug a ditch, laid Geopro300 geotextiles, poured a bed of crushed granite stone of fraction 20-40, and compacted it with a rented vibrating plate. The preparatory work took us 4 full days. And then the day of delivery and installation came. The main nuance in installing the trays is that the trays are transported upside down (the shipping lugs are filled in), and they must, of course, be installed bottom down. The tray needs to be turned over, but how? We used a trick: we decided to use drainage holes in the walls of the trays: we welded removable eyes from the reinforcement from the reinforcement, which can be secured with a pin, threading it into the drainage hole. The process looked like this:
- We remove the tray from the scow and place it on the ground; bend the technological factory eyes at the bottom of the tray with a sledgehammer;
- We attach 2 of our 4 removable eyes on one side of the tray through the drainage holes;
- We turn the tray with a crane: hooking the loose side of the tray to the ground, turn the tray over;
- We attach our remaining 2 removable eyes to the other side, lift the tray horizontally, and install it bottom down in the ditch.
I’ll say right away: using a manipulator for operations was a mistake.
It copes with the task poorly: it moves very slowly. In addition, the boom reach is very small, and for laying in the “far corners”, he had to load the trays onto himself, then transport them to the installation point, and repeat the unloading operation there. On the first day, in 7 hours we were only able to unload all 45 trays onto the ground (without turning them over), and only turn over 26 of them and install them in the ditch. After which the manipulator operator announced that his day was over (and tomorrow was a day off) and left. We were left with unfinished work at 19:00 on Saturday and were quite upset about this. We had to urgently look for a crane! We were lucky: the crane was found immediately and by chance. A man was driving by and stopped to find out about the cost of the trays. We started talking. It turned out that he knew the local crane operator Yura from Sertolovo and could recommend him. Yuri was immediately recruited, and he turned out to be a professional: the next day, at 8:00 Sunday, he was at our site minute by minute. His fee is at least 3 hours for 6 tr, then 1 hour = 1 tr. This is very humane, but we did not know how much time we would need; based on the experience we had already gained, we estimated 5-6 hours.
Imagine our surprise when we turned over and stacked the remaining 19 trays. in 1.5 hours! This is what an experienced crane operator and a real crane (MAZ with a telescope) mean! Since there was still paid time left, we moved several trays to align them and moved the ring. Yuri had nothing else to do and we let him go.
Here's what happened in the first part of this stage:
In the next parts of the stage (there will be four more) you will: 2) Build formwork
for joints of trays in corners, junctions with entrances, and ends;
3) Install a channel
;
4) Fill the formwork with concrete
;
5) Fill the edges
of the ditch.
The volume of surface water usually exceeds the volume of groundwater.
The benefit of making drainage trays yourself is that the shapes can be made to suit your needs, while store-bought ones sometimes have to be cut. Semicircular trays are considered ideal for water throughput, but making them is not so easy, so we make calculations drainage trays, first using boards or sheets of plywood, preferably laminated, and then the procedure is as follows:
- We build a U-shape, if necessary, strengthening the boards with metal corners - this part is called formwork.
- We cut a plastic sewer pipe of the appropriate diameter in half. The main thing is that the top of the pipe has a smooth surface, because this will make the concrete surface without flaws.
- It is better to make 8-10 formworks at once, so as not to stretch out the work time.
- Let's start making concrete. If you don’t have a concrete mixer, you will have to work with a hoe to mix bulk materials with water.
- We make a concrete solution from M-400 cement, sand and crushed stone in a ratio of 1:2:4. The correct solution is a viscous solution.
- Quickly pour the prepared solution into the formwork and forcefully press the halves of the plastic pipes. For additional strength, you can place pieces of reinforcement at the bottom of the formwork, and then pour in the mortar.
- We try to vary the level with the planting depth of the plastic pipe in order to achieve the same dimensions as much as possible. If necessary, you need to put some kind of weight on top of the pipe. Complete hardening of the concrete takes about 28 days, but you can hold the molds for about a day and carefully disassemble the formwork, and also pull out the pipe.
To make formwork, take flat boards with a thickness of 25 mm and use wood screws to better hold the structure.
The entire formwork must be covered with a 200-micron polyethylene film so that water from the concrete solution does not flow out through the cracks. At the exit, the tray should be rectangular in shape with a semicircular inner part. In addition, there should be no cracks, bulges or holes. Not many people know that the strength and longevity of the building’s foundation is ensured by high-quality and correctly installed drainage trays. It is these simple devices that help rid the foundation of excess moisture and protect it from destruction. All modern buildings are required to be equipped with similar structures.
Concrete tray
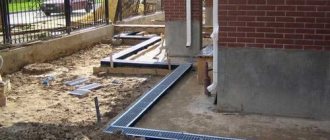
The same thing happens with a household concrete mixer. It is, of course, easy to use; it can be moved directly to the edge of the formwork. But still, there are places where it is impossible to deliver a concrete mixer. In this case, you either pour concrete from it into buckets and manually fill the formwork, or you dump the mixture into a tray, through which it evenly flows to the right places.
Most often, a tray for receiving concrete is made of boards, since the iron structure is very heavy, working with it requires considerable strength and skill. The wooden tray is lightweight, quickly assembled on site, and can be made of any size to fit a specific formwork.
The width of the tray is easy to determine - a shovel should fit in it to help the mixture move off it during pouring. The length of the structure usually does not exceed 3 meters, but there are exceptional cases. Then the tray is made based on the size of a specific object.
To make a tray, take a wide board.
On the one hand, where the concrete will go, it is processed with a plane so that the flowing mixture does not linger on the rough surface. Inexperienced builders cover the board with cellophane film or roofing felt. But you don't need to do this. These materials will rupture when the mixture is first applied. If you have extra galvanized sheet, you can upholster the structure with it from the inside. But if there is no galvanization, then the concrete will move along the planed board.
If the length of one board is not enough, the tray can be extended with a second board, fastening them from below with scraps of plank using self-tapping screws. They also increase the width by screwing a block of the required size to the side of the ribbing.
The height of the side walls will be enough 20 cm. If there is no one board of this width, then you can connect two 10 cm wide. They are connected to each other with self-tapping screws through small pieces of plank.
The next step is to screw the sides with self-tapping screws to the bottom board.
The concrete receiving tray is almost ready.
To prevent the sidewalls from moving apart under the weight of the concrete mixture, they are fastened on top with bars at a short distance.
The concrete tray is ready. Before starting work, it is advisable to moisten its surface with water to reduce the friction force.
Using it, it is convenient to fill formwork even with walls 15 cm thick. The main thing is to direct the mixer feed chute exactly to the center of the tray. If you ordered a mixture with little fluidity, you will have to work with a shovel to help it move. And do not forget to vibrate the concrete well with a deep vibrator, removing air bubbles from it. This will increase its fluidity, the mixture will fill the narrowest niches. Vibrated concrete also has higher strength and water resistance compared to non-vibrated concrete of the same grade.
If you liked the article, share it on social networks.
DIY concrete tray
Fixed concrete tub BN Bell/glass
Bucket for concrete: shoe or glass?
Concrete buckets are containers designed for moving mortar around a construction site or storing it. Of course, storage of concrete should not be long - it must be used before the solution sets.
Concrete tubs are usually made of metal, some can be installed on a frame made of profiles or pipes. Such special containers are very convenient; they can be used all year round.
To move the solution around the site using a rope, special metal boxes are used. Their design is also hermetically sealed, the containers are equipped with slings, and there is no shutter.
How to choose a bucket for concrete
When choosing containers for mortar, first of all, it is necessary to take into account the convenience of a particular model for loading and unloading concrete mixture during operation. If you have to work with small volumes of solution, then the best option may be a container in the form of a rectangular trough - the so-called shoe or slipper.
This model is best suited for manual work. But when using pumps or in the case of mechanized supply of solution, preference should be given to the tub-glass. The neck of this container is wide enough for loading, and at the bottom there is an outlet pipe equipped with a locking device.
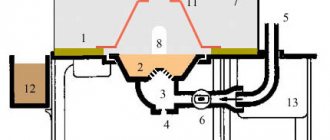
This design of the concrete bucket allows you to easily dose the solution or, on the contrary, supply it continuously. Both modifications of containers for concrete have a wide range of sizes and many models. Some of them can hold several cubic meters of concrete.
Rotating bucket for concrete BP
The rotating bucket BP, designed for transporting the solution to the place of pouring and short-term storage of concrete, is called a shoe or shoe by builders due to the fact that the container actually resembles a shoe in shape. Such a tub is a structure made of steel sheets, which are connected to each other at the top by means of a channel for rigidity. Two loops for slings are attached to the channel using a welded joint.
If necessary, a vibrator can be installed on the Bucket shoe - a special platform is provided for it. At the bottom of the tub there is a lever for a mechanism that ensures the distribution of concrete. To protect it from mechanical damage during lifting and lowering, a special frame is mounted there.
Interestingly, the design of the Bucket Shoe allows you to practice simultaneous loading of two containers. Concrete buckets are installed close to each other, and pouring occurs simultaneously. Each tub shoe is tested:
- Concrete is poured into the tub (a volume 15% greater than the maximum permissible by weight).
- The container is left hanging for 10 minutes.
- After this, the tub must withstand 10 ups and downs.
A tub that has passed such tests without damage is considered suitable for use on a construction site.
Vertical fixed bucket for concrete glass
The builders nicknamed the vertical non-rotating tub the Tub Glass or Tub Bell, and this is due to the conical shape of this container. Such concrete buckets are used for temporary storage of the solution and its movement around the construction site. The tub is made of steel sheets (st3), connected by welding.
In the upper part of the container there are two stiffening belts, which are made of channel. To lift the tub, four eyes are welded to one of the belts, into which slings or chains are passed. To distribute concrete, the glass is equipped in the lower part of the metal structure with a two-jaw shutter, driven by a lever.
The solution can be supplied either continuously or in batches. The solution can also be supplied to hard-to-reach places by attaching a hose to a special flange. To prevent it from flying off, clamps are put on top of the sleeve, and locking flanges are installed on the pipe. Sometimes such concrete buckets are equipped with an additional tray for easy unloading of the solution.
It should be noted that a concrete bucket is the most affordable and simple means that is used to quickly transport concrete mixture to the right place. Since the tub is heavy, it is moved using a crane. Currently, it is widely used in construction. This container may have a different design, which determines its use in certain conditions. Also, this container may vary in the material from which it is made, in overall dimensions, load capacity, capacity and other characteristics.
In general, there are two types of concrete buckets - Bell and Shoe.
The most common type currently is the Shoe. It is very popular, since the loading of mortar or concrete occurs in a horizontal position. The shoe is used in construction in the construction of industrial, residential and civil buildings. The body is made in the form of a welded metal container. The distinctive properties of such a tub are as follows:
- Loading of concrete is carried out in a horizontal position
- The tub is rotated to a vertical position using special lifting mechanisms
- Characterized by the presence of a platform for a 40V vibrator.
As for the Bell tub, they are a universal container. The container set may include a hanging tray designed for directional supply of mortar or concrete. The tub can be jaw-type when the tray is removed, and directional when the tray is installed.
If you need information on such an issue as the price of a bucket for concrete, then you can find it out on the websites of companies offering such products. Buy this product in our store, and the prices will pleasantly surprise you.
The AFV and AFMP concrete mass hopper is used for transporting and unloading concrete, as well as for convenient pouring of both concrete floors and columns of monolithic frame structures.
The design of the bunker provides the possibility of installing an electric vibration motor on the cone of the bunker for hard concrete and dry mixtures, as well as a flexible rubberized hose for pouring hard-to-reach places.
Rent a tub for concrete, a shoe for concrete, a box for mortar, a glass for concrete, a container for mortar, concrete supply, a mason's box, a mortar box, a rotating tub of concrete, tray 1, a tray for concrete, buy a tub for concrete, a bell for concrete, container for mortar, tub shoe, tub glass, tub BN, tub for mortar, tub for supplying concrete, tub for concrete shoe, tub for concrete shot glass, tub for concrete buy, tub for concrete BN, tub for concrete 2 m3, tub for concrete 1 m3, do-it-yourself concrete tub, tubs for supplying concrete, BP concrete tubs, renting a concrete tub, how to make a do-it-yourself concrete tub
Dear customers, please note: information about technical characteristics, description, delivery set and appearance is for informational purposes only and is not a public offer as defined by the provisions of Article 437 of the Civil Code of the Russian Federation. The manufacturer reserves the right to change the characteristics of the product, its appearance and completeness without prior notice. Images shown and colors may vary. Before purchasing, we kindly ask SAV54.RU managers for the availability of the desired functions and characteristics.
Concrete supply and concreting methods
When constructing monolithic structures, concreting methods are possible using the following equipment (the intensity of concrete supply is indicated in brackets. m 3 / h):
— concrete mixer trucks with a conveyor (8-10); — concrete trucks supplying the mixture to the formwork (up to 5);
— concrete trucks with trays/chutes (up to 5);
kakdelatsvoimirukami.ru
Concrete transport chutes
Gutters are a structure for draining or mechanically transporting liquid to the desired location. Such a device is a useful, effective assistant both in everyday life and in industrial conditions, in the road system, and the construction industry. It is the construction type of gutters that will be discussed. A construction gutter for concrete is a simple design that you can actually make with your own hands. With such a gutter it is possible to ensure high-quality, uniform placement of concrete mortar during the construction of the foundation for a building.
Types of gutters
There are several types of gutters for pouring concrete:
Hanging device
It is used when transporting concrete mortar over a short distance with a shift to the site of the future foundation. To build this mechanism, you need to take a rope and attach a tray to it using cables threaded through a couple of blocks. One end of the rope is tied to a column or pole. A weight is attached to the other and left on the ground. The load should also be hung on the edges of the cables so that it is convenient to adjust the degree of inclination of this mechanism.
If a massive foundation is being laid for a large project, a fixed angle of inclination of the concrete conveyor should be installed. This can be achieved by increasing the height of the tower or installing additional columns. Actually, the mixture from the central tower will be transferred to these additional pillars.
Gutter structures with jibs
Such a device is a mechanism in which the lower edge of the tray is attached to a jib - a lattice structure made of metal, one edge of which rests on the lower slide, the other is connected to the upper ones by means of a lifting cable. To maintain stability of the angle of inclination of the gutter, the lower edge of the structure is attached to the ground using cables. This device is used when delivering concrete composition to the formwork at a distance not exceeding 60 meters.
Truss-type concrete mix tray
The simplest mechanism for delivering concrete to the foundation site of all those listed. It is a design in which the lower edge of the concrete conveyor is attached to a support.
How to make drainage trays with your own hands
Having minimal abilities, you can make drainage trays with gratings with your own hands from concrete. This process will save you a fair amount of money, although it will require some effort on your part.
To make such an idea a reality, you will need the following tools and materials:
Manufacturing technology
The benefit of making drainage trays yourself is that the molds can be made to suit your needs, while store-bought ones sometimes have to be cut.
Trays of semicircular shapes are considered ideal for water throughput, but making them is not so easy, and therefore we calculate drainage trays, first using boards or sheets of plywood, preferably laminated, and then the procedure is as follows:
To make formwork, take flat boards with a thickness of 25 mm and use wood screws to better hold the structure.
The entire formwork must be covered with a 200-micron polyethylene film to prevent water from leaking out of the concrete mortar through the cracks.
The resulting tray should be rectangular in shape with a semicircular interior. In addition, there should be no cracks, bulges or holes.
Do-it-yourself installation of drainage trays
First of all, before installation, you need to dig a trench according to the size of the manufactured parts, adding a few centimeters for ease of installation.
To make it easier to adjust the slope (10 mm per 1 m), a sand cushion is made at the bottom. The adjustment itself is carried out using a level or level.
After completing the steps, we install your creations, filling the gaps between them with concrete, and do a check. We first pour plain water, and then with sand, creating the effect of storm water.
If nothing lingers in the trays, then you can praise yourself.
When installing drainage trays with your own hands, cover them on top with special gratings, which will protect them from large debris, and will save you from unnecessary labor costs in cleaning this stormwater system, as well as from dangerous cases.
Source
Purpose of concrete trays
Such a structure is intended for pouring mortar into the formwork of the future foundation of the building. From the concrete mixer, the mixture is supplied through a chute to its destination. However, if concrete is poured at the same point, then due to the uneven placement of the mixture, a flat surface of the designed foundation will not be obtained.
In this case, beware of delamination in concrete, when the watery part of the solution flows into the far corners of the formwork, and the denser part remains at the pouring point. By making mistakes when supplying the concrete mixture using a special tray, you can create a low-quality foundation that will soon begin to deform.
Therefore, be sure to create conditions for the smooth movement of the concrete mixer around the construction site so that there is access to any corner of the future structure. If in some places this is not possible, the length of the gutter should be increased in order to reach hard-to-reach corners.
Installation of trays
Before laying the trays, it is necessary to dig rectangular trenches for them in accordance with one of the selected installation schemes. The bottom of the dug trench is covered with a small amount of sand (the so-called sand cushion) to make it easier to adjust the slope of the tray.
The slope of the trays itself is measured by two methods - a level or a level with a block (slat) attached to one of its edges. The second method is more imperfect, but will help those who do not have a level. When the slope is adjusted along the entire length of the trenches, it is possible to lay trays. In the end, it is possible to check their performance by first pouring only water in that direction, and then water mixed with sand (simulating runoff after heavy rains). If there is nothing left in the trays, then everything was done correctly.
If the trays run near pedestrian paths or through concrete, they can be covered with gratings, which will prevent garbage from accumulating there and will protect the movement of people.
Preparation of materials and tools for creating a gutter
When producing a transport mechanism for a concrete composition, pay attention to some points:
- This device must be in close contact at one end with the mixer, at the other with the formwork, thus connecting them.
- Install the device with a certain angle of inclination so that it is easier for the concrete under its own weight to flow down the gutter into the formwork.
Tools that may be needed at work.
To create such a mechanism, you will need the following tools:
To do this you will need to prepare the following materials:
- board measuring 2.5/12 cm;
- a piece of polyethylene, linoleum or tin;
- timber or block as a support;
- nails (you can use screws).
Return to contents
Tips for making troughs for pouring concrete mortar
Before starting the production of a concrete delivery tray, it is worth paying attention to some conditions regarding setting the correct angle of the structure. The degree of the established inclination must be stable and the same throughout the entire working process. As the slope decreases, the flow of the concrete solution slows down . The consequence of this may be premature hardening or clogging of the mixture.
Pouring concrete through a chute into the formwork.
If the angle of inclination of the gutter, on the contrary, becomes even greater, the speed of transport of the solution inside the formwork will increase. This is fraught with the disintegration of the mixture into different parts, which can lead to a significant deterioration in the quality characteristics of concrete. The foundation will lose its performance qualities, become fragile, vulnerable and short-lived.
The angle of inclination for installation of the gutter structure is selected taking into account the level of supply range of the concrete mixture and its density coefficient. For liquid solutions conveyed over a shorter distance, a small level of inclination is permitted. If the composition is sufficiently dense or it is delivered over a long distance, the angular degree of the tray should be increased as much as possible in order to speed up the pouring process and not deform the structure due to the weight of the concrete mass.
The uniformity of the concrete composite is influenced by the shape of the gutter structure. A long, narrow tray, made with your own hands, during the delivery of the solution contributes to a closer connection of its grains. At the same time, the trench should be made quite deep to prevent the concrete solution from overflowing over the edges of the tray while pouring the foundation.
If the manufactured device transporting concrete from the mixer to the formwork turns out to be too narrow, it must be strengthened with horizontal crossbars. This will protect the structure from deformation during the thrombotic process of the concrete mass. If you want to give the structure greater strength, you can increase its hardness by means of corners attached to the tray perpendicularly. The length of such fasteners must correspond to the width of the gutter.
Today, similar mechanisms for laying foundations are produced from 3 to 15 meters in length. Such devices, as a rule, are used for more global purposes - in the construction of large-scale commercial, often multi-level structures.
Under private construction conditions, shorter (up to one and a half meters), convenient gutters are suitable, which are quite possible to make with your own hands. Its weight also depends on the footage of the tray. The longer the structure, the heavier it should be. This will protect the solution conveyor from bending under the weight of the mass entering it.
Stages of work
Mold making
A tray for concrete with a “P” configuration is assembled from wooden material (leveled board, laminated plywood 1.0–1.5 cm thick). The formwork material is selected carefully - it must withstand the pressure of the poured solution. Individual elements of the form are reinforced with metal corners. This creates additional rigidity of the structure.
After making the main part of the tray for filling, we begin to prepare the molding part of the structure. For these purposes, a metal or plastic pipe of the required size is sawed lengthwise. An important element of the form is its smooth, non-porous surface, which ensures the formation of a semicircular gutter along which waste water will move by gravity. To ensure continuity of the concrete pouring process, it is advisable to produce 10 products, otherwise the construction of a drainage structure on the site will take a long time.
Reinforcement
A reinforcement cage embedded in concrete increases the strength properties of the cast product. Also, when removing the tray from the formwork, the “skeleton” of the structure will not allow it to collapse. The strengthening property of metal rods or mesh makes it possible to produce elongated trays. When placing reinforcing elements in molds, they are placed at a distance of 50-100 mm, in a vertical and horizontal plane - this creates a mesh frame configuration, which is fixed with wire or connected by welding. To prevent corrosion of metal elements of concrete, the edges of the rods should not be located at a distance of less than 50 mm from the plane of the wooden tray and the molding part.
Pouring into molds
After laying the reinforcement cage, they begin pouring the prepared concrete into the molding trays. During this stage of work, it is advisable to use a special vibrator. The unit will compact the poured solution and remove air and excess water from it. If it is not possible to use such a device, take a sharp metal object and, with its up-and-down movement, bayonet the mixture into the molds.
To prevent the solution from leaking out of the wooden formwork, it is tightly covered with plastic film.
When the solution is in the molds, using a blank and a cut pipe, begin to form a semicircular shape of the drainage gutter. To do this, press the part into the solution, scrolling in different directions several times, without pressing hard on it. This will give the tray a smoother surface. To improve the properties of concrete and “harden” its surfaces, sprinkle the top of the formwork with cement. Such manipulations will give the monolith greater strength.
The maturation period for concrete poured into molds is 4 weeks. But after 1 day, the constructed formwork is dismantled, and the monolith has reached a level of preliminary readiness. It did not achieve the design strength, but it also did not collapse when removed from the wooden tray. The poured product will have a rectangular shape, its inner part will be semicircular in shape, smooth, without cracks or other flaws.
Installation of concrete drainage systems
Drainage systems installed on the territory of a personal plot can be of several varieties, but there are several mandatory rules for constructing a structure:
When trees and shrubs are planted in the drainage area, then a branching system is performed. For areas with flat terrain, the standard placement is used - linear. To do this, lay channels parallel to each other in the soil. Then the connection is made in a place that has a minimum angle of inclination.
Before the process of laying concrete trays, rectangular channels are dug according to the selected laying system. A sand cushion is placed at the bottom of the structure, which helps adjust the slope angle. When performing work, this indicator is controlled in 2 ways - using a level or a level with a strip or beam attached to it. After regulatory measures along the entire length of the system, the installation of drainage systems begins. When the work is completed, the structure is tested. To do this, pour water into the gutters and then mix it with sand. If after simulating heavy rain there is no solution in the trays, then the structure is functioning correctly. When constructing channels near garden paths and through monolithic areas, they are covered with gratings, which prevent debris from accumulating and ensure the safe operation of the structure.
Source
The process of creating a trough conveyor for concrete mass
It is not at all difficult to build such a mechanism with your own hands. This is a simple process that does not require professional skills and abilities. First, use a saw to cut the board, adjust it to the dimensions of 2.5 by 15 cm, and knock down a shape resembling the letter “P.” The sides of this structure must be high so that the concrete solution does not stagnate during transportation.
To facilitate the flow of the solution along the tray, the entire inside of the structure must be covered with smooth materials: polyethylene, tin or linoleum. This will ensure better sliding of the solution and reduce its adhesion to the bottom and walls of the conveyor.
After making the trench device for pouring the foundation, it is placed in the required place, supported by four supports. The role of such supports can be perfectly fulfilled by gas silicate or other monoliths that can protect the means of transporting the composite from collapse.
You should know that inside elongated open-type structures, a specific percentage of moisture evaporates from the concrete mixture, thereby disrupting the homogeneity of the solution. Therefore, such transport mechanisms are used only at private construction sites.
When laying foundations for industrial purposes, gutters are used, constructed in such a way that at the bottom of the device, before entering the formwork, the concrete passing through the tray is constantly mixed. This is done with the help of a special trunk pipe, reminiscent of a funnel, through which the solution passes.
How to make a gutter to receive concrete
The device for receiving concrete will provide a uniform supply only if it is made in the correct shape. If you plan to make a circular gutter, connect the sections with a rotating head. When there is no need for horizontal rotation, use hinges to adjust the tilt, adding plasticity to the assembled product.
Creating a gutter yourself will not require special skills or large spatial resources, but will significantly facilitate the construction process, guaranteeing the reliability of the poured foundation.