Metal gravel for engraving
A graver is the main tool for metal engraving. The engraver holds in his hand a sharp and durable cutter equipped with a semicircular wooden or plastic handle for palm resting. The cutting edge can be of different shapes to perform different engraving operations. Many engravers are not content with store purchases, but make their own tools.
DIY wood carving knife from an old drill
Wood carving has centuries-old roots, reflects national traditions and is currently popular. Figurines, panels, and other carved decorations fit perfectly into any interior.
To create amazing masterpieces, professionals do not use super-devices; all the main work is done by ordinary wood carving knives, which, although they have the same shape, differ from each other in size.
A cutter, a Geismus, a cranberry, or maybe a graver – let’s try to figure out which of these tools is suitable for a novice craftsman.
Making a gravel for engraving on metal
Making a serger of the simplest design is possible for a home craftsman with metalworking skills. To do this, take as a basis:
- file or needle file;
- spring leaf;
- part of the bearing race.
The main thing is that the steel is high-strength and elastic. Strength is necessary for the graver to successfully cut the metal of the workpiece, not become dull for a long time and maintain the specified sharpening shape. Elasticity will allow the tool not to break under load.
A higher-quality cutter can be obtained by forging, but for this you must have good blacksmithing skills and have a forge. A file made from a needle file will be noticeably inferior to a forged one in both strength and flexibility.
Before you start sawing and forging metal, you should build a drawing of the tool. You will need not only a large-scale image of the cutter itself, but also a drawing of the handle.
How to forge a graver
Beginner engravers make do with purchased gravers or repurposed files. Mature craftsmen often feel the need for a reliable forged chisel.
Making a forged graver yourself requires intermediate level blacksmithing skills. Instructions on how to make a gravel using the hot forging method are given below.
Forging is divided into the following main stages:
- forging workpieces;
- hardening;
- final processing and finishing.
During forging, it is necessary to constantly monitor the temperature of the part. It is determined by a pyrometer or the traditional method - by the color of the glow. At the beginning of the process, the part should be light yellow, in the last operations it should be light red.
A well-heated workpiece must be grabbed from the forge with pliers and placed on the anvil. Light, frequent blows knock off the scale. To obtain a rectangle, the cross-broaching technique is used. To form a triangular shape of a part, it is pulled longitudinally on the edge of the anvil, turning it at the required angle. A similar technique is used for broaching for a trapezoidal section shape.
In a more complex way, the blacksmith achieves a diamond-shaped section. First, the tip is pulled in one direction, then the product is turned over and pulled in the opposite direction. In this case, part of the part will have to be cut off.
The next operation is broaching the tail part of the cutter. it must be additionally calcined and stretched until a pyramidal tail is formed.
You can move on to the next stage - hardening. Hardening of carbon alloys is carried out in the following sequence:
- heat the product to 805 ±15 °C;
- quickly immerse in cold water;
- check the degree of hardening with a file: if it slides over the metal without forming chips, then the required hardness has been achieved;
- When chips form, quenching should be repeated.
And the final stage is machining. The grinder is given its final shape on the abrasive wheel. Here the blade is sharpened to the required sharpness. The final finishing is done on a fine-grained wheel.
Making chisels for wood carving with your own hands
instrument.guru > Manual > Making chisels for wood carving with your own hands
Description and varieties
A chisel is a professional tool for a joiner or carpenter, used for removing layers of wood and applying a wide variety of ornaments, including carved ones. The design of the tool itself includes a handle made of wood or plastic (often used for electric chisels) and a sharp blade.
With the help of chisels, craftsmen process wood products and decorate certain products. For this purpose, devices with different blade configurations are used. Wood is processed with the following types of chisels:
The described types of chisels for wood carving are used in various quantities by professionals. In addition, they have a lot of modifications, for example, shaped chisels for wood carving.
Tool sets contain several options. However, it also happens that the kit does not include a device that would suit specific purposes.
That’s why some craftsmen decide to make the device themselves.
Making a chisel
Materials and tools
First of all , you need to choose the right materials . As a blade you can use:
So, now you need to prepare all the necessary materials and tools:
From needle files you can make a device even for cutting complex shapes. Moreover, you can make it right in your kitchen over the stove.
Angle tool.
To create corner-type tools, you can take an ordinary metal profile. We cut off the excess material and sharpen the workpiece at the required angle. A chisel can also be made by bending a part, but it is not suitable for processing hard wood.
Purpose of the graver
For engraving, the master needs a set of metal stamps of different shapes to engrave various elements of the image. The most common are:
- Spitz is a wedge-shaped cutter with a slope of 30 to 40°, used to design the outline of an image and clear elements of great depth;
- Messer - resembles a knife, the wedge slope is from 15 to 30°, it is used to make fine details;
- flah - similar to a chisel blade 0.15-6 mm wide, used to select depressions in the design;
- bol - a rounded point with a radius of 0.2-0.6 mm; with its help, semicircular depressions are selected, from which text elements of the design are formed;
- hornbeam - diamond-shaped section, large elements on concave elements are chosen with it;
- facet - a trapezoidal section with a blade sharpening angle from 50 to 115°, used for forming images of high complexity;
- Shatir - the blade has a serrated shape with a distance between the teeth from 0.1 to 0.5 mm, it is used to obtain several parallel strokes.
Stichels for carving metal of other shapes are rarely used for restoration work and when making particularly complex images.
How to choose?
The cutter used for engraving must be stronger than the metal it is cutting. Ideally, you should try working with a graver under the supervision of an experienced specialist. Hand engraving is a delicate craft, each engraver gets used to his own tool, but you can only understand why one is better than another only through practice. A beginner usually does not have the opportunity or extra funds to endlessly search for a quality product: that’s why a master class from an experienced engraver helps out.
Experts share their experience with novice carvers.
Choosing a pen can be compared to choosing brushes for painting. Both there and there are some standards, certain sets and options.
But even the best brushes from the best manufacturers are not suitable for everyone - again, it comes down to personal comfort. And excellent brushes do not guarantee a talented drawing. Likewise, gravers - no matter how expensive they are, will not replace the skill of cutting, its artistic component.
Engraving with a graver on metal surfaces
Sticky engraving on metal requires the engraver to have a faithful eye, a steady hand and artistic taste, but above all, patience and perseverance. It is also necessary to decide on the material for the blanks. Copper and brass are more suitable for a novice craftsman. More experienced engravers work on other non-ferrous metals and soft steel alloys, using specific engraving methods and improved tools.
All that is needed for engraving tools and equipment is a work table and a set of gravers. At the first stage of mastering hand engraving technology, it is recommended to achieve stable quality of straight and curved strokes. When they begin to turn out confidently, you can move on to more complex elements of the image.
Before starting to engrave the workpiece, the master traditionally checks the sharpness of the sharpening pen by running it along the tip of the nail. If the strip can be cut without effort or pressure, the sharpness is sufficient. The handle is clamped in the working hand, the thumb and index fingers cover the incisor 10-20 mm from the tip.
The blade is pressed against the surface of the workpiece at an angle of 35-45°, then the angle is sharply reduced to 5-10°, while a piece of metal is cut out of the workpiece and a stroke is formed. For beginners, it is not recommended to limit their length to 3-4 mm. As you gain experience, you will begin to get longer ones.
Color engraving
To make the drawing look more clear and beautiful, use a glass pencil or ink.
In order for the effect of using these tools to remain as long as possible, the surface is coated with colorless varnish.
You can make the drawing clearer using a needle and oil paints. This set allows you to scratch auxiliary lines of the pattern, which are subsequently covered with paint.
Artistic color engraving allows you to make the product colorful. To do this, those elements that do not need to be painted are coated with transparent varnish.
Video:
How to blacken a metal object? Special equipment is not used for this, but the following substances are required: sulfur and potash (potassium carbonate) in a ratio of 1:2.
This composition must be put on fire; to do this, it is poured into a tin can. The mixture must be constantly stirred, and the fire should not be high.
The mixture is removed from the heat when it turns black. Before this, it will need to be ground in a mortar; after the fire, it is also placed in a mortar and ground again (cooled).
IMPORTANT TO KNOW: Sandblasting and metal cleaning technology
Blackening occurs as follows:
- Water is added to the resulting mixture (1:9);
- A brass object is placed in the solution;
- It is heated until the product acquires the desired shade.
You can make the background dark before applying the drawing. In this case, varnish is not needed.
You can make an object brown with your own hands by keeping it in a solution of zinc chloride and copper sulfate with the addition of water (100g, 100g, 200g, respectively).
Hand painting in steel gray color is obtained from 1 liter of water, two grams of ordinary salt and two grams of a mixture of sulfur and potash.
The orange-red color is obtained from a solution of potassium sulphide: 1 gram of the substance per 250 grams of water.
Upon completion of work, the varnish is erased.
The blackening of an object and the blackness we know are two different things. The technique used to create niello is mechanical; it cannot be done with your own hands.
Types of gravers
In addition to traditional hand tools, mechanized cutters have recently become increasingly widespread. The shape of their blade is exactly the same as that of a manual blade, but the pressure on the cutter is carried out due to a mechanical drive. Depending on the type of drive, the following types of gravers are distinguished:
You can buy an electromechanical serger, or you can make it yourself. This will require serious skills in electrical engineering and design.
The design and manufacturing technology of a pneumatic hammer for metal is much simpler. To assemble it, it is enough to grind (or select a suitable one) a cylinder and a piston, which, under the influence of compressed air supplied through the pipe, will hit the shank of the graver.
General technology
The technique can be manual or mechanical (various equipment is used).
It is also divided into line and armor:
- The line engraving technique is performed by applying contour lines and strokes to an object. Metal carvings are not deep, affecting only the surface of the object;
- Defensive, otherwise called three-dimensional, mechanical deep technique allows you to achieve a three-dimensional pattern. See photo.
Incisive engraving is performed with a special tool – a graver.
If you ask yourself how to make it yourself and where to buy these tools, then the answer is simple: this tool is sold in the same stores where you can find various art supplies.
The finest lines are made with a Messer-Stichel. If you need to make parallel lines, they are made with a rap pen.
Photo:
To perform high-quality work, this tool must be sharpened; for this, a fine-grained whetstone is used, which is pre-moistened with water or oil.
The graver is brought “to readiness” with a leather product (you can take an old belt) coated with chromium oxide.
Manual processing of small items at home requires the presence of a special pillow; you can easily make it yourself: take two pieces of fabric of the same size (round or square), sew them together along the edge, stepping back from it a little, but you need to leave a small gap in order to so you can pour sand inside.
The prepared form is turned inside out, dried sand is poured in, and the remaining hole is sewn up.
The cushion engraving tool is ready.
How to properly hold the instrument in your hand?
This should be done as if you were holding a regular ballpoint pen: the index finger should be on top of the blade (that’s what the metal part of the cutter is called), and the thumb should hold it on the side.
Work must be done on your own.
In the case when you need to change the direction of the pattern, unfold the pillow with the object on which the element is being applied, but do not change the direction of movement of the hand.
What else is useful to know about incisors?
To do your own engraving at home, it is advisable to first practice so that the carving turns out beautiful in the end.
IMPORTANT TO KNOW: Secrets of cold galvanizing of metal
It is better to purchase a set of tools: it is better to apply rounded lines with a square section of cutters, and it is better to make straight lines with a round section.
During work, burrs very often appear, which cannot be avoided, but they can be removed with the help of a scraper.
You can make the scraper yourself. To do this, you will need a file, from the edges of which you need to grind off the notch.
Before application, the surface must be cleaned with fine sandpaper and polished. A special polishing paste is used for polishing.
The paste can be easily replaced with chromium oxide (oil paint). The surface of the object must be thoroughly and vigorously rubbed. The paste is ground with a thick piece of leather.
Pneumostihel Sergei Valtman
and so, I played with these tubes and motors, gradually began to understand for myself what weight of pistons for what work, which compressor is better to take, the engine.
Well, there was an ambush with the turners, but my hands were itching terribly, I bought a lathe and started making my own version from a stainless tube. Based on my considerations, I chose the size of the tool holder and the intermediate impact element, to match the rubber bands that are available in the auto store, sat down and drew on graph paper, and this is the first option I got
The drawings were drawn by Rumen Radkov
Oleg has already posted the details on the forum. The pistons are only now different with fluoroplastic jackets
Of course, I ruined a couple of blanks, but then I got what I needed, well, of course, I sanded the .. raw .. stainless steel and carbonitrated the cylinder tube and lock nut, in the composition that I wrote about at the beginning, after two hours, the result was a beautiful black part like a weapon , with surface hardness, the file slides. Then I used felt and polishing paste to just add gloss and that’s it!
Making your own quills
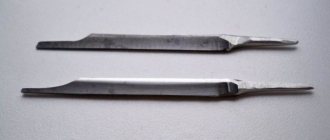
The graver, like all engraving tools, is usually made from carbon tool steels such as U8, U10, U12. Stickers made of alloy steel grades HVG, HV5, although they hold an edge better, are inferior to cutters made of carbon steel in the clarity of the stroke when engraving handwritten fonts and glossy monograms.
The production of gravers begins with filing rectangular steel blanks with a length of 90-100, a width of 9-10 and a thickness of 2-3 mm. They are given a shape that resembles a wedge in cross section. During final processing, the wedge-forming side edges of the Spitztichels are made slightly convex, and the Messerstichels are made flat. When making a graver, the following mandatory conditions must be observed: 1) the cross-section of the cutter must be the same along its entire length; 2) the lower edge of the cutter should be straight or with a slight smooth external rounding from the middle of the blade to the toe; 3) the cutting edge, semicircular in cross-section, must have a constant width or a slight expansion towards the cutting edge.
A bevel is made on top of an unheated gravel (then after hardening it will be easier to sharpen the polished section on a mechanical sharpener), and on the opposite side a flat tongue is filed for attaching the handle. Finished cutters should not be polished: shiny metal glare irritates the eyes and polished gravers are inconvenient to use and slip out of your fingers.
The next operation is hardening. The cutter, heated to a light crimson color (about 800°C), is immersed two-thirds of its length in water. To avoid the formation of a fragile boundary between the hardened and raw parts of the blade, the immersion level is quickly changed. Partial hardening of the graver is done not only because in practical work the cutter is rarely used for more than half its length, but primarily so that it does not break when hammering the handle and especially during work. Breaking the blade in the tang can cause serious hand injury.
Scheme of working with flasks and bolts through the lining The lower edge of the cutter and the thumb of the right hand rest on the lining, the index and middle fingers of the left hold it on the engraved plate.
At an angle of about 70°, the serger is directed towards the surface to be processed and, with the handle lowered down, it simultaneously moves forward, cutting off the metal. The support lining has a bevel on one side. Side edges of different heights allow you to select the most favorable support point for cutting during work, depending on the depth of the cut. To relieve stress, hardened and descaled gravels are tempered. They are uniformly heated to a light straw color in the flame of an alcohol lamp and quickly cooled in water.
After release, the gravers can be attached to wooden handles. The extended necks of the handles allow you to adjust the servimeter exactly to your hand. The most convenient to use will be a gravel, the toe of which in working position protrudes beyond the thumb by 15-20 mm. A safety metal ring with a diameter of about 10 mm is placed on the handle, and a guide hole is drilled in the center of the neck. The handle is stuffed onto the cutter, clamped through spacers in a vice, and then a segment is chopped off from the bottom of the “fungus”.
The working movements of the cutter during the finishing process are made strictly parallel to the plane of the abrasive. A microbevel is formed on the cutting edge as a result of the handle being raised.
On mounted gravers, flat emery stones or diamond files are used to correct possible distortions in the shape of the cutting edge after heat treatment. The finishing of the cutting edge is completed by sanding with micro-abrasives and polishing with chromium oxide applied to thick paper or leather. All finishing work is done on an even flat block.
During final finishing, the following requirements must be met: 1) movements of the cutter during longitudinal grinding and polishing of the cutting edge are made only in one direction—towards you; 2) the graver is evenly rotated around its axis to give the cutting edge the shape of a semi-ellipse; 3) during finishing, the cutting edge should not have any angle between any of its generatrices and the abrasive plane, otherwise microchamfers appear on the cutting edge, preventing the cutter from moving forward or pushing it upward. Chamfers are formed in the final phase of the pen's movement toward itself if the handle is raised upward.
The tear-off angle (alpha) for engraving on a plane is 4-5°. Taper angles for steel (a), brass (b), copper (c).
Further refinement of the cutter involves adjusting its most important working angles.
The lift-off angle, which ensures that the cutter moves at a given depth and removes it from the metal at the desired point, should be approximately 5° for engraving on a plane. It is adjusted during finishing of the cutting edge.
Do-it-yourself electrostihel drawings
The success of a metal carver largely depends on the correct organization of the workplace, selection of tools and materials.
Typically, copper plates with a thickness of 0.5-2.5 mm are used for engraving work. Red copper is used. The cleaner it is, the better - the needle or serger takes the metal more evenly, choosing the desired depth. A rolled and forged sheet of pure copper is well polished and does not break. The cutting tools usually used are cutters, gravers and needles. Of course, an inexperienced engraver should start with simple drawings that do not require special skills. Keen vision and firmness of the carver's hand are the key to quality. This matter, we note, is very painstaking, so weigh your patience. And to make the work easier, we recommend making an electric engraving machine. Its design is shown in the drawings.
The drill is clamped in a table vise mounted on the table so that the handle rotates in a horizontal plane. Rotating it with your left hand, guide the wire with your right, adjusting the tension.
The wire is taken with a diameter of 0.15 or 0.2 mm in enamel insulation such as PEV or PEL. A 220 V winding contains 2500-3000 turns. Carefully remove the finished coil from the mandrel and carefully insulate it with varnished cloth. Collect the W-shaped plates into one bag and insert them into the coil window.
The magnetic field of the core will be closed by a movable steel armature suspended above the core on a ribbon spring. It allows it to perform oscillatory movements at the network frequency. You can pick up a spring from a broken alarm clock or cut it from a bronze plate 0.3-0.5 mm thick.
Anchor - a steel plate up to 3 millimeters thick is attached to the plate with screws or rivets. We do not indicate the dimensions of the armature; they depend on the core used. The free end of the armature is extended by 10-15 mm, and a hole with M3 thread is drilled in it. Cutters are installed in it.
The entire structure is fixed on wooden or plastic cylindrical inserts. The body is an insulated metal, or better yet, plastic pipe of suitable diameter, 200 mm long.
The tool can be made from lengths of hardened steel rods from tool steel. An M3 thread is cut on one end, and the other is sharpened with emery; By having several of these cutters with different sharpening shapes, you can achieve strokes of varying depths and profiles.
Upon completion of assembly, do not forget to install a protective grounding terminal on the case, if it is metal. This will protect you from possible contact of live wires with the housing.
Connect the machine to the network and test it in operation. The amplitude of the cutter vibrations should not exceed 3-4 mm. If it is too large, install an adjusting screw above the armature or replace the spring with a stiffer one.
Before work, cover the engraving plate with a layer of varnish. It will serve as a primer for applying the design. This operation is performed using a leather roller or linen swab. After priming, the plate must be smoked. This will strengthen the soil and the strokes will become more visible. Smoke the plate over a cotton swab dipped in kerosene. Before lighting, secure it to a metal handle. Make sure that the soot evenly and abundantly covers the entire surface.
Drawing with a needle directly on a plate is difficult; you need to have sufficient experience and skill. Therefore, we advise you to use a ready-made drawing. Select it according to the size of the engraving plate, place it on a smooth board and, placing tracing paper on top, secure it with buttons. Using pen and ink, copy the main outlines. Then rub one side of the tracing paper with soft graphite and, tracing the drawing with a blunt needle, transfer it to the board. Deepen the stroke slightly so that the needle reaches the metal surface more easily. Now remove the varnish with acetone or solvent. The board is ready for use.
Source