Materials for production
The selection is relatively small. Plastic doors, fence panels, garage doors have a long service life and an attractive appearance. However, these products are flammable and also have a low level of protection, since such material is easy to break.
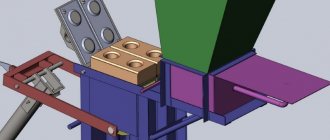
Variety of models
Therefore, the manufacture of gates is usually made of metal and wood. Plastic elements can be used as an addition to finishing an already finished entrance gate structure.
Design samples
Gate leaf installation
Sheets of metal profiles are fixed to the frame using metal screws or special bolts. At this stage, all structural elements of the gate are connected. The door leaf is placed on a roller platform.
Wicket drawing
Typically, a gate in a dacha is made with the door leaf of the structure opening inward. This is required for operational safety: by stepping back when opening the door leaf, there is a high risk of getting your shoes dirty or accidentally stepping out onto the road.
Drawing of a product made from a profiled sheet
If the entrance structure opens outward, the door hinges will have to be fixed on the street, this will make it much easier for intruders to enter the area. If for some reason the product can only be made with an outward opening, you need to install anti-burglary wicket hinges on the door.
Drawing for assembling gates and wickets from corrugated sheets yourself
The width of the gate is taken to be no more than 800–1100 mm. It is undesirable to narrow it down to 650–750 mm: people will walk through this entrance opening wearing outerwear. If the canvas is wide, an unclosed gate may be damaged by a strong wind when it hits the fence.
Sketch of components
The height of the gate is calculated taking into account the size of the fence, but the vertical parameter should not be more than 2 meters. When creating a drawing, you should also take snow and icing of the fence into account. Between the doors and the pipe where the hinges are located, you need to leave a distance of 5 mm, to the ground level - 90 mm, on the remaining sides - 3 mm.
Installation diagram of wooden gates and wickets
In order not to install an extra support post between one of the gate leaves and the gate, a common pipe is installed: the gate hinges are welded on one part of the support, and the gate hinges on the other. The common pole is usually metal, the opposite support can be wooden.
Reinforced support is also necessary if the door is built into swing or sliding gate leaves.
Example of a forged structure
It is not advisable to install pillars in the form of an asbestos-cement pipe filled with concrete, as is often recommended, as the support will be fragile. Gate posts are not piles; they are subject to instantaneous dynamic loads. Without a solid foundation, the support pillars holding up the front door structure will quickly crack.
Scheme for forming the main elements with your own hands
Door pillars are most often made of 1 brick. To support the gate, you will need to lay one and a half bricks if the doors are up to 1.5 m. Supports with 2 bricks are made if the gate is higher than 1.5 m. Also, for very tall buildings, a three-row angular ligation scheme is used.
Dimensions
To begin with, do not forget to prepare and later also look at the drawings of the gates when you design them with your own hands, so that all the dimensions match and there are no annoying surprises in the form of gaps, cracks or overlaps.
The height of the gate on external fences ranges from 2 to 1.2 meters. Gates delimiting the territory within the site can be made lower. And for solid fences, it is better to make the doors flush with the top of the fence.
The optimal width of the passage is 110-100 cm, but not narrower than 90 cm. Otherwise, passing through it will be problematic.
How to make a gate in a fence
When choosing a suitable location for arranging the structure of the front door at the dacha, the basic principles are taken into account. For example, you need to think about how to organize a convenient approach to the garage or outbuildings on your summer cottage. You should consider whether there are any holes nearby. If there are depressions near the front door, then water and dirt will certainly collect here.
Creation option
You should not assume that you can build only one gate at your dacha. You can install several. For example, one will be used as a front entrance, and the other will be a rear one, designed to reduce the distance to the required object.
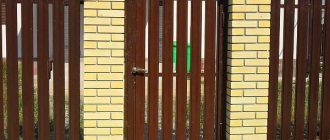
Harmony of brick and forging
There are various ways to arrange an entrance door, but, one way or another, it must fit correctly into the design of the fence and garden area. Therefore, it is necessary to pay great attention to the choice of building materials, door assembly and decorative elements.
Combination of forging with corrugated sheets
Among the most popular are the following door designs, which differ in the material used, appearance, and structure:
- Metal entrance doors. They consist of forged patterns, look quite beautiful, and are used in the construction of fences with the same decor.
- The Euro picket fence allows you to give the door leaf an original design. By complementing the door design with carved wooden posts, it can be installed as an internal fence that will divide the local area.
- Metal profile products are best suited for fences that have a similar design.
- The panel structure looks great with a fence made of stone or brickwork.
Euro picket construction
You will also need additional fittings. For any door design, the following accessories may be needed:
- automatic or manual latch;
- door closer;
- double-sided loop;
- bolt;
- electric drive;
- overhead loop;
- lock (mechanical or electromagnetic);
- latch with a ring;
- cap lock.
Designer version of a fence with a gate
Installing pillars
Gates can be attached to supports made of various materials - wood, metal, concrete or brick. The depth of the pillar depends on the loads, soil characteristics, and climatic conditions. Usually 0.7-1.2 m is enough, but with weak soils and large freezing depths it can be increased. A layer of crushed stone or sand at least 10 cm thick is poured onto the bottom of the well or pit to drain water and prevent the pillars from being squeezed out in winter.
Fixing metal poles in the ground
Wooden supports are made from debarked logs with a diameter of 10 cm or timber with a cross-section of 150x150 mm. It is recommended to coat the lower part with mastic or waste oil and wrap it with roofing felt. Another option is to burn it with a blowtorch or over a fire. Additionally, you need to dip the bottom of the stand in a clay mash and dry it. This waterproofing lasts for 5-10 years.
For metal racks, use a profile pipe 60x60-80x80 mm or a round one of the same area. The pillars are mounted by driving into the ground, backfilling, and concreting.
Supports made of brick or concrete blocks are laid out with mandatory vertical reinforcement. A pipe, channel or reinforcement cage is installed in the pit, which gives the pillar stability. Then concrete of a grade not lower than M300 is poured. During the masonry process, embedded parts are installed to weld the hinges. Over time, wooden and metal supports may become askew under the weight of a massive gate. To avoid unwanted deformations, the structure is further strengthened by fixing the racks in the lower chord. To do this, dig a shallow trench between them, add crushed stone or sand, lay reinforcement and concrete. Metal poles, if they are of sufficient height, can be connected from above with a piece of pipe or an angle, wooden ones - with a transverse beam.
Design options for wooden entrance gates
During the manufacture of any structure, the choice of lumber is of no small importance. It is advisable to choose deciduous or coniferous varieties. Larch is the most durable material. Therefore, if a long service life is important, purchase this particular variety.
Moreover, the thickness of the board for assembling the door leaf should be the same.
Types of entrance groups models
Picket fence products
Doors that are small in height or protected from the wind are best made of wood using a frame design. For standard canvases, the frame of the entrance gate is made of a board measuring 35x140 cm, the main planks are 20x80 cm. The support should be made in a Z-shape.
Sketch of a model made from a wooden picket fence
If the filling of the door leaf is unable to withstand increased loads, the frame should be made in the shape of an hourglass (X-shaped supporting structure) or a “butterfly”. In the latter case, under the sheathing of 15x25 mm beams, 2 crossbars are installed horizontally at the top and bottom, the X-shaped structure is framed along the entire perimeter. For a door that is stretched in height, it is better to make an E-shaped frame.
Load distribution scheme
garden gate
As a rule, canvases are made with an openwork pattern. To ensure good strength, it is better to make a frame gate. The elements at the joints are cut into half the tree and secured with several diagonally installed self-tapping screws.
Scheme of the stages of wicket assembly
Beautiful frame products will be obtained from the interior door leaves for small glazing.
Basic requirements for a gate
Swing gate made of corrugated sheets
The designs of the passage in the fence are varied, the number of options increases due to the use of materials that have opposite technical characteristics.
There are general requirements for all gates:
- the dimensions are chosen so that people of different builds can freely pass through the opening;
- opening should not disturb the usual flow of people passing by, for example, if there is a sidewalk nearby, the gate swings open into the yard;
- it is advisable to install pendulum awnings so that you can open the sash away from you on both sides;
- the canvas should open easily so that a passing person does not expend effort;
- The lock and handle are attached at the height of a half-bent arm in a convenient place.
Internal opening is recommended to reduce the visibility of the open door from the street and reduce the risk of entry into the yard. In regions with heavy snow, the canvas at the bottom is cut in height by 15 - 25 cm, creating a gap to open the door during skidding. The hinges are made so that they cannot be damaged from the outside, and the sash is made strong and resistant to impacts.
Construction of gates made of profile sheets
Before making a gate, you need to either develop a project yourself, or use ready-made drawings, diagrams and design sketches. This will allow you to accurately calculate building materials.
Finished product made from corrugated sheets
Materials and tools:
- Profiled pipe or angle 30 mm.
- Profiled sheet 1.6 mm thick.
- Primer for metal.
- A pipe with a cross section of 10 cm will be required as supports.
- Acrylic paint.
- Gasoline for degreasing.
- Welding.
- Rope for marking.
- Sander.
- Screwdriver.
- Garden drill.
Design diagram
The metal entrance gate structure must be mounted on profile pipes 60x60x3 mm, which are dug to a depth of 1 m. Mark the area and places where the supports will be attached. Using a grinder, cut the required size of the post plus 1 meter.
Drawing of a swing gate with an additional wicket
Dig holes for supports. The width of the supports must be 15 centimeters greater than the cross-section of the professional pipe. After this, mix the cement mortar. Insert the post, cover it with a layer of fine gravel (about 20 centimeters), compact it, then fill the hole completely with solution. The frame is based on a metal profile - a corner or a square corrugated pipe 55x55x3 mm. A frame is assembled from a pipe by welding.
Installation diagram
Taking into account the created sketch of the frame, cut the required size blanks from the long profile. Lay out the parts on the table and connect them using a welding machine. For better frame rigidity, attach cross braces. The frame must be spot welded. This will save time for assembling the structure.
Frame creation diagram
The last stage is attaching the corrugated sheet to the door frame. Cut the door leaf to the required size. Remove burrs from cut areas. Secure the cut sheet. The connection of the corrugated sheet to the wicket frame is carried out by welding using the continuous seam method.
Secrets and rules for making a gate yourself
In order for a self-made fence gate to be durable and beautiful and to last a long time, you need to know a few important rules.
To install supports, prepare holes to the required depth (it should be below the freezing level). They can be made with a drill or dug out by hand with a shovel.
Place the posts vertically and fill them with gravel or crushed stone. Compact thoroughly and fill with concrete solution. When the composition sets, this will not happen earlier than on the 7th day, you can hang the gate, it will no longer warp.
It is important to install the hinges evenly - along one axis strictly vertically. Under this condition, the gate will close and open well and smoothly. In order to install a lock on the gate with your own hands, reinforcement from metal plates or corners will be required in this place.
The open edges of the frame pipes must be welded or closed with plugs to prevent water from flowing in and destroying the gate. You can choose plastic plugs that fit the size or fill them with silicone.
In order for a cut piece of corrugated sheet to fit perfectly to the gate, you do not need to fasten it tightly right away. It is better to install literally 4 screws around the perimeter, align where necessary, trim, tighten, and only then, having achieved an ideal fit, attach it permanently.
These were the basic rules for making gates yourself. Then you can use your own imagination and dexterity. Each homemade gate is different from the others; it reflects the character of its owner. This is its charm.
How to make a door in a gate leaf
You can save a lot of effort and money if you install the door structure into the gate leaf. However, this only applies to metal swing products. A door installed in a sliding or sectional gate is very difficult to make yourself.
The location of the gate is closer to the inner edge of the sash
The step-by-step instructions are as follows:
- The support next to the door must be reinforced (corrugated pipe 110x110x4 mm), concreted at least 1.3 meters deep, regardless of the depth of soil freezing.
- The width of the gate should be no more than half the length of the gate leaf.
- The frame is made with one transverse stiffener and two diagonal ones.
Drawings of metal and wood structures
With wooden structures it is a little more difficult: it will not be possible to make a door entrance without losing the rigidity of the structure. This can only be done if the gate leaf is made of durable (expensive) wood.
If the gate leaves are made of coniferous wood, the gate can only be hung next to the gate.
Inside view
Self-installation procedure
Posts for a wooden gate
First, install the posts. Dig a hole up to one meter deep and add 15 cm of crushed stone to the bottom. The vertical support is placed plumb, secured with crushed stone, or broken brick can be used. Fill the hole with concrete. The frame can be fixed to the post on the seventh day.
To properly make a gate, take welding and a square pipe 40 x 20 mm with a wall of 3 mm. Measurements for the frame are made at the installation site between the embedded parts.
Operating procedure:
- cut off two transverse elements and two posts;
- the crossbars are welded to the embedded parts, having first checked the horizontal position;
- racks are welded to them at an angle of 90°, the seam is made along the perimeter around the pipe;
- check the squareness and attach the hinges.
The canopies are placed vertically, placed on the same axis, the lower one is attached first, then the upper one. After this, the tacks that held the canvas in a vertical position are removed, and the sash should open. For rigidity, braces are installed in the gate frame, which are also made from a square. At the location where the lock is installed, reinforcement is made from a pipe.
The open ends of the pipes in the product are welded, sealed with silicone, or suitable plugs are found. Next, the metal is ground at the welding points, primed and painted.
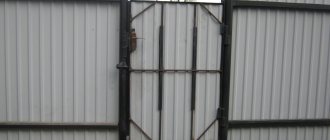
Chain-link construction
Products made from chain-link mesh do not look very attractive, the structure is completely visible, but this gate is cheap, easy to install, and can be repaired. Therefore, as a rule, the product is used to block household yards and areas for keeping animals.
Entrance group made of chain-link
The main feature of the chain-link mesh is that the skin does not bear any significant load, while it is freely blown by the winds. Therefore, the frame can be made from a 45x45 mm corner. But for reinforcement you will need at least one diagonal ligament on the frame.
Detailed drawing
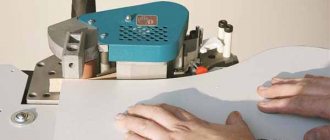
Gate painting
If a material that does not have a polymer coating was used in the manufacture of the gate, then the finished product should be painted. Painting is done like this.
- The surface is coated with a primer (the type of primer is selected depending on what kind of paint you plan to use: alkyd or acrylic).
- The product is allowed to dry. If necessary, repeat the priming procedure, then allow the primer to dry again.
- The gates are painted using a roller, applying parallel, even stripes. Each subsequent stripe should overlap the previous stroke by 1–2 cm.
- Take a contour and paint brush, and paint over all hard-to-reach places.
Dyeing can be done several times until the desired color is achieved.