Digging potatoes
In conclusion, we want to thank a resident of the Vasilkovsky district of the Kyiv region, Vasily Mikhailovich Patskan, and his wife Olga Nikolaevna, who kindly gave us the opportunity to work in their garden. This is how we saw their garden (see photo) in June: clean and tidy. We were pleased to talk with these people and see their farm. Vasily Mikhailovich is not a farmer. He works at a state-owned enterprise and in his free time is engaged in farming. But they manage to do a lot: in the garden there are cucumbers, tomatoes, pumpkins, corn, raspberries, beets, carrots and much more. Laying hens graze in the garden, and to ensure the eggs are real and not store-bought, a cockerel tramples them. And Ber's pears are such that Crimeans will envy. In general, hard workers, and that’s all! May God grant them health and good harvests!
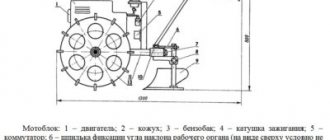
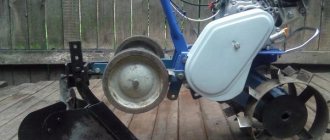
Universal tool for digging and planting potatoes
Just a few decades ago, the farmer’s assortment included only two types of metal blades: a scoop and a bayonet.
The cuttings also did not differ in great variety:
In recent decades, the range has expanded significantly, and new types of shovels have appeared. The tool is selected according to several criteria. The main one is the type of soil on the site.
For loose and light soil with a large proportion of sand, a shovel is suitable, the blade of which has a rectangular, slightly rounded shape.
Attention! The effectiveness of the scoop lies in the blade lifting a large volume of soil.
To work on heavy, hard loam, you will need a tool with a blade with a sharp edge. The previous option is not suitable, since it is difficult to stick it into the ground. It is dangerous to use it in this case and for health - it puts a strong load on the spine and back. Here you need a bayonet shovel.
Attention! Among the modern universal tools from the 3-in-1 category is a manual plow-hiller. With its help, tubers are planted, subsequent processing is carried out and the crop is dug.
Types of potato diggers
Let's look at the types of devices. There can be two of them - factory-made and home-made.
Factory
In turn, they are divided into 2 types:
- Simple potato diggers that look like heart-shaped shovels, which do not have a handle, and sharp teeth are welded on top
They work like this:
- The tip of the car hits the ground;
- The fruits rise;
- The tubers fall on the teeth;
- The earth is sifted between the teeth;
- The potatoes roll to the ground.
“Paired” with walk-behind tractors, the following simple single-row potato diggers are used:
- KKM-1;
- KVM-3
- Kum-1;
- Poltava resident;
- 2KN;
- Etc.
Each of these units is similar in its design, and the differences are only in the brand.
- Complex devices, of a screening (vibrating) type, which have a ploughshare, and sifting grids are located on wheels
The principle of their operation differs from the first type in that when digging up tubers, the ploughshare directs not only potatoes, but also soil onto the grate.
Such units include conveyor potato diggers. They have a special tape along which the fruits are delivered to the required place, and the soil is shaken to the side as efficiently as possible.
Homemade
Of course, the cost of potato diggers may vary. And, even if a person has his own walk-behind tractor, he may decide to make a homemade machine for digging potatoes.
This may seem like a rather complicated process, but if a person has dealt with a welding machine and metal, then the task is quite feasible. Drawings of such devices can be found on the Internet.
What you will need for assembly:
- Welding machine;
- Hammer drill with metal drill;
- Set of spanners;
- Metal scissors;
- Hammer;
- Consumables that can be found at any farm store or market.
Of course, describing the assembly process of these devices is not easy, due to their huge variety. One thing is worth noting - having found the drawing and instructions, you must strictly follow them.
What tools and materials will be required for manufacturing
To make a miracle shovel for digging, you need to stock up on the following materials and tools:
- welding machine;
- sharpening machine;
- metal rod;
- 2 metal corners 50 and 60 cm long;
- pipe with a diameter of 15 mm;
- M10 bolts (2 pcs.).
All materials are standard. But it is especially important to find a good rod. It can be hexagonal, square or round - it doesn't matter. The main requirement is a diameter of 10 mm. Then the entire design of the miracle shovel will be reliable, which will allow you to dig even dense soil.
There are several types of garden shovels for summer residents, which are ideally designed to perform certain jobs.
Which gardening equipment is better to choose?
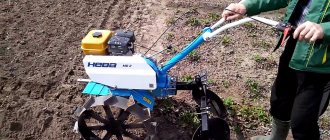
Gardening equipment is produced in different modifications. You can watch the video to see how motor cultivators, mini-tractors and walk-behind tractors work in areas of different sizes. Some machines are made for narrowly focused tasks, while others can do almost everything in the garden.
Walk-behind tractors are multifunctional. The equipment is adapted to work with additional attachments: a plow, a grass mower, a potato digger, etc. The motor cultivator is designed mainly for loosening the soil, but it is a machine, so it is used by many gardeners for digging potatoes.
You need to buy a unit taking into account the work for which it is designed, as well as the size of the garden and the composition of the soil:
- If potato digging takes place on a plot of more than five acres, then only a walk-behind tractor with a power of 5 liters or more will cope with the task. With. Such a machine is expensive, more difficult to operate and weighs at least 60 kg.
- For a country garden of 2–3 acres in size, using a motor cultivator will be sufficient. The video of the different models presented shows how easy it is to operate such equipment. The weight of different motor cultivators varies from 10 to 30 kg. The power of the units is in the range of 1.5–2.5 liters. With. If you wish, you can attach a potato digger to the motor cultivator yourself, weld metal wheels, and use it where the soil is light.
- It is difficult for a motorized cultivator to work in gardens of 3 to 5 acres. Here, to dig up potatoes, it is better to use a walk-behind tractor with a low power of 3 to 5 hp. With. Such units weigh between 40–60 kg.
Each piece of equipment can be equipped with a factory-made or home-made trailer hitch. Conventionally, all potato diggers are divided into two types:
- The simplest fan models consist of a cutting part, to which metal rods are welded on top. The dug potatoes fly off to the side like a fan, and the soil is sifted out through the cracks between the rods.
- Vibrating potato diggers consist of a cutting part - a ploughshare, and a vibrating sieve.
Next, we will look at ways to dig up potatoes with each type of trailed mechanism.
Attention! You should not attach large potato diggers to small motor cultivators. Severe overload contributes to rapid wear of engine parts
Types of shovels
Structurally, the miracle shovel can be divided into two types. With and without front stop. Another significant difference between the models is the length of the bayonet. Otherwise, the models simply have different designs. Therefore, it is necessary to consider only 3-4 options more carefully.
Homemade device for digging a vegetable garden Source agronet.ua
Ripper without front stop
This miracle shovel model does not have a second ripper fork. And the simplest is the stationary design. That is, the back stop is tightly welded to the forks. The latter have an increased size in order to leave a wide dug furrow behind them. To make work easier, the handle was equipped with a crossbar to increase power.
Ripper without front stop Source 7ogorod.ru
The model can be adjusted to suit the owner's height. For this purpose, the handle has several holes for mounting bolts. And it can slide in a special groove to rise to the required level, which makes it easier to use the miracle shovel.
The digger makes minimal effort when working, and therefore all actions are performed fairly quickly. And the only disadvantage of the design is the inability to use it on hard (compacted) soils, due to the lack of a ripper.
Miracle fork for digging up soil Source 7dach.ru
Plowman
The model has a front stop added. They are the second forks, which, after the main ones are completely buried, lie flat on the ground. They help loosen the soil and after a pass it often happens that there is no need to even straighten the bed with a rake.
Ripper (miracle shovel) 350mm Source www.ozon.ru
It is not difficult to work with this miracle shovel and even a woman can handle it. And all because the model is not designed for deep digging. And its bayonet length is no more than 15 cm. This allows you to easily cultivate different types of soil.
Mole
The model has a bayonet length of 25 cm, and it is designed for more in-depth development of the soil for planting. This miracle shovel is also used for digging up root crops. It has a massive frame with front and rear support, and the main forks are hinged.
Ripper miracle shovel (550mm) Source maximumufa.ru
Timing for digging up potatoes
It is impossible to name specific harvest dates, since some gardeners dig up tubers on their plots in July to get young potatoes, while others wait until September.
In addition, there are several factors that influence the timing of harvesting vegetables: variety, time when the potatoes were planted, caring for the bushes throughout the season and weather conditions.
It should be borne in mind that the shelf life of young potatoes is no more than three to four days. Over a longer period, the thin skin loses its protective functions, and the tubers may be affected by rot or various diseases.
How to properly dig potatoes with a pitchfork
For harvesting, 2 people are enough: digging and collecting tubers.
Reference. It is better to use plastic buckets as containers for collecting and carrying vegetables, as they are lighter than metal ones, or baskets through the holes in which soil will fall.
Dig and collect potatoes like this:
- The digger positions himself with his back to the sun in order to have a clear view of the bushes.
- The forks are stuck into the ground so as to capture the entire bush and not damage the tubers. The distance is selected experimentally, since it will not be the same for different potato varieties and soil composition.
- By pressing the handle, they lift up a bush with a layer of earth.
- The tops are thrown to one side.
- The earth is sifted through the teeth of a fork, and the tubers remaining on them are poured in the other direction. To be sure, a piece of land can be sifted several times to collect all the vegetables.
- The person walking behind places the dug potatoes in buckets or baskets. In this case, it is better to immediately sort the tubers.
More on ShumCity.Ru:
Picking tomato seedlings in the spring in March 2021 - how best to pick.
Advantages of digging potatoes using machinery
Gardeners who are just learning to use walk-behind tractors are afraid to use the equipment to dig potatoes. The main reason for fear is the risk of crop damage. In fact, the fears are well founded, since an incorrectly configured walk-behind tractor leads to unwanted cutting of potato fruits. In fact, using a walk-behind tractor and a potato digger requires minimal effort, since the attachments have a simple design and you need to correctly adjust the immersion depth taking into account the size of the ripe fruit.
The simplest garden equipment is bent at a minimal angle. When harvesting potatoes, the plow tilt is adjusted to the optimal depth of penetration. If you set up the equipment correctly, you can easily walk through the garden without the risk of damaging the tubers.
Digging potatoes with a walk-behind tractor has the following important advantages:
- completing the task is significantly simplified, thanks to which you can save effort and time;
- It is expected that gardening activities will be carried out in the shortest possible time;
- the crop is completely removed from the ground and losses are minimal.
Proper digging of potatoes using a walk-behind tractor guarantees saving time and effort for every gardener.
Reviews
Gardeners speak positively about using forks for digging potatoes, noting their productivity and simplicity.
Andrey, Kostroma region. : “Since many modern varieties have tubers arranged compactly, you have to pierce the ground with a pitchfork much less often than with a shovel. It is important to stick the latter closer to the stem.”
Galina, Tomsk: “From his region, my husband brought a new method for digging potatoes for us. Using a garden fork with wide flat tines, he turns the bush completely, tilts the tops in one direction, and the tubers side by side in the other. In terms of productivity, it can compete with a cultivator.”
Alexey, Moscow region: “I haven’t used a shovel since the last century. When planting, use only a flat cutter; when harvesting, use a fork. Is it sprouting? Of course it sprouts. But no more than after a shovel. The problem is not with the tool, but with the variety of potatoes planted. The better suited it is to local conditions, the larger the tubers will be.”
Choosing a walk-behind tractor and its parameters
- Weight of equipment. To make the walk-behind tractor easier to operate, it is better to purchase a model with a weight of more than 70 kg. In this case, you will not need to push the equipment yourself, because the wheels will have good traction with the ground. Even a woman can handle such a cultivator.
Fortunately, the weight of the walk-behind tractor can be increased with the help of weights.
- Power is another feature that you should pay attention to before purchasing. For home use, it is recommended to purchase models with an indicator of 5.5–6 liters. With.
- The presence of a gearbox is a prerequisite for a good walk-behind tractor. Single-speed models may not be able to pull the digger at all, and you will have to dig up the garden manually. When planting potatoes in ridges, single-speed cultivators cling to the ground with the gearbox and do not go further.
It’s good if, in addition to the gearbox, the walk-behind tractor is equipped with a belt speed reducer. The choice of speeds becomes 2 times larger, which means it will be more convenient to choose the operating mode.
- Fuel consumption is of great importance, because this affects the final cost of the harvest. It is recommended to purchase walk-behind tractors with imported engines; they are much more economical than domestic models. The engines are gasoline and diesel; air and water cooling are used to increase their durability. Cooling with water is a complex process, but it is also very effective. It is used only for diesel designs and allows you to increase engine life to 3 thousand hours.
- Starting system. It is very difficult to manually start heavy equipment. Therefore, it is better to purchase models equipped with electric starters. They will cost more, but will make working with the equipment easier. On more expensive models, both launch options are installed. Manual serves as a backup option.
- A special mechanism – a differential – helps ensure maneuverability. It ensures blocking of one of the wheels of the walk-behind tractor, which leads to the rotation of the equipment in a circle. This makes it easy to turn the walk-behind tractor at the end of a row to move on to processing the next one.
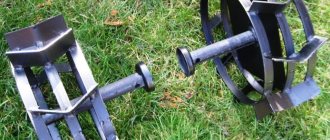
- Wheels can be pneumatic (tire with a tube) or metal (with lugs).
- Attachments are necessary to expand the functions of the walk-behind tractor.
Powerful or weaker?
Potato digger "Agro" (KKM-2) made in Belarus.
When choosing, be sure to take into account the type of walk-behind tractor purchased. For lightweight models, choose the Zubr and Agro potato diggers, and for a powerful walk-behind tractor, the following are suitable:
- KVM-3, which goes 25 cm into the ground. This makes it possible to harvest without damaging the potatoes. Additionally, the equipment can be equipped with knives for collecting tubers in hard ground.
Vibrating potato digger KVM-3.
Connecting KVM-3 to the walk-behind tractor via a roller system.
- KVM-1 is also equipped with additional slots for knives working in hard ground.
External view of the KVM-1 potato digger.
Soil preparation
Soil preparation is an important stage that should not be ignored. At the end of October the fields are plowed. Organic fertilizer is applied to the soil according to the following type:
- manure;
- bird droppings;
- humus;
- ash;
- compost.
To improve soil health, agronomists recommend sowing fields with green manure in the fall. Mustard and butter radish are perfect for this purpose. As soon as the budding phase begins, the plants should be mowed and buried in the ground.
Types of potato diggers
Factory
Factory walk-behind tractors differ in their design, as a result of which their successful use is assumed
Digging potatoes with a walk-behind tractor can be done in different ways, so it is advisable to pay attention to the design features of factory-made special equipment.
- Vibrating view. In this case, the trailing mechanism consists of a ploughshare and a vibrating sieve. A special sieve vibrates when digging potatoes. The ploughshare undermines the layer of soil with root crops, after which it steps on a vibrating grate, through which the soil spills out. The crop remains on the grill of the walk-behind tractor, after which it is placed on the ground behind the movement of special equipment. This type of potato digging scheme is efficient, but vibration models have a specific design.
- Transporter view. Using this type of equipment, it is assumed that the soil is undermined by a plowshare and goes to the conveyor platform, from which the soil and the remains of potato tops fall. Clean root vegetables remain on the grid, which has a special hooking device. The conveyor walk-behind tractor is reliable and easy to use.
- Lancet view. Such walk-behind tractors are the simplest, since there are no moving parts. The equipment has a bayonet shovel, which is mounted on a rod and walk-behind tractor. As a result, the cutting surface must be at a certain angle to the ground. The soil layer is removed. The gap between the twigs is ideal for trapping root crops, so efficient harvesting is guaranteed.
The choice of factory walk-behind tractor largely determines the possibility of successfully digging ripened potatoes.
Homemade
Digging potatoes with a homemade walk-behind tractor is also possible, but you need to create the equipment correctly. It is advisable to use thick and durable iron.
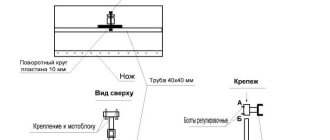
The basis of a homemade walk-behind tractor is a frame, which is welded from metal corners and an iron channel. It is planned to make a ploughshare from iron plates, which is subsequently bolted to the elevator casing. Subsequently, metal frames are used to create a cylindrical body. Bushings connected by two metal shafts are inserted into the housing to treat the area. The key of the walk-behind tractor also contains sprockets with hubs responsible for the movement of special equipment.
Another important point is the manufacture of the drum from roller chains and a rod. The rod is created in the form of a wheel and connected to the chains. To increase the strength of the structure, the chains are mounted on bent disks, which are welded to the disks. The structure is installed on 2 fixed axes.
Then the support-conveyor unit is installed. The input axis should be located in the housing on the left side. After this, the sprocket and bearing are secured.
Advice! Making your own walk-behind tractor with a potato digger is a complex undertaking that requires technical knowledge and skills. For this reason, it is advisable to buy a ready-made walk-behind tractor with a potato digger.
How to choose ready-made
There are a lot of gardening tools in stores, so it is often difficult for vegetable growers to navigate when choosing a tool. It is important to understand which forks are suitable for the site, given that the number of teeth must be at least 4, and their thickness must correspond to the density of the soil.
It is desirable to have a forged working part made from a single piece of metal.
Reference. Despite the high price, telescopic forks are very convenient to use, with adjustable handle lengths made of aluminum and durable plastic.
When choosing a conventional tool with a welding work base, it is recommended to pay attention to the following:
The best companies producing high-quality gardening tools are:
Motoblock what is it
It’s no longer such a rare situation when a garden is plowed using a walk-behind tractor!
A special device requires certain knowledge and practical skills. Therefore, before using the walk-behind tractor, we recommend that you familiarize yourself with the features of its use.
Advantages
Many novice farmers are afraid to use a walk-behind tractor, because it can ruin part of the harvest. These fears are partly true, because incorrect adjustment of the mechanism leads to damage to the tubers.
Mechanized potato harvesting is simply irreplaceable in large areas.
But the walk-behind tractor has a lot of advantages:
- Automation of the potato digging process. It is physically difficult to cultivate a large plot of land with a shovel, but with a walk-behind tractor the task is simplified.
- Save time. It is enough to understand the design and operate the mechanism to harvest the entire crop in just a few hours.
- Easy to manage and configure. It is enough to study the instruction manual to correctly set up the walk-behind tractor and quickly dig up root crops without damaging them.
Preparation of planting material
Potato yield depends entirely on which tubers are planted in the spring. So, you should purchase good varieties of plants, and then start processing the tubers, which is done in three stages:
- In autumn . Sort through the planting material, removing tubers that are small or damaged. Then pour the potatoes in one layer and keep them in the light for 2-3 weeks, but not in direct sunlight. Soon the tubers will turn green and be disease resistant. It must be remembered that planting one hundred square meters will require from 500 to 700 tubers.
- In the spring . 1 month before planting, inspect the tubers and remove those that show signs of rotting or disease. Move good potatoes to a cool, damp place where the sun's rays penetrate. If the room humidity is low, the tubers should be sprayed moderately with water. They can be kept outside if the air temperature is not lower than 10 degrees.
- Just before landing . Potatoes can be kept in a solution of potassium permanganate or boric acid for 20 minutes, which will make them more resistant to pests. To stimulate plant growth, tubers can be sprayed with biostimulants.
Popular methods of pre-sowing processing of potatoes can be found in the table:
| Processing method | Benefit | Features of the technology |
| Gibberellin or Heteroauxin | Increases yield by 65 kg per hundred square meters. | A few days before planting, spray the tubers with a solution of the drug in a ratio of 7 mg per 1 liter of water. |
| Ferric chloride | Protects the crop from scab, which reduces the marketability of potatoes and shortens their shelf life. | Spray the potatoes with a weak solution of ferric chloride 2-3 days before planting. |
| Succinic acid | Helps nutrients remain in root vegetables, which improves their biochemical composition and taste. | A few hours before planting, treat the tubers with a 1% solution of succinic acid. |
| Wood ash | Increases the level of starchiness and nourishes the plant. | Treat the tubers before planting by dusting them with ash at a ratio of 1 kg of ash per 50 kg of potatoes. |
| Microelements | Nourishes potatoes with useful elements. | A few hours before planting, sprinkle the tubers with a solution of macroelements containing boron, manganese, copper in a ratio of 0.5 tsp. half a bucket of water solution. |
Before planting, large tubers can be cut, but in any case they should have strong and not too long sprouts that will not break off during planting.
How to set up equipment correctly
Using a walk-behind tractor involves the use of a traction mechanism. The harvesting speed depends on the power of the equipment, but the main settings are performed on the trailed device. The pointed nose of the equipment cuts the soil layer, after which it throws potato tubers onto special rods. According to this scheme, the crop can be left on the surface of the soil.
There are always holes on the walk-behind tractor bar with which you can adjust the equipment. The trailing mechanism can be placed in different ways, as a result of which the angle of inclination of the walk-behind tractor nose changes. If a large slope is expected, the walk-behind tractor can sink deeper into the soil and facilitate harvesting.
Important! Harvesting potatoes using a walk-behind tractor requires the correct settings, since you need to dig up whole root crops and eliminate problems with walking through the beds.
Experienced models have special devices that allow you to narrow or expand the distance between the wheels of special equipment. This parameter depends on the row spacing. Widely spaced wheels lead to the separation of tubers into parts, resulting in unsuccessful harvesting.
Device
Potato diggers, depending on their design features, can be manual or attached to a walk-behind tractor. Using a potato digger is simple. The only effort required is to stick the tines into the ground next to the potato bush and press down on the front arch with your foot. The forks lift the potatoes up, the soil crumbles. In this case, the root crop is not damaged, since the teeth pick up the potatoes from below and from the sides.
Note! The tool is called universal for its versatility. Using a potato digger, you can prepare beds for planting, loosen and dig up the soil.
Types of potato diggers
To dig potatoes with a walk-behind tractor, various types of potato diggers are used. When harvesting, simple homemade models and factory cultivators are used, which independently dig, collect and transport the harvested crop.
Factory
Factory models are often used to dig up potato roots, as they are of higher quality. Simple models are produced that look like a regular shovel with sharp teeth and without a handle. When digging potato tubers with a walk-behind tractor, the teeth go deeper into the soil and lift the root crops. Then all the potatoes in the soil fall onto the surface of the teeth and are carried out. Models with teeth require precise adjustment to avoid accidentally damaging the potatoes when digging.
There are also more complex models, tests of which have shown that they are more effective in comparison with simple models equipped with teeth. Such potato diggers are equipped with special belts for transporting already dug potatoes to their further storage location.
Homemade
Sometimes people simply don’t have the money for a super potato digger for harvesting potatoes, and so some try to make such a product themselves. Such work may seem difficult for many people, but in fact the manufacturing process is not that difficult. People who have previously worked with welding machines and metal products can easily make a homemade digger using drawings from the Internet. To create a structure for harvesting potatoes yourself, you will need the following tools and materials:
- hammer;
- welding;
- hammer drill for working with metal sheets;
- Consumables;
- metal scissors;
- spanners.
Do-it-yourself potato digging shovel – Metalist's Handbook
There is a lot of work in the garden, but the most exhausting work is digging up the soil, cultivating it and removing weeds. They start digging ahead of time, in small sections, since the load is too great.
The miracle shovel will help reduce the complexity significantly and at the same time speed up the process at least twice. This relatively inexpensive and uncomplicated device really works, even on difficult soils.
What is different and what can
To be precise, this is not a shovel, but a ripper, since it not only digs, but also breaks clods.
The miracle shovel consists of two (sometimes one) slats with pins movably connected. Some models also have a back stop - for easier digging of dense, heavy soil.
So in reality it looks more like double pitchforks (see photo below).
Miracle shovel and its components
From the picture it is clear that this tool does not have a shovel as such, but the differences from the classic bayonet shovel do not end there. It also has a much higher handle - it should reach your shoulder. It is also convenient if there is a crossbar at the top - you can operate it with both hands.
The miracle shovel performs three operations at once:
- loosens the soil;
- breaks clods;
- “extracts” the roots of weeds without tearing or cutting them (in any case, damaging them much less);
- Digs root vegetables easily - you can dig carrots, potatoes, etc.
But its main advantage is that it greatly facilitates digging the earth, and the main load falls not on the back, as when using a conventional bayonet shovel, but on the legs (driving the working forks into the ground) and on the hands (turning the forks out of the ground). During work, the back is in a vertical position and is almost not loaded.
Another version of the miracle shovel
The only downside to this tool is the weight. It is really much larger than the bayonet one. But the super shovel can be rearranged; there is no need to lift it. Or rather, it is raised only a few times: when it is placed on the ground at the beginning of the row. Then, by pulling the handle, it is simply tightened a little.
There is another very attractive point in using a miracle shovel - it digs the garden at least twice as fast. This occurs due to the wider working part - up to 50-60 cm. Provided there is little physical activity, this is very good.
How to work
Although this design is not particularly complex, working with it has its own characteristics. First, you need to start from the far edge of the bed, then move back, gradually dragging the forks back. Well, the general procedure is this:
- Holding the handle, place a miracle shovel and rest it on the front ripper.
- Stick the pitchfork into the ground. Drive them in until the back stop touches the ground. If the ground is heavy or dense, additional force may be needed - press your foot on the crossbar of the front forks.
- Pull the handle towards you. With this movement, the forks will begin to move upward. As they rise, they pass through the forks of the front stop, breaking up the lumps.
- Pull the device back a little, repeat all the steps (plug, squeeze, pull the handle).
It's actually very simple. It’s worth trying a couple of times and then everything repeats automatically.
Constructions
In addition to the option shown above (called “Tornado”, “Digger” or “Plowman”), there are several more variants of miracle shovel designs under different names.
Assembly drawing of a miracle shovel
Soil ripper without front support
This design also has working and support forks, but does not have a front stop. Because it is less bulky and weighs a little less. But the front stop gives increased stability during operation. And the weight when dragging is not so important.
The handle is attached to the working forks, the back stop is welded to the comb of the second forks. Both of these structures are movably connected to each other (even door hinges can be used).
Ripper miracle shovel for easy tillage
The photo shows one of the implementations, which is made on the basis of a corner and a round pipe. When working, the pins are driven into the ground by pressing on the crossbar, and not on the stop, as in most models.
Digger
An option called “Digger” is essentially a wide fork with a stop for easier turning and a high, powerful handle.
Miracle shovel "Digger"
The peculiarity of this design is the stop and the adjustable handle. It is fixed with two bolts and adjusted to the height of the working person.
The emphasis is not stationary, but movable. It is fixed to the frame. When plunging the pins into the ground, press on it with your foot, then, without removing your foot, turn it out by pressing the handle of the fork out of the ground.
Digger in action
The physical load during work is low, the work progresses quickly. But this miracle shovel will not work for hard and lumpy soils: it does not crush the soil. She collapses through the pitchfork under her own weight. But this is only possible on loose soils. On clay or black soil it is better to have a second comb with pins.
How to make a miracle digger, see the following video.
This miracle shovel design is slightly different from the previous one. The stops in it are rounded, the handle is arched, but the basic structure is the same. There is some drawback - there is no way to adjust the handle, but otherwise everything is the same - a movable stop and working forks.
Two options called "Lightcop". The simplest ripper for the vegetable garden, garden and cottage
It’s hard to say whether this variation is better or worse. It would be possible to evaluate only by comparing the performance of both copies on the same site.
If you watch the following video, you will see that with such a miracle shovel you can dig not only loose soils, but also heavy ones. And the second thing you can pay attention to is that for such soil it is better to have a second comb of pins, against which you can crush the inverted lumps.
What and how to make it from
The designs, as you have seen, are different, but the set of materials will be approximately the same. Their number differs, but the cross-section and characteristics remain unchanged.
You can use a round or profiled pipe, metal rods or “parts” from forks
Materials for production
They usually start with making the frame. It is often made from a profiled pipe, the optimal cross-section is 30*30 mm or so. The wall thickness is important - at least 3 mm. Some models used a corner. The shelf width is also about 30 mm, the metal thickness is at least 3 mm.
The handle can be made from the same profile pipe, or you can use a round one. The thickness of the walls is also important. In principle, having made a latch, you can use a wooden shovel holder. Some purchased models provide for the installation of a wooden holder.
Corner frame
The main attention should be paid to the material that is used for the teeth of the working forks. It must be good structural steel. The forks are made from a rod of at least 8 mm in diameter.
What craftsmen make them from:
- They cut it off from an ordinary fork and weld it onto a miracle shovel.
- Straighten the suspension springs.
- Car springs are sawn into narrow strips.
If you can find a good rod - round, square or hexagonal - it doesn't matter, it will be much easier for you. Not a bad option, by the way, with a pitchfork. But you have to buy good ones, and this is not cheap. And one more thing: calculate the dimensions of the miracle shovel so that the working forks have 8 pins. Then you will need to buy two jokes of ordinary pitchforks.
If the design is chosen with two forks - working and thrust, you can place pieces of a suitable length of metal rod on the thrust forks. The loads here are not so high, so the strength should be enough. The diameter of the rod is 10 mm; you can use ribbed reinforcement, which is used to reinforce the foundation.
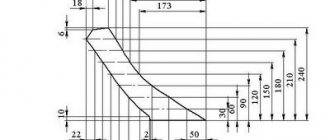
Dimensions
Most companies that produce miracle shovels have a range of sizes for this product. Our people are different in build and physical fitness. For men, you can make more massive models, and for women and older people, smaller and lighter ones. The average sizes are:
- The width of the working part is from 45 cm to 60 cm. There is no need to do more: it will be difficult to dig and productivity will only decrease, not increase.
- The length of the working fork pins is 220-300 mm.
- The distance between the pins is 70-80 mm.
- The length of the handle is according to height, it is more convenient if it ends near the shoulder. The dimensions of the miracle shovel can be selected “to suit you” - it is important that it is comfortable to work
All other sizes are selected depending on the design and material used.
Blueprints
Miracle shovel working forks
Detailing of the stop and forks
Full design with front stop
Option with single forks and rear support frame
Other dimensions of the digger and different design of the stop
Lightweight digger with solid bent handle
Potato digging tool
“Harvesting potatoes has never been so easy!” - say the sellers of another idea. Now is the time to understand the numerous innovations in engineering.
But let’s make a reservation right away: the technology or device that makes your crop jump out of the beds without making any effort has not yet been invented.
You just have to decide on the best method for you.
Digging potatoes with a pitchfork and shovel
We can only remind you of a simple shovel. This is a kind of wheel that was invented a long time ago and is essentially a prototype for the following devices.
One of the variations is a bayonet pointed shovel ( photo 1
) with a metal bucket 210x280 mm, with four oval holes. It costs about 120 rubles, but it doesn’t make life much easier for potato diggers.
Advantages of using a walk-behind tractor
- Digging up potatoes using a walk-behind tractor is much easier than, say, doing it manually. When working with technology, you save your energy and, of course, precious time.
- Using a walk-behind tractor, you can quickly harvest the crop by removing it from the ground, especially if bad weather is coming.
- Almost all potatoes (with the exception of very small tubers) are completely removed from the ground. Crop losses are kept to a minimum.
Summer residents, gardeners and amateurs who are not well acquainted with such equipment (motoblock) are afraid to take any action to dig up potatoes with the device, as they are afraid of harming the rich harvest. It is worth noting that their fears are not in vain. If the walk-behind tractor is not initially set up correctly, then removing the tubers from the ground will end in a cut crop.
It is important to know! Any of you can easily master this technique. The equipment consists of a potato digger and a walk-behind tractor
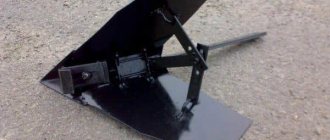
The equipment is essentially simple; it is mounted and, in simple terms, is a metal plow pointed at the end, with a thick fan-type rod welded onto it.
How to dig potatoes with a walk-behind tractor
Harvesting with a modern mechanism is very different from harvesting with a conventional bayonet shovel.
- The sharp part of the mechanism goes into the ground when harvesting, and when the walk-behind tractor moves forward, the soil, along with the tubers, goes to the teeth of the device and rises to the top.
- Excess soil crumbles away, and potato tubers remain lying on the surface of the soil. Then you need to collect the potatoes. As a rule, several people harvest the crop at once, but one can do it alone.
- The use of such equipment not only simplifies labor, but also increases the speed of harvesting, but does not in any way affect the speed at which the potatoes themselves will be harvested. Because people must follow the device and harvest the crops.
Important! If you initially plan to harvest potatoes with a walk-behind tractor, then you definitely need to make the potato rows as straight as possible. Most walk-behind tractors provide for harvesting row widths that reach up to 50 cm. Almost any device harvests crops from a depth of up to 30 cm.
It is also worth noting that in one hour of operation of the mechanism you can harvest up to 20 acres of potatoes, but it all depends on the speed of work, the ability to use the device and, of course, its power. The average power of the walk-behind tractor will allow you to process a plot of up to 15 acres.
How the cleaning process itself is carried out
- As the mechanism moves along the row, the potato digger, or rather the ploughshare, cuts off the surface of the earth up to 30 cm and turns the earth along with the tubers. There are such walk-behind tractors equipped with a grate, then you don’t have to walk around and collect potatoes; when they fall on it, they remain intact.
- Through the grate, the earth crumbles onto the soil, as if sifted mechanically. Excess soil is separated from the potatoes, leaving them clean.
- Some models of walk-behind tractors are equipped with additional transport belts, which improves the appearance of the tubers by carefully separating the soil from the potatoes.
Features of walk-behind tractors
If you purchased a potato digger with a grid and an additional transport belt, then you can collect the potatoes yourself, without anyone’s help.
Motoblocks are also produced by manufacturers for different types of soil. There are also mechanical devices additionally equipped with a vibrating potato digger - the main element.
Additional functions
Potato digger for MTZ walk-behind tractor
A potato digger is a multifunctional gardening tool that simplifies many tasks. You can replace an outdated shovel and fork using the Harvest potato digger. It allows you not only to dig up root crops, but also to dig up beds and loosen the soil. Design features:
- forks made of tool steel with fine teeth (7 pieces);
- a pedal on hinges that acts as a lever.
The furrow width is 28 cm, the loosening depth is 25 cm, the weight of the unit is 3 kg.
Long pins not only dig up the soil, but also break up clods of earth, making the soil homogeneous. The bush of the plant is easily removed from the ground; the potatoes are not pierced or cut. When moving to the next potato bush, you do not need to lift the tool; you just need to step back and pull it towards you.
Another modern unit is the “Farmer”, which combines 5 tools. They can dig potatoes, harrow, loosen and turn up the ground. In addition, it is used for spreading manure. To activate the “potato digger” function, you need to secure the plates along the arched lever. Pressing the lever raises the forks upward. Shaking the tool by the lever releases the potatoes from the soil.
Design parameters:
- length of teeth and working blades – 25 cm;
- depth of penetration into the ground – 20 cm;
- size – 120 cm;
- unit weight – 3 kg.
There are also potato diggers that work on a different principle. They are a versatile alternative to a shovel. The entire unit rests on one metal pin stuck into the ground. Rotating the handles clockwise moves the curved teeth made of hardened steel. The tubers are picked up along with the soil and turned to the side.
Planting potatoes with a Salute walk-behind tractor
It turns out that we will process a certain strip of land with a milling cutter 2 times. If you go through the entire garden in just one pass, then the depth of cultivation for planting potatoes will be insufficient. This is the method used to cultivate the vegetable garden by the “kalymschiki”. They are not interested in the quality of processing; they quickly covered the plot in one pass, received 200-300 rubles for 1 hundred square meters and went to another garden. And the owner of the site will then suffer all season. Therefore, for ourselves, we work slowly, cultivating the soil in 2 passes, immersing the cutters into it as much as possible. After cultivating with a rake, there is no need to level the ground; it is enough to level it in places where the equipment is turned.
PLANTING POTATOES WITH A MOTOR-BLOCK SALUT
In the recent past, we planted potatoes using a Neva walk-behind tractor. But for a small amount of work this device turned out to be too heavy. Therefore, we replaced it with a lighter Salyut with a Lifan engine with a capacity of 6.5 horsepower. To plant potatoes, you need to buy additional equipment: lugs, hitch, plow, axle extensions. Some gardeners plant potatoes using a single-row hiller. We will tell you about the method of planting using a plow. In our opinion, this method is more convenient and simpler, since you do not need to mark the ground with a marker and guess the distance between the beds.
So, let's remove the cutters from the axes, then install extensions, followed by lugs with a diameter of 30-40 cm (wheels with a larger diameter are used for hilling). There are 2 holes drilled on the axle extensions.
How to make a miracle shovel with your own hands
Making a miracle shovel for personal needs is quite simple if you have the skills to work with electric welding: it is with its help that you can weld all structural elements. The sequence of actions is as follows:
- Make 15 identical sections, each 30 mm long. Sharpen 8 of the 30 segments on one side using a sharpening machine (they are shown in the photo below).
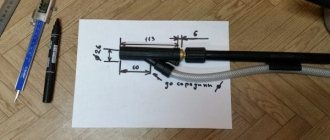
To construct the base of a miracle shovel fork for digging, you will need to take a metal corner 60 cm long and mark 8 identical parts on it (there will be 8 pins).
On a 50 cm corner, mark 7 parts. You will need 7 pins.
Weld the rods to the corners. To the smaller of them (50 cm) also attach metal corners (length 35 cm).
- Make round holes and loops at the edges. 14
- 2 identical fragments (length 125 cm) are cut from a metal pipe (Ø15 mm). They are slightly bent at the edges.
Then you will need to weld the pipe sections. Secure them to the edges of the top corner.The homemade shovel is ready. All that remains is to experience it in action.
Forks can also be made using a ready-made tool by simply straightening the pins. But this option is less durable, since the metal can be very thin, and the diameter of the rod must be at least 8 mm. Another option is to design forks based on suspension springs (straighten) or car springs (cut).
Important! When carrying out welding work, you must strictly adhere to safety requirements.
If you don’t have the skills, it’s better to buy a ready-made miracle shovel: it’s not worth the risk.
How to hill a vegetable garden
After planting potatoes, it is recommended to hill them several times. The first hilling is carried out when sprouts appear. This aeration facilitates the access of oxygen to the tubers, due to which the potatoes grow more actively and the harvest is larger.
In addition, hilling allows you to avoid greening of the tubers, which crawl to the surface during the growth process.
Hilling can be done manually, but it is much more convenient with a walk-behind tractor. Additionally, you will need a single-row hiller attached to the walk-behind tractor using a hitch. Rippers are installed in front of the walk-behind tractor, and at the back there is a hiller that covers the bushes with soil.
Single-row hillers can work with low-power walk-behind tractors.
Hilling up is recommended after abundant watering. Wait until the top layer dries so that the soil does not stick to the wheels and proceed to the procedure.
To make it easier to work with the hiller, the rows should be located at a distance of at least 70 cm from each other. This is taken into account before planting potatoes.
- The walk-behind tractor is installed in the center of the row spacing, turn on speed 1 and hill up without touching the potato sprouts.
In one pass, one bed of potatoes is hilled.
- During the first hilling, the soil should completely cover the emerging shoots.
- During subsequent hillings, the stems are simply sprinkled.
The better the hilling is done, the higher the harvest is expected.
Soil preparation
It is recommended to plant potatoes under a shovel in sandy and loose soil. Clay soil reduces productivity because... prevents the passage of water and the growth of seedlings.
Well-lit areas with low groundwater levels (at least 5-6 m from the surface) are suitable for planting. It is advisable to plant potatoes where sunflowers, beets, cucumbers, corn or pumpkins grow. After planting potatoes, it is recommended to take a break of several years.
Root crops grow well in soil with a pH of 5.5-7.0. A sign of suitable acidity is a large amount of dandelions, clover and wheatgrass.
Why is it sometimes necessary to speed up harvesting?
Garden owners know that manually harvesting potatoes under a shovel is a complex process that takes a lot of time. First, you have to remove all the weeds and large dry potato tops from the garden. Next, they dig up the ground with a shovel or pitchfork, throwing the tubers to the surface. You still need to bury the holes behind you, so as not to sprinkle rolled potatoes dug from the next row into them.
Manual operation occurs over more than one day, which is especially unacceptable during the approach of bad weather. With the onset of the rainy season, undug tubers begin to germinate again. Many potatoes rot or change their taste. If the crop is dug up after rain, all the tubers covered in mud will have to be washed, which is why they are poorly stored in the cellar in winter. A motor cultivator or walk-behind tractor helps to avoid all problems with harvesting and speed up this process.
Important! The only advantage of manual harvesting of potatoes is the absence of costs for the purchase of a motor cultivator and fuel for it. .
harvesting tools and tips
Growing your own potatoes is a national tradition
The approach to growing our “second bread” is interesting. Most potato growers approach this crop with true pragmatism: when 10-15, or even all 50 acres of land are allocated for planting, there is no time for an individual approach. The rest believe that potatoes are worthy of “dancing with tambourines” no less than a tomato or eggplant, and therefore treat potato care with all the attention. But for both the former and the latter, the culmination of the entire season is the harvest. Let's figure out when, what and how to dig potatoes.
To dig or not to dig—that is the question!
In fact, this is the most difficult question, since there is no clear answer to it.
The publication of our website When and How to Dig Potatoes can help you understand that “it’s time.” It describes in detail all the “signs” of harvesting potatoes. It is important to remember that the most obvious and reliable sign of harvest readiness is the withering and drying of the tops. As soon as you notice that the potato “tops” have lost their attractiveness, you have 20 days to dig up the “roots”. The tubers should not lie in the ground any longer. We look at the forecast, choose nice days and without hesitation we take up the shovel.
Withering of the tops is one of the most important signs that it is time to take up the shovel. It is necessary to pay attention not only to the precipitation situation, but also to night temperatures. It happens that the days are fine and warm, but at night the frost sets in. Potatoes, even slightly touched by sub-zero temperatures, will have an unpleasant sweetish taste, and it will not be possible to preserve them.
You need to dig potatoes in dry weather
The agony of choice
So, the harvest is ripe, you even dug up a couple of bushes to make sure that it’s time to harvest the potatoes. What tool is suitable for this task? And we have three of them in our arsenal: a shovel, a walk-behind tractor and a pitchfork. Let's look at the pros and cons of each.
Walk-behind tractor
Many gardeners, without sufficient information, do not trust machinery to dig up their potatoes for fear of ruining half the harvest.
And therefore, all relatives who are able to hold a shovel in their hands are called to the harvest, as well as their children, grandchildren and dogs to pick up tubers. The walk-behind tractor will not ruin your harvest
However, everything is not so scary. The mini-tractor itself is used only as traction force when harvesting potatoes. For almost any model, you can purchase a variety of attachments, including a potato digger, which consists of a plow with steel rods welded to it. Removing the tubers to the surface occurs quite delicately; there are fewer “losses” left than with manual digging.
The undoubted advantage of the technology is speed and high productivity. Having a mini-tractor, you can tackle large areas: the range of attachments also includes a potato planter. In unstable weather, when every dry hour counts, only with the help of a walk-behind tractor can you quickly dig up and harvest your crop. And our “Kulibins”, having brainstormed, are able to further improve the potato harvesting process, reducing it by one operation. Let's watch the video.
The disadvantages are obvious: a mini-tractor and attachments for it need to be purchased in addition to the garden tools you already have. In addition, like any other equipment, the walk-behind tractor will require storage space, maintenance and refueling.
Shovel
Technology is good, but not everyone has the opportunity or need to acquire it. A shovel has always been a faithful assistant to any summer resident. Many people prefer to dig up potatoes with it. The current shovel is not as simple as the shovel of our grandmothers. Then there were only 2 types of metal blades - a bayonet and a scoop, and only 3 types of cuttings - long, short and broken off)) Nowadays, the choice is much wider and more varied, and the tool is selected based on the type of soil on the site and the type of work you plan to implement it with its help. Which shovel is more convenient to use in each specific case? If your site has light, loose soil with the presence of sand, then a bayonet shovel with a rectangular or slightly rounded blade will suit you.
Working with such a tool is very effective - a blade of this shape captures a large volume of soil. A bayonet shovel with a rectangular blade is ideal for harvesting potatoes on loose soil
But such a shovel is not suitable for use on heavy, hard soil . Sticking it in will be problematic, and it’s not safe for your back. To work on dense loam, you need to choose a shovel with a pointed blade.
Bayonet shovel with a pointed blade. Trademark "Sibrteh" When purchasing, pay attention to the cutting. For truly reliable shovels, it is made of steel and has a polypropylene cover. Shovels of the Sibrtech brand have a durable handle, securely attached to the bayonet with a double connection (welding + steel riveting). Moreover, it moves away at an ergonomic angle, like the so-called “American ones” - working with them is much more comfortable than with a regular straight shovel. The super-elastic canvas, after bending, returns to its shape without residual deformation, so it will not break in heavy soil.
A good shovel makes digging potatoes more enjoyable
A good, durable shovel is an excellent tool for harvesting potatoes. It would seem that there are only advantages. However, some gardeners say a categorical “no” to this tool, explaining that the blade often cuts the tubers, and they become unsuitable for storage.
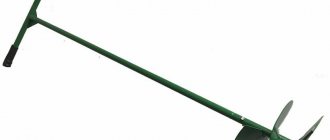
Pitchfork
Proponents of the fork believe that when using this tool, digging is easier - the earth spills between the teeth.
It is easier to completely remove the potato nest to the surface. These are definitely advantages. Opponents say that a tuber (or even a boot!) is pricked with a pitchfork no less often than it is damaged with a shovel. But pierced potatoes cannot be stored at all - they immediately begin to rot, while a cut with a bayonet dries out quite quickly and such a “wounded animal” will lie for some time. What a shame!
In any case, if you choose a fork, it is advisable to choose one with 4 teeth, which should be flat. And gardeners who are especially talented at invention use crushed stone forks for digging potatoes, which have more teeth and are spaced more often. They assure you that it is convenient!
Crushed stone forks can also be useful in a potato field
9 tips at hand))
So, the potatoes are ready for harvesting, the tool has been selected, and you can start.
Listen to some advice from seasoned gardeners before you get started. 1. If you have a walk-behind tractor equipped with a potato digger, then before you start digging, be sure to mow the tops . Otherwise, it will interfere with the operation of the equipment, or even injure the tubers. When using a shovel or fork, mowing the tops is not a necessary condition, especially if they are thoroughly wilted. If the time has come and the tops are still fresh, by removing them we speed up the ripening of the potatoes. And, of course, the greens touched by diseases are necessarily mowed, removed and burned.
2. If the forecasts are disappointing, they also dig in the rain (but not in torrential rain). Then you need to prepare a room for drying the harvested potatoes.
3. If the weather is favorable, then it is better to let the newly dug tubers lie right on the bed for about 3 hours - this will make the skin a little rougher. These potatoes keep better.
If the weather is favorable, it’s good to let the newly dug tubers lie right on the garden bed for 2-3 hours
4. When digging with a mini-tractor, you should not go row by row , it’s better to go through one. Otherwise, one of the wheels will move on plowed ground, and the second on dense ground, which is very inconvenient.
5. You need to dress thoroughly so that your clothes cover all parts of your body . Don't forget to apply mosquito and horsefly repellent. A hat with a brim or at least a cap on your head will also come in handy.
6. The one who digs should stand with his back to the sun - so he will see what he is doing.
You need to dress thoroughly, so that the clothes cover all parts of the body
7. When going out to a potato plantation, do not skimp on bags - you should have 4 in your work at once. The first time, set aside planting material for next year - healthy tubers from the most prolific nests. Give the second bag for large and medium potatoes, put small items weighing 40-50 g in the third bag. The fourth bag is for damaged specimens, which will go directly to food or livestock feed.
8. After harvesting, do not be lazy to remove all plant debris and fertilize the soil . Potatoes take up a huge amount of nitrogen, potassium and phosphorus compounds. There is no point in applying nitrogen fertilizers in the fall, but phosphorus and potassium fertilizers are a must.
Plastic buckets are a good choice for collecting potatoes - they are lighter than metal ones. It’s even better to use baskets , so you won’t carry around the soil that crumbles from them in addition to the tubers. It's a small thing, but it's nice!
The most convenient way to distribute potatoes in bags is in baskets
It is not enough to grow a good harvest; you need to correctly determine the timing of its harvesting. Early digging means a shortage of and unripe tubers; overexposure increases the risk of late blight infection, and the potatoes may rot or freeze. It is also important to correctly calculate your strength and provide yourself with the appropriate tools for processing the plantation. What tricks do you use? Share your potato digging experience in the comments.
7dach.ru
How to set up equipment correctly
Before you start harvesting the cultivator, it is pre-configured
When setting up equipment for collecting potato root crops, special attention is paid to adjusting the plow, which is responsible for digging up potatoes.
First, the distance the plow goes deep into the soil when digging is adjusted. It is enough to set the depth equal to the size of one shovel bayonet. If you set a smaller distance, then when digging potatoes out of the ground with a motorized cultivator, the root crops will be damaged.
The depth regulation is controlled by bolts located between the lock and the plow stand. After loosening the bolts, you can move the plow down or up yourself.
After adjusting the depth, the angle of inclination of the field board relative to the ground surface is adjusted. To adjust the angle, you will have to use a screw handle. When adjusting, the handle is twisted until the board rests completely on the ground. Then the handle is twisted in the opposite direction so that its back part rises 2–5 cm above the ground.
Miracle shovel: purpose and operating rules
Working in the garden can sometimes be very exhausting. At the same time, it is performed in parts, which is explained by the enormous physical load. A miracle shovel will help reduce the labor costs of a vegetable garden. Being a simple device, it speeds up the work process and can be used on soils of varying complexity. The material in this article will tell you what this device is, what its advantages and disadvantages are, as well as what the main nuances of working with such a shovel are.
Design varieties of potato diggers
In principle, you can dig potatoes with a walk-behind tractor not only using a fan potato digger. There are many models of factory-made and home-made trailer mechanisms. Let's look at the three main commonly used potato diggers and how they work:
- A vibrating potato digger consists of a sieve and a ploughshare. When we dig potatoes with a walk-behind tractor, the trailing mechanism vibrates. The ploughshare cuts the layer of earth along with the potatoes, and then directs it onto the grate. Due to vibration, the soil wakes up through the sieve, and the tubers roll down the rods and remain on the surface of the earth. This type of potato harvesting with a walk-behind tractor is considered the most productive, but requires complex adjustment of the trailed mechanism.
- The conveyor-type trailing mechanism operates on the principle of a vibration model. When we dig potatoes with a walk-behind tractor, the soil is similarly cut with a ploughshare, after which it goes to a special site along with the tubers. On the conveyor, the soil and tops are sifted out and only the clean crop remains, held by the hooking device. The conveyor model is more reliable and easier to use, but is sensitive to soil density.
- A fan potato digger is also called a lancet mechanism, since the nose of the plow resembles the tip of an arrow. With a correctly adjusted slope, the spout cuts the soil, and the crop flies out to the side along the rods, from which a fan is welded behind the boom. The mechanism is simple, reliable and can be used on difficult soils. The main thing is that the machine has enough power.
Walk-behind tractors and walk-behind cultivators are available for sale. The first type of machines has more functions and they are much more powerful. Motorized cultivators are weaker, so they are more designed for loosening soil. But these units can also be used as a traction mechanism when digging up crops on soft soil.
As you can see, digging potatoes with a Neva walk-behind tractor or a unit of another brand occurs in the same way. The only difference is the towing mechanism.
Homemade manual potato digger
A do-it-yourself manual potato digger is easy to assemble without a drawing. For the fork you will need a hollow square pipe 40 cm long. You need to weld 6 teeth taken from ordinary forks to it. The teeth can also be forged from wrenches; their length should be about 25 cm. A pipe or a short pipe is welded perpendicular to them.
Homemade manual potato digger
A movable lever on the handle is attached to the metal handle. You need to make holes in two plates for the lever and weld them to the handle. To be able to adjust the height of the lever, it is better to increase the length of the plates and drill several holes in them. A homemade lever is made from a round curved pipe. A stop is welded to the bottom of the lever, which is best made from a corner. Thus, on the handle there is a pair of lever limiters in the form of pipe sections.
The comfort of the handle is ensured by its bend. This shape helps increase leverage. The handle is attached to the handle using bolts and nuts. But it is better to use welding for connection. A homemade mechanical manual potato digger is ready. Homemade tools are inferior in terms of soil loosening to special tools, so the beds have to be further leveled. The advantage of a homemade potato digger is its ease.
There is another way to make a device for digging up potatoes. This device grabs from both sides, pulling root crops to the surface. With the forks in the open position, the digger is placed above the bush. By pressing the crossbar with your foot, the forks are immersed in the soil. By spreading the handles to the sides, at the same time bringing the forks closer together. The roots, tubers, and soil captured by the teeth rise to the top. The soil falls away, leaving clean root crops.
DIY manual potato digger
You can assemble the unit at home according to the drawing. Materials you will need:
- a pair of pitchforks;
- a pair of pipe sections, length from 720 to 950 mm, diameter 27 mm, wall thickness 2 mm;
- metal plate 330 mm long, 50 mm wide, 5 mm thick.
Manufacturing algorithm:
- The pitchforks are freed from the wooden handles.
- At the bottom of the tulika, in the middle of the forks, two “ears” are welded (diameter 11-12 mm, distance 55 mm). A crossbar should fit between them.
- At the bottom of the crossbar, on the short sides, tubes are welded (diameter - 10.5 mm).
- A hinge bolt with a diameter of 10 mm and a length of 70 mm must pass through the tubes and “ears”.
- The pipes intended for the handles must be bent and made comfortable to hold. Pieces of hose are put on the ends of the pipe.
- All that remains is to weld the handles into the forks.
Important! Do not use the tool on wet soil, as its performance will decrease.
A potato digger is a convenient and useful gardening tool. Harvesting can no longer be called hard work, as the process brings pleasure. Each owner can make his own convenient tool for digging up root crops or design a new version. This will improve productivity, save time and money, and protect your health.
0 0 votes
Article rating
Advantages of digging potatoes with a walk-behind tractor
Some vegetable growers refuse to dig up potatoes with a walk-behind tractor because they are afraid of ruining the potato harvest. Such fears are not in vain, since if the cultivator is used incorrectly, tubers can actually be damaged. Incorrect adjustment of the mini tractor often results in spoiled tubers cut into pieces.
However, despite this, the use of a walk-behind tractor has advantages that make the collection of root crops much easier. Common benefits include:
- Simplicity of design. The equipment has a simple design, the features of which are easy to understand. The main element of the cultivator is a potato digger, consisting of an upper fan and a metal plow.
- Easy setup that an inexperienced person can handle without any problems. Even gardeners who have never been interested in technology can handle setting up a potato harvesting machine. In order not to damage the root crops during harvesting, it is enough to adjust the depth of the plow, which is responsible for digging up the tubers.
- Reducing physical activity. The walk-behind tractor digs the potatoes itself, thanks to which physical activity is significantly reduced.
- Quick harvesting of ripe crops. Harvesting tubers using a cultivator takes less time than harvesting manually.
Advantages and disadvantages
Despite being somewhat bulky, the miracle shovel is more convenient to use than its classic-type counterparts. It is easy to operate, practically digs itself and amazes with its performance, significantly facilitating the user’s work. The process of soil cultivation is carried out faster and easier with it, which summer residents have already noted. Of course, a miracle shovel cannot replace a mechanical cultivator or walk-behind tractor, but it is many times more productive than the traditional bayonet variety. This is explained not only by the design features, but also by the width of the channel.
On average, using such a shovel you can dig up an area 2 times faster than a regular one. This tool is reliable, multitasking, and durable. This is a device for arable work that can be used for sowing and loosening soil. Moreover, it can cultivate the soil to a depth of 25 cm, which is good for cultivating potatoes. You can also use a miracle shovel to prepare the ground for planting corn and cabbage, tomatoes, cucumbers, eggplants and other crops grown on the site.
However, despite a number of obvious advantages, the super shovel also has disadvantages. For example, it is completely unsuitable for gardening. It cannot be used to carefully dig around trees or make holes. As for working in the garden, there are some nuances here too. One of them is the fact that a simple unit cannot perform figured digging. In addition, it is impossible to dig a hole with a miracle shovel.
It is worth noting that only a user whose weight exceeds 80 kg can use such a shovel , otherwise the work will not be productive. The weight of the shovel is significantly different from the usual bayonet shovel. And although this shovel is lifted during operation only to be installed at the beginning of the row, and then simply moved using the handle, the weight can affect the user’s physical fatigue. Other disadvantages include the difficulty of repair.
Digging potatoes with a walk-behind tractor
Any potato digging using a walk-behind tractor has 3 phases:
- clearing the area of various leaves, debris, weeds, etc.;
- directly, the digging itself;
- harvesting a ripe harvest.
Good to know! Collecting potatoes after planting with a walk-behind tractor is much easier, even with a shovel, than with manual planting.
Digging potatoes with a motor cultivator
Potatoes must be dug through the row. That is: after digging the first row, you need to move on to the third, not the second. This is necessary in order to:
- do not damage the dug up tubers that accidentally ended up between the beds with wheels;
- so that the equipment is not pulled to the side due to the difference in adhesion to the soil.
So, having dug the 1st, 3rd, 5th, Nth rows, we harvest the crop and move on to digging up fruits from even-numbered beds.
Adhering to such a simple scheme, provided that there are 6 of us and a plot of 5 acres, you can collect all the potatoes in literally 30 minutes.
DIY fork for digging potatoes (PHOTO + VIDEO) | With your own hands
AN EXCELLENT TOOL FOR CRAFTERS AND HANDCRAFTS AND EVERYTHING FOR THE GARDEN, HOME AND Cottage LITERALLY FOR FREE + THERE ARE REVIEWS.
At the dacha there is a small plot where we grow potatoes. You have to dig the crop with a shovel, since there is no walk-behind tractor. As I got older, this job became difficult. To cope with the task easily and quickly, I made a pitchfork.
1. From a metal water pipe d 21.5 mm I made a U-shaped frame-handle 109 cm long (depending on height). I connected the free ends together by welding an arc crossbar made of the same material to them. In the latter, six holes d 14 mm were drilled at the same distance from each other (approximately 40-50 mm). I inserted bushings of the appropriate diameter into them and welded them along the contour.
2. In an agricultural equipment store I bought three teeth for a horse rake with a length of 320 mm and a diameter of 10 mm (they can be replaced with a spring steel rod). I cut the blanks (teeth) in half, threaded the resulting parts 160 mm long into bushings on the crossbar and fixed them by welding (photo 1).
3. A little higher than the finished comb, I welded a U-shaped stop to the frame (photo 2), but after trial tests I was convinced that it was better to make it semicircular.
4. To make it convenient to work with a pitchfork, I bent the handle in the form of an arc (photo 3). To do this, on each crossbar at the same level and at approximately the same distance from each other (plus or minus 5 cm), I made cuts up to half the diameter with a grinder. Then I bent the frame in these places, after which I welded the cuts and processed the welding seams with a file. If you sharpen the teeth using sandpaper, you can start harvesting.
5. The principle is simple - I drive the teeth into the ground under the potato bush and lower the handle down, due to the stop the tuber ends up on the fork, I tip it to the side and easily harvest.
Buying tips
When choosing a motor cultivator, pay attention to its characteristics.
- Device weight. To make it easier to operate the equipment, you should focus on models weighing no more than 70 kg. So, you don’t need to push the device in front of you yourself. Wheel grip on the ground will be good. A woman can also operate the device.
- Power. If you plan to use the walk-behind tractor for personal purposes, for cultivating a plot of land at your dacha, an option with a power of 5.5-6 horsepower is suitable.
- Transmission. Equipment with a gearbox is considered good. Single-speed devices do not always pull the digger. As a result, gardeners with equipment have to remove the tubers by hand. For example, single-speed walk-behind tractors are not able to reach potatoes planted in ridges. The gearbox clings to the soil and the equipment does not move further.
- Fuel consumption. This parameter plays an important role. So, a gardener can estimate how much automated harvesting will cost him. Experts recommend focusing on walk-behind tractors with imported engines. Such power units are more economical. Engines are diesel and gasoline. The first option is considered more economical.
- Launch mechanism. It is difficult to start the walk-behind tractor manually. It is recommended to purchase units with an electric starter. This model will require large expenses, but will facilitate the use of equipment. Expensive walk-behind tractors are equipped with both manual and automatic starting options. The first one is considered a spare.
- Maneuverability in the walk-behind tractor is ensured by the differential. Thanks to the mechanism, one of the wheels of the walk-behind tractor is blocked, and the equipment can rotate in a circle. So, the device maneuvers from row to row without any problems.
- Availability of a hanging mechanism. Allows you to expand the functionality of the walk-behind tractor.
- Wheels. There are pneumatic and metal wheels. There is no clear answer which option is better.
Types of shovels
The shovel is intended for working with bulk materials and soil. It consists of two parts - a scoop or ladle and a handle (handle). The first products were made of wood or bone (the material was elk antlers and bones). Over time, the canvas began to be covered with sheet iron, and then made from a whole sheet of metal. The latter option has acquired a number of advantages: it is lighter, stronger and more convenient.
Before choosing a tool, you should study its types and purpose.
Based on their scope of application, shovels are divided into several types.
For the garden:
Loading and unloading:
The snow plow is of the shovel type. Its peculiarity is a wide plastic, aluminum or plywood sheet.
Small:
For working in a suburban area, garden tools with a classic bucket and handle are suitable. It is indispensable for long-term digging of the vegetable garden and garden area. Loading and unloading products are highly specialized and are used to perform a limited range of work.
According to their design, shovels are divided into the following types: