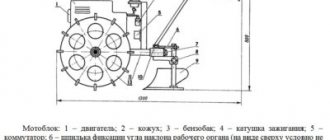
General information about the mechanism
A potato digger is a special towed device for a walk-behind tractor or mini-tractor, which allows you to separate the tubers from the soil and dump them on the surface. Afterwards, all that remains is to collect the tubers in a suitable container. The potato business will develop successfully with such a device thanks to mechanization.
A factory-made mechanism is extremely expensive. There are cheap Chinese products on the market, but their quality is worse. It makes sense to start making the device yourself. To do this, it is necessary to distinguish between the types of potato diggers, which are distinguished depending on the operating principle of the devices.
Device types:
- ogival;
- screening or vibrating;
- conveyor
The lancet potato digger has a simple design and is easily suitable for any mini-tractor.
There are no moving parts in the device, which simplifies manufacturing. The digger cuts the soil with a knife. Next, the earth falls on steel bars, from where the visa is poured. Potato fruits are retained by the twigs and fall on top of the ground in their pure form. This device is effective only on soft and dry soil. Wet soil will be cut in clumps, making it impossible to separate the potatoes from it. This will require additional effort. The simplicity of the design should not captivate farmers in the northern regions - the device simply will not work. However, a homemade potato digger for a lancet-type mini-tractor can be made quickly, even without drawings - this is a significant advantage.
The vibration-type mechanism (also called a screening mechanism) consists of a ploughshare, a barrel and a drive. This is a productive device, but difficult to manufacture. Moving parts add challenges to assembly. Operating principle:
- The ploughshare undermines the earth along with the fruits.
- The material falls on a table made of twigs, where the soil is loosened and spills down through the sieve.
- On the opposite side, tubers are poured on top of the ground.
The vibrating table complicates the design, but allows you to work on hard and wet ground.
Thanks to vibration, lumps of earth are broken up, and the fruits become relatively clean. Installation with a conveyor allows you to work on any type of walk-behind tractor or mini-tractor. The design is similar to a rumble digger, but there is a conveyor immediately behind the plowshare. Its purpose is to support the tubers on the platform to better clean them from adhering earth. The device is more practical than a vibrating digger and is suitable for all types of soil. It is not advisable to use a digger with a conveyor on soft, loose soil.
The choice of design must be made depending on the type of soil on which to work. The rule is simple: the lighter the soil, the simpler the potato digger needed. You can also make a conveyor, but it will not be useful on dry sand. These will be extra costs. However, if you need to make a potato digger for a mini-tractor with your own hands, the drawings and dimensions should be selected so that the mechanism harmoniously fits the traction device.
Design features
It is worth immediately recalling that this mechanical device, as can be seen from the photo, clings to the walk-behind tractor to perform the work. Such a do-it-yourself digger, as shown in the video, is capable of cultivating a plot of land not only near the house, but also in the field.
The main purpose of a potato digger is to separate potato tubers from the soil and lay them out on the ground area. This unit is easy to operate and has a simple design. Therefore, constructing it with your own hands is usually not particularly difficult. The most important thing is that this attachment mechanism is suitable for any model of walk-behind tractor, be it the well-known “Neva” or another modification.
Many readers will say that you can buy such a potato digger at a retail outlet that sells agricultural machinery and equipment, and why make it yourself. This statement is correct, but not entirely. Any experienced gardener will tell you that a digger designed in a home workshop will be more practical, since it will be designed to suit the already known characteristics of the soil, and will also be made within the capabilities of a specific person. Another thing worth adding here is the price. A DIY device will cost much less than buying it in a store.
Before you begin creative constructive work on creating a potato digger, you need to remember that it is adapted to work on soils that have medium and low density criteria. To manufacture units adapted to work on heavy soils, it is necessary to have a deep knowledge of physics and mechanics.
A potato digger, adapted to a walk-behind tractor, as shown in the photo, comes in the following types:
- Screening or vibrating mechanism - it consists mainly of a ploughshare and a vibrating sieve. The operating principle of this type of potato digger, operating using a walk-behind tractor, is simple. The soil along with the potatoes is undermined by a ploughshare. Then the immovable conveyor grid leaves the tubers on its surface, and shakes the soil back, as if through a sieve. This model is effective in operation, but quite difficult to manufacture.
- A conveyor installation for digging potatoes - it can work freely, for example, on the basis of a walk-behind tractor such as the Neva. By design, a conveyor digger consists of a ploughshare and a driving conveyor, which has a special hooking device for maintaining tubers on the platform and clearing soil. The conveyor design for digging potatoes is more practical than the vibrating type of potato digger. But on soil with a light degree of density, it is not advisable to use this type of device.
- Lancet type - in terms of design, this is the simplest mechanism that can easily be adapted to any model of mini tractor, for example, such as the Neva. It does not contain movable components. As shown in the video, the soil with tubers is trimmed with a knife. Next, the cut falls on the surface of special rods, where the earth is poured back, and the fruits in their pure form lie on top of the soil. This digger is effective on soil with a low degree of density, where it is not practical to use other types of devices.
Before you start constructing such a device, first of all, you need to accurately determine the density of the soil on which it will be used. It is worth remembering that where a conveyor structure with a lancet appearance could be ideally used, it will be difficult to work.
Making your own lancet digger
A homemade potato digger for a lancet-type walk-behind tractor is a simple type of attachment. In some ways it is similar to a cultivator. To construct it, you do not need a lot of material and complex tools. The assembly operations are simple and, with minimal skills, can be done by any gardener.
Necessary materials:
- steel channel;
- plow - it can be cut from an old shovel or a circular saw, but it is better to take high-quality steel with a thickness of at least 5 mm;
- metal corners 40 and 63 cm;
- steel rods in the amount of 8 pieces - can be removed from used forks or broken garden tools and replaced with fittings.
The device should ultimately be small in size. It needs to be made so that it is easy to attach to the Neva walk-behind tractor. There are no moving parts in the lancet digger, so there is nothing to break. The main thing is that the structure itself can withstand and not crack.
Manufacturing procedure:
- The channel is used as a base. A tow hitch is mounted on it.
- A plow is placed on the base.
- Rods are welded to the plow, which separate the tubers from the sand.
Disadvantages of the device:
- The small width of the strip is about 25 cm, because of this, crop losses increase by about 15-20%.
- There is a high risk of damage to the tubers from the knife.
The grass should not clog the bars during operation. Otherwise, the device will stop performing its function and begin to crush the potatoes. Despite its shortcomings, it can be used in a small backyard in the southern regions. The wider the plow is made, the better.
Drawings of homemade and factory potato diggers
For a small farm, in order to conveniently harvest potatoes, you need to make a small device. It should be convenient during operation and easily hung on the walk-behind tractor.
Potato digger design: 1 - welded frame, 2 - knife, 3 - conveyor, 4 - pulley, 5 - connecting rod, 6 - bevel gear pulley. 7 - belt, 8 - stand, 9 - adapter, 10 - support wheel, 11 - spring tensioner.
In order to make the device in question, you must have:
- Steel channel.
- The opener is cast from a high-quality metal alloy, with a thickness of at least 5 mm. To make it, you can use a saw from a circulation machine.
- Metal corners in sizes 40 and 63 mm.
- Steel rods. They are required to make the device, as shown in the photo, at least 8 pieces.
To make a vibration-type potato digging device, you first need to make a frame. It should easily dock, for example, with the Neva mini tractor or with another modification.
In general, as shown in the video, such a device consists of the following components:
- Frame design.
- Hanging elements.
- Vertical adjusting rods.
- Chassis.
To design such a unit, it is necessary to make accurate calculations and create drawings based on them. Without following this rule, the DIY process will be difficult.
DIY vibration option
A screening (or vibrating) type digger has moving parts, which significantly complicates the design, so the mechanism requires precise manufacturing. However, a device of this type performs well on hard and wet soil, cutting it well. You need to know how to make a potato digger with your own hands without outside help in order to save money.
Manufacturing procedure:
- Form a frame. Cut the pipe into 4 parts. It is advisable to use blanks with a square cross-section - these are easier to join. You need two pieces 120 cm long, and two 80 cm long. The cross-section of the pipe is 4 by 4 cm. The parts are connected by welding into a rectangle.
- Install jumpers that will serve as the basis for control rods. On one side, elements are mounted a quarter of the length of the base of the frame, and on the other, two blanks for fastening the wheels. To do this, you will need two tubes with a diameter of 3 cm and a length of 15 cm.
- Install the racks vertically. On the side where the jumpers are located, 2 sheets 50 cm long are fixed at a distance of 5 mm from the edge of the frame. At a distance of 20 cm from them, racks 4 cm long are installed. Then another 40 cm are retreated and racks 30 cm long are installed.
- Ralo is made of metal sheet. It should be 40 by 40 cm in size and at least 3 mm thick. The workpiece is rigidly attached to the racks from below. The second workpiece, measuring 70 by 70 cm and 4 mm thick, is butt welded to the first, then the shape is bent into a cone with a sledgehammer.
- The grille is made of metal rods with a diameter of 1 cm. At the bottom they are attached to the railing, and the second end extends beyond the perimeter of the frame. You will need 10 to 15 rods. For additional rigidity, two rods should be welded across the structure.
- The wheels are installed in a pre-prepared place.
Features and design options
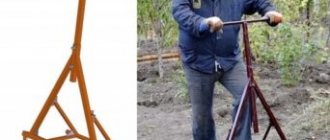
A miracle shovel is a convenient device for digging earth that you can make with your own hands. The device allows you not only to dig up the soil, but also to loosen it. This saves a lot of effort, since when working with a regular shovel you have to periodically break up large clods of earth.
Principle of operation
The miracle digging shovel is a ripper consisting of two forks:
- The workers (the main ones) stick into the ground under the pressure of their feet. They are mobile, so they can enter the ground at any angle.
- The front support forks are stationary and run parallel to the surface. They produce additional loosening, due to which the earth is crushed, becomes uniform in density and is well saturated with oxygen.
The body is a metal frame with front and rear stops that contact directly with the ground surface. The main forks are equipped with a lever mechanism, which allows you to press them at a convenient angle when digging and then pull them out of the soil.
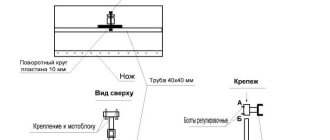
The schematic diagram of a miracle shovel for digging will allow you to easily make it yourself
Thanks to the presence of two forks, the device, along with its main task, also performs a number of other functions:
- Loosening the soil, saturating it with oxygen.
- Breaking up clods.
- Removing weed roots.
- Digging various root vegetables - potatoes, beets, carrots and others.
The described design is not the only one. There are several types of equipment, the most common are a ripper without a front stop, a digger and a light digger.
Ripper without front stop
The design is completely identical to the one described above, but it lacks the front stop. On the one hand, it provides reliability during operation - the tool lies well on the ground when digging, so all that remains is to press with your foot and stick the forks into the ground. On the other hand, due to the absence of a front stop, the design becomes noticeably lighter.
Conveyor for better cleaning
A vibrating digger simplifies cutting the layer of soil with potatoes.
However, cleaning the tubers from the remaining soil is not always successful, since the cut layer moves along the rods under pressure. There is no additional impact, and the rods often become clogged, which creates inconvenience during the digging process - you have to make stops for cleaning. A conveyor is a moving part in a potato digger where soil with tubers is supplied. This mechanism allows you to separate the cut layer. As a result, the tubers are clean, with virtually no adhering soil. The conveyor can be directed to the receiving bunker, which eliminates manual labor on the field.
In general, the design is similar to a vibrating digger, only instead of rods there is a conveyor. It is made of metal rods or tubes that are located parallel to each other. They are installed in a moving rim or chain. You can make a conveyor from steel mesh or rubber fabric.
The mechanism is driven from the shaft of agricultural machinery through a gearbox. The torque is then transmitted through a chain or gear train. Before making such a device, it is better to study the factory diagrams. Craftsmen presented many designs, and everyone strives to offer something original that will improve the mechanism.
Steps to create a conveyor digger:
- Making the frame. For this, a steel profile with a rectangular cross-section is used.
- The plowshare knife is made of sheet steel.
- Rollers for the conveyor belt are attached to the frame.
- Assemble the conveyor belt and install it.
- Install brackets for the gearbox and chain or gear drive, after which the devices themselves are secured.
- They put on the wheels.
The main task is to assemble the conveyor with high precision. The device has moving parts and will operate in extreme dust conditions. The speed of harvesting depends on the reliability of the unit.
A homemade digger for a mini-tractor when installing a receiving hopper will allow you to mechanize the entire harvesting process. The main thing is that you don’t need to spend a lot of money to create such a device. The necessary material can be found at home or in a landfill. As a last resort, you can use old mechanisms.
Description
The peculiarity of the Salyut type potato digger and others is that a knife is mounted to it on a frame driven by a walk-behind tractor. It allows you to harvest on all types of soil, even heavy ones. This digger cleans tubers well and increases labor productivity.
The mass of the units ranges from 30 to 50 kg. They allow teeth to be inserted into the ground to a depth of about 20 cm. The working width of potato diggers is 32-37 cm, which can significantly speed up the harvesting process.
This machine is structurally similar to a conveyor machine. Its difference is that it does not have a conveyor. It can be used to dig up tubers in each row, which is very convenient if different varieties of potatoes are planted in the field.
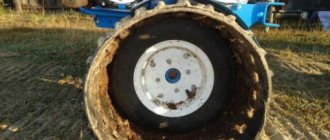
Potato digger for walk-behind tractor
Advantages
Among the advantages of this unit, farmers note the fact that it significantly facilitates human work during harvesting. It is used not only for harvesting potatoes, but also other vegetables: carrots, beets. The device saves time and effort. The potato digger and rumbler for the Patriot walk-behind tractor provides excellent harvesting results.
Before purchasing a potato digger, you should make sure that it can be installed on a walk-behind tractor and a walk-behind cultivator.
Note! Before purchasing, you should consider the design of the walk-behind tractor and the type of soil.
Drawings, diagrams and dimensions of a miracle shovel for digging a vegetable garden
The drawings presented below allow you to make a reliable and durable miracle shovel with your own hands, as shown in the video.
When designing the device, it is recommended to proceed from the following dimensions:
- The width is in the range of 45–60 cm. You should not do less, since you need to cover as much soil as possible. But it is no longer recommended, because digging will be harder, the structure will be bulky and massive.
- The length of the fork pins is from 22 to 33 cm.
- The interval between the pins is from 7 to 8 cm.
- The length of the handle is according to height (aligned to the shoulder for ease of use).
Important! The interval between the forks should be the same, since they will fit into each other when digging. They are placed so that the pins do not touch in any way.
The most popular schemes:
- Drawing of a miracle shovel for digging with recommended dimensions.
Particular attention is paid to the length, number of pins and the spacing between them - Working forks - miracle shovels for digging.
- Complete design.
Dimensions and drawings depend on the types of apparatus. Below are several options.
Principle of operation
The structure of the potato screening machine for the Neva block and other units is a carriage located on two small wheels. Its body is a body welded from steel wire. The distance between the twigs is from 20 to 30 cm. This is necessary so that the potatoes are cleared of tops and soil impurities.
A shovel is installed in front of the carriage. It is made of sheet steel; rods are welded at the back, bent slightly downwards. This is necessary so that the shovel is fixed in the front part of the body. The shovel is mounted so that in the lower part it is located several centimeters below the body of the potato digger.
When making reciprocating movements back to the body, the shovel rises and throws the dug up potatoes into the wire body for the purpose of cleaning it.
The principle of operation of a potato digger is based on the fact that reciprocating movements are transmitted to the shovel using a lever and a connecting rod from the power take-off shaft. The rotational movement through the digging mechanism is transmitted using a chain transmission or shaft extension to the potato digger, turns into a reciprocating movement, and drives the shovel. She goes down and undermines the potatoes. The forward movement of the walk-behind tractor moves the dug-up vegetable into the body.
Potato digger for walk-behind tractor
Manufacturers
These devices are produced at many enterprises in Russia and the CIS countries. Below is a list of the most famous companies producing potato diggers:
- , located in Starokonstantinov (Ukraine), produces the KM-1P potato digger. This device is recognized as one of the best on the Russian and CIS markets. It is certified according to all requirements of the ISO 9001:2009 standard.
- IP Akimov (Cheboksary, Russia) produces the KKM-2 potato digger. It is widely used by Russian farms.
- Mechanical Plant LLC, located in Molodechno, Belarus, produces high-quality and reliable potato digger KM and its variety KM-2.
- SAZ LLC (Smorgon, Belarus) produces the KFT-2 digger. This is a powerful and reliable digger, powered by a Belarus walk-behind tractor.
- Beltractora LLC (Brest, Belarus) produces the KT-5 potato digger. Its designers are constantly working to improve the model and improve its performance.
DIY potato digger
In order to make a potato digger with your own hands, you will need the following materials and tools:
- frame made of metal (it is made by welding several corners measuring 63x40 mm to each other).
- iron channel, pipes with a diameter of 13 cm;
- sheet metal (its thickness should be at least 7 mm);
- fittings with a diameter of 10 mm;
- hardware;
- chain (used to transmit rotational movements);
- metal racks (they are made from pieces of pipe, channel);
- metal or rubber wheels;
- metal or reinforcement drum;
- No. 10 bolts.
Motoblock Neva with potato digger
To make a digger you will need the following tools:
- welding machine (for connecting parts together and constructing an iron frame);
- wrenches;
- hammer;
- sledgehammer;
- metal scissors;
- metal saw;
- drill and drill bits.
When working, you should adhere to the drawing of a screening potato digger for a walk-behind tractor. The sequence of actions when assembling this unit is as follows:
- Making a frame using a welding machine from corners and channels. The entire structure will be supported on it. Its length should be approximately 120 cm.
- Stepping down 30 cm from the frame, weld a channel to install the control parts.
- Connect the posts by welding. First you need to install the longest stand 50 cm, then two more - 40 and 30 cm each. The base is welded to them.
- Connect the racks with the remaining parts of the channel. After proper work, they should have a triangular shape.
- Weld a sheet plate approximately 30 cm wide to one of the triangles. After the entire structure has cooled, bend it with a sledgehammer and secure it near the second triangle. The ploughshare is made of turned metal plates and is secured with bolts.
- Weld the reinforcement to the base. A thick sheet of metal should be placed on the sides of the metal rods.
Important! This sheet of metal should be installed to prevent the dug up root crops from falling out of the trellis during harvesting.
Then shafts are installed on the elevator that react to the rotation of the wheel mechanism. To assemble the support-transport unit, you need to secure the rod with sprockets. The disks to which the wheels are attached must be welded to it.
Important! To construct a potato digger, it is necessary to use metal with a thickness of at least 7 mm.
The simplest potato digger for a walk-behind tractor with your own hands
Even the simplest device for mechanizing the process of digging up potatoes will facilitate physical labor in the garden. Advantages of using a homemade potato digger for walk-behind tractors:
- Low price of a made digger compared to a finished product.
- When manufacturing the unit, the owner adjusts it to his own conditions.
- There is no need for service: all repairs can be done yourself.
For your information! Homemade equipment may cause injury to the operator. For safe use, protective mechanisms must be provided.
Materials and solutions for insoles
Lancet is the easiest potato digger to manufacture and operate. There are no moving parts or connections in its design. It is an all-welded structure, which is suspended in a hitch on a walk-behind tractor. It uses only three types of parts:
- The share is made of carbon steel, 5 mm thick.
- Stand made of sheet 8-10 mm.
- A bundle of guide rods made of round steel with a diameter of 8 mm.
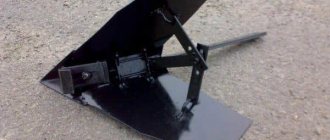
Fan potato digger
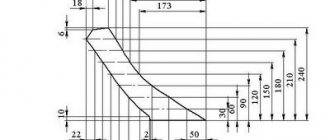
A craftsman with minimal metalworking experience can make a passive tillage tool. Fan potato diggers consist of a knife, a stand and a lattice structure for sifting the soil. Manufacturing sequence:
- A support 50 cm long is cut out of a 12 mm thick sheet. The bottom edge should be bent at an angle of 30 °. 8 holes with a diameter of 14 mm are drilled in the upper part with a pitch of 50 mm.
- A ploughshare measuring 150 x 150 mm is inserted. Bend it diagonally at an angle of 45°.
- Rods 50 cm long are cut from a circle with a diameter of 8 mm.
- Weld the ploughshare to the stand. Then guide rods are attached to it. All parts are well boiled.
- Clean the metal from scale and corrosion, cover it with paint or primer.
Types of potato diggers
Potato diggers are used on loose and moderately compacted soils. Potato digging machines vary:
- sizes;
- design features;
- width of the working strip;
- requirements for clearing the field of weeds;
- ways to clean tubers from soil.
Craftsmen make several types of potato diggers with their own hands. The most popular are fan and screening units. More experienced craftsmen make conveyor and drum diggers for potatoes.
Potato rows in fields cultivated with tractors and walk-behind tractors must be level. Enough space is left between the rows for the wheels of agricultural machines to move.
Types of potato diggers for walk-behind tractors and which one is better to choose
Different types of potato diggers for walk-behind tractors may differ in a number of ways. Usually there are five main devices: fan, screen, drum, conveyor, conveyor.
Fan
A fan potato digger is the simplest and most versatile unit. The name of this device is explained by the arrangement of the teeth. They are made of equal-length pieces of reinforcement connected in a fan shape.
The structure of a fan potato digger is similar to an agricultural plow
The principle of operation does not have significant differences with other types of potato diggers: the device is immersed in the ground and catches tubers, which, in turn, are sifted from the ground due to the large distance between the teeth. Finally, the fruits dug up and cleared of soil end up on the surface of the beds, where they can be conveniently collected by hand.
Grohotnaya
The main difference between a screening potato digger and other types of devices is the presence of a lattice compartment. It is located at an angle relative to the ground, which allows the teeth to be driven into the soil with less effort. Also, due to the additional support point and a pair of wheels, the screening unit has a more stable design than a fan potato digger.
The potato digger got its name due to the noise and vibrations produced during operation.
The advantage of the screening device lies precisely in the grid. Due to the constant oscillatory movements of the compartment, the collected tubers are cleared from the soil more efficiently and quickly.
In the video about potato diggers for walk-behind tractors, it is the screening version of the device that most often appears in work, since it is most applicable when cultivating both small and large plots of land.
Drum
A potato drum digger is a fully mechanized device that can make the harvesting process as easy as possible. Thanks to this unit, the fruits are not only dug up and cleared of soil, but also transported to a separate box.
The design of the device implies the presence of a lattice drum. The fruits fall into it directly after being dug up by the plow. Due to continuous rotation, the tubers are cleared of excess soil and then sent to a pre-prepared container.
Most often, they resort to making a potato digger for a walk-behind tractor with a drum with their own hands in order to facilitate harvesting, but this condition is not always feasible.
The drum unit can only be used on soft, loose soil.
Conveyor
The conveyor potato digger is used less frequently than other types of devices. The operating principle of this unit is to move a layer of earth with root crops along a conveyor. The process of clearing fruits from soil in this way is slower than in a drum or screen potato digger, so it may take more time to cultivate the soil.
When working with a conveyor potato digger, the type of soil is important; the device is not applicable in areas with wet or sticky soil
Attention! The use of a conveyor potato digger is not recommended in areas where weeds grow. Long plant stems get wrapped around the partitions, which can lead to device failure.
Conveyor
Another type of device that is rarely found in the personal use of landowners is a conveyor potato digger. It is a structure consisting of a bucket and a belt. Together with a piece of soil, the fruits are placed in a container and then move along a conveyor. During the process, the tubers are cleared of soil and placed on the surface of the soil, where they are subsequently collected by hand.
Using a conveyor potato digger, it is possible to process several beds at once
Despite the variety of units, fan and screen potato diggers are considered the most universal devices. They are suitable for all types of soil and do the job well. You can also often find a drum potato digger in use by farmers, but for its operation it is necessary to take into account the operating requirements.
Fan potato digger for walk-behind tractor
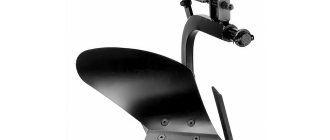
The fan potato digger has several names. It is also called a lancet digger and a paw. Manufacturers of agricultural machinery call this model “Dolphin” because of the characteristic shape of the plow (ploughshare). The unit is simple in design and removes tubers from the ground well.
- The digger is attached to the walk-behind tractor.
- The sharp end of the ploughshare loosens the ground.
- The potatoes are removed from the ground, placed on the inclined surface of the ploughshare, and pushed onto metal rods.
- The soil is separated from the tubers and poured onto the arable land through the twigs.
- The potatoes move up the raised rods and fall to the ground where they can be collected.
Digging with a fan digger allows the presence of rare and low weeds in the field. Potato tops are mown before harvesting.
Making a fan potato digger with your own hands
To work you will need a grinder, a welding machine, a drill and metal drills, and bolts. You will also need materials:
- sheet steel 3-4 mm thick for making a knife (ploughshare);
- bolts with a diameter of 10-12 mm or more;
- steel profile of rectangular section or thick steel sheet for the manufacture of a rack-holder and bracket.
- round steel rod or fittings (not corrugated) with a diameter of 8-10 mm.
In addition, you will need a measuring tape and a pencil for drawing on metal. The procedure for making a fan potato digger:
- Two holes are drilled in the middle part of the ploughshare for fastening to the stand.
- Pieces of steel rods are welded to the expanded part of the knife (to the left and right of the convex part) (so that they fan out upward and to the sides). The length of the rods is 47-50 cm. Sometimes the rods are bent in the form of a marching step.
- The holder stand is bolted to the plowshare. The height of the stand depends on the design of the walk-behind tractor. The support post can be welded directly to the plow without using bolts.
- A bracket with pre-drilled holes is welded to the top of the rack (to connect the potato digger to the walk-behind tractor).
- For structural strength, the lower part of the ploughshare, directed towards the ground, is reinforced with a welded strip of metal.
The advantage of a fan potato digger over other units is its reliability. This unit can be used for more than one year. It has no rotating parts, which become unusable under heavy loads. Potato digging is done quickly and efficiently.
The disadvantages of the unit include the small width of the dug strip (20-25 cm), due to which crop losses reach 20%. The knife of a fan potato digger damages some of the tubers, making them unsuitable for long-term storage and sale.
How to make a potato digger for a walk-behind tractor
Most people in rural areas have personal plots. In the fall, harvesting is added to the work. Harvesting potatoes is a labor-intensive task that requires automation. Otherwise, the work will move slowly and hard. It is not profitable to use a shovel.
A walk-behind tractor is a common vehicle on a personal plot. People are trying to purchase attachments for it. This also includes a potato digger. However, there are craftsmen who independently make potato diggers for walk-behind tractors. Some will note that it is easier to purchase a finished product. However, the following advantages speak in favor of a homemade potato digger:
- Possibility of sharpening to suit the characteristics of your soil.
- Individual dimensions, convenient for the farmer.
- Sharpening for a specific walk-behind tractor model or creating a universal digger, if necessary.
- Significant cost savings.
The main thing when making a potato digger with your own hands is to have an idea of the future product.
Note! The purpose of a potato digger is to separate potato tubers from the soil and place them on the ground. The device has a simple design, so making it yourself is not difficult. However, a homemade digger will only be effective on light and medium-heavy soil.
Potato Digger
This potato digging unit is also called a vibrating potato digger or shaking digger. A potato peeler consists of three parts: a knife, a moving grid with mechanisms that ensure its vibration, and a metal frame (frame).
A potato digger can be manufactured within a few hours; the work requires experience and skill in working with agricultural machinery. To make the unit you will need:
- Bulgarian;
- welding machine;
- drill, metal drills;
- metal profile with a square side of 2.5 cm;
- steel sheet 3-5 mm thick;
- steel wire with a diameter of 8 mm (or non-corrugated reinforcement of the same diameter);
- wheels;
- bolts, hinges, levers, eccentric, measuring tape, consumables.
You will also need a ruler and a pencil for marking. The procedure for making a potato screening machine:
- measure and cut the metal profile for the frame (frame);
- weld the frame;
- Wheel stands are welded at the bottom of the frame;
- inside the frame, holders for hinges are welded on which the screen will be suspended;
- brackets are welded to the frame for installing the gearbox and mechanisms that will create reciprocating movements (vibration) in the unit;
- a sifter box (screen) is welded from metal rods;
- the screen is hung on hinges inside the frame;
- A gearbox and other equipment for creating vibration are attached to the brackets, and they are connected to the screen. During operation, the rotation of the walk-behind tractor shaft is transmitted through mechanisms (lever and connecting rod) to the screen, vibrations create rotation of the eccentric;
- a potato digger knife is cut out of a steel sheet and bent to the desired shape;
- the plowshare knife is hinged and attached to the bottom of the frame and the screen;
- Wheels are put on the unit and secured.
The ploughshare-knife for a gravity potato digger is made in different shapes. It can be bent and pointed, convex and concave. Digging potatoes proceeds as follows:
- The ploughshare goes deep into the soil and cuts it along with the tubers.
- The knife constantly oscillates in accordance with the vibrations of the screen, cuts off the soil with potatoes and throws the tubers up a little into the screen. The rumbler performs vibrating, reciprocating movements in the frame.
- The peeled tubers roll off the grate and fall onto the arable land behind the potato digger (or on the side of the strip, depending on the design of the unit).
A vibrating potato digger is used for harvesting potatoes over large areas. This unit has a number of advantages:
- The strip coverage is 38-40 cm.
- The depth of penetration of the knife into the soil is 20-25 cm.
- The yield loss is, depending on the potato variety and the flowability of the soil, from 2 to 10%.
- The vibrating potato digger also has a number of disadvantages. They are due to the design features.
- The vibrations of the screen-sifter are transmitted to the control levers of the walk-behind tractor, which makes long-term work tiring.
When digging, the area must be completely cleared of weeds and potato tops. Otherwise, grass and tops will accumulate under the screen grid and in the wheel mounts.
In improved screen-type potato diggers, vibration is dampened by installing two eccentrics instead of one.
How to make a miracle shovel with your own hands
Making a miracle shovel for personal needs is quite simple if you have the skills to work with electric welding: it is with its help that you can weld all structural elements. The sequence of actions is as follows:
- Make 15 identical sections, each 30 mm long. Sharpen 8 of the 30 segments on one side using a sharpening machine (they are shown in the photo below).
- To construct the base of a miracle shovel fork for digging, you will need to take a metal corner 60 cm long and mark 8 identical parts on it (there will be 8 pins).
- On a 50 cm corner, mark 7 parts. You will need 7 pins.
- Weld the rods to the corners. To the smaller of them (50 cm) also attach metal corners (length 35 cm).
- Make round holes and loops at the edges. 14
- 2 identical fragments (length 125 cm) are cut from a metal pipe (Ø15 mm). They are slightly bent at the edges.
- Then you will need to weld the pipe sections. Secure them to the edges of the top corner.
- Weld the handle to the pipes.
The homemade shovel is ready. All that remains is to experience it in action.
Forks can also be made using a ready-made tool by simply straightening the pins. But this option is less durable, since the metal can be very thin, and the diameter of the rod must be at least 8 mm. Another option is to design forks based on suspension springs (straighten) or car springs (cut).
If you don’t have the skills, it’s better to buy a ready-made miracle shovel: it’s not worth the risk.
Conveyor potato digger
Conveyor potato diggers are made both large and very miniature. Potato tubers and soil are loosened with a plow knife. The cut material enters a moving belt and is separated.
The tape is a lattice of metal rods or tubes located parallel to each other. They are fixed in the moving rim of the conveyor (chain). The conveyor belt is also made of steel mesh and rubber on a fabric basis. The soil spills down through the grate or holes, and the potatoes are moved to the arable land or into a receiving hopper.
The movement of the conveyor is carried out by transmitting torque from the shaft of the walk-behind tractor (tractor) through the gearbox, chains, and gears.
A digger with a conveyor belt has a wide blade that cuts the soil by 10-18 cm. Therefore, crop losses when using it are no more than 2-5%. The knife is cut from a thick steel sheet and attached to the frame with rods and bolts.
Independent production of a conveyor potato digger is possible if you have experience in such work. The unit can be made by studying the operating diagrams of factory machines of this type.
There are many designs of conveyor potato diggers; each master introduces new elements and improvements to the product. The process of creating a conveyor digger includes the following steps.
- Welding a frame (frame) made of square steel profile and corners.
- Making a knife-ploughshare from sheet steel.
- Installation of rollers or wheels for the conveyor belt into the frame.
- Assembling a conveyor belt from chain, steel rods, and other material.
- Installation of brackets and fastenings for the gearbox and gear drive.
- Installation of conveyor belt and mechanisms into the frame.
- Installation of a knife (ploughshare) and wheels on the frame.
Drum type potato digger
Potato diggers with drums have proven themselves well when harvesting large areas. This unit consists of three parts:
- frames with wheels;
- knife (ploughshare);
- rotating drum made of steel rods.
The knife is attached to the frame on hinges. He cuts the soil, which, together with the tubers, enters the drum. When the drum rotates, the soil lumps are broken and the soil spills down through the grate. The potatoes move to the end of the drum and fall onto the arable land.
The drum is connected to the tractor shaft through gears, chains and a gearbox, from where torque is transmitted to it. The wide knife cuts deep into the soil, which reduces crop losses to a minimum, and the passage of tubers through the drum cavity does not damage them. This unit justifies the cost and time of its production due to its high productivity.
Which potato digger is better?
If you don’t want to spend money on buying a factory-made potato digger, you can make this unit yourself. For small areas, it is enough to make a simple fan digger. If potatoes are grown annually over large areas, not only for yourself, but also for sale, it is better to choose a screening or conveyor potato digger.
Mechanical devices for digging potatoes allow you to quickly harvest the crop and clear it from the ground. At the same time, with mechanized harvesting there will always be crop losses, since the steel ploughshare does not remove tubers from potato bushes that have grown to the sides. Potato diggers do not dig up tubers that are deep in the ground. This happens if the soil is too loose and fertile.