Over time, every home needs to replace plumbing fixtures. And for the most part, all processes are carried out independently. One of the tasks is to install the toilet yourself, which is actually quite simple. It is enough to know a number of features and fully follow the algorithm for performing the work. But first of all, you need to know what types of toilets there are in order to choose the right installation technology.
Let's prepare the tool
Before starting installation, you need to think about what tool you will need at each stage of the work and prepare it. This will significantly reduce the installation time of the drainage structure.
When using mains powered equipment, prepare an extension cord of the required length.
Mounting equipment:
- scaffolding or ladder for carrying out work at the edge of the roof;
- marking equipment: pencil, marker, level, tapping cord, tape measure;
- power tools (you can get by with a manual equivalent): grinder (hacksaw), screwdriver (screwdriver);
- additional equipment: metal scissors, hammer, straight and corner pliers, clamps or holders;
- personal protective equipment: gloves and goggles are required, a protective suit and special shoes are optional.
Mounting features
Roof with front board. Mounting on plastic brackets
The plastic bracket, funnel and connector are attached with self-tapping screws directly to the front board. To secure the gutter in a plastic bracket, you must first insert the edge of the gutter closest to the front board into the bracket clamp. Then, lowering the gutter into the bracket receiver and pressing firmly on the opposite edge of the gutter together with the clamp, insert the edge into the clamp until it clicks. When attaching to a front board, it is necessary to strengthen the connection between the board and the roof to prevent it from being pulled out when loaded with snow.
Roof without front board. Mounting on metal brackets
The brackets are attached to the roof structural elements. To secure a gutter, funnel or connector in metal brackets, you must first place the edge of the gutter closest to the roof under the hook of the bracket, lower the gutter into the receiving socket of the bracket and fix the opposite edge of the gutter by bending the clamping bar.
Roof without front board. Attachment using extensions
Metal extensions are used for long pitch sheathing and are attached to roof structural members. On metal extensions, the gutter is fixed in plastic brackets. When using an extension, the plastic bracket is secured with a bolted connection, which allows you to move the bracket when adjusting the slope of the gutter. A bolt (with a semicircular head) M5x30 is inserted through a washer into the upper central hole of the bracket, passes through the slot in the bracket and is tightened with a nut after the plastic bracket is positioned in the required position. A washer and a spring washer must be installed under the nut. The outer diameter of flat washers must be at least 15 mm. The spring washer is installed between the washer and the nut. To avoid vertical movements, the bracket is additionally fixed to the extension through the lower hole either with a bolt (M5x30 + 2 washers) with a hex head, or with a short self-tapping screw. The funnel and gutter connector are attached with a bolted connection (M5x30 + 2 washers) directly to the extension. The funnel is fastened with two bolts, and the connector with one.
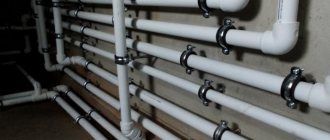
Fastening pipe and fittings
The pipe and fittings are secured using a universal clamp. The installation location of the clamp is highlighted in red.
Using a universal clamp
There are two possible methods of fixation: Pipe: fastening with slipping, on the side surface of the clamp there is the inscription “Pipe”. Fitting: fastening with rigid fixation, on the side surface of the clamp there is the inscription “Fitting”. The base of the clamp is screwed with a self-tapping screw (diameter MB, length from 50 mm) to the wall of the house. The clamp arms are inserted into the base until it stops. The clamp is tightened with a bolt with a semicircular head (M5, length 40 mm) and a nut.
Gutter installation technology
The drainage structure includes a standard set of parts that are joined together using component connectors and outlets.
Comprises:
- horizontal collecting gutters - installed under the roof slope at a slope to the next element or water intake funnel of at least 2° for the natural movement of water;
- funnels - is the end of the gutter, transmits the inertia of water movement vertically;
- vertical pipes or risers.
These components are basic and mandatory. Additional configuration of corners, turns, elbows and bends is individual.
At what level should the gutter be installed?
Any instructions for installing gutters with your own hands on the roof contains recommendations on the level of installation of gutters. So, if there is not much snow falling, and the roof has a fairly large slope, then it does not matter at what level the gutter is installed. Otherwise, this element must be lowered and installed at such a level that when the snow falls off the roof, it does not blow down the gutter. If it is not possible to lower the level of the gutter on an attic roof or other type of roof, then snow holders should be used. They do not allow the snow mass to melt in large quantities. The snow melts little by little and flows as water into the installed drain.
Installation
Let's look at the features of assembling and installing metal systems with all the nuances and warnings against errors.
Gutter
Gutter installation begins with markings. Having the necessary tools, the stage will not take much time.
bracket
Fastening of brackets or supporting brackets is carried out on the edge of the rafters or on the front board installed on the facade using self-tapping screws.
The distance between hooks should not exceed 50cm. The first fastener is installed at a distance of 15 cm from the extreme edge of the roof.
At the junction of the watercourse, fastenings are installed on both sides of the connecting element at a distance of 15 cm, this will ensure reliability and eliminate leaks
The slope of the roof covering descends towards the gutter, covering it by 1/3 of its width. In different cases, the use of long or short brackets is acceptable.
Cutting trays
It is made using a hacksaw for metal, the edge is processed with a file. Be careful not to damage the protective coating.
Funnel cutout
This is done by placing and tracing the hole of the funnel on the bottom of the water flow. The work is carried out with a hacksaw for metal, this will allow you to make the cut as accurately as possible. Fold the edges of the cut towards the funnel for a more secure and tight fit of the links.
Installation of drainage into prepared hooks and their fastening in locks, complete with funnels.
The next stage in the assembly of horizontal trays is the installation of plugs.
By following simple rules, attaching gutters will not cause complications.
Gutter riser
The distance from the facade of the building to the drainpipe is 7-10 cm. Fastening is done using clamps. It is desirable that they be of the same manufacturer and material as the rest of the water intake mechanism.
Stages of work.
- Marking will allow for faster installation. To do this, use a level and tapping thread.
- Fastening the lower and upper clamps to the marked vertical with self-tapping screws. Distance 15 cm from the ends of the drainpipe.
- Docking of tap-off elements : elbow, turn.
- Fastening all clamps vertically at intervals of 1.5 m from each other.
- Installing the pipe into the seats, having previously freed it from the protective film. Tightening the vertical element with clamps.
The final stage of assembling a metal drain is inspection. Each node is checked separately. To do this, water is supplied from a hose or bucket from the highest point.
The correctness of the assembled system is determined by the absence of leaks and the liquid reaching the end point of the drain.
Basic Rules
- When giving preference to one metal or another, do not skimp on components from the same manufacturer and material. The use of incompatible metals reduces the performance and aesthetic appearance of the entire structure.
- The physical properties of metal change depending on temperature; this factor should be taken into account during installation.
- For each horizontal tray there is one drainage funnel and a vertical riser.
Types of toilets
First of all, you should consider the types of designs and shapes of this type of plumbing so as not to make mistakes during installation.
First, let's look at the classification of toilets and their features. There are four types in total, namely:
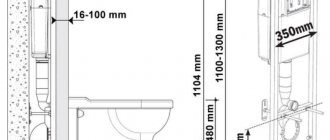
- Mounted. This type does not come into contact with the floor covering, and is mounted directly to the wall using special fasteners. A wall structure is made that provides all the necessary communications. Thus the whole system looks quite attractive. But this type is quite rare, due to the complexity of installation and the rather high cost.
- Attached. The second option is an attached system, which involves installing the toilet itself on the floor, but all communications, as well as the tank, are hidden behind the wall. The only thing that remains visible is the drain button. The option is quite attractive, but at the same time, if any problems occur, a large number of disadvantages appear.
- In-floor system. This system is known to everyone from the example of public toilets. Involves installation directly into the floor recess. Those. just a regular hole in the floor, which is quite inconvenient. Therefore, it makes no sense to consider this type in more detail, since hardly anyone will install such a miracle of technology at home.
- Floor-standing. And the last type of system is floor-mounted. These are well-known and familiar toilets that are attached directly to the floor. The design itself is inexpensive, and its installation is quite simple. It is with the example of such a standard toilet that we will consider the installation process.
We are done with the types of systems, and now we can proceed directly to the consideration of the work algorithm.
Useful tips
Little tricks will allow you to organize the drainage of rainwater and melted snow more efficiently.
- The location of the vertical riser in buildings with a wall length of more than 15 m is more appropriate in the center. This will allow you to slope from the corner of the house to the middle.
- Special paint with protective properties in cylinders will extend the life of the metal in places where the protective coating is damaged and chipped.
- The use of mesh installed around the perimeter of the trays or in the funnel will prevent clogging of the drain.
- It is necessary to organize the drainage of water from the house using a stormwater system or a water collection tank.
- For areas with aggressive climatic conditions, it is important to use anti-icing devices.
Such subtleties will prevent the need to replace the drain earlier than the deadlines stated by the manufacturers.
Types of drainage systems
There are several classification parameters: according to methods of organizing water flow and according to the material of manufacture.
By method of organization
Here the systems will be like this:
- Unorganized. In this case, water flows from the roof directly to the ground due to the slope of the roof. The disadvantage of this organization is that liquid gets on the walls and foundation, accelerating their destruction. It is not recommended to use it for residential buildings. It is more suitable for technical and utility structures with a pitched roof type.
- Organized internal. They settle in multi-storey buildings. This system is considered preferable in harsh climates. Drainpipes are located inside the walls, so the risk of them freezing is reduced.
- Organized outdoors. They are structures made of gutters and pipes through which water is drained from the roof.
The shape of the system can be rectangular or round. You can make it yourself or purchase a factory-made version.
By material type
According to this parameter, the structure can be metal or made of plastic. Each has the following advantages and disadvantages:
| Material | Characteristics |
| Plastic | The system can be glued or glueless. It has the following advantages:
But plastic has the following disadvantages:
|
| Metal | Such products are durable, have stable dimensions, and can withstand temperatures ranging from -60...+130°C. The advantages of metal structures are:
But systems of this type are expensive and difficult to install. The color range is poor. When the protective layer is mechanically damaged, rust appears on the product. Metal structures contain a small number of elements, so their scope is limited. These systems are as follows:
|
The choice of design for drainage depends on the type of roof, the expected load, the roofing material used, and the number of storeys of the structure.
The combination of plasterboard and stretch ceiling is cool
Now I would like to tell you how to make a two-level stretch ceiling, as in this photo. It is quite possible to do it with your own hands, because it is not the gods who burn the pots.
The combination of two types of ceilings gives unlimited freedom of imagination. First you need to install the box under the suspended ceiling. The box can be of all kinds of shapes - geometric, fancy, just a border around the perimeter, or anything. The installed plasterboard structure is first puttied, painted in the desired color, and then proceed similarly to the steps described above - the profile is attached to the plasterboard and then step by step. The huge advantage of a two-level ceiling is that you can create the most unusual lighting without compromising the integrity of the film.