How can I dig a hole for a post?
You can make a hole for a post with a shovel, drill or digger. Each method has its own advantages and disadvantages:
- Shovel. One of the advantages is that with its help, shovels can easily dig wide holes, which are mainly needed for installing pillars. The disadvantages include the fact that people with poor physical fitness will not always be able to dig a hole of the required size without any problems.
- Boer. There are two options for this design: a manual drill and a motorized drill, the rental of which is not affordable for everyone. It is also necessary to apply force to a hand drill, but much less than to a shovel. Therefore, most often masters give preference to it. There is also a special technique that is used if it is necessary to make a depression in a short time. Since it is impossible to quickly dig a hole for a post without it.
Hand drill Source rozetka.ua
- Digger. This tool is designed for digging holes manually, without using a shovel. The advantages: no need to use much effort, minimizes time consumption. The disadvantages include the fact that it is difficult to use on hard ground, problems arise with dry soil, and also, if you need a hole of 1.5 m, then only 1.1 m can be made with diggers, which is not suitable for such a case.
But it is important to remember that before you dig a hole for fence posts, you need to make calculations and preparations.
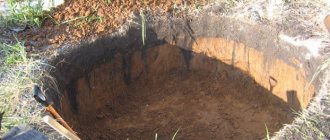
Digger for digging holes Source alicdn.com
What is the service?
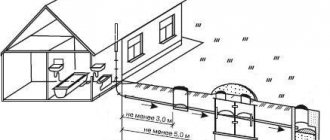
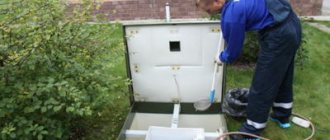
Residents of country houses in many situations do not have the opportunity to connect to a centralized city sewerage system. They have to set up their own local facility, with purification, disinfection and wastewater disposal.
To lay pipes, it is often necessary to dig a large hole. This is almost always done with a shovel, manually, without the use of special equipment. This is the so-called earthwork, which has its own difficulties if you try to do it yourself.
Preparation and calculations
You cannot install poles without first making calculations. Also, the future location of the fence must be indicated on the site plan. After this, you need to calculate the number of pillars, and then purchase the material.
Before you drill a hole in the ground for fence posts, you need to familiarize yourself with certain rules:
- During calculations, it is necessary to correctly determine the distance from one pillar to another. It will depend on the area of the site, as well as on the weight and size of the canvas that will be used as a fence and attached to the support. Often this distance is no more than 3 m
- The hole must be made wider than the cross section of the pillar. But it also should not be too wide, otherwise the soil will be too loose. If the hole is made narrow, then concreting will be impossible.
The post must be carefully aligned Source mahis.ru
See also: Catalog of companies that specialize in the construction of fences and enclosures.
- To determine the number of holes, you also need to make calculations. The length of the fence perimeter is divided by the distance between two posts that stand next to each other. These calculations must be made to ensure that the number of pillars is optimal. With a smaller quantity and a larger distance between them, the canvas may sag, and if you purchase a larger quantity, it will be too expensive.
- It is important to remember that the higher the fence, the closer to each other the posts should be installed.
- The depth of the holes depends on the soil. The harder it is, the smaller the hole can be made. But if there is sand or clay in the soil, then the depressions should be larger, since such soil is not very stable. And if with solid soil the depth of the hole can be made up to 1 m, then with sand or clay it is advisable to dig more than 1.5 m.
- Before digging holes, you need to find out if there are underground communications in that place.
It is also important to remember that the calculations must be made accurately, without the slightest errors, otherwise the fence may warp or fall.
Fence after incorrectly installed poles Source khersondaily.com
Digging a hole with a mole
What gardener is not familiar with this born digger. So, in order to dig holes with the help of a mole, you need to find its lair, since adult individuals are practically untamed and we will need children. How to determine where the mole's lair is? The answer is simple - we take two bunches of fragrant hemp, wrap it in the old Komsomolskaya Pravda, set it on fire and throw it into the first mole hole we come across. We repeat the process for a week and then stop abruptly. In two days the mole will come for the next “rocket” and you will have a chance to bargain, but you need to be extremely careful, since kidnapping is a criminal offense.
So, everything is done and you have become the happy owner of a mole, and maybe more than one. Now everything depends only on you - you have a truly titanic task of preparing a professional mole - digger, but it’s worth it - isn’t it?
Drilling holes for poles
If you need to make a lot of holes, then it is better to choose a garden auger and sharpen its edges and tips. Before quickly drilling a hole for a post, you need to mark the places where the recesses will be, and then start working. The drill is installed vertically and rotated by pressing the handle. On clay soil at a depth of 0.3 - 0.4 m, it is more difficult to turn the drill. To make the task easier, you can pour half a bucket of water into the hole, which will soak the soil in less than 5 minutes. After these steps, the handle turns without problems.
If the drill is firmly stuck in the soil and cannot be removed, then it is necessary to loosen it in different directions. This will loosen the soil a little, making it easy to get the tool out. Adhered dirt can be easily removed with a knife. To minimize time costs, you can make several small holes and fill them with water, then the ground will be well soaked and the work will be easier.
The drill makes a neat hole for the post Source onlypatriot.ru.com
The story of how I learned to easily dig dense soils
By the time I entered the Faculty of Soil Science, I already had many years of experience working with soil at the dacha, where I annually dug up a vegetable garden, laid drainage ditches, dug all kinds of pits - and yet I still dug holes like a complete sucker ! Because a sucker, when he needs to dig a hole - a well, a pond, a trench - digs each layer, like a vegetable garden, trying to capture the earth in the same layers... I never expected that a small change in the digging technique would have such a strong impact on the entire work. Digging immediately ceased to be hard work! The method may seem simple , so everyone will want to say that he would have figured it out in an elementary way, but why have I not seen it for so many years and have been digging in such a way that digging has always been a difficult burden? The method deserves to be talked about. It allows you to quickly and easily dig, for example, a country pond.
I made this discovery for myself very timely, since I still had a lot of soil to dig up. A typical soil section is a hole comparable in size to a grave: 2 m deep, 2 m long and 1 m wide. It is advisable to dig it so that at the time of studying the profile (and taking samples for analysis along the entire depth), the front wall is illuminated by the sun and everyone from above can clearly see what the teacher is picking there with his soil knife, commenting on the layers. And during my student life alone, I had to dig countless such cuts, because during educational practice and on expeditions, guys were always sent to dig the cut, and then everyone else came in herd. And then you also had to bury it, because whoever dugs it buries it...
And after the first year , in September, the guys and I gathered, as was customary then, in the dorm to drink beer. Everyone had just arrived from expeditions from all over the country. And one of my friends, long and very thin, who went on an expedition somewhere in Central Asia, said along the way: “I realized that the main thing for a soil scientist is to be fat!” And he said that there was such soil there that the shovel flew off with a clang, and how he pressed on the shovel and jumped on it - it was useless, but his overweight boss simply pressed with all his weight - and it easily went in at the full bayonet!
I understood well what he meant. Even here in the Moscow region, with depth, the clay becomes so dense that you almost had to hit the shovel with your boot. It was considered possible to dig two cuts a day (before lunch and after), and one was not considered work at all (the teacher could always come and say that he had chosen a more suitable place, and this one needed to be buried). They dug with ordinary bayonet shovels, which the whole country used then.
By the way, no one explained to us any special technique for digging a section, and I don’t remember that any of the teachers even once suggested any improvement in the technical side of a soil scientist’s work (neither in digging nor in drilling). They simply dug and threw the soil up: the humus fertile layers in one direction, and the parent rock in the other, to be returned later in the same order (we were told that in America soil scientists put each soil horizon on a separate piece of film, so that later they could put everything in in its original form, otherwise the owner of the land could sue for damage to the resource, but with us everything was simpler, no one was going to waste the film).
In a word, the digging of the section progressed tediously and slowly, and I had such a need to somehow adjust to make the digging easier. And on some kind of cut, on a whim, I noticed in comparison that the blade moves easier when it cuts a very thin strip of soil. And I realized: I need to plan! And I immediately found the “ideal thickness”: 3-4 cm. Even in the densest clay (for example, in gley aquifer), a shovel easily, almost effortlessly cuts off a layer 3-4 cm thick. And this light layer is easy to throw out of the hole over a long distance , not like a complete bayonet. And it also leaves less crumbs at the bottom (it’s always extra work to collect and throw away crumbs). As a result, work has become faster and easier. After all, it is very important not only to dig a large volume of pit in a day, but also not to get tired at all. And the volume of daily excavation itself can be very large, since if necessary, without getting tired, you can dig for hours and dig out a reservoir over the weekend.
Since then, there has not been such dense soil that this digging technique . As I understand it, during the war soldiers dug in with sapper shovels in exactly this way, cutting the clay along a very thin layer: manual strength was enough for this.
The discussion of the topic can be continued on the forum of Pavel Trannoy
And here you can subscribe to the newsletter for announcements of new materials on Pavel Trannoy’s website.
You can also watch:
- Purchasing fertilizers in winter
- Soil water movement and soil leaching
- Buying fertilizers in winter (continued): microelements are very important!
- Buying fertilizers in winter: part 3
- We buy fertilizers in winter: soil and sodium
- About soils
- Soddy-carbonate soils: soil types
- Table salt and plants: soil salinization
- Autumn soil preparation: should you sow green manure?
- Sand and limestone: “boiling” of the soil
- Soddy-carbonate soils-2: more about this type of soil
- How to prepare the soil for spring planting potatoes in the fall
- Development of turf using the expansion method
- Planting pits on limestone
How to dig a hole for a post
Before you dig a hole for a post without a drill, you also need to mark the places where the recesses will be. The best way to do this is with signal tape or any other bright thread or fabric. This way the master will not crawl out of the frame and the hole will not be too wide. If you don’t have fabric or tape, you can simply place stones in the corners, which will also serve as a kind of limiter.
If it is not possible to make a hole with a drill, then you can use a shovel or digger:
- When all the lines are marked, you can start digging. The top layer of soil is often removed without problems. But the lower it is, the more difficult it is to insert a shovel into the soil. In this case, you can begin to loosen the soil with a bayonet shovel, then it will be easier to remove the soil. Such actions must be performed until the recess reaches the desired size.
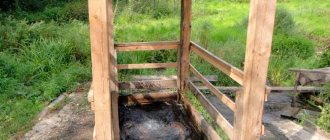
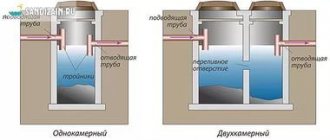
Types of sewer pits
A regular pit for pipes is the most economical option for excavation work. The sewerage system itself may be more expensive, but digging will cost little, unless the water purification system is located in a neighboring yard. Digging a cesspool requires additional effort and expense.
The cesspool must be dug according to special standards - no more than 20 meters from the water source and exactly three meters from the residential building itself. The excavation is fixed, almost always 4 meters deep, but you need to lay a reinforced concrete structure at the bottom and cover the walls with concrete rings. The process is much more labor-intensive and expensive, but it is essentially a full-fledged analogue of sewerage.
Briefly about the main thing
You can dig a hole for a post using several tools: a shovel, a digger, a drill and a mechanical drill, which will cope with the task in a short time.
Before you start work, you need to make certain calculations: how close the pillars should be to each other and how many there will be. You also need to know what kind of soil the work will be done on. If it is too hard, then it needs to be moistened; if it is too loose, then problems may arise with it during installation of the post. If you put it in loose soil, it may not stick well to it. In this case, the hole needs to be made deeper.
It is better to make formwork from reinforcement; it will be more durable. The concrete mixture should have a consistency similar to sour cream. After it is filled and the pole is installed, it is necessary to remove the remaining air inside by vibration.
Ratings 0
Types of DIY digging tools
To develop soil from a trench, several types of tools are used:
Trench . This tool is equipped with a rectangular bayonet and has a pointed tip. The design helps clear the walls of the trench without polluting the nearby soil. When clearing space for a trench, such a shovel will help remove plant roots that are too deep.- Bayonet. Designed for digging up soil. They are also convenient for digging trenches, since the bayonet has a slightly pointed end. They come in rectangular or square shape. If the bayonet is flat and square, it is convenient for them to dig out tightly compacted soil. If the bayonet is curved, it is perfect for digging out the earth from a trench.
- Drainage (narrow) . A drainage shovel is also called narrow because of the special width of its scoop. It is not only narrow, but long and is just suitable for creating holes and trenches. A drainage shovel with a curved scoop can easily remove soil from a dug trench. The tool is equipped with a special platform for the foot - it allows you to save your shoes and prevent pain that can occur when using a regular shovel.
- Sovkovaya. Necessary for transporting bulk material. For example, you can dig up soil with a bayonet or drainage shovel, and with a shovel you can collect it and bring it to the surface. This tool has wide and flat bayonets at the edges.
- Scraper. Used additionally to remove debris. They are also mounted on a long handle and will help quickly remove excess dirt from the trench.
- In the shape of a crescent. They are used to cut small turf and remove the fertile layer, you can use a small crescent-shaped spatula.
How to choose the right place?
The first important indicator is the presence of finds around the foundation and in the garden of this house. If they exist, and especially in large quantities, then by all means dig! Finds around will also tell you about the approximate age of this pit. The older it is, the more promising it is, naturally. If the house disappeared in the 20th century, then get ready to dig through Soviet garbage. Well, if it disappeared under the kings, then this is an almost clean place! But finding such a place of a long-vanished house is still difficult. Finding the foundation of an old drinking establishment, inn or postal station is a different story. Then a huge number of finds are guaranteed. Also of interest are houses where not peasants lived, but, for example, railroad workers, mill workers, government employees and any officials. Unlike the others, they always received their salaries in hard cash on time. And of course, buttons and buckles