The simplest option
If the outer diameter of the end part of the faucet (watering can, outlet pipe) and the inner diameter of the hose are equal, then the hose can simply be pulled onto the faucet. But this, as a rule, happens very rarely in life. We need to come up with something.
Faucet and hose
The faucet has an outlet
What is flexible eyeliner?
First of all, it is necessary to emphasize that although this option for supplying water is considered budgetary, it is quite reliable, provided that the materials are correctly selected and the connection technology is followed.
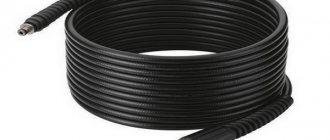
In essence, a flexible water supply is a rubber hose (the same as a watering hose) placed in a tight-fitting braid made of metal threads. Its main purpose is protection against mechanical damage, both external and internal. The latter may occur due to water hammer. In accordance with the standards, such connecting hoses must be designed for a pressure of at least 10 atm.
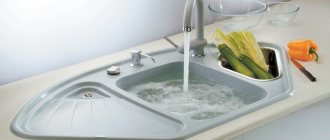
Below is an example of connecting a herringbone kitchen sink faucet with flexible hoses (A) used to supply cold and hot water.
Connection example using flexible hoses
Please note that the sink siphon is connected to the sewer with a corresponding flexible connection (B).
Lifehack: connecting a hose to a tap
There is a very simple and popular way to connect a hose to a kitchen faucet if you do not have any plumbing fixtures. You need to prepare a children's inflatable balloon, tape and scissors in advance. It is advisable that the diameter of the faucet spout and the outer diameter of the hose are not very different in size.
Approximately one third of the length of the ball is cut off and placed on the free end of the hose. Then the hose is pressed tightly against the end of the faucet, and the piece of the ball is pulled over the spout of the faucet. Now the entire connection needs to be tightly wrapped with narrow tape. The building can be used. It is airtight and durable.
Connecting a hose using a balloon
Installation of an expensive tap
To install a faucet in a bathroom correctly, you need to understand the design of products from different manufacturers and know the intricacies of installing faucets of a particular brand. Especially if you choose a good European option - many of them are now equipped with a water saving system.
Incorrect installation will reduce all the advantages of an expensive purchase to zero. If installed incorrectly, the rubber gaskets can be pinched, pipe joints may be poorly insulated, and the valve may not be assembled correctly. Having your bathroom faucet professionally installed will extend its lifespan.
Connection using a cut PET bottle
You can try this method too. To do this you need a PET bottle of the smallest diameter. This happens with medications. A conical part approximately 5 cm long is cut off from the neck side. One side of this piece is placed on the faucet, and on the other side a hose is inserted into it. Now this kind of coupling should be warmed up well with a hair dryer. PET under the influence of hot air will begin to shrink and compress both the tap and the hose. For better sealing and tightness of the connection, it is advisable to thickly coat the inside of this kind of coupling with silicone sealant or Moment glue.
Connection using a PET bottle
What will be needed during the installation of the mixer?
In order to install the mixer, you will need to prepare some devices, materials and components.
If you have already purchased a mixer, then you need to pay attention to the components. After all, not in all cases the length of the hoses (pipes) included in the kit is sufficient. Most often, their standard length is 30 centimeters, but this is not enough. In addition, if this faucet is from a dubious manufacturer, then in most cases the quality of the flexible hoses included is unsatisfactory, so it is better to replace them immediately.
The length of the eyeliner in a metal braid is not always enough
When purchasing such flexible hoses, it is necessary to take into account that their fittings should have different lengths, which will make the structure easier to assemble - because the hexagons will not abut each other.
In addition, you should pay attention to the threaded connection to the water supply. This applies not only to the size of the threaded part, but also to its type (internal or external). Of course, in most cases, hoses with internal connections are used to connect to the pipe. However, another option is also possible if the ball valve already has an outlet with an internal connection.
When choosing liners, it is necessary to take into account the size and type of threaded part
It is important to achieve optimal hose tension. So, the eyeliners should not be under strong tension or, on the contrary, dangle excessively. Indeed, as a result of the constant opening and closing of the valves, the hoses will move, and this, in turn, will lead to wear of the rubber tube that is located inside it. A hole may form in it, causing the liner to leak.
External and internal structure of flexible braided liner
Video - Features of flexible eyeliners
In this case, it is better to purchase a flexible stainless steel corrugation. Of course, such hoses are more expensive and are not so easy to install. However, they will definitely last you for several years because they have good rigidity.
Stainless steel corrugation has good wear resistance
In some cases, it is possible to completely eliminate the installation of such connections, because you can supply water to the mixer using a metal-plastic pipe. To do this, you should buy a set of fittings with press fittings suitable for these pipes.
Fittings with press fittings look like this:
Of course, this method of eyeliner is a little more complicated. However, you won’t have to change the fittings for many years to come.
Option for supplying pipes
In addition, before installing the mixer, we will need to prepare the following tools:
- Wrenches for tightening nuts of different diameters. If it becomes necessary to secure the faucet to the sink with a nut that is too large, it is better to take a universal adjustable wrench.
- Set of different screwdrivers.
- Pliers.
- Pipe wrench (may only be required in some cases).
- If you are installing a faucet on a new sink that does not have a hole for the faucet, then you need to prepare an electric drill with special attachments with a diameter of at least 3.5 centimeters.
- It is important to clearly see all connections during installation, so it is recommended to have a portable flashlight with you.
It is better to change the faucet during daylight hours so that the space under the sink is illuminated
During the work you will need the following materials:
- Sealant for threaded connections or fum tape. Seals will be required only in cases where there is a need to install additional adapters on pipes. For such purposes, it is recommended to purchase a special plumbing tape or use a special sealing paste, so that the connection will definitely not leak.
- If you will be disconnecting the sink, you should purchase silicone sealant.
- If you are replacing an old faucet, some connections may be difficult to unscrew. You can cope with this problem using universal aerosol lubricant WD-40.
Installation of the mixer requires a minimum of tools
When all the devices are ready, you need to start working.
Prices for the range of drills
Drill
Connecting a hose with proprietary fittings
There are not so many options for connecting a faucet and a hose without fittings. But a high-quality connection between a hose and a tap in the kitchen is also not such a difficult matter. If the necessary parts are not in the household, then you need to go to the nearest construction market or to the plumbing department of a hardware store, buy a quick-release fitting with a ¾ nut (this is a typical hose size) and a quick-release coupling with a collet clamp for the hose. In common parlance, the type of these parts is called “father” and “mother”. The same terms are used in official documentation.
Necessary fittings for connecting the hose to the mixer The fitting is screwed onto the tap using a standard thread. The collet coupling is simply attached to the hose. The nut is loosened slightly by half a turn and the hose is inserted into the coupling. The nut is then tightened by hand without tools. The hand feels better the amount of force applied.
Attaching accessories to the hose
The hose is connected by inserting the fitting into the coupling. To preserve sealing washers made of rubber or silicone, it is recommended to lubricate them with Vaseline.
Push-in coupling for the “female” hose and fitting for the “male” tap
Details
Features of sizes
Rigid connections for mixing devices have a length of twenty to fifty centimeters. The flexible hose can have a length of at least thirty centimeters, maximum two meters.
Connection options
There are variations of the connection node. It may consist of:
1. fitting with a union nut, internal thread with a cross-section of 1⁄2 inches.
2. a thread that is suitable for a mixer type M 10, or a half-inch union nut with an internal thread.
3. A non-standard type of connection is rare: in the form of an M 8 fitting, or a nut measuring 3/8 inch or 3/4 inch. To connect a faucet, sometimes you need an adapter or replacement of all plumbing.
Attention! The hose dimensions should be selected with a certain accuracy so as not to complicate the installation work by using non-standard designs.
Installation work
Having chosen the hose size, it should be connected, observing all the requirements.
If the installation is done incorrectly, the hose will not last long. It will have to be replaced. Things to consider when connecting:
1. At the beginning of the wiring, you should install a filter to improve the quality of the water, so as not to change parts frequently.
2.Before installation, the hose should be checked for defects on the sleeve, thread, and surface. If there are doubts about the condition of the elements, then it is worth repairing the part or replacing it.
3. The flexible hose does not tolerate strong kinks; the product should be installed carefully. The radius of bends should not be greater than six times the cross-section of the liner. Otherwise, the hose will be damaged and leak. The presence of small microcracks will lead to leakage in the near future.
4. If the fittings for the connection are tightly screwed, the tightness may be broken and the fitting may be damaged. When tightening, do not use excessive force.
Attention! Despite the presence of gaskets in the fittings, plumbing flax should be wound around the threads.
5. The fittings should be screwed into the holes on the mixer. The hoses are passed through the holes in the sink. To secure the faucet, clamp brackets are used. The hoses are connected to the water supply pipeline using nuts.
6.At the end of the work, you should check the tightness of the system. Turn on the water in the mixer and observe for leaks for twenty minutes. If there are no defects, then the system is working well. If leaks appear, the gaskets should be replaced, tow should be wound, and everything should be installed again.
Type of eyeliner
The connection to the mixer can be of a hidden or open type. The hidden method is chosen for the bathroom faucet. It is carried out during renovation, because it is necessary to trench the walls, or make a special box.
Hidden eyeliner needs to be done professionally so that you don’t have to break the wall again when making repairs. The open system is easy to install. It is necessary to screw the fasteners to the wall, then connect the mixer to the above diagram.
Nuances of selection and installation
To choose the right hose, you should follow the recommendations:
1.Each hose has a label with parameters containing information about the diameter of the product and connection method.
2.weight indicates the material from which the product is made. Aluminum parts are light, steel parts are heavier. Light weight usually indicates a low quality product.
3. if the fitting is made of plastic, then the hose is unreliable and will not withstand the load.
4.The product must be flexible. If the hose bends poorly, it means the product quality is low. Cracks will quickly appear on the surface.
5.press – sleeves are made of stainless steel; the products must fit tightly during high-quality pressing.
6.The material for the nuts must be of high quality, which can also be judged by the weight and thickness of the product.
7. The hose should not have a strong rubber smell. If there is one, it means the material is of low quality and will not last long.
8. The red marking indicates that it can be used for hot supply, the blue marking for cold supply. There are universal type hoses with stripes of two colors.
9. The hose must have a reserve length so that it is not stretched during installation. Often faucets are supplied with hoses fifty centimeters long, which is enough for installation in the kitchen. A length of one and a half meters is suitable for a bath. Some specialists use such hoses to increase the length; in this situation, an extra element appears, and therefore the strength of the system decreases. It is better to buy eyeliner of the required length.
Homemade assembly from branded parts
This simple connection method is also possible. There is an aerator on each faucet on the watering can. It needs to be unscrewed. Only the body will be used from it.
Aerator body
Then you need to find or buy a fitting with a ½ spout that is suitable in external size.
Union
All parts for connecting the hose to the tap
A set of proprietary parts for your own connection assembly is shown in the figure below.
The assembly is performed in this order
A hose is pulled onto the fitting.
Everything is assembled and working
There are more complex ways to connect a hose to a tap. But those described above are quite functional and available for reproduction.
Mixer installation and maintenance
If you think that after choosing and purchasing a bathroom or kitchen faucet there will be no more problems with it, you are mistaken. After all, the device will not install itself and will not connect to the water pipes, so your direct participation is necessary. Do not forget also that the crane, like any other equipment, wears out and breaks down over time, which will require its repair or complete replacement. Of course, you can use the services of professional plumbers, but what if this is not possible for one reason or another? Installation of a mixer and its repair are quite accessible to a non-professional. Of course, this will require certain experience, skills and knowledge from you, but in general this procedure does not pose a particularly serious problem.
Crane design
But in order to properly install or repair this equipment, you need to have an idea of what it is and on what principle it works. Although there is a wide variety of models on the market, different in shape, size, and individual design elements, in general the design of mixers is similar and includes the following main parts:
- Frame.
Provides mixing of hot and cold water, imparts the necessary rigidity to the entire structure, and serves to secure the mixer to the sink (sink) or wall. Made from corrosion-resistant stainless steel or brass. - Spout.
Forms a stream of water and gives it direction. Made from the same materials as the body, it can be rotating or stationary. At the end of the spout there is an aerator that reduces splashing. Often this element is rotating or retractable, which allows you to adjust the height of the fall and the direction of the water jet. - Shut-off and regulating element.
Designed to adjust the pressure and temperature of the water jet, as well as its complete shutoff. In single-lever models, its role is played by a metal ball or ceramic disk cartridge connected to a lever-switch; in two-valve models - two valve axle boxes with rotating valves.
Hard eyeliner
It differs from the previous version in that the mixer is rigidly attached to the supply pipes. This type of installation is attractive from an aesthetic point of view, and installation in this case is quite simple.
Rigid connection to the faucet in the bathroom
Installation process
- Determine the location of the mixer, taking into account the dimensions of the bathtub. Typically the bowl is 700 mm wide, and the distance from the floor, taking into account the legs, is 500-600 mm.
- Select the center point of the mixer, taking into account the dimensions of the bathtub, for example, dividing the width by 2. Measure 950-1000 mm from the floor and also place a point. At the intersection of these two lines there will be a center.
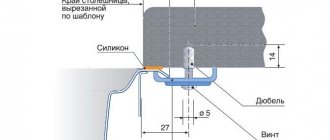
- Prepare the wall for pipe installation. Mark the stripes on it where they will go and make a groove using a hammer drill and a nozzle.
Grooves for pipes in the bathroom
Tip: do not forget that the system has elbows, which should be marked in advance on the drawing.
- Collect all pipes. There is nothing difficult about it, just be careful and consistent.
- Screw in the eccentrics. There is no need to use winding at this stage yet.
- Install and secure the mixer. The width between the landing points is the same for all models.
Replacement of rigid external liner
- Align the faucet on the next one, install the pipes and make sure the system is positioned exactly the way you wanted.
- Fill the grooves with mortar and level the surface with a cement mixture. However, do not forget that you may also have a layer of ceramic tiles.
Tip: pay attention to the fittings; they usually have holes designed for tearing out and fixing the liner.
- Remove the mixer after the solution has hardened. Finish the surface by placing plastic or tiles on it. Finally install the mixer, not forgetting to seal the pipe threads with tow or fum tape.