Design features
Large carpentry vices have a number of advantages over analogues of other types. They are suitable for installation on both a workbench and various other support stands. They are easy to install and dismantle once the job is completed.
Any vice model has the following structural elements:
- support platform;
- movable sponge that fixes workpieces;
- scenes for shifting the position of the workpiece during operation;
- lead screw;
- knob for rotating the screw.
To make a high-quality and easy-to-use vice with your own hands, drawings with dimensions should be as detailed as possible. You can use ready-made drawings from experienced craftsmen or design your own to suit your needs.
The main thing is that all elements are perfectly aligned. Otherwise, the vice will not perform its functions, which will negatively affect the result of the work.
The workbench vice has a spring that allows you to process very large workpieces. The lead screw is responsible for fixing the spring. The spring must have a sufficiently large force. You can find such a part at flea markets and metal collection centers.
Quick-release clamps: how to make a quick clamp with your own hands, drawing
It will not hurt a novice craftsman to know that in the first stages it is unlikely that he will be able to get by with just a hammer or saw.
Subsequently, you will have to resort to using a vice or quick-release clamp to fix the workpiece or glue individual fragments. Making it yourself is quite simple.
There is no single clamp that is universal enough to meet all the needs of different types of work. More information on how to make a corner clamp can be found here.
Use of wooden clamps
They come in a variety of styles, patterns and sizes. Therefore, you can stock up on various models that will always come in handy. A master can purchase several models of Assistent clamps, and besides, they are not that expensive. If a person does not want to pay for such a purchase, he can make a wooden or pipe clamp with his own hands. Wood models are very popular, you can make them yourself. This model is easy to use and easy to adjust.
Model F is a wooden clamp that has been slightly improved. It uses a maple plank with a width of 5 cm and a thickness of 0.6 cm. The design also contains a metal rod on which a thread is applied. To make a handle, you need to take a wooden blank. Hardwood without defects is suitable for this.
The moving parts must be well dried in order to slide smoothly on the bar. There should be two nuts on the rod. They are located at the end and then tighten against each other.
Thanks to this, they do not separate during use. You can use a separate locking nut or a simple permanent locking model.
And two more nuts are needed to secure the clamping pads along with the washer from the outside.
It is permissible to use a locknut and other fastening methods. Double products jam each other. This is the most reliable and easiest way. It's also the cheapest. It is important to leave some space for the screw so it can rotate freely.
Made of wood and steel
This model involves the use of special steel, which is indispensable for working with important parts. Here both durability and strength of the metal are essential. The goal is to provide a lightweight clamp that isn't too bulky but is quite durable and easy to adjust. The most difficult part is making the plate where the strip is inserted.
It is best to make several holes and then cut out the material. It remains in the shape of a small round file. When the main part is cut out, use a grinder to clean the work area. The result may not be so perfect, but the bar will be easy to pass.
A hole must be drilled at the opposite end of the plate. It should correspond to the helix. The final metal part is the locking plate. Its end should be oblique and match the neckline.
This can be done on a belt sander. Wooden parts are easy to make. To do this you do not need to have any specific experience.
Clamp without tie
Such a self-clamping clamp can be easily manufactured. Even a beginner can make several without experiencing any difficulties. It is better to take hardwood. First, a wooden clamp and sliding jaws are made. At the end of the drive screw that goes into the clamping block, it is flattened. This makes it possible to fix the nut at the ends. After this, it is unscrewed and crushed on the rod.
What parts are required for clamping jaws? The top part has a depth of 6 mm. There is also a through hole with a diameter of 10 mm.
The lower zone is rounded in such a way that it is not dependent on the lower bar of the rod. The two nuts are jammed to prevent them from falling apart. These parts are left in accordance with their original thickness.
Thanks to this, the elements move easily along the thin rod.
The bolt head is fixed into the holes of the rod. The top block requires a slight bevel to allow the jaw to slide on the bar. During assembly, moving parts must move freely when unlocked. The fixed jaw is assembled, and a small space must be left between the bar and the clamping block. Thanks to this, the first one will move freely.
When drilling a hole in the clamping block, it continues to be off center. You can use this moment by rotating the platform to create a gap. When gluing the handle onto epoxy resin, the flat surface should be facing downwards. Due to this, the flat part will flow freely from it.
What can you collect from?
You can assemble a vice with your own hands at home from a variety of materials. The main thing is to consider the purpose of the tool. Traditionally, they are made of steel or cast iron. This product will be reliable and durable. Cast iron vices can last for decades.
To make a vice with your own hands, you need to choose a reliable base. The following materials are suitable:
- car pads;
- round and rectangular pipes;
- corner;
- rail.
Wood can also be used. Often, do-it-yourself carpenter's vices are made from wood, since the load during work is usually light. A primitive wooden vice can be built using only an ax and a saw. You can fasten parts with nails. It is important to maintain the evenness of the planes and right angles so that the structure is reliable.
If you plan to make metalworking yews, you must use metal. Due to the nature of plumbing work, a high load will be placed on the product, so the structure must be as strong and rigid as possible.
To clamp a part, you need to ensure that the movable jaw slides freely along the frame. To clamp the part in a carpenter's vice, you can use a pointed piece of wood in the form of a wedge. The sharpness should be sufficient, but not excessive, otherwise the workpiece will not be clamped securely.
How to make a homemade vice for carpentry work
Due to the variety of spare parts that the modern market offers, as well as thanks to the Internet, where you can find a large number of drawings with dimensions, making a vice with your own hands is absolutely unproblematic. It’s worth noting right away that the price of a homemade tool will be an order of magnitude lower than the cost of a ready-made vice.
Helpful advice! To make the equipment convenient and cope with the task, before making a vice, you need to select the dimensions in advance, consider the availability of tools and materials, and prepare the workpieces.
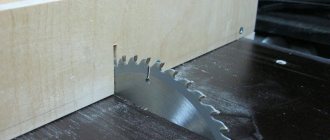
The first thing to consider when making a carpenter's vice is that the jaws should be made of soft wood, which will avoid damaging the soft parts.
To make work as convenient as possible, the vice is screwed to the workbench. Then a simple furniture nut is attached to the fixed half for subsequent screwing in the stud. The latter, in turn, will be responsible for the mobility of the mechanism. The next stage is fixing the washer on the movable jaw and attaching the knob to the handle. The sponge tips themselves can be made from simple plywood.
If you need to make a homemade vice for a drilling machine with your own hands, then you should mark the parts, and then cut out three identical beams. The bed is made from a thick board or three sheets of plywood. Two vertical holes are drilled on two fixed bars, and on the third - a hole for a pin, which acts as a clamping mechanism. Next, install the nut into the beam.
A small patch with four holes for fixation is welded to the end of the stud. Next, screw the pin to the fixed jaw, and its end to the movable one. The finished structure itself is mounted on a workbench.
Do-it-yourself bench vise at home: video, photo, diagram
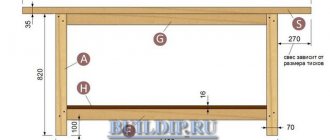
A subtype of carpenter's vice that can be easily made from wood is the Moxon vice, or bench vice, which allows you to fix large and dimensional boards, plywood and panels. At the same time, they do not require a large area in the workshop; they are made from wood. To make a wooden vice with your own hands you will need:
Using the diagram, you can make a bench vise with your own hands at home
- hairpins - 2 pieces;
- nuts - 4 pieces;
- boards - 3 pieces.
Sequence of work:
- The boards are cut to the required size.
- Two holes are drilled in the fixed and moving parts.
- On the stationary part, nuts are inserted into the prepared holes, which are pre-lubricated with glue on both sides.
- A knob is welded to the edge of the stud (for convenience) or a wooden handle is attached.
- You can make a stand for the stationary part of a wooden vise with your own hands in the form of a step.
- The finished product is attached to a workbench or to a special table. For fixation, you can use both bolts and self-tapping screws.
An important point in the manufacture of wooden vices is that the holes in the stationary part should be smaller than the nuts, which will prevent the nut from spinning idle in the hole.
Helpful advice! Just like the carpenter's vice itself, you can make a workbench for it yourself. The table for the vice is made by hand in accordance with the required dimensions. In this case, the workpieces should protrude slightly beyond the support.
Required materials and tools
If you plan to work with a heavy load, it is best to build a vice with your own hands from a channel. In this case, the following basic materials will be needed:
- corner 50x50 mm;
- metal channel up to 50 cm long;
- bolts, nuts, washers and screws for M6 threads (about 20 pcs.);
- lead screw (long pin of large diameter);
- steel sheet with a thickness of within 5 mm;
- thick steel (from 10 mm);
- paint (about 2 cans);
- nut for lead screw;
- metal rod for the knob.
Before making a metal vice, you should prepare the following tools:
- welding inverter;
- angle grinder;
- drill;
- wrenches for the bolts used;
- file;
- metal ruler;
- construction compass;
- sandpaper;
- brush;
- bright marker.
The list is quite impressive, since a lot of heavy metal processing work needs to be done.
Manufacturing procedure
You should start constructing a bench vise with your own hands from a support. It acts as a base for the instrument. A fairly thick steel sheet is best suited for making a support. It is necessary to cut a plate of suitable size from the metal. To fix it on a workbench, several holes are made in the plate.
Note!
Do-it-yourself compressor: selection of materials and tools for assembly at home + step-by-step instructions for making and assembling yourself- Homemade products for the garage with your own hands: options for products for arranging a garage, detailed diagrams and drawings for creating with your own hands
Do-it-yourself press - design features, choice of manufacturing materials. Step-by-step instructions for making it yourself + simple diagrams and drawings
To make the internal assembly, a channel is required. This unit is used to attach the movable jaw. The channel is attached to the base with a welding connection. Most of the remaining fixed parts will also be mounted on the channel by welding.
Next you need to make the outer vice assembly. It serves to fix the fixed lip. The outer part is made of sheet steel according to the drawings made or downloaded.
Welding is used to attach individual parts. It is advisable to connect elements immediately above the moving unit to avoid mistakes.
The rear assembly of the structure will serve as a support for the hydraulic pump. For its manufacture, thick steel should be used, since it will be subjected to fairly high loads.
After this, the moving unit is polished using an angle grinder and sandpaper. It is necessary to achieve ideal smoothness of the surfaces, and then weld the parts.
A hydraulic cylinder is mounted into the finished structure. It must rest on the fixed unit on one side, and on the other it is attached to the movable unit, ensuring its movement. To return to the open position, install a powerful spring, relieving the cylinder pressure.
Note!
Do-it-yourself winch: classification, manufacturing materials, description of work stages + instructions for DIY construction- Do-it-yourself clamp - step-by-step production and description of options for using a clamp
DIY knife | A step-by-step description of how and from what materials to make a homemade knife
To make lips, you need to use a material of the highest possible strength. The lips bear the highest workload. It is important to perform high-quality welding so that the parts are connected reliably and there are no backlashes during operation.
To fix the lips themselves to the movable and fixed units, screws or self-tapping screws are used. You can then sand the remaining parts and paint the finished vise in your desired color.
Using photographs and diagrams, you can get an idea of how a vice should turn out with your own hands at home; the video will help you visually familiarize yourself with the manufacturing process of the structure.
Instructions for making a vice: option No. 2
Homemade vices do not require complex design developments and calculations. You can use numerous photos and drawings of such devices, which are easy to find on the Internet. A fairly simple, but at the same time very effective design is created on the basis of metal pipes.
As is known, pipes used for the installation of water and gas pipelines are manufactured in such a way that a product of a certain diameter fits tightly into a pipe of a subsequent standard size. It is this feature of the pipes that allows them to be used for such a device as a homemade bench vise. A visual drawing, photo and description of the manufacturing process will help you make this vise yourself.
Drawing of a homemade vice. Below are two photos of the finished product.
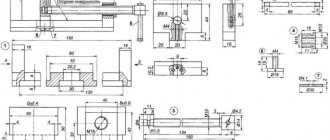
The structural elements that will make up a homemade vice are:
- a piece of metal pipe that will act as the internal moving part of the device;
- a piece of metal pipe of the following standard size, which will serve as an external fixed part;
- running nut with thread diameter M16;
- lead screw with thread diameter M16;
- a knob through which rotation will be imparted to the lead screw;
- front and rear supports, due to which the stationary pipe will be fixed to the base;
- pieces of rectangular pipe (future clamping jaws of a vice);
- two lock nuts with thread diameters M16 and M18.
Two main parts of the vice (movable and fixed)
To make such a vice with your own hands, you begin by welding a flange to the end of a section of a larger diameter pipe, which will act as a stationary element. A nut with an M16 thread must be welded into the central hole of the flange. A flange with a central hole into which the lead screw will be passed is also welded to the end of a section of a movable pipe of a smaller diameter.
At some distance from the edge of the lead screw, an M18 nut is welded to it (it will become a fixing element). After this, the end of the lead screw, to which the nut is welded, must be passed through the inside of the movable pipe and inserted into the hole in the flange. In this case, the nut should press against the flange from its inside.
Vise assembly (in the photo there is a hammer clamped in it)
A washer is put on the end of the lead screw protruding from the outside of the flange and an M16 nut is screwed on, which is then welded to the screw. A washer must also be installed between the inner nut and the flange surface, which is necessary to reduce the friction force. To correctly perform this stage of making a homemade vice, it is better to focus on the corresponding video.
After the movable vice assembly is assembled, you should insert it into a fixed pipe of a larger diameter and screw the second end of the lead screw into the nut of the second flange. To connect the lead screw with the knob, a nut or washer can be welded to its end protruding from the side of the movable pipe, into the holes of which the knob will be inserted.
The clamping jaws of such a vice can be made from sections of rectangular pipes, which are welded to the moving and fixed parts. To give the structure stability, two supports are welded to the bottom of the fixed pipe, for which corners or rectangular pipes can be used.
The inner tube can also rotate during the rotation of the lead screw, which makes the use of such a vice very inconvenient. To prevent this from happening, a longitudinal slot can be made in the upper part of the stationary pipe, and a locking screw can be screwed into the movable pipe, which will move along this slot and prevent rotation of the movable part.
Many photos of homemade vices of a similar design show devices whose moving and fixed parts are made of square or rectangular pipes. The use of such pipes also avoids rotation of the moving part of the vice.
If you do not plan to heavily load the vice, then it is quite possible to make it from wood according to a simple scheme
Quick clamping vice
You can even assemble a quick-release vice with your own hands. The clamping in this case will be provided by an eccentric. These vices are very popular among craftsmen because they allow you to quickly fix parts, which is especially important for large volumes of work.
They are produced in a similar way to classic channel vices, but with some modifications. Additional parts needed: a shock-absorbing rod, an elastic rubber bushing and an eccentric.
Note!
Do-it-yourself vibrating table - selection of materials, components and assemblies for a vibrating table with a step-by-step manufacturing description- Do-it-yourself grain crusher - operating principle, types and features of creating a device for processing grain crops
DIY concrete mixer | A visual aid on how and what to make a concrete mixer yourself
In parts made from channel bars, you need to mark the centers and make holes for the rod. The latter is installed directly into the holes in the channel blanks.
Clamping parts and working platforms are welded to the channel and processed according to the dimensions according to the drawing. The lips are secured with nuts. An eccentric is mounted in the center. After checking the quality of the clamp, you can weld the workpieces together.
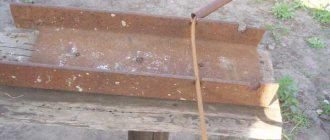
How to make a vice from a channel
A channel is the most common type of metal product, which is excellent for making a vice. Let's take a closer look at how you can make your own vice using a channel.
The instructions for making a vice from a channel are as follows:
- Initially, the base of the future vice is prepared. A channel is used as a base, in which a rectangular hole is made
- From the end side, weld a plate to the channel, which will act as a stationary jaw of the tool
- A stop is made, consisting of a nut and a guide fitting. The movable jaw of the tool will be attached to this stop.
- We attach the movable jaw of the tool to the stop
- A screw is installed, to which you need to attach a handle to move it
- The result is a ready-to-use vice, made independently from a channel
The video below shows in detail the process of how a vice is made from a channel. It is important to take into account that it is not at all necessary to subject all parts to processing. The screw can be made from a pin with a diameter of 16 mm or turned on a lathe. Please note that you will also need to make a nut with the appropriate thread.
In order for homemade clamping devices to last a long time, they must be painted. To secure the resulting product, it is necessary to weld a plate in the lower part to the channel, in which holes must first be made. Now the homemade tool is ready for use for clamping various workpieces.
Locksmith
To construct a bench vise, it is best to use a channel and sheet metal. A thick pin that can withstand high loads should be used as a lead screw.
Dimensional structural elements are made from channel parts, angles and sheet steel. Connections are made by welding and bolts.
Before you make a vice with your own hands and weld the joints, be sure to carefully mark all the elements. Precision design is of utmost importance.
If the holes and dimensions of the parts do not match, the workpiece will not be securely clamped in a vice. You can mark the holes with a marker and a construction compass. The lips, screw and handle are installed last, when the dimensional structural elements have already been manufactured and welded.
Machine tools
On lathes and woodworking machines, special rotary vices are used. Making such a tool is quite difficult due to the large number of parts and the need to ensure perfect accuracy. It is advisable to make the vice itself from stainless steel, since corrosion can impair accuracy.
Guides are mounted on the plates that act as the base. Precise holes should be made in the base first. At the ends of the plates, special pins are installed, through which guides for the pressing lips are mounted. A handle for controlling the vice is mounted at one end of the lead screw.
The lip nuts should be located on the outside to allow for quick disassembly and replacement. The lips are installed on a holder welded to the structural components. The hinges are mounted by welding and centered with pins and nuts.
If you want to construct a vice for a drilling machine with your own hands, you can do without a rotating mechanism. Unlike a lathe vice, when working on a drill press there is usually no need for a rotary mechanism.
But, it is important to ensure that the vice can be moved along the machine bed. To do this, it is enough to make the required number of holes so that the tool can be moved and securely fixed with screws.
Main stages of work
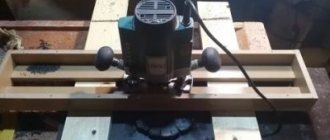
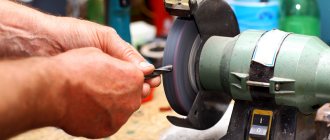
The next step is to cut a rectangular plate and weld it to the square rods. The welds and the metal itself will need to be cleaned with a flap wheel for an angle grinder.
In the strips themselves, using the same grinder, you need to make slits. Having previously made markings along the edges, the master drills holes. You also need to make a slot in the top plate (a rectangular “window”).
Next, a piece of metal is welded to the edge of the plate. In it, the author drills two holes for attaching the pressure jaw. This sponge will be motionless. Then a movable pressure jaw is also made.
At the last stage, we cut off all excess from the silicone gun, drill holes and screw it to a metal bar welded to the top plate of the yew base.
For details on how to make a quick-clamping vice for a drilling machine, we recommend watching the video on the website.
Making a comfortable and high-quality homemade vice is quite simple. Even easier than knitting. They may be needed in cases where it is necessary to securely fix a part or product. An additional advantage of such a vice is its low manufacturing cost, since not everyone can afford to purchase a production model.
Read also: Small electric chain saw
Carpentry
It is recommended to make your own carpenter's vice from durable steel. Cast iron can be used, but the material must be protected from corrosion. For carpentry work without high loads, even wood is suitable as the main material. Usually the lips in such a vice are made of wood in order to reduce the cost and simplify the design.
It is advisable to make the base metal. It will be attached to the workbench and must be motionless, since it performs a supporting function. The thickness of the lead screw should be selected according to the needs. If the load is heavy, it should be thick enough - about 20 mm.
Metal, including cast iron, with a thickness of at least 10 mm is suitable for making the scenes. The control knob can be made from a metal strip of suitable sizes. It is important to process the structural elements with high quality so that they fit tightly together.
As a gate, you can use a regular wrench with a welded or pressed screw. Lips can be made from oak bars.
DIY carpenter's vice
Do-it-yourself carpenter's vice for a workbench
These carpentry vices, also called Moxon vices, are well suited for various types of carpentry work; they are convenient for clamping wide boards or panels, cutting and finishing ends. Vices do not take up much space, they can be placed even in a small workshop, and production is not expensive. There are many similar types of designs available on the internet, you can compare them with this version of woodworking bench vise, which has its own advantages and the sizes can be customized according to your needs. The design is not complicated, how to do it yourself, look at the step-by-step photos.
Photo source www.instructables.com/id/Make-a-Bench-Vise-for-Woodworking/?ALLSTEPS
Another version of the Moxon vice, made from plywood. Vices can be made in a variety of ways and from a variety of materials, this version used sheets of plywood, wood glue, some screws, two clamping screws, two tubes to serve as clamping screws. Two T-nuts and matching carriage bolts to ensure sliding.
Photo source www.instructables.com/id/Sliding-Moxon-Vise
How to make a double screw carpenter's vise
If you need a truly powerful Moxon carpenter's vice, this model will certainly interest you. M20 Towbar bolts can produce several tons of force, so they are an excellent option for a vice.
The assembly procedure is shown in step-by-step photos, but you should pay attention to such nuances as installing bushings so that the screws do not break the wood in the clamp. The author also used silicone glue to attach the spacers.
You can use clamps to secure it to the table, but the author preferred metal brackets.
Photo source www.instructables.com/id/How-to-Build-a-Twin-Screw-Vise-DIY-Woodworking-Too
Moxon Mini Vise
Here you can learn how to make a mini Moxon vise with your own hands. The photos below show you step by step how to do this, the design will not cost much, and they are also quite simple to make. The materials you will need are wooden blanks, screws, nuts, washers and leather. Tools: table saw, router, chisel, glue, sandpaper. 2 types of wood were used for production. Beech for clamps and walnut for wheels. In the picture you can see the dimensions of all the parts. After trimming, the edges must be sanded with sandpaper. To round the edges of the wheels, use a drill and sandpaper. Use a table saw to make the bevels. To make screws, buy a long threaded rod and cut it into two short pieces. Then insert the nuts into the holes. Glue the leather onto the clips and simply cut off the excess. To protect the surface, you can use tung oil; unlike other products used to treat wood, it polymerizes not only on the surface, but in the mass of the wood, where it quickly penetrates. Once the oil is dry, simply put all the parts together. Ready
Photo source www.instructables.com/id/Mini-Moxon-Vise
Pipe
One of the easiest vice models to make. Suitable for clamping parts of different shapes. They can withstand quite high loads and can be used as a clamp. The frame of the product is made of profiles, round pipes and sheet metal. The thickness of the steel must be at least 10 mm.
There is a hole for a screw in the central part of the profile. Welding should be used to connect pipe sections and rectangular profiles. Additionally, the joints can be reinforced with bolts, but in any case the frame must be assembled using welding.
A profile with a diamond-shaped cutout is used as a clamping element, pressed against the back of a similar shape. The side pipes act as guides, for fixation on which parts of the pipe cut along the length are welded to the clamping part.
Useful tips
The dimensions of the vice should be calculated taking into account the planned load. The higher the load, the larger the dimensions. When making machine vices, you should take into account the dimensions of the bed where they will be installed. For example, a homemade vice for a drilling machine should be slightly smaller than its frame, but have an area sufficient for strong fixation.
The weight of the finished product depends not only on the size, but also on the material. Cast iron vices will be significantly heavier than models made of plain steel. Therefore, when choosing a material, you need to take into account the purpose and load.
For example, in a carpenter's vice, to lighten and reduce the load on the workbench, it makes sense to use wooden parts.
The clamp must have sufficient force for the user's purposes. The larger the parts you plan to process, the stronger the clamp should be. You should also take into account the force that will be applied to the part during processing.
Different vices are suitable for different jobs, differing primarily in the type of clamp. Therefore, vices should be assembled according to individual needs. For example, for rare household tasks, a classic vice with a lead screw is suitable. For regular professional use, a quick-clamping vice will be useful, allowing you to save time and effort on clamping the workpiece.
Design and principle of operation of clamping devices
Since machine vices are necessary to securely hold the workpiece during processing, they are made of durable steel elements. Depending on the type and purpose of the machine vice, their design can vary significantly.
The most inexpensive and least functional are the fixed-type vices, but these models have the most rigid design. By the way, homemade vices for a drilling machine are most often non-rotating.
The mid-price category includes rotary models, the functionality of which allows drilling operations to be performed more efficiently. The advantages of vices of the first and second types are combined in universal devices for a drilling machine, which, naturally, makes the cost of such devices quite high.
Even vices of the same type, but produced by different companies, may have certain design differences. This is explained by the fact that each manufacturer tries to provide their products with additional options, to make them more reliable and convenient to use.
Professional machine vices can be equipped with various clamping bars
Whatever functionality the machine vice has, the basis of its design is made up of mandatory elements, which include:
- strips that act as the base of the vice;
- two jaws that provide clamping of the workpiece;
- a screw with a handle, which ensures the movement of the movable clamping jaw;
- plates that serve as working elements of the clamping jaws;
- a number of additional details.
The device of the simplest machine vice
The bar, which acts as a base, is the supporting element on which all other parts of the vice are fixed. It is on the bar, which is made of hard and wear-resistant metal, that a hole for the screw is drilled and the movable and fixed jaws are mounted. To ensure precise movement, there is a rectangular shank on the bottom of the movable jaw, which is inserted into a cutout made on the fixed jaw.
Shank responsible for the parallel movement of the jaws
The screw responsible for moving the movable jaw is connected to it, which is ensured by a special locking ring. Rotating in the threaded hole of the base plate, the screw moves the movable jaw, thereby ensuring clamping of the workpiece processed on the drilling machine. To understand how a vice works, you can watch the corresponding video.
Both serial models and homemade vices for a drilling machine can be made according to different patterns of screw action on the movable jaw. In the simplest models of a vice, which are easy to make with your own hands, the screw is directly connected to a movable jaw, which it either pulls (unclamps the jaws) or pushes (compresses the jaws), which depends on the direction of its rotation. In more complex models, which may include both fixed and rotary vices, rotation of the screw is transmitted through gear drives, which makes the work of the drilling machine operator easier. Thanks to the gear drives, very little force is required to compress or unclench the jaws of the vice.
It should be borne in mind that the presence of a gear mechanism is not at all a criterion that should be emphasized when choosing clamping fixtures for a drilling machine. Many well-known manufacturers, whose products are popular with specialists all over the world, produce devices whose operating principle is implemented according to a standard scheme, which does not make them less effective or inconvenient to use
Hydraulically reinforced vice provides stable compression, independent of shock and vibration
Important structural elements of any type of vice, which experience significant loads during operation and ensure reliable fixation of the workpiece, are pressure plates, or strips. Such elements, made of durable metal, are attached to the working surfaces of the clamping jaws using screw connections.
In the standard version, the clamping bars have a flat working surface, on which a cross notch is applied. More specialized types of planks are also used, which are necessary for processing workpieces of a certain shape. The working surfaces of such planks can be made in various shapes (angular, concave, etc.). In some modern vise models, the clamping bars may be spring-loaded. This design makes it possible to slightly increase the convenience of fixing parts in the clamping fixture of a drilling machine.
Vise with prismatic jaws