How to make: instructions
First, the frame is welded.
Obviously, the larger the frame, the heavier the device will be and the slower it will move. The optimal frame length is 2 m plus/minus. The following are sequentially fixed on the frame:
- drive shaft with receiving star;
- power plant with a transmission star and gas tank;
- front wheel axle (fixed fastening to the frame by welding or bolts);
- rear wheel axle (fixed with a movable guide element);
- front suspension with steering structure and guide ski(s);
- seat(s) and body.
Caterpillars are made of drive V-belts or conveyor belts. The optimal track width is from 40 to 50 cm. With a smaller width (40), the snowmobile will be more maneuverable and better controllable. With a higher value (50+), the patency of the device improves.
The function of lugs is performed by PVC pipes of the diameter indicated above, sawn in half lengthwise. They are attached to the rubber base using bolts and nuts. V-belts of insufficient width can be fastened to each other with metal grousers.
In order to be able to adjust the tension of the track, the rear wheel axle is attached using a movable guide element, which allows you to fix the position of the axle in a certain position.
Additional notes:
- The center of gravity should be approximately the center of the structure. Since the power plant is mounted at the front, the driver's seat should be centered over the front axle or slightly offset to the rear.
- The distance between the drive shaft and the power unit should be minimal to minimize losses of energy transmitted to the shaft.
- If you install a shock absorber under the seat, then the front seat support is rigidly mounted on a profile arch, and the rear seat rests on the shock absorber.
- If you are making a snowmobile with a heavy load in mind, then to remove some of the weight from the tracks, it is advisable to install an additional ski in the middle of the base (between two tracks). This ski, 50-70 cm long, is attached directly to the frame. However, this design requires a more accurate preliminary calculation with subsequent leveling of the height of the “leg”, which complicates the manufacture of the snowmobile.
- It is advisable to maintain low pressure in snowmobile tires to avoid rapid wear of parts and high fuel consumption.
The considered version of the snowmobile is the simplest in design. If you have the tools and a welding machine, it can be assembled in the garage without any problems.
As soon as winter begins in our country, given the climate, two-wheeled vehicles are put away in the garage until spring. It may be impossible to use a car for transportation due to heavy snow. And here, a snowmobile on tracks, which you can make from a walk-behind tractor with your own hands, comes to the aid of all motorists who want to move along a snowy road.
Not everyone has the opportunity to buy an additional vehicle, but everyone can independently construct a homemade tracked snowmobile from a walk-behind tractor.
DIY motorcycle caterpillar
Which motorcycles are best suited for conversion into an all-terrain vehicle (snowmobile)? During the snowy winter period, many motorcycle owners come up with the idea of creating an all-terrain vehicle out of their motorcycle. To do this, you need to install the caterpillar on the wheels. In principle, this can be done with any “iron horse,” but most users agree that the best domestic unit for such a change is the Dnepr, Izh, or Ural motorcycle.
Even during the Second World War, a German motorcycle on tracks was known, which was designed by the inventor Heinrich Ernst Kniepkamp. At first it was used only by German paratroopers, but later became more common as a traction force. It continued to exist after the war; the remaining models were actively used in agriculture.
Two main types of all-terrain vehicles
In our huge country there are a large number of craftsmen who can create a winter form of transport from a motorcycle or walk-behind tractor. All of them have at least basic knowledge of auto mechanics, a certain number of spare parts for motorcycles, and a lot of imagination. Each such vehicle is unique, but they have something in common. Some authors place their equipment on a caterpillar track, others install a structure with skis in place of the wheels. Leading skis can be either front or rear skis.
Before you conjure up your favorite motorcycle, you need to stock up on some knowledge or the help of knowledgeable designers. After all, your equipment may break. But often in our conditions it is impossible to simply drive in the snow. This kind of riding is similar to driving on sand or mud, but in deep snow the motorcycle can even stall, and it won’t be able to travel on every rut. Therefore, we choose the lesser of two evils and still decide to make changes.
Features of manufacturing tracks for motorcycles
Of course, you can always buy factory-made snowmobile skis or track wheels. Then the need to invent something will disappear. But we are not looking for easy ways, and not everyone has the opportunity to purchase new spare parts.
Sometimes it's not the price or the fact that the parts are hard to find. For some people, it’s a hobby to create their own “transformer” and ride it around their town.
That's why we decided to put together some tricks that different craftsmen use to create their snowmobiles to make your creative process easier.
Best materials
Most craftsmen use a material such as aluminum to make spare parts. It lends itself well to deformation, is easy to drill, grind, and is not heavy, which will help give your vehicle additional maneuverability.
Caterpillars are made from spiked rubber, tires, and chains. For their manufacture, sheet steel is most often used. Now let's figure out how to build a snowmobile or all-terrain vehicle from a motorcycle.
Physical Features
When designing such a vehicle, you need to remember several important laws of physics, without knowledge of which your work will be reduced to zero. For good cross-country ability on a snowy surface, you need to make the contact area with the coating as large as possible. This will help the snowmobile not to fall through.
In order to reduce the load on the snow cover, you need to make the weight of your vehicle as small as possible. In order for your snowmobile to be stable, another law of physics should be applied - you need to make at least three points of support. That is, a snowmobile with three skis will be more stable when moving than with two.
The design may consist not only of skis, but, for example, of one track and two skis or, conversely, of a ski and a pair of tracks. There can be four support points, then you will get something resembling an ATV.
Most often, such units as “Dnepr”, “Izh” are used for such conversion; you can also find a “Ural” motorcycle on tracks. The steering part is left original; all the necessary systems are connected to it - clutch, gas lever. Steel pipes or angles are used for the frame. To make the ski, sheet steel and again angles are used.
Track manufacturing technology
Making a caterpillar for a motorcycle with your own hands is not difficult for those in the know. Let's look at the most common method.
We make the caterpillar for the motorcycle from a conveyor belt, which we divide into 4 parts. The resulting strips are 5.5 cm wide. We assemble them into a single structure using U-shaped profiles. The track supports need to be balanced. Balancers are made of steel sheets. We cut out the halves of the disks using stamps. We take bronze hubs or grind them ourselves.
Then we connect the half-disks with six bolts. The blanks for balancing are ready. It is necessary to make shafts for the support drums at the front and rear. They are made from steel rod. They make holes for the bearings and insert them there. The support drums are made of aluminum or duralumin parts. Then the structure is connected with bolts. When installing, rubber sprockets are inserted between the support drums.
And now the caterpillar on the motorcycle is already rotating from the chain. A special unit, which is attached to the ear of the bushing at the front, helps to fix this entire structure on the back of the all-terrain vehicle. Two such ears are needed; they should be welded onto the longitudinal pipes and the previously made balancers should be attached. Here is the main part of the work that allows you to make a snowmobile on tracks from a motorcycle.
Second life for old tires
There is another well-known method. Let's look at how to make a homemade motorcycle track using old tires. For such work, it is best to choose tires from large trucks. It is better that the tread pattern is kept in satisfactory condition.
To work, we will need a very sharp shoe knife and some cutting skills, no matter how strange it may sound. In the manufacture of such a caterpillar, the method of cutting out the sides from tires is used. To ease the effort when cutting thick tires, you need to periodically dip the knife in a soapy solution.
You can also use an electric jigsaw with fine teeth.
So, for old tires we remove the beads, select parts with a well-preserved tread pattern, or we will have to cut it ourselves to improve grip on the road surface. The undoubted advantage of such a tire chain is that it consists of a closed solid material, which means it is more resistant to breaks. The disadvantage of this design is the limited tire size.
Using belts
Snowmobile tracks are also made from belts. The manufacturing principle is similar to the previous one. It uses belts with a V-shaped profile. They are connected to each other with rivets or soil hooks. This creates a motorcycle track with holes for the drive sprocket.
All in your hands!
We see that you can convert any motorcycle or walk-behind tractor, put it on tracks, skis, or combine it. Fantasy is not limited by anything except its own capabilities. First, look around your garage - maybe you already have a caterpillar for a motorcycle in stock.
Steering
Assembling an ATV with your own hands is not an easy task. And, perhaps, the most difficult thing is to make the steering. To do this, first weld the frame of the front part of the ATV. Then you will need steering knuckles from a car, for example from a Niva, but any others will do. After which you need to build suspension arms
Pay special attention to the design of the mounting of the levers, since when they are connected to the frame, large loads arise, so additional stiffening ribs will not be superfluous. Levers are usually bolted through silent blocks
This is a rubber-metal joint that is an essential link in the suspension. It dampens wheel vibrations, preventing vibration from being transmitted to the frame. Levers can be made according to these drawings.
Go ahead. What is the front suspension without shock absorbers? Here you can use 4 motorcycle shock absorbers, one for each arm in the front, and two for the swingarm to dampen the rear axle. Rear shock absorbers from Izh will do, but if you are willing to shell out for gas-oil shock absorbers with pumping, this will give you the opportunity to adjust the suspension to suit road conditions, which is very useful for equipment such as an ATV!
Telescopic suspension
Perhaps this is one of the most common and simplest types of suspension based on the principle of operation. Most often, this suspension is used on snowmobiles of the “utilitarian” class. The design of the telescopic fork consists of a spring and shock absorber, which are located directly in the strut. Thus, the telescopic stand is able to smooth out shock-type loads. It is worth noting that the stroke of this type of suspension is limited according to the stroke of the shock absorber itself. As a rule, snowmobiles with such suspension have incredible maneuverability in dense forest conditions, since the ski base is small.
Also, one of the simplest and most common suspensions is the spring system. This engineering solution was used on the legendary domestic car "Buran". This model has one ski track, as a result of which the equipment does not have the necessary maneuverability. It is generally extremely difficult to enter the required turn at speed. But in general. The suspension performance itself is quite acceptable.
What is "karakat"
When you see such a car for the first time, you involuntarily think about whether it has good driving characteristics, since from the outside it may seem that the caracat is very bulky and clumsy. In fact, it's just the opposite. A strong suspension, welded from steel pipes with a swivel joint, allows you to withstand the heaviest loads. The steering of such a mechanism is not very complicated, since it has a simple principle based on a standard worm gear. Even the carakat from the Urals shows good performance, not to mention the ease of maintenance and availability of spare parts compared to factory all-terrain vehicles.
The secret to the success of such an invention lies in the original idea - to make an affordable pneumatic all-terrain vehicle based on ready-made units. In the design of the karakat, you can use parts from motorcycles, mopeds, trucks and cars, which gives wide scope for a creative approach to designing the model.
Karakat from a walk-behind tractor
There are projects, even karakats from a walk-behind tractor. Naturally, to make such a machine you need a medium or heavy class walk-behind tractor.
The Karakat is a homemade all-terrain vehicle equipped with three or four wheels with low-pressure tires, which is propelled by the use of an internal combustion engine. A variety of engines can be used as a power plant, ranging from Izh to the Urals, it all depends on the power of the designed vehicle.
The suspension, in most cases, is welded independently and consists of two independent systems, which are secured to each other using a reinforced hinge joint. And finally, the most impressive part of the car is its wheels. It should be noted that this can also become the most expensive part of the design, which is why many decide to make low-pressure tires with their own hands.
Snowmobiles from Ural
But Ural motorcycles are used as snowmobiles more often in the tracked version. Their peculiarity is that the motorcycle itself is quite heavy, and it also has a cardan drive to the rear wheel, so a conventional tracked module with a chain drive is not enough.
The design of the module for the Ural is much more complicated, and the drive is organized in a different way - through a gearbox. Therefore, changes are also made to the design of the motorcycle frame, otherwise the height of the motorcycle will increase, which will lead to an increase in the center of gravity, and as a result, a decrease in stability.
Homemade swamp tricycle on IZH Planet 3
The design of this homemade swamp vehicle is so simple that almost any car enthusiast can repeat it in his own garage. The basis of the swamp vehicle is the IZH Planet 3 motorcycle. IZH Planet motorcycles often become donors in all-terrain homemade vehicles, this is primarily due to the endurance and unpretentiousness of their engines.
The bridge was taken from a Muscovite and modernized. We cut out the bearing mounts from the doll with a grinder, then welded the yoke to the bridge stocking (if it is not welded, the stocking will warp when you cut it in half), then cut the stocking itself in order to secure the sprocket. The chain tensioner was also borrowed from the combine.
The KF-97 cameras are used from the agricultural trailer of the T-150 tractor. The tire for such a tube wheel is the same tube, only cut to a smaller diameter. First, the “tire” is put on, then it is tightened with belts. The transverse harnesses turned out to be 1.02 m long, and the longitudinal strip was 3.5 m long. The width of the longitudinal strip is 30 centimeters. The transverse belts with the longitudinal strip are connected using bolts.
The basis was taken from cornfield disks, cut in half using a small grinder and extended by 30 centimeters with steel plates welded between the disk halves (6 plates in total). The disc is covered with a chamber from a VAZ car, cut to a larger diameter. Since the disks were used from a Niva, and the axle from a Muscovite, the rear disks at the mounting points had to be trimmed.
Frame, brakes and transmission
The motorcycle frame has been lengthened and strengthened. To prevent the pendulum fork from “walking”, it was welded. The chain and sprockets are borrowed from the combine. Their ratio is 2 to 1. A small star with 25 teeth, it is attached to the drum using eight hardened 10-point bolts. A large star with 50 teeth. The braking system of a swamp vehicle is no different from any other, so the brakes are left unchanged. But the drum was modernized to accommodate sprocket mounts.
Make a snowmobile out of a motorcycle? Easily. Review of factory products and homemade products for snow bikes.
A few days ago, in the Yandex Zen feed, I came across an article in which the author describes a device, the existence of which I had ignorantly not suspected until that time. We are talking about a kit that is installed on an enduro or motocross motorcycle, resulting in, with technically correct installation, a snowbike, or simply a crawler motorcycle with a ski instead of a front wheel.
Having scoured a number of websites and looked at approximately the same number of advertisements for the sale of tracked kits, I realized that there are quite a few manufacturers and modifications of such devices, and their prices are in a fairly wide range. benefit not only me, but also you from the time I spent
, I will present some of the sets located in different price categories.
The Canadian
company Timbersled
offers several versions of its own systems for Japanese-made motorcycles. At first glance, the design is quite reliable, but the price of the product is not affordable for everyone. Manufacturers are asking $5,500 excluding delivery for the most inexpensive kit in the line. The weight of the products is slightly more than 60 kilograms.
The Russian brand VORTEX offers kits that, as they claim, have no analogues in the world, for enduro and cross motorcycles with a power of 250 to 750 cm3, which enable motorcyclists to engage in sports in winter
What’s important is that the kit comes with a set of bushings, with which the track and ski, according to the manufacturers, will exactly fit your motorcycle
Tyumen
is a manufacturer of Snowrider kits. The line includes three models differing mainly in the length of the tracked chassis. The weight of the set ranges from 60.5 to 64 kilograms.
“The adapter kits produced allow the track kit to be installed on almost any modern lightweight enduro or motocross motorcycle with a left-hand chain, with an engine capacity of 250 cubic centimeters or more.” -indicated on their website.
The price of product sets is from 318,000 to 342,000 rubles, delivery will be at your expense. The set of adapters is not included in the price, but is sold separately, the cost of the set is 10,000 rubles.
Let's go down the price range closer to the people.
“Price without canister and case. The 101″ track kit is ideal for prepared trails, as it does not need to lubricate the track with snow. The kit is suitable for riding through fields and forests. Suitable for any KTM motocross or enduro motorcycle. Yamaha. Husqvarna. Kawasaki. Honda. Suzuki. Kayo. BSE. Avantis. GR7. 125. 140. 150. 160. 190. 230. 250. 350. 400. 450. Motorcycle caterpillar. Snowbike. Snowbike. Snowmoto.fun. SMF. "
Track kit SMF CROSS 101″ from 136,000 rub. Track kit SMF 129″ from 185,000 rub. Track kit SMF PRO 127″ from 250,000 rub.
Detailed and clear instructions for refacing a moto
in
snowmoto!
Samara
offers a set with adapters that are included in the price of the kit.
The issue price is 76,600 rubles.
+ delivery by transport company. Source
Snowmobiles based on "Minsk"
Let's start with the smallest representative of the domestic motorcycle industry - the Minsk motorcycle. Although it is equipped with a 125 cc engine, it is quite capable of acting as a snowmobile, and craftsmen “manage” to make two types of snowmobiles out of it.
The first type is wheel-ski. Structurally, nothing much changes in the motorcycle, but the wheels are removed from it. Instead of the front wheel, a wide ski is installed.
Moreover, it is done very simply - take a pipe as a stand, and attach the ski to the front fork using a fastening element and the wheel axle shaft. At the bottom, a wide metal strip with a wrapped limber is attached to the rack on a hinge.
Regarding the rear of the snowmobile, it is somewhat more complicated here . A module is made that is mounted in place of the rear wheel.
In addition to the frame, the design of the module includes a rear axle from UAZ, but slightly modified. The driven gear of the bridge is replaced with the rear sprocket of the IZH motorcycle. The drive to the bridge is carried out through an intermediate shaft, but it still remains a chain drive.
Tubes from the PTS-2-4 trailer are used as wheels, but for reliability, the sidewalls of the tube are reinforced with tire sidewalls. To make it lighter, the discs are made of welded rods, and the camera is secured to them using belts.
A snowmobile based on Minsk is capable of reaching speeds of up to 45 km/h.
The second type of snowmobile from “Minsk” is tracked. Moreover, in front, a ski is again used, attached to the fork. A module is also installed at the rear, but consisting of a frame and two shafts attached to it.
The front shaft is equipped with sprockets. Two large sprockets drive the track, and a small sprocket drives the shaft. The rear shaft is equipped with rollers. A caterpillar made of V-belts and plastic strips is stretched between these shafts.
The drive is carried out via an intermediate shaft. The tracked version of the Minsk can already accelerate to 50 km/h. And these are just two of many types.
Engineers and designers did a good job on the Izh Junker motorcycle, one of the most beautiful models of domestic production.
The Jawa 350 motorcycle was quite popular among the people, let's take a look at its technical characteristics.
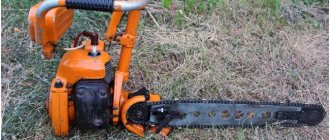
Sawmill
Several homemade sawmills using chainsaws have been invented. They are:
- Stationary, motionless. In them, the chainsaw is placed in a special machine and remains in place - a log moves towards it. The cutting quality is high; workpieces of any length can be cut. But the design has a complex log feeding mechanism.
- Stationary mobile. Option with rail guides along which a carriage with a fixed saw moves. The workpiece is stationary. The option is easier to use, but the length of the logs is limited.
- Mobile. The sawing part moves along the log. It is not heavy and can be tolerated. The workpiece itself serves as a guide. This option is convenient for one-time work or small volumes of cutting. Requires a lot of effort to move the sawing device.
Advantages and features of a homemade snowmobile
The vehicle has a mechanical drive and a tracked walk-behind tractor, when driving which you will not get stuck in snowdrifts. Steering is done by the skis and the steering system is located in front so you can control it easily. The price when purchasing a particular vehicle is important. Therefore, if you do the math, the cost of making a snowmobile yourself will be five times lower than buying it from the manufacturer. And it will be even cheaper due to the available walk-behind tractor and other parts. Reliability – where a person cannot pass and a car cannot pass, the snowmobile will overcome all obstacles with ease. If a snowmobile is made by hand, then the designer is very careful in choosing parts. By doing everything yourself, you are responsible for the quality of your design
In addition, by paying great attention to the components of the mechanism, you make the snowmobile all-terrain.
Homemade snowmobile from an IZH motorcycle or any other
A homemade snowmobile from an IZH motorcycle or any other is not as difficult as it might seem. Moreover, when winter comes, you can’t ride a regular motorcycle very much, so you have to make a homemade snowmobile from a motorcycle.
To make it comfortable to ride on winter roads, you need to re-equip the motorcycle, install a side trailer and change the front wheel so that it has a deeper tread.
Only a snowmobile can drive on snow-covered roads; not even cars can drive through serious snowdrifts. For those who can, it’s better to buy a snowmobile and not worry, but for those who don’t have money or want to make something useful and original themselves, you can make a homemade snowmobile from a motorcycle.
No one will convert a modern sportsbike or tourist motorcycle, but an old IZH or any other rural motorcycle can easily be converted into a snowmobile for the winter. Today we’ll talk about how to make a homemade snowmobile from an IZH motorcycle, Minsk and Ural.
DSA suspension
This suspension is characterized as the first long-travel system that was used in the construction of snowmobiles. To be more precise, it was installed on the F2000 and S2000 chassis. The shock absorbers and springs are located between the levers (arranged in parallel) and the chassis. The inclination of the springs and shock absorbers towards the central part of the snowmobile is maintained. Due to this, the travel of the suspension itself is greater than that of the shock absorber. The shock-absorbing system consists of a snow frame and a trailing arm to which two transverse arms are connected. Levers located transversely must have the same length. There are snowmobile models on which the length of the levers can be adjusted. This adjustment is relevant when it is necessary to overcome an icy section of the route. There is no point in adjusting the length of the levers when moving in deep snow. The disadvantage of this suspension is the lack of controllability of the snowmobile due to the horizontal movement of the skis.
Do-it-yourself snowmobile from a walk-behind tractor: reasons for choice and selection criteria
A walk-behind tractor is a worthy technique for transformation, which is in the arsenal of almost every resident of our country. In the list of homemade devices that can be adapted from it, the snowmobile occupies one of the first places, competing with the caracat and the all-terrain vehicle. This is due to the fact that in winter, when a snowmobile is needed, the farm does not need the standard tasks of plowing, hilling or mowing the grass. Therefore, it makes sense to remove the engine in the winter and make a snowmobile based on it, and in the summer to return it to the walk-behind tractor and operate it in the standard way. Not every modification of a walk-behind tractor is suitable for a snowmobile. It is best to use for this purpose those that have:
- rear towing device;
- possibility of manual control;
- medium-power motor, cooled by air.
The Neva walk-behind tractors, which are available in eight models, are considered ideal for a homemade snowmobile from a walk-behind tractor. All of them represent a group of tillage machines with average traction potential (6-9 hp). Despite their low cost, the motor systems are assembled and tested in Japan, which makes them extremely durable.
Taking all these points into account, such walk-behind tractors make snowmobiles with good power. This means that it will be able to carry not only the driver, but also at least one passenger.
How to create a snowmobile with your own hands?
Have you decided to make a snowmobile yourself? If there was a desire... Of course, to create a decent vehicle you will also need metalworking skills, basic knowledge of physics, ingenuity, materials, spare parts and some tools. There is no doubt that you have all this, and what you don’t can be acquired along the way. The main thing is what the result is! A self-made snowmobile moving on snow, overcoming snow-covered off-road terrain - that’s cool!
Features and advantages of homemade snowmobiles
The basis of the design of a winter vehicle is a caterpillar drive and steering skis. Of all the advantages of homemade snowmobiles over factory models, the following can be highlighted:
- The price of motorcycles assembled from scrap materials is 5-10 times lower.
- The ability to assemble a model of the desired configuration, power, etc.
- Reliability of the design, thanks to the use of high-quality materials and proven mechanisms.
- The benefit is that you don’t have to buy new materials and parts, but use those stored in the garage.
A homemade snowmobile is a vehicle that can be found not only on country roads and ski resorts, but also on the streets of populated areas.
Manufacturing a snowmobile according to drawings
How to make a snowmobile with your own hands, what parts and components will be needed? To create a homemade tracked vehicle for moving on snow, a list of necessary components is compiled, a sketch is made and drawings are made. In the future, they will serve as a guide for creating a vehicle.
The standard design consists of several elements. It includes:
- A frame that can be borrowed from an ATV, scooter, scooter, motorcycle, etc. If this is not possible, it is made by welding from thin-walled metal pipes with a diameter of 40 mm.
- The seat should preferably be made of water-repellent material.
- The engine can also be from a walk-behind tractor, motorcycle, scooter, etc. The choice is determined by the speed and weight of the vehicle.
- A tank, which is a 10-15 liter container made of metal or plastic.
- Skis for a homemade snowmobile on tracks can be taken ready-made or made from nine to ten-layer plywood, 3 mm thick.
- The steering wheel, like many other elements, is taken from a two-wheeled unit.
- A drive that transmits rotational movements from the engine to the track, which can be a motorcycle chain.
- The caterpillar is a complex component that requires detailed consideration.
How to make caterpillars with your own hands?
Homemade tracks can be made from car tires. The advantage of using tires is that they have a closed circuit, which reduces the likelihood of bursting. To make tracks, the tire beads are cut off with a sharp shoe knife. Grousers are attached to the remaining flexible web, which are made from plastic pipes 5 mm thick and 40 mm in diameter, sawn to length. The pipe halves are cut to the width of the tire and bolted every 5-7 cm.
Caterpillars are made from a conveyor belt in a similar way. Its advantage is that if it is used, there are no restrictions on length. But there is a need for coupling by overlapping the ends of the tape with an overlap of 3-5 cm and fixing with bolts. When making tracks with your own hands, V-belts are often used. Connected by lugs, they represent a full-fledged caterpillar with ready-made cavities for gears.
A wide track improves the cross-country ability of the unit, but reduces its controllability. Factory models have three options:
- Standard – 15;
- Wide – 20;
- Ultrawide – 24.
The sequence of creating a snowmobile with your own hands
To make a snowmobile on tracks with your own hands, you first need to connect the frame and steering mechanism. The height and angle of inclination are selected, then spot welding is performed. In accordance with the drawing, the engine is installed and fixed. It is necessary to ensure that there is no strong tilt. To avoid a long fuel line, the tank is located at a close distance from the carburetor.
Next, the caterpillar is installed. The driven axle with the canvas is attached behind the frame (depending on the design, on a suspension, fork, shock absorber, etc.), the drive axle is attached in the middle of the snowmobile (usually under the driver’s seat), closer to the engine. The axle gears are pre-engaged. After this, the fuel tank, throttle and brake cables are connected, the seat is mounted, and other work is carried out.
Homemade cars
I made a homemade snowmobile from an old Izh motorcycle.
This all-terrain vehicle was not conceived as a “workhorse”, but as a weekend toy – for walks through the fields near his native village. My father and I built it together. We already had experience: before that we built two snowmobiles.
We chose a design with two drive wheels at the rear and a ski at the front. The front wheel was abandoned due to difficulty in steering: poorly balanced, it tried to knock the steering wheel out of your hands, rested and slowed down the vehicle in loose snow. They also abandoned the differential: when driving on snow, it is not needed, and we do not drive on public roads.
The basis of the design of the all-terrain vehicle was the frame of the Izh motorcycle. An additional part of the frame was made from angle and inch pipes. To ensure rigidity, sheet metal gussets were welded. A part of the frame from the Voskhod was welded in front to relieve the load on the steering column bearings - after all, when driving over uneven surfaces, the load on them is considerable.
The engine chosen was from a motorized stroller - high-torque, simple and practically indestructible. In addition, the possibility of starting with a starter and the presence of a forced air cooling system were captivating.
The muffler was made from original pipes and a resonator from a Zhiguli. Of course, such a scheme contradicts the theory of exhaust of a two-stroke engine, but in practice this turned out to be not so significant.
Transmission elements were borrowed from decommissioned agricultural machinery. The rear axle and intermediate shaft are mounted on self-aligning bearings. To tension the chain, longitudinal holes were made in the frame. The overall gear ratio is 1:9, which allows the snowmobile to move confidently with two adult passengers in the trunk! Speed on dense snow is about 40 km/h.
The cameras are from the 1PTS-9 tractor trailer. The longitudinal belts were cut from a conveyor belt, while the transverse belts were made from drive belts - thanks to their profile, they better serve as lugs. The wheels are 16˝ from the trailer, their design is simple. Six bushings are welded along the inner diameter of the wheel to attach a second pair of wheels for driving in deep snow (additional wheels have not yet been completed).
The ski was made from a sheet of duralumin. For better controllability, two 15x15 mm corners were screwed to it from below.
The controls were taken from the Izh motorcycle, the steering wheel was expanded to 1 m - for convenience. The windshield is from an Irbis snowmobile. There is an ammeter and a voltmeter on the instrument panel to monitor charging. The engine has a magneto. For driving at night, headlights and side lights are provided.
The snowmobile is currently being tested. Along the way, we eliminate a small drawback - the lack of reverse gear. Instead of the intermediate shaft, it is planned to install a reverse gearbox from the Ant scooter. We will replace the differential in it with a solid shaft. The drive sprocket of the rear axle and a disc brake from Izh will be installed on the shaft. The temporary absence of brakes does not in any way affect the performance properties; the snowmobile rolls up slightly: it stops almost immediately.
Homemade author: Roman Bulakh.
Share on social media networks
Interesting homemade products on our website
- DIY snowmobile
- DIY snowmobile
- DIY snowmobile made from a chainsaw
- Homemade snowmobile from Moskvich
- DIY Karakat from the Izh Planet 3 motorcycle
- DIY mini tractor
- DIY mobile home
- DIY motorized towing vehicle
TRACKED…MOTORCYCLE
The need to ensure the required ground clearance, as well as to obtain optimal (rather low) speeds of the drive wheel-roller of the caterpillar, forced the use of an intermediate chain drive-reducer in the transmission, for which there are corresponding brackets on the frame with grooves that allow tensioning the chain of the first stage (chain pitch - 12, 7 mm). The transmission of rotation from the gearbox to the drive wheel-roller of the caterpillar propulsion unit is also carried out by a chain from agricultural machinery (pitch - 15.785 mm). This chain has a more significant resource in dirty conditions, compared to a motorcycle chain. As has already become clear, the caterpillar propulsion unit consists of a caterpillar and two rollers - drive and tension wheels. Previously, between the wheels on both caterpillar tracks there were two more supporting small sloth rollers (see photo of the screensaver). But operation has shown that a well-tensioned track with such a small distance between the wheels and without sloths holds the load well.
The drive and tension wheels of the caterpillar mover are the same, from the Tulitsa motor scooter (or similar ones), and transverse grooves are cut on the drive tire (without touching the cord) for engagement with the track lugs. Both wheels have independent suspensions. Each of them is installed in its own pendulum fork, articulated with the frame through silent blocks (from the Voskhod motorcycle).
At the ends of the pendulum forks there are grooves for moving the wheels to tension the track, and they rest on the frame through simple shock absorbers (pipe to pipe, with springs from the Voskhod front fork), which ensures a minimum weight. Rocking does not occur due to the distribution of the load over the wheels of the caterpillar mover. The wheel rims are standard, but lightened by drilling. The hubs are inserted into the central holes of the disks and secured with welded spokes-struts made of 5 mm wire.
For the hubs, a cylindrical body from a car hand pump is used, its internal diameter is just suitable for the 202nd bearing, and so that the latter (there are two of them in the hub) do not fall through, sections (rings) of a suitable pipe of a smaller diameter are inserted inside and fixed through the holes in the hub electric rivets. Since the hub flange is flat and thin-walled, for rigidity on both sides it is reinforced with struts made of 5 mm wire, which distribute the load to the edges of the hub. The shaft of the front (drive) wheel of the caterpillar and the rear (tension) axle are made of a pipe with a diameter of 16×2.5 mm and the middle part is lightened (turned). Snow and dirt get clogged between the struts, so it is better to fill them with Macroflex and paint them. By the way, all niches and voids, including the internal cavity of the front wheel (steered pneumatic), are also filled with foam.
The protection of wheel bearings requires special attention - they operate in conditions of intense contamination, so they must be well protected with covers or bearings with protective washers must be used. The track drive wheel has two bearings on the sprocket side for reliability, and the hub tube has additional pads on top to distribute the load.
The caterpillar is assembled from 2 strips of nylon cord tape and lugs made from 8 mm wire rod and reinforced in the middle part with another piece of the same wire. To connect the lug strips to the lug strips, sections of channels bent from a 4-mm sheet are welded to the latter, to which the caterpillar strips are bolted.
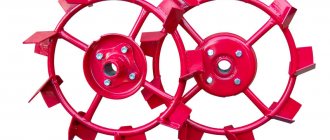
Crawler mover: wheel discs are lightened with drilled holes; their attachment to the hubs is reinforced with spokes; grooves are cut into the drive wheel tire for track brackets.
Front wheel: tire lightened - tread removed; the wheel rims are solid, and the space between them is filled with construction foam; The tires are bolted to the rims.
I pay attention to the shape of the lug - it follows the profile of the tire. The ends of the wire rod must be beveled for unhindered entry of the drive wheel, and the welds must be thoroughly cleaned. Of course, the oval shape of the lugs also has “disadvantages” - slipping of the caterpillar on compacted snow, as well as lateral sliding on ice due to the oval shape of the lugs, but this drawback is insignificant, what is more important is the ease of control of the motorcycle when cornering, which is why this form of lug is made. With a straight (flat) lug, it will be difficult to maintain balance, especially when turning (tested!). The drive and tension wheels of the tracked unit have newly manufactured hubs - due to the significant mass of the standard ones.
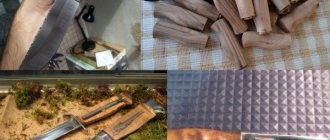
Now about the “minor” nodes. The 12-liter fuel tank is argon-welded from a 1-mm aluminum sheet (AMG-2) and has partitions inside (otherwise, with a large length and low height of the tank, fuel will be released into the drain).
Muffler:
1—primary chamber (pipe Ø 60×1); 2—inlet pipe fitting; 3 - intermediate chamber; 4—connecting pipe of the primary and secondary chambers (pipe Ø 32×1) with holes Ø 5; 5—secondary chamber (pipe Ø 60×1); 6—outlet pipe (pipe Ф25х1); 7—fastening eye with a jumper (steel sheet s3).
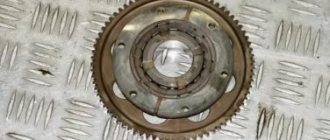
Transmission - two-stage chain drive with intermediate shaft:
1—power unit; 2—output shaft of the power unit; 3—engine output shaft sprocket (z = 13); 4—chain PR-12.7 of the first stage; 5—intermediate shaft support (friction bearing 80204, 2 pcs.); 6—drive sprocket of the intermediate gearbox (z = 21), 7—intermediate shaft; 8—driven sprocket of the intermediate gearbox (z = 18); 9—chain PR-15.875 of the second stage; 10—drive sprocket of the track drive wheel (z = 21, t = 15.875); 11 — drive wheel hub; 12—track drive wheel, 13—hub bearing (2 pcs.); 14—drive wheel axis.
The entire “facing” (sidewalls) and the front wing are also made of AMG-2. The headlight is plastic, installed for protection between the jibs of the front fork. The wind shield is also made from AMG-2, removable, and is mounted on four wings.
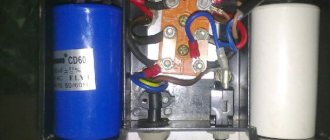
The driver's seat is removable (its base is made of AMG-5 with a thickness of 2.5 mm), under it there are two compartments, the walls of which are also made of light alloy sheet. The first contains a relay-regulator, and the second contains a tool.
In the future, when switching to a thyristor ignition system, the relay-regulator compartment is supposed to be used as an air purifier.
The exhaust muffler is made of extremely compact 1 mm steel, not dismountable, the noise level during engine operation is comparable to the exhaust of road motorcycles. About twice a year it has to be burned from the motor oil that cokes in it.
All electrical equipment (generator, relay regulator) is standard, as is the K-36G carburetor. In the future, it is planned to install a valve block (based on materials from “Modelist-Constructor”). The footrests are tubular and retract back and up. The steering wheel is from the Voskhod, but expanded by a 150 mm insert; the controls on it are the same as on road motorcycles. Behind the driver's seat there is a cargo area, handles are welded to it on three sides for pulling the motorcycle out of the quagmire (and this sometimes happens!), They also serve as hooks for slinging the load.
There is a hitch under the trunk. It was installed later, and, admittedly, not entirely successfully (that’s why I didn’t show this device in the drawing). It must be covered with a mudguard so that it does not get covered with dirt. However, you should not raise the coupling device high (you will have to make a long trailer tongue).
Chain drive with an intermediate shaft-reducer: in the foreground, above the driven sprocket of the intermediate shaft, the engine output shaft sprocket and the first-stage PR-12.7 chain are visible.
Under the driver's seat there is a small electrical compartment and a tool box.
Crawler all-terrain motorcycle with trailer.
As already mentioned, the voids under the seat (behind the tool compartment) and the trunk are filled with foam; in combination with the front wheel, they ensure that the motorcycle is unsinkable, which is quite important in recent warm winters. Agree that this is still better than getting a motorcycle from the bottom of a reservoir. The front wheel has a low-pressure tire made from lightweight UAZ tires. The manufacturing method is described in the “Model Designer”, but I note that it is not necessary to make a “checker” - the clutch is quite enough if you cut a shallow “herringbone” with a grinder.
All transmission chains are covered with AMC-2 casings, this reduces their contamination and ensures driver safety. The drive wheel chain casing is collapsible to make it easier to remove the wheel and repair the casing in the event of a breakdown (this happens when driving through a windfall). The casing was left open at the bottom (so that snow or dirt would not linger in it), and the chain, which sagged at high speeds, did not touch the bottom.
Since a tracked motorcycle is an off-road vehicle, due to the complexity of its design, it was not equipped with brakes, and there is no particular need for them. I make planned stops by gradually reducing the speed due to friction in the transmission (you can also slow down with your foot - the speed is low). I perform emergency braking with the engine - I sharply release the gas or turn off the ignition (I used the latter method only as a training).
A. KOKSHAROV, Loukhi village, Karelia
We recommend reading
- HOCKEY GLOVES Every day we use a huge number of things and have almost stopped noticing them. But it turns out that in the production of seemingly insignificant things there is a lot hidden...
- EXPRESS “PLUG” You can quickly and reliably “plug” a water pipe or radiator pipe when checking it for leaks using a simple device. When the handle rotates, the rubber bushing...