About BGA chips
The use of housings with pins in the form of balls, instead of the usual pins, has now become the only alternative in micro and radio electronics.
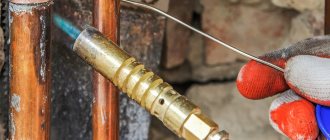
Chip with BGA pins
Of the main advantages of using microcircuits of this configuration, we note:
- saving space on the board;
- small pickups;
- thermal conductivity, with the exception of elements of motherboards and computer video cards.
Disadvantages include: inflexibility of the leads, complexity of installation and the need for additional x-ray control after installation of these microcircuits.
Soldering Station
We will talk about choosing a specific model in other publications, but in this article let’s decide on the type of soldering station.
For successful installation/disassembly of a small BGA chip, such as a mobile phone, a Lukey 852D+ hot air soldering station is sufficient. A more convenient option is a portable infrared soldering station like Tornado Infra Pro.
| Lukey 852D+ | Tornado Infra Pro |
If you need to restore a laptop motherboard with a large PCB area and large BGA chips, then, in this case, you cannot do without a repair complex with a lower and upper heater such as Jovy Systems RE-8500. You can read more about choosing a soldering station in the corresponding article.
| Jovy Systems RE-8500 |
Flux requirements for bga soldering
The main task of this soldering material during the soldering process, in particular, bga elements, is the removal of metal oxides and oxide films at the stage of preparing the soldering area.
A high-quality flux should provide better spreading of solder (reduced surface tension) and prevent re-oxidation of the prepared surface.
The operating temperature of the flux must be lower than the melting temperature of the solder that makes up the terminals of the microcircuit.
In the case of using a chip with tin-lead leads, the liquidus (full melting temperature) mostly starts from 179ºC.
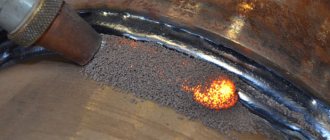
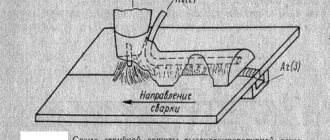
Soldering flux applied to the board
The flux should start working at a temperature an order of magnitude lower. So that during complete melting of the solder all oxides are removed from the soldering area.
It is worth adding to the fundamental requirements that the flux should not boil and emit carcinogenic fumes.
Easy removal of flux residues or no need for cleaning is a property that experts consider a “must have”, recently, when soldering microcircuits with ball leads.
Ideally, the flux should completely evaporate by the time the microcircuit is soldered; in extreme cases, it should be a dielectric and chemically inert in its composition.
In the case of reballing, the requirements for ease of rinsing are usually less stringent, since it is much easier to rinse off the flux using a cleaning fluid with open access to the soldering area.
Soldering the chip
90% of the success of the repair depends on the correct dismantling of the microcircuits. It is at this stage that it is important not to tear off the nickels and not damage the microcircuit with high temperature. And they begin desoldering the chip by removing the compound.
Compound
Compound is a polymer resin, usually black or brown, used in the manufacture of telephone motherboards. Purpose of the compound:
- Additional fixation of radio components and bga chips on the board.
- Protection of non-insulated contacts from moisture.
- Increased board strength.
The most critical microcircuits, such as: CPU, BB_RF, EPROM, NAND Flash, Wi-Fi, are filled with compound at the factory after installation. And before dismantling, it is necessary to clear the perimeter of resin.
Removing the compound
Dismantling sequence
- Carefully inspect the board for previously performed repairs.
- Perform diagnostics and take the necessary measurements.
- Prepare the board for soldering, remove protective screens and stickers. Disconnect and remove the coaxial cable.
- Secure the motherboard in the appropriate holder.
- Remove the compound around the chip being removed. The temperature on the hairdryer is 210 – 240 degrees Celsius.
- Install heat sinks. The installation location of the heat sinks depends on the location of the soldered chip.
- Use a hairdryer to warm up the board for a few seconds. Thus, we increase the temperature of the board so that the flux spreads evenly.
- Apply FluxPlus, or any other no-clean flux, to the surface of the chip.
- Direct a stream of hot air onto the element to be soldered. Temperature during dismantling is 340 degrees Celsius. How can you tell when the solder has melted and it’s time to remove the chip from the board? There are several ways to do this: Track time using a stopwatch.
- Count down the seconds to yourself.
- “Push” with a probe or tweezers the microcircuit itself or the nearby harness (capacitors, resistors or coils). As soon as the chip being soldered begins to move, by a fraction of a millimeter, it is time to place the spatula under or use tweezers.
- Use a special spatula to remove any remaining compound;
Examples of fluxes intended for soldering BGA chips
How to choose a soldering flux for mounting and reballing bga chips? Below we provide examples of materials that meet most of the characteristics listed in the article. They were also tested in combat mode and proved their suitability in practice.
High quality flux for repair and soldering. Has transparent residues that do not interfere with quality control. Halogen-free. For dispensers or brush application. It is a yellowish paste with a viscosity of 6600±10% mPa.s. The declared shelf life without loss of properties is 12 months at temperatures below 10ºC.
Adhesive flux TF-A254 is indispensable for soldering and reballing BGA microcircuits in phones, laptops and other electronic digital devices, as well as when working with other SMD components. Flux TF-A254 must be washed using cleaning liquids. Vigon® is recommended. The unique technological properties of TF-A254 flux allow soldering even in conditions where the preheating was short, as a result of which the required heating level was not achieved.
We hope we were able to highlight all the most important nuances when choosing a flux when soldering BGA packages. Note that microBGA technology is currently gaining increasing popularity and demand. Where the distance between the leads is even smaller and the requirements for fluxes, as well as for other soldering materials, will be higher.
You can always get advice on selecting flux to solve your production problems by calling 8.
Soldering iron
PS-900 METCAL – induction soldering system. A soldering iron power of 60 W is quite enough to work with multilayer boards of modern electronics. Phone repair engineers have 4 years of experience working with this particular soldering iron. What are the distinctive features of the PS-900:
- no need for calibration,
- large selection of tips,
- reliability of the station, the consumable material is the inductor. With daily intensive soldering, the inductor is replaced on average once every 10 months.
Soldering iron
How to choose the right flux. Review of fluxes for soldering.
Today on the shelves of radio markets and electronics stores you can find a huge number of soldering fluxes of different purposes and prices.
Flux manufacturers offer truly high quality products, but finding them on the market is quite difficult. The number and options of fakes are simply amazing in their diversity. Even if you are lucky and find an original product, its cost will differ significantly from the cost of a fake. Most potential buyers, after comparing prices, decide to save money and look for a cheaper flux. Craftsmen select the optimal set of soldering chemicals for their requirements, which suits them in terms of technical parameters and price. But to do this, they have to sort through unknown fluxes and, through experiments, select the most suitable option for a particular job.
Hundreds of cheap fluxes with high performance parameters stated on the label are sold on almost every corner. But a completely unpleasant surprise may await you inside the package. Now let's figure out how fluxes are diluted and how this affects their technical characteristics .
Rosin instead of flux
Imagine the situation: you bought superflux, open the tube, and instead of high-quality flux there is low-quality rosin (waste from the production of rosin). Moreover, this same rosin is also very much diluted with some kind of contaminated technical petroleum jelly.
It is simply impossible to solder or tin with such a mixture. The so-called “flux” begins to “escape” from the soldering area. As a result, we get undeserved conclusions, poor-quality “cold” soldering, and contact pads and tracks instantly fall off the board due to overheating.
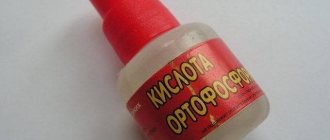
Flux diluted with acid
Very often, acids (citric, orthophosphoric) or chlorides (zinc chloride) are added to an already poor-quality flux. Compared to rosin, the picture immediately changes - everything is tinned and soldered. It seems that the flux is simply superb, but electronic boards cannot be soldered with such flux. It is very difficult, and sometimes almost impossible, to remove acid residues, especially from under SMD elements. Acid can even remain inside the solder, in the pores of the solder.
As a result, after a month or two, soldering with acid (or zinc chloride) crumbles into powder along with the terminals of the radio element. Repairs will then be very, very labor-intensive, and sometimes they will be completely impossible.
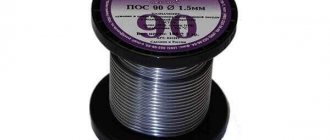
Solder selection
The choice of solder comes down to the choice of lead or lead-free, so in this matter everything is much simpler than the choice of flux.
Nominally, soldering with lead-free solder creates greater mechanical strength of the connection, and its chemical composition is more environmentally friendly (approximately 98% tin, 2% copper, silver). In fact, it is very difficult to feel this in practice, but otherwise lead-free solders are inferior to lead solders in all aspects:
- they are more difficult to solder, and for this you need to use special soldering stations;
- they require the use of extremely expensive fluxes;
- they are less wetted and spread over soldered surfaces;
Read also: Make a stand for an eye-machine with your own hands
As a rule, such solders are used in authorized service centers, where the control service strictly checks the quality of work and its compliance with the RoHS directive.
Among lead solders you can find a large number of variations on the theme of the classic POS60.
Pro'sKit 8PK-033F (POS63)
Pro'sKit 8PK-033DDS (POS62 with 2% silver added)
Cynel LC60-0.50/0.25 (POS 60 with the addition of flux)
and many others.
Also, solder coils may differ in weight and wire cross-section diameter. Here the choice depends only on your needs.
Flux diluted with glycerin
It also happens that glycerin is generously poured into the flux. Glycerin flux solders great, it's cheap and there's plenty of it, but try coating a board with it. And then measure the resistance of the PCB board. That's bad luck: it conducts current from units to tens of Ohms where it should not conduct. Even if you try to wash off the glycerin, and it washes off easily, the “conductivity” of the board will still remain! Glycerin is absorbed into the PCB (the resistance of PCB not coated with copper is from 10 to 50 Ohms ). For most devices this is simply not acceptable. Even the simplest and most banal schemes will fail. To somehow make the device work, try scratching the textolite between the tracks with a needle.
Conclusion: glycerin, acids, chlorides in no-clean fluxes for working with radio electronics, BGA and SMD components should not be used.
Basic requirements for high-quality flux for working with lead elements, BGA and SMD:
- lack of corrosive activity
- good tin properties
- high wetting ability
- no boiling when heated to operating temperature
- lack of electrical conductivity
- ease of removal of residues if necessary
- support for lead-free and lead-containing solders
- no-clean soldering technology (residues do not need to be washed off)
- ease of application (gel, paste)
- affordable price.
CHRONOLOGY OF CHOICE
I’ll say in advance - these are the first three fluxes that I had the chance to use at all, because before purchasing them I used exclusively pine rosin, fiddling with which I eventually got tired of, I wanted not to waste any more time, nerves and make my work easier during installation. The choice was completely banal and standard - a request for the word “Flux” and sorting of lots on AliExpress by the number of orders. 223
turned out to be the most popular , I ordered it first, inspired by the laudatory reviews of people on the seller’s page, but after using this consumable in reality, I realized that I could not share this numerous praise.
Then someone in the comments of one of the reviews here said that he was using a 100-gram Kingbo RMA- 218
, which he was pleased with - Ali ordered the same one for himself, only in a smaller package - a syringe.
This one worked for me at work. And the rarer 559 (UV TPF)
was bought in reserve from a video on YouTube, where the author of the video also demonstrated its good properties. Later, needles were also purchased, but more about them later.
Characteristics of fluxes and their features
Let's now look at some of them in more detail. First, let's look at the name. What do all these big letters mean?
- G (gel) - gel-like flux.
- NC (no clean) - does not require rinsing.
- 5268 – flux index.
- LF (lead free) - suitable for lead-free solders.
CHIPSOLDER G-NC-5268-LF
This flux is suitable for soldering tinned contacts. It has good thermal conductivity; the contact pad remains on the board and not on the soldering iron tip. Gel flux CHIPSOLDER G-NC-5268 LF is a high-quality, translucent, synthetic no-clean flux with resin-like characteristics. Used for soldering and disassembling BGA/SMD components. Suitable for working with a soldering iron, hot air gun, IR station, as well as for reballing.
The flux is made from highly purified components. Conveniently secures BGA and SMD components during soldering (“fitting”). Fully supports both conventional and lead-free soldering technology. Halogen-free for long-term reliability and excellent soldering performance.
It has minimal, “soft” activity when soldering, which allows you not to wash off residues. It does not boil, does not leave a dark “carbon deposit”, and remains a transparent gel after soldering. It loses transparency only at a temperature of -5 °C, but at the same time retains its properties. Easily removed using any alcohol-based (gasoline-based) universal product and a paper napkin.
It has excellent thermal conductivity (the component heats up as evenly as possible) and is very convenient to use. Does not contain solvents, does not dry out in the open air and does not harden after soldering. Suitable for repeated use.
CHIPSOLDER –G-NC-6500-LF
This flux is very similar to G-NC-5268-LF, but is designed primarily for lead-free solders. Although it also solders well with conventional (lead-containing) solders.
After soldering it remains transparent and hard (the residue is slightly harder than in flux 5268).
Can be used for re-soldering. It is not necessary to rinse off, but if it is necessary to rinse off, use any universal alcohol (gasoline) based product.
CHIPSOLDER –G-NC-6800-LF
The flux is intended primarily for “difficult” rations. It has the same adhesive gel consistency as G-NC-5268-LF, but has increased tinting ability. It removes oxidation well from the soldering site and is intended for both conventional soldering and soldering (tinning) of highly oxidized leads and contacts. It has high thermal conductivity, the component heats up as evenly as possible. It does not boil, does not leave a dark “carbon deposit”, remains a transparent gel after soldering, is easily wiped off with a paper napkin and is very convenient to use. Does not contain solvents, does not dry out in the open air and does not harden after soldering. Suitable for repeated use.
The flux residue is clean, soft, transparent, non-corrosive and non-conductive. Cleaning the residue is not necessary, but if necessary, it can be wiped off with a dry cloth or any alcohol-based (gasoline-based) product.
This flux is convenient for restoring “cold” solders, soldering after water ingress, as well as “fallen off” BGA contacts. Often, with the help of this flux, it is possible to tin even those contacts that more expensive fluxes cannot do.
GEL FLUXES
I don’t know anything about the original versions of the reviewed fluxes. Those who have “touched” the originals in practice can tell you more about this by comparing them with what I have. The printing of the 218
, as you can see, has almost completely worn off, but the
559
has also partially begun to peel off the coating on the label.
The cheapest 223
ironically retained its original appearance. All three options come in 10cc syringes.
Holographic stickers from Kingbo 218
and
NC-559
The caps covering the nozzles of the syringes are different for everyone, but for more expensive fluxes 218
and
559
- they are screwed onto the thread.
On the back there are caps with latches. As for the cheap 223
, it has ordinary covers on both sides without any thread or fixation.
has 218
, immediately after receiving it, I saw small bubbles inside:
And when extruding without a needle, sometimes it looked like this:
But soon after several uses, the bubbles “settled down” and came out.
I smeared a little bit of one of the fluxes on the board. From left to right: Vaseline-like substance - 223rd
, cloudy -
218th
Kingbo, more transparent -
559th
If we look at all three in ultraviolet light, we are presented with another ironic moment: the 223rd
and
the 218th
flux, where UV was not declared, are clearly visible, and
the 559th
flux, where UV was declared, is not noticeable at all:
Fluxes SP
These fluxes are similar in characteristics to the CHIPSOLDER series of fluxes, but they are a little cheaper. It should be noted that the cost did not affect the quality. They can also work great and get good results. Now let's look at each of them in more detail.
So, let's start with SP-10+ flux
This is a cheap and pretty good low-activity flux. It is recommended to be used for mounting and dismantling FLIP CHIP, BGA and SMD components, crystals, as well as for repair work using a soldering iron, hot air gun, and IR equipment.
Has virtually zero activity. Used for soldering and dismantling tinned leads. Suitable for lead-free solders. SP-10+ is absolutely safe for radio components. Evenly distributes temperature during soldering and prevents peeling of printed conductors. It has an adhesive consistency (viscous, sticky), does not cause corrosion, and reliably fixes elements when soldering. It also does not conduct current.
The flux is used without subsequent cleaning in printed circuit assemblies. Suitable for use in various environmental conditions.
The SP-15+ will be next on our list. This is a universal flux. Has average activity (“soft” activity). In terms of its characteristics and scope of application, the SP-15+ is virtually no different from the SP-10+. The main difference between them is activity: SP-15+ is medium active, and SP-10+ is low active . It is recommended to use it for warming up and mounting BGA dumps, as well as for mounting and dismantling FLIP CHIP, BGA and SMD components.
SP-18+ is no longer just a flux, but a medium-active flux paste .
It is recommended to be used for low-temperature soldering. Designed for soldering with solders with a melting temperature from 80 to 180 °C . Not suitable for lead-free solders. Evenly distributes temperature during soldering and prevents peeling of printed conductors.
There is a small amount of residue after using SP-18+, but it can be easily washed off if necessary. This flux paste has a slightly yellowish color, is non-corrosive and safe for radio components.
SP-20 is already an active flux paste .
Recommended for most types of work. It has increased activity, tins well without acidic effects.
SP-20 , like SP-10+, SP-15+, SP-18+, is used for mounting and dismantling FLIP CHIP, BGA and SMD components, crystals, as well as for repair work using a soldering iron, hot air gun, IR equipment . Suitable for lead-free solders.
Can be used for soldering and tinning of oxidized leads and contact pads. Also suitable for warming up and installing BGA dumps. Flux is used for various printed circuit assemblies with high-frequency circuits.
After working with SP-20 there is a small amount of residue that can be easily washed off if necessary. This flux paste does not conduct electric current, is safe for radio components and reliably fixes elements during soldering.
The main difference is consistency. SP-30 is a translucent, adhesive gel. The flux is intended for repair and production of electronics. Can be used with all standard solders.
Which flux is best for bga soldering?
Hello, I would like to hear a professional opinion on some aspects of soldering.
1. What is the best flux to use (not very expensive) for soldering connectors, small things, etc.? (Now I’m soldering some kind of F5, but it’s not very good).
2. What flux should I use for soldering BHA? Now I'm soldering RMA-223 (most likely a fake).
3. When you plant a BGA microcircuit, do you need to coat the contacts and board with flux?
4.What is the best way to wash the board after fluxes?
Thank you in advance .
1 . , any flux you like..(I sometimes solder connectors with active flux for soldering aluminum..but then rinsing in water is necessary)
2. I myself have been using FluxPlus EFD for 4 years PN: 7019074
3. Before planting the bga... I apply flux only to the board
4. Flux-off perfectly removes flux residues from the board (without cleaning). (I also often use gasoline galoshes.. and isopropyl alcohol)
after soldering the board with active fluxes...it is advisable to rinse it in a high-pressure cleaner...at least in water..
Does it matter what flux you use? Try a few and decide for yourself which one is better. Flux Plus, which everyone praises so much, for me personally is simply unbearable with its smell. I use Chinese in a round jar, whatever it’s called, who knows, but the smell is normal and there are no problems with soldering. I use it everywhere, I don’t see any point in washing the board after it - I cleaned the galoshes and that’s it. If you use it in moderation, no one will ever notice that someone was soldering until it starts to heat up. But it’s not like you disassemble the phone after the “masters” and there the entire board is covered in flux, so you can’t even see the markings on the M/S, but you can’t even see the key
this is if “the craftsmen use solder fat... Chinese... which they buy” the distinctive feature of such a flux... when heated... it begins to smell like machine oil... or some other sh-t... but that means you bought a fake fluxplus... because the original has practically no smell. ) and it costs from 400 rubles per tube of syringe..and for “meisters..this is a scribe, what money...”
this is if “the craftsmen use solder fat... Chinese... which they buy” the distinctive feature of such a flux... when heated... it begins to smell like machine oil... or some other sh-t... but that means you bought a fake fluxplus... because the original has practically no smell. ) and it costs from 400 rubles per tube of syringe..and for “meisters..this is a scribe, what money...”
Who the hell knows. I took it from the locals (250 rubles), the guys gave it to me (they say they bought it from gsmserver, which by the way the sticker says on the syringe) the smell is the same. I do not like him.
Nope! Fluxplus orig. It smells specifically (for me – pleasant) when heated, I can distinguish it from thousands of other fluxes or odors. Smells like pine resin concentrate or something similar: classic:
Whoa. That's exactly what it smells like. If there is no hood it is impossible to breathe:lol:
Hello, I would like to hear a professional opinion on some aspects of soldering.
1. What is the best flux to use (not very expensive) for soldering connectors, small things, etc.? (Now I’m soldering some kind of F5, but it’s not very good).
2. What flux should I use for soldering BHA? Now I'm soldering RMA-223 (most likely a fake).
3. When you plant a BGA microcircuit, do you need to coat the contacts and board with flux?
4.What is the best way to wash the board after fluxes?
Thank you in advance .
1. For soldering connectors, it is better to use pine rosin, preferably obtained independently from a Christmas tree in the forest, a natural product. You won't run into a fake. 2. For soldering the bga, I use the same rosin, crushed in a coffee grinder (or twisted in a meat grinder) and mixed with windshield washer fluid, the liquid is cheaper - it is stronger. 3. You can plant the bga dry, spit a little onto the soldering area. 4. Oddly enough, the board is best washed by a solution of cow's milk with water and Klin beer.
Good luck with the repairs.
1. For soldering connectors, it is better to use pine rosin, preferably obtained independently from a Christmas tree in the forest, a natural product. You won't run into a fake. 2. For soldering the bga, I use the same rosin, crushed in a coffee grinder and mixed with windshield washer fluid, the liquid is cheaper - it is stronger. 3. You can plant the bga dry, spit a little onto the soldering area. 4. Oddly enough, the board is best washed by a solution of cow's milk with water and Klin beer.
Good luck with the repairs.
You burn:lol: did you remember to pour gasoline on it and then set it on fire? To dry better?:lol:
Thank you all very much for the advice, in general, can the connectors be soldered with RMA 223? What liquids can you use? Which cleaning spray is best to use to clean boards from oxides and flux?
And another question: why is this paste used? https://ua.all.biz/img/ua/catalog/1008010.jpeg
Somehow I’m not keen on expensive fluxes and pastes. Kanesh understands that this is professionalism and sometimes saves time, but I use paste for 25 UAH and a jar of gumboil for 15. Everything works out great.
ZY Before planting the BGA, I don’t give a lot of paste, because the mikruha rides on it. When she’s already hooked, then I give it from the heart and give it a good drink and push...
ZY Before planting the BGA, I don’t give a lot of paste, because the mikruha rides on it. When it’s already hooked, then I give it from the heart and solder it well and push it.. And so that it’s soldered well, use more paste under the bga:laugh: . We are talking specifically about paste, right, not about gumboil?
Which cleaning spray is best to use to clean boards from oxides and flux? It will be 2 different sprays, or even 3 or 4.:wink:
Instructions for reinstalling BGA ICs
privet uchastnikam foruma, nashel v seti, spasibo bond95, Escobar i kyputejib
Rolling of BGA microcircuits.
I was prompted to write this manual by the constant questions from novice GSM repair technicians. I don’t want to pretend to be original and I’ll try to write, perhaps not based on science, but solely from my own experience. So please don’t criticize if something is wrong, but simply supplement my notes with your own experiences. And so what we need for normal rolling of balls onto the BGA chip.
1. Stencils (preferably the latest configuration) which include almost all currently available stencils for BGA chips used in GSM REPAIR (usually purchased from sellers of components and equipment).
2. Paste for rolling microcircuits (usually purchased there or at radio markets. The reseller of this product should tell you which paste is best to use). I want to say right away that as a rule, a set of stencils also comes with a tube of paste, which 99.9% is simply bad, so don’t entertain yourself with illusions and immediately buy the paste separately.
3. A tool for applying the paste. This can be a small spatula (the kind I’ve been using for years), a rubber spatula (usually included with stencils) or any other similar tool.
4. Crooked tweezers (purchased wherever possible, usually in MEDTEKHNIKA stores)
5. A roll of adhesive price tags used in stores and markets to write the prices of goods. No surprise, I didn’t make a mistake and then you will understand why this material is needed. As a rule, along with stencils there is a set of small clamps and niches for microcircuits of different sizes, the so-called machine. But using it is quite inconvenient in terms of time, the procedure of laying and clamping the stencil with the microcircuit takes too long. I know people who use them, but most prefer the PRICE LIST method.
6. I missed it. Flux paste for soldering BHA microcircuits and more. This is for those cases when you need to tin a clean microcircuit, or one that has been removed but in some places with oxidized spots (legs), as well as the board on which the microcircuit will be installed.
7. A coil of copper or silver-plated braid to remove excess solder and tinning.
9. A low-voltage and low-power soldering iron with a thin tip. The thickness of the tip at the end is about 0.5 mm, perhaps I didn’t measure thinner.
10. Soldering station or HAIRDRYER for hot air soldering with a set temperature of 270-300 degrees Celsius.
So, if we have all this, we can safely start rolling microcircuits .. We take a new microcircuit (although these are usually rolled from the factory) or a used one with which we will have to work, we tin it by first applying a little flux paste to it. We tin it using braids or with the soldering iron tip itself, barely touching the spots on the microcircuit, but at the same time we make sure that each one is well tinned and shiny and not dull (which indicates that the spot is either poorly tinned or slightly oxidized) At the end, we take a linen or cotton napkin soaked in alcohol and degrease the microcircuit until it is clean. We select a stencil according to the configuration of the legs of the microcircuit. We paste the microcircuit with its front side on the price tag, take the stencil and now, having aligned the microcircuit according to the drawing, glue it to the stencil with this price tag. We place the stencil with the microcircuit on a flat surface on which soldering will be performed. that is, heating (I don’t recommend it on a home table in the kitchen because after heating with a HAIRDRYER, as a rule, scorched places remain and household members may not understand your creative nature). We press the stencil to this surface with curved tweezers and apply the rolling paste which was described above. Before this, we squeeze the paste onto We apply our spatula with it, trying to carefully hammer in every single hole in the stencil, but at the same time, everything around the holes should be clean of paste. When the application process is completed, without releasing the stencil, which we hold pressed to the surface with tweezers, we take the HAIRDRYER with our free hand and begin to heat the place where we applied the paste. It is advisable to warm up from a distance of no more than 5 centimeters and rotating in a circle, evenly heating the entire area of the microcircuit. When you see that your paste driven into the holes of the stencil has turned into small balls in these holes, you put the HAIRDRYER aside, but at the same time, do not release the tweezers, allowing the microcircuit to cool for a minute and a half. After that, removing the tweezers, remove the price tag from the back of the stencil and carefully prying the microcircuit at the corners with a scalpel or something similar, remove it from the stencil. If all the conditions have been met and the stars on you are located as they should, then you should have in your hands a microcircuit dotted with small balls, which is what we wanted. We check whether all the balls are in place, if not, then we deliver the missing ones by hand by squeezing it out of the stencil and carefully with a needle placing it in a place where it cannot be reached, first smearing the place with a little flux paste, then placing it on a flat surface, heat it with a HAIRDRYER until it melts and is soldered in place. That’s all in a nutshell.. I’ll repeat it again, maybe this is not an ideal soldering method, but I described all this from my experience, maybe I missed something, but if this is the case, I think that the EXPERTS will correct me.
Read also: Collet for wood milling machine
With respect and wet brow Gray (bond95)
Business for 20 minutes. I do this, heat the board in a vice, sometimes I notice the corners with a syringe needle. Hairdryer on a hanger temperature 200-1 min. flux all around, temperature up to 330, – I touch the air with tweezers as much as possible, I’m ready! depending on the company. The pace is different but 330 is the limit!
I remove the micro with angled tweezers, immediately remove it with a solder under the micro, leaving all the remaining balls, 2 balls diagonally. I brush with a toothbrush with a degreaser and hold it. I check with tweezers under the mukr - I put everything aside. At this time, the board has cooled down, but not completely, I remove everything down to the nickel with a sting, then do the same with a brush, it dries for all of 5 minutes! Then I take the stencil, try on the chip for which matrix it fits - I found it, honey. the patch, I stick it under the microm, I make sure that everything is even, everything is smooth, I squeeze the patch with my fingers, fortunately, the remaining balls immediately become like on rails. The paste is applied to the finger and the circle. I rub it in with movements and remove the excess with my fluorine finger.
Hairdryer 200 g, flow min., heat, 1 min, ready. After 30 seconds, everything cools down to deg-40-80, I remove it with my fingernail, tear off the microscope, under a microscope, a 240 hair dryer, I warm it up to half-air and see how the balls are in place and secured. At this time I also clean the stencil for another 5 minutes.
half a minute, cooled down, put the balls down on fine sandpaper in a couple of circular motions, the balls were aligned and in a semicircle, ate 1 quarter of the size of the ball. Under the microscope, I look to see if everything is ok, I clean my hands with a brush with a degreaser, the remains of flux and shavings are gone, marks are visible on the sides!
Fee for Melkscope, a drop of flux, hairdryer 200 gr. The flux has flowed, I twist the board so that it spreads evenly. I place the chip, according to the marks, and align it with the microspm so that everything is clear. hairdryer 200, air min!, the flux has spread around, I center it with tweezers and tap it, if everything is smooth, the tempo is 300 half air, the chip twitches and sits in place, the flux does not boil! I see everything in the microscope! To be sure, you can poke it with tweezers and the chip should shake like jellied meat. The last point cannot be done if there are wires stuffed under the BGA! That's it, cool down for about 4 minutes, remove excess flux with a brush. Out of 10, it turns out 9 times, sometimes again more often due to the fact that it has moved a little, and this moment is about the ball. In principle, about 20 minutes, if you don’t smoke, don’t chat on ICQ or your cell phone. It is beneficial to change the cable on a Samsung slider during this task. And of course, the mood affects the quality of work. Sometimes I’ll throw 20 pieces in a day, how to accumulate, but sometimes in the morning it didn’t work out and that’s it, on the shelf - until tomorrow.
Chinese crap stencils from Sirius, a set of 10 matrices - enough for six months Flux 6412A from Sirius Paste 62NCLRA - from Sirius Medical plaster from a pharmacy - translucent for the layer. coil 2 cm by 5 meters - 30 rubles Medical equipment tweezers - 40 rubles, manufacturer - I don’t remember
Glass - the same thing, I remove it with a tip with a drop of solder
Of course, everything looks simple, but this technique allows you to quickly get the hang of it.
I couldn’t resist watching how some people complicate everything! For me, the problem is to find a fault, but you can learn how to fix it, as long as your hands are in the wrong place
take the mikru, remove it when there is an abundance of flux at 380-400 degrees (it’s 60-80 degrees in reality) on the 852nd D (China), clean it with copper wire dipped in flux (I try not to use braid due to its large size) and the board and mikru, in the end - neat hemispheres made of tin, both here and there. Using a cleaned soldering iron, I place icicles in the corners of the micra, apply a stencil according to the design or a universal one to the micra, a metal plate under the micra, and press it along the edges with clothespins from a set from the kit. wasp beds. Well, applying the paste and rolling it up is no problem, the only caveat is that nothing flies off anywhere, and the air flow is uniform - I completely remove the nozzle from the hair dryer, it’s better without it, and the air flow is 60-80%. Well, with the seeds and butter 8800, the same canoe, so that the balls are all rolled out, you need to hold the stencil with tweezers. If 1-5 are not rolled out, use flux in micro quantities and the balls remaining in the stencil - a needle and a hair dryer. method - 10 minutes, or even less, look - I’ve already put it in place, the main thing is to fill my hand, yes, and I remove the mikru from the stencil exactly 15 seconds after I removed the hair dryer. You take off the clothespins and the micra fits into your hand by itself.
Choosing a flux for soldering
First you need to understand what flux is. Flux is a substance that allows hot liquid solder to wet solder joints. After the solder cools, a solder joint forms. If you do this without flux, you will end up with a cold solder joint that may fall off immediately or over time. All fluxes exhibit acidic properties when hot. Many are acids at ordinary temperatures, for example, orthophosphoric acid, soldering acid. The higher the acidic properties during soldering, the stronger the flux, the better and faster the soldering will be. Here is a list of fluxes we produce in order of increasing activity. The higher the number, the higher the activity of the flux.
- Rosin
- Liquid rosin
- Flux paste
- Liquid rosin LUX
- rosin gel
- rosin gel active
- LTI-120
- Glycerin hydrazine flux
- FIM
- F-34
- Soldering acid
- Orthophosphoric acid
- F-64
Solder quality
After completing the soldering work, you need to make sure that the bga soldering is done efficiently. Control is carried out in several ways:
- Visual.
- Measuring.
- Turning on the device.
- Connect to a laptop and check in 3uTools.
Read more about verification methods in the following material. For example, when diagnosing the iPad Air charging circuit by connecting the board to the LPS, with a working TRISTAR, the current consumption should be no more than 0.07 Amperes.
Choosing a flux for soldering
Soldering small radio components onto a printed circuit board.
If all the parts are tinned, then Liquid rosin or LTI-120 will suit you. There is no need to remove residues, but ensure they dry as liquid residues can have mega-ohms. Liquid rosin can be replaced by flux paste; due to its paste-like form and non-drying base, it has some advantages. Residues are harmless but difficult to remove. A modern means of replacing liquid rosin and flux paste is Rosin gel. Having all the advantages of both fluxes, it, consisting of modified rosin, is as easily removed as Liquid rosin, and at the same time has a higher activity. A gel-like replacement for LTI-120 is Rosin gel Active. In structure it is a rosin gel and in activity it is comparable to LTI-120. Rosin is used quite rarely today for soldering radio components. Steels are widely used LTI-120LUX and Liquid rosin LUX due to their fashionable property of absolute water washability. For soured radio components, it is better to use LTI-120 or Rosin gel active, as well as the new fluxes LTI-120LUX and Liquid Rosin LUX.
Soldering small radio components onto a printed circuit board.
Rosin activated fluxes: LTI-120 or Rosin gel active cope excellently with large-sized radio components. Glycerin hydrazine flux has also proven itself very well, but after it it is necessary to clean the soldering areas with hot water from glycerin residues. Residues of Glycerin hydrazine flux do not oxidize soldering and for parts not related to electronics, residues are acceptable, but residual mega-ohm resistances are possible on the printed circuit board.
Iron, copper, brass. Small parts.
When the parts are small and you don’t have to resort to acid fluxes, use Glycerin hydrazine flux or LTI-120. Water-containing LTI-120LUX and Liquid Rosin LUX can also cope with this task. Flux paste often helps. Sometimes what is more important is not the activity of the flux, but how long it takes for it not to evaporate at the soldering temperature, since the part still needs to be heated and during this time the active, but quickly evaporating flux will evaporate. This is where water-based fluxes, such as LTI-120LUX and Liquid Rosin LUX, Hydrazine Glycerin, come in handy. In addition, non-drying fluxes Rosin gel Active and flux paste can be very useful for the same reason as water ones. Unlike water-based fluxes, they do not hiss and melt beautifully.
Iron copper brass, galvanized iron. Massive details.
In such cases, take acid fluxes: Soldering acid, Fim, Phosphoric acid. Acidic fluxes begin to work instantly and it seems that the part needs to be heated less. This is an illusion, but it reflects how much easier parts can be soldered when using acid fluxes. Orthophosphoric acid and soldering acid are more or less similar in activity. FIM flux has less activity. They differ in their residues after soldering, and for such active acid fluxes this is very important. The residues of orthophosphoric acid begin to interact with metals first. These are dark gray deposits of phosphates. But these residues are quite stable and create a strong phosphate film that protects the metal from oxidation. Suffice it to say that this acid is used in auto repair shops instead of galvanizing, which is unreliable in garage conditions. Phosphate coatings obtained in this way reliably protect iron from rust. Cl of soldering acid takes a little longer to manifest itself. The residues are metal chlorides that form unsightly oxides. If it is iron used outdoors, then it can become a catalyst for rust. And finally FIM flux. Its remains, due to the low content of orthophosphoric acid, are slightly corrosive, so it is well suited for clean but active rations. A question that very often arises among people who solder with active fluxes: What to do when you are soldering a product and the last seam closes the container? Some of the flux will remain inside and it will no longer be possible to remove it. The answer to this question was found in Soviet times when sealed casings of infrared instruments for satellites were sealed. The last seam was made exclusively with orthophosphoric acid. The quantity was selected exactly as needed for soldering. The flux was applied with a pointed wooden stick soaked in acid. The sufficiency of flux was determined by how much flux was sprayed. Control autopsies were carried out after climatic tests. On the inside of the soldering joint, where removal could not be carried out due to inaccessibility, flux residues formed persistent phosphate films that did not affect anything.
From everything I said, it’s clear that the residues need to be removed. And if in the case of orthophosphoric acid it is necessary to remove residues for aesthetic reasons, then in the case of soldering acid this will prevent further troubles. How to remove acid residues? Ideally rinse off with plenty of water with a brush. It is better to use Flux Remover after this, which neutralizes the acidity of acid flux residues. Wiping with a damp cloth is also widely used. Usually two or three movements are enough. But you need to wipe it, not like you brush crumbs off a table, but with a little effort so that the soldering shines. It is better to remove rosin fluxes using a “rosin solvent”, but you can use most solvents sold in household goods or alcohol.
Choosing a tip for a soldering iron.
First of all, you need to make sure that the tip is actually suitable for your soldering station. Information about this can be obtained from the product description, but it is better to clarify this point with a manager or technical consultant.
Next, you need to decide on the scope of application of the soldering station and, based on this, choose a tip according to the shape and size of the tip.
1. “Needle” type stings . Most often found in the standard configuration of a soldering station.
This tip is convenient for desoldering small components. The heat transfer of such a tip is not very high.
2. Bevel tip (one-sided cut) . This is a universal type of tip, so most likely the single-sided cut will be your main working tip.
Models with bevel diameter 1
3 mm - suitable for installation, primarily of discrete radio components, as well as for many SMD components.
Models with bevel diameter 3
5 mm is more suitable for soldering massive contacts and wires.
A separate type of tip with a bevel is the so-called “microwave”. Much has already been said and written about the miraculous properties of the “microwave”. We note that indeed, at the moment, this is the most universal type of tip, with which you can successfully solder planar microcircuits in different cases, efficiently and simply tin the board, connect large-section wires and at the same time achieve high mechanical and aesthetic quality of contacts. The whole secret of this type of sting lies in a small notch on the cut surface.
The only drawback of the “microwave” is the lack of models with a cut diameter less than 2 mm. This is due to the difficulty of applying a notch of sufficient size.
3. Double-sided cut tip (wedge) . Comparable in popularity to a one-sided cut, but the choice between them is still a matter of personal preference. The author of the article prefers to use such tips with a diameter greater than 5 mm for soldering massive contacts.
4. Knife-shaped sting
It cannot be called universal, because when used to solve ordinary problems, it is inferior in convenience to the wedge-shaped one. Therefore, the scope of its application is quite specific. This tip is very effective as a cleaner of contact surfaces under BGA chips. In addition to the tip, you will also need solder-absorbing braided tape for this task. Large BGA soldering repair kits that have a built-in soldering iron, such as the Quick IR2005, are equipped with a knife-shaped tip for this very purpose.
5. Tip for SMD
As the name suggests, this tip is designed specifically for SMD components.
Its shape allows two contacts to be heated simultaneously, which greatly simplifies the process of this type of soldering.
You should select a tip that matches the size of the components you are working with.
6. Sting tunnel.
It can only be found in combination with powerful soldering irons (above 100 W) or soldering stations for lead-free soldering. It is used for joining copper sheets or other tasks that require a large heat capacity of the tip.
AOYUE (LF) WQ-1402
Choosing a nozzle for a hot air gun comes down to determining the type and size of the microcircuit for which it is actually purchased.
The most common nozzles for housings are BGA, SOP, QFP, PLCC, BQFP, SOJ, TSOL.
It is worth paying attention to the fact that turbine soldering stations (Lukey 702, Lukey 898, Lukey 868, Lukey 852D+Fan and Lukey 853D) are not compatible with standard nozzles. To use them, you must purchase a special adapter.
In the following articles we will talk about other consumables and accessories for successful soldering.
Yuriy Stakhnyak, Technical specialist at Masteram tool store
Theme Options
Display
- Linear view
- Combined view
- Tree view
Soldering aluminum.
There are many “ways” to solder aluminum. For example, rub a soldering iron tip under some kind of rosin flux and maybe the solder will stick to the aluminum in some place. All this is more like making fire with tinder. Today everyone uses lighters. And for soldering aluminum there is a modern flux F-64, which easily solders aluminum just like rosin flux solders a printed circuit board. But don’t get carried away - when soldering a lot, turn on the ventilation. F-34 flux was made using a completely different chemistry. It is much less active, but also many times safer. Both are fluxes whose residues require removal.