Today, many country developers attach special importance to the uniqueness of their home. The distinctive feature becomes a highlight in the exterior of the building. True, there are not many such devices, and one of them is a weather vane. It has long been a popular element in Western European countries, but today you can also find a weather vane on Russian houses, the reason for installing it is to show the direction and strength of the wind.
Currently, manufacturers of various designer items offer a huge range of weather vanes made from different materials. There is no point in talking about shapes and design; the choice is actually wide. True, such a toy costs a lot of money, so it makes sense to figure out how to make a weather vane with your own hands from scrap materials.
Features of a weather vane with a propeller
This device can be of different shapes, most often the weather vane has the shape of a domestic or wild animal, an angel, a fairy-tale hero, or an airplane.
A weather vane is not only a functional device, but also a decoration for the roof of a house.
Selecting material for making a weather vane
The main criterion when choosing material for a weather vane should be the ultimate purpose of its manufacture. But despite this, it is recommended to choose the material that will make the structure a decoration of your home for a long time. A weather vane can be made from almost any material, but each of them requires different tools and equipment.
For more information about what you can make your own weather vane from, read our article - Where the wind blows from: how to make a weather vane with your own hands.
Wood weather vane
A fairly light and easy-to-work building material that does not require specific tools and skills. High quality raw materials are suitable for a weather vane. Before use, it is recommended to impregnate the wood with mixtures to protect it from dampness and harmful insects. However, such a product will not last long.
It is recommended to treat a wooden weather vane with a special preparation to protect it from moisture and pests
Steel weather vane
This material is durable and resistant to any mechanical stress. Most often, black or stainless steel is used for weather vanes. The second type is resistant to corrosion, has a long service life, but still requires proper maintenance and timely repairs. This can be a problem because the weather vane is installed in a place where repairs are quite difficult.
Steel has high anti-corrosion properties, which is why a steel weather vane can most often be seen on the roof
Copper weather vane
It is a durable metal that can even withstand hurricanes. It's quite easy to work with. Additionally, a layer of silver can be applied to the surface of a copper weather vane, for which reagents that are used in making photographs are ideal. This metal is resistant to corrosion, so the product can be exposed to rain for a long time and will last for a long time without repair.
Copper is highly resistant to weather conditions, so it is best suited for making weather vanes.
Plastic structures
Plastic is a modern material, characterized by high strength and resistance to sunlight. Another advantage is ease of processing. Plastic products can be sawed, glued, soldered, and the properties of the material do not change.
The plastic weather vane can be made in any color; it is highly durable and resistant to sunlight
Plywood
To make a weather vane, only multi-layer waterproof plywood is suitable, but you need to be prepared for the fact that such a product will not last long. Dyeing the material will help artificially increase its service life, but for a very short period of time.
To make a weather vane, you can only use multi-layer waterproof plywood
Tools for making a weather vane
The list of tools for making this device is quite simple:
- metal scissors;
- hacksaw or saw;
- sandpaper of different fractions;
- electric drill;
- Bulgarian;
- office tools, for example, ruler, pencil, glue.
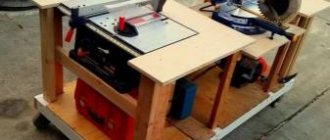
Airplane windmill made of plywood
A more reliable and at the same time simpler design can be made with your own hands from sheet materials. In terms of durability, sheet steel wins, but it is more difficult to process. It’s easier to make an airplane weathervane from moisture-resistant plywood.
The manufacturing process involves the following steps:
- You can draw the airplane pattern yourself on a large sheet of paper or print it from the Internet. The simplest diagram, as shown in the photo, consists of triangles.
The self-made weather vane remains to be fixed at the highest point of the roof.
This video shows how to make a beautiful airplane weather vane:
Basic elements of a weather vane
Regardless of what shape your weather vane will be, it must contain certain elements, the main ones being an axis and a flag with a counterweight.
Vane body and axis
The body serves as a support for the entire structure. Both steel and brass pipes with a diameter of 1 inch are suitable for its manufacture. The body has a strictly vertical axis - a rod, usually made of steel reinforcement.
The main function of the support rod is to hold the windmill. The diameter of the reinforcement is about 9 mm, this is enough to withstand strong winds and any other mechanical load that will act on the weather vane.
The weather vane body is the support of the entire structure
Flag with counterweight (wind vane)
The main part of the device located on the vertical axis. The flag shows which direction the wind is blowing. The counterweight serves to balance the flag and is located on the opposite side. The main difficulty in the manufacture of this element is that the flag and the counterweight must be located evenly on both sides of the axis, that is, have the same mass.
Of the entire structure, it is the weather vane that is of artistic value. An experienced craftsman is able to make a part of any shape without disturbing the balance between the flag and the counterweight.
When making a weather vane, it is important to maintain an even distribution of mass on both sides of the axis
Protective cap
The protective cap has the shape of a circle or a cone and is located on the axis of the weather vane, most often directly above the body. Its main function is to protect the housing and bearings from moisture and dirt.
Rose of Wind
A cardinal direction indicator consisting of two rods crossed at an angle of 90°. As a rule, the rods are attached to the top of the lid in a stationary state. At the ends of the pointer, letters are installed to indicate the cardinal directions. To fix the element in the correct position, you need to use a compass.
To set the cardinal direction indicators in the correct direction, you need to use a compass
Bearings
They are located inside the body and ensure free movement of the supporting rod under gusts of wind. The internal diameter of the parts is 9 mm.
Fasteners
The choice of fasteners depends on the material used and the method of fastening. These can be corners, overlays, bolts, rivets.
Propeller
It helps determine wind speed. You can make the propeller yourself from plastic and wood or use ready-made parts.
It is the airplane with the propeller that looks most organic, since this detail is also present in the original design. And it’s much easier to model this shape than others.
The plane is ideal for making a weather vane with a propeller
Children's windmill airplane made from PET bottles
If a windmill is needed only as a children's toy, you can make it with your own hands from plastic bottles together with your child. When choosing a figure, it is better to choose an airplane. To make it you will need a 2 or 1.5 liter PET bottle, a wooden block, cardboard and a cutting tool.
The aircraft is manufactured in the following order:
- For the body of a homemade windmill you will need 1 bottle. If you make a propeller from the bottom, you will need to take another container. They are washed from labels and dried.
- Cut out a long rectangle with rounded corners from thick cardboard. These will be the wings. The propeller can also be made from cardboard by simply placing it on the neck of the bottle, but it will not rotate well in the wind. It is better to cut this part from the bottom of the second bottle, as the photo shows.
- Using a stationery knife, make two slits along the body of the bottle along the width of the wings. The prepared cardboard rectangle is inserted into the slots, and a small cockpit window is cut out above them.
- Holding it with pliers, heat the nail red-hot over a fire and burn a hole in the center of the plug and plastic propeller. Next, these two parts are connected to each other, but with a cold nail. It is necessary to check that the propeller rotates freely around its axis.
- Similarly, burn a through hole in the neck. Through it, a weather vane is nailed to the end of a wooden block, which acts as a stand, and the lid with the propeller is screwed on.
- The body is decorated with colored stickers or you can decorate it yourself with acrylic paints.
In the cockpit of a finished aircraft, you can seat a pilot from a small children's toy, as shown in this photo. Now all that remains is to attach the weather vane to the high mast and admire the airplane you made with your own hands.
In this video you can see the making of an airplane weather vane from PET bottles:
Drawing of an airplane weather vane with a propeller
A weather vane is usually located on the roof, so high aesthetic demands are placed on it—its appearance will judge not only the taste of the owner of the house, but also his wealth. Therefore, it is very important to design the structure correctly, while showing maximum imagination and creativity. The drawing of the future model should be as detailed and accurate as possible.
The drawing of the future aircraft model should be as detailed as possible and with exact dimensions
Final revision
In order for a metal weather vane to serve for a long time and at the same time have a presentable appearance, it must be carefully painted, having first prepared the surface well. First, use sandpaper to remove the rust, completely down to bare metal. Then we coat it with automotive primer (you can also use a rust converter). After the primer has dried, you can paint it.
Winged horse - why not decorate your home
We take paints for exterior work. All automobile ones are perfect, but oil-based ones, such as hammer ones, are also suitable. They give an interesting effect. You can also try painting with powder paints, but they require special conditions - high temperature. Otherwise, the coating will quickly fall off.
After applying the paint, leave the product to dry for two days without touching it with your hands. Such paints take a long time to dry (with the exception of powder paints), and after “testing” stains remain. If you are satisfied with the quality of the painting, you can install the weather vane in place.
Read also: How to make a potato digger with your own hands video
Selection of tools and materials
Let's start with the materials, because this device is installed on the roof of the house, it is subject to all known natural loads, so you will need to think about its service life in advance. In principle, you can make a weather vane from anything with your own hands. The most common varieties are made of wood (mainly plywood), sheet iron, and rarely copper. Although the copper option is considered ideal.
A wooden weather vane, even if treated with protective compounds, will last for several years. Steel will last for several decades if it is periodically tinted, which is not always possible. But copper is an eternal design. In addition, copper sheet is the easiest to process, and decorating it will not be a problem.
Many craftsmen have recently turned their attention to plastic, fortunately sheet material is available for free sale today. Processing polymer material is simple; there is no need to use any complex tools. But such a weather vane can be installed on the roof of a summer house. It simply won’t look good on a big, beautiful house. Here expensive materials are needed to match the structure.
As for the tools, they are ordinary; every owner has the necessary arsenal in his barn. For example, metal scissors, a hacksaw, a saw, a file, sandpaper, an angle grinder, a drill, a ruler and a pencil.
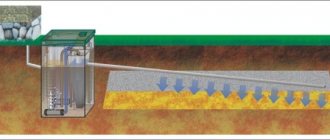
Chimney Decoration
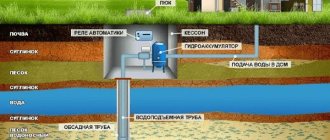
To enhance the efficiency of the chimney, as well as to protect it from precipitation and debris, you can design and install a weather vane deflector with your own hands. The height of the structure should be in a ratio of 1.7 to the internal cross-section of the chimney. The width of the deflector is 1.3 times the diameter of the smoke channel. Galvanized iron sheets, copper or stainless steel are suitable for manufacturing.
First, on thick cardboard, a sketch is made in expanded form of all the parts: cap, cylinder, diffuser. Using the templates made, these parts are cut out on metal. The entire structure is assembled together, the individual elements are bolted together, either welded or fixed with rivets.
The finished product is installed at the end of the smoke channel using a ring with a bearing assembly so that the housing rotates together with the deflector visor. A weather vane on the chimney pipe will not only provide a constant flow of fresh air into the room and effectively remove flue gases, but will also become a real decoration of the roof.
Empty plastic bottles: use as intended
Four empty plastic containers can become material for making a simple weather vane. You will also need a cutting knife, a metal rod, and a pole used as the axis of the structure. We start making a weather vane from plastic bottles... by collecting empty containers.
Bottles are cut differently. For two of them, the upper part (with the stopper) is cut off for further use, almost half the length of the container. The bottoms are also not thrown away, but are used together with two others, cut off from the remaining two bottles. The result is two cut “tops” and four bottoms the height of a 200-gram glass.
On each of the four containers, using a sharp knife at an angle of about 45 degrees at the cut line, make one cut along the oblique in the form of a hangnail. This is a kind of fastener to which the weather vane parts will cling with the same burr. With the upper parts of the bottles, prepared in advance, proceed as follows:
- the plug of one of them is unscrewed;
- in the center of it, using a knife or a hot rod, a hole is made - a groove for the axis on which the entire structure will be supported;
- a plug with a hole is screwed onto the neck.
- the other “top” remains without a lid.
Read also: Discs for grinding concrete
The weather vane is assembled in the following sequence. First, the two tops are joined using cut surfaces with pre-cut grooves. Like a nesting doll, they are connected to each other by easily screwing one into the other. They attach the resulting “body” with oblique cuts at the junction of the bottom. They should be located around the volumetric body in one direction.
A rod, branch, metal rod - anything that can be used as an axis - is threaded through the bottom hole of the bottle. The top limiter will be the bottle cap, into the hole of which the axis of the weather vane will fit tightly. The structure is ready. Can be installed in a convenient place. When the wind blows, the light plastic blades will begin to rotate.
DIY metal product
Before you learn how to make a weather vane with your own hands, you need to evaluate your strengths. Metal construction is the most complex, but it is also of good quality.
Before you start working, you should prepare a template of the finished figure or prepare a sketch. Stencils are best made using cardboard. They will then be easier to transfer to metal.
You will need to make a drawing of the arrow and the rotating part of the structure, with their help the direction of the air will be shown. Everything should be written down on the drawing - the parameters of the arrow, the turning point and more.
For work you will need the following materials:
- metal sheet up to 2 mm thick;
- wire;
- metal tubes of different parameters and one profile;
- a metal ball (its diameter should be 80 mm);
- bearing ball with a diameter of 15 mm;
- 12 mm round rolled metal;
- iron plate.
The work requires special tools. We must not forget about personal protective equipment. You need to prepare the following:
- welding machine;
- angle grinder;
- grinder;
- electric jigsaw;
- file drill with metal drills;
- chisel and hammer;
- goggles, gloves and a special suit for protection;
- shield
When everything is prepared, you can start working. It is necessary to observe the order of its stages.
Production of elements separately
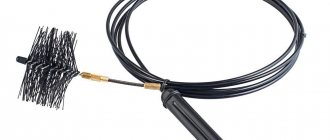
First, you need to apply a template of a figure to a sheet of metal, which will need to be cut out along the created contour. Then it is attached to the workbench and secured with clamps so that it does not move while cutting. The template is cut along the contour with a jigsaw, then the burrs are removed with a grinder equipped with a grinding wheel. Access to the remote ones is ensured thanks to a thin file. Small decorative elements are made using a drill, wire and other things.
An arrow to determine the direction of air is also cut out using a jigsaw along the contour marked on the sheet of metal. The arrow is not made completely at once, but only the plumage and the index element. These parts are welded to profile pipes, with the tail being on one rod and the indicator on the second. The welding joints need to be cleaned well.
The next part of the work is the production of the rotary assembly. You need a steel ball, a hole is made on it with a drill. The cover must be attached by a welding machine to a piece of tube of the required size. In order for the arrow tubes to fit tightly to the ball, minor indentations are made on both opposite sides. The two ends of the boom are welded to them, then a rod based on a profile tube and a partially round tube need to be attached to the ball.
How to fix it correctly
When the part of the arrow with the possibility of rotation is ready, you can fix the weather vane figurine on a metal ball. To tightly join the base with the ball, it is not entirely cut out like a semicircle and attached to the ball by welding. It is imperative to ensure that an angle of 90 degrees is maintained between the arrow and the turn. This or that figure is installed on the axis in such a way that there is a counterweight on both sides.
For free movement of the weather vane, a support rod is prepared. For this purpose, a round rod is placed in a copper pipe, then the elements are welded together. The bearing ball is inserted into a wide pipe and treated with lubricant. A copper pipe is also placed there. The finished structure remains to be painted and placed on the roof.
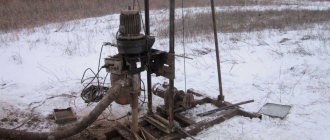
Making a wind generator at home using a car generator
- Articles
- Wind power
- Making a wind generator at home using a car generator
You can make a wind generator with your own hands from a car generator, you just need to do some modifications.
Research in the field of wind energy, namely the development of new ways to convert wind energy into electrical energy, has been going on for quite some time.
There are commercially produced industrial wind generators that are capable of providing electricity to entire villages. In this regard, many homeowners are studying with interest this direction of obtaining alternative energy and are wondering about purchasing or are interested in how to make a wind generator at home.
You can make a wind generator with your own hands from a car generator, you just need to do some modifications.
The option that we will consider in this article is assembling a wind generator from a car generator. In this case, a ready-made node is used (although it requires some modification). You will also need a propeller, battery, converter, mast and fastening elements. When choosing a wind generator design, preference is traditionally given to wind turbines with a horizontal propeller orientation due to their higher efficiency and less complex design.
Conversion of a car generator
The process of assembling a windmill from a car generator begins with choosing the generator itself. You can use any car generator, but preference is given to the most powerful devices from trucks and agricultural machinery. Many craftsmen use tractor generators AT700, G700, G.964. The power of a generator of this class allows it to generate a sufficient amount of energy.
Taking a car generator as the basis for the design of a windmill, you need to remember that it is designed to operate at rotor speeds of 1200 - 6000 rpm. A home wind generator simply does not require such speeds, so the autogenerator needs some alteration and modification: it is necessary to install a reduction gear or rewind the stator. This is done with a thinner wire with an increase in the number of turns by 5-7 times. The point of this procedure is to increase energy generation at low speeds.