Drilling wells is most often required when installing a water well, but in addition, periodically such work is needed: installing metal poles under a fence (gazebo, pergola), creating a field for collecting heat from the ground when installing an earth-to-air heat pump, when installing a columnar foundation and many other construction works. A small-sized drilling rig will facilitate and significantly speed up the processes. Having some welding skills, you can do it yourself.
Homemade drilling rig
Types of drilling rigs
Mini drilling rig
The units under consideration are classified in accordance with the characteristics of well drilling methods.
Thus, when performing percussion-rope drilling, the soil is destroyed by a heavy load tied to a support frame, the ribs of which in most cases are connected into a pyramid. The weight is simply lifted up and thrown down as many times as necessary to create a recess of the desired size.
Drilling wells using the percussion-rope method
Rotating drills are both simpler and more difficult to use. Such equipment requires much less physical effort on the part of the performer, but the design of such drilling rigs is more complex - many of the components of the system simply cannot be made with your own hands without special equipment and appropriate skills.
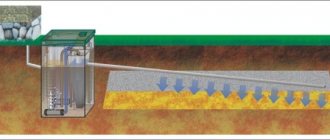
Well drilling diagram
As a result, some of the necessary elements have to be purchased or ordered. However, the cost of this is still significantly lower when compared with the cost of a factory-assembled installation.
In general, there are 4 main types of drilling rigs, namely:
- units operating using the shock-rope method. Externally, this design looks like a frame with a triangular base. A strong cable with a bailer is attached directly to the frame;
- screw-type installations. When such equipment is used, earth excavation is carried out using a special auger. The hole in the ground is not washed out during the drilling process;
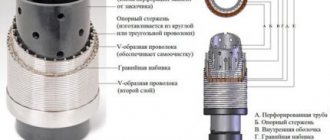
Types of drills for the auger method of drilling wells - rotary units. They operate using the principles of hydraulic drilling;
Rotary well drilling - rotary hand mechanisms. The simplest type of installation. The design does not include an electric motor - instead, physical force is used. It requires irrationally large labor costs, so it is used extremely rarely.
Rotary well drilling
Advantages of a DIY installation
- Relatively low cost. Ready-made drilling rigs are several times more expensive than their homemade counterparts. At the same time, a homemade mechanism will be in no way inferior to a more expensive factory-assembled installation.
- The technical characteristics of a homemade unit are fully consistent with factory-made equipment.
- Compact size and relatively light weight.
- Ease of use and maximum mobility. With the help of a small homemade installation, it will be possible to drill even in the most inaccessible areas.
- High speed of assembly and disassembly.
- Ease of transportation - a disassembled homemade drilling rig can easily be placed and transported in a light trailer.
Well drilling process
Drilling project
In the case where the depth of the aquifer is precisely determined, it is possible to drill directly with the length of the drill under the casing . When not, you must first find out at what depth the water layer is located.
That is, each borehole is an individual project and is influenced by the following characteristics:
- selected drilling option;
- depth of the aquifer. This does not mean the first layer that the drill reached, but the one that meets the conditions of use in terms of ensuring the debit of the amount of water;
- geological structure of the soil;
- the requirement to maintain the required distance to locations (installation of a “sanitary zone”);
- requirements for water quality and quantity.
Guide to assembling a homemade drilling rig
To assemble a drilling rig yourself, it is enough to have minimal experience working with a welding unit, an electric drill and an angle grinder.
Prepare the required equipment in advance. You will need:
- tool for creating external inch threads;
- Bulgarian;
- adjustable wrench;
- half-inch galvanized pipe, as well as a pipe of a similar size;
- plumbing cross.
Prepare everything you need and proceed to perform the work in accordance with the step-by-step guide.
First step
Do-it-yourself drilling rig
Prepare pieces of pipe for making the main part of the drilling device. The pipes will need to be fastened into a bracket and a cross. To do this, prepare a two-centimeter thread at the ends of the segments.
Weld pointed metal plates to the ends of several sections. They will serve as tips.
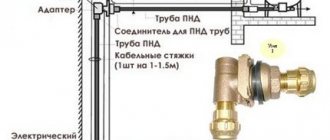
This installation involves drilling with a constant supply of water, thanks to which the actual construction of the deepening and soil removal will be easier.
DIY drilling rig
To supply water, connect a water supply or pump hose to any hole in the cross blank. Make the connection using a suitable adapter.
Second step
Proceed to connect the structural parts to the threaded connections. Connect a piece of workpiece with a fitted tip to the lower end of your working pipe. Make the connection using a squeegee.
Drilling itself will be carried out by deepening the pointed tip and rotating the working installation. Blanks with tips must have different lengths. You use the shortest jig first. Once the approximately meter deep hole is complete, replace the short tip with a slightly longer one.
DIY drilling rig
Third step
Assemble the base of the drilling structure from a square section profile. In this case, the base will be a rack with supporting components of the structure. The supports are connected to the main post by means of a transition pad using welding.
Attach the platform and motor to the square profile. Fix the profile itself to the rack so that it can move along the rack. The dimensions of the profile used should be slightly larger than the dimensions of the rack.
DIY drilling rig
When choosing an electric motor, be sure to pay attention to its power rating. To ensure optimal drilling conditions, a 0.5 horsepower motor will be sufficient.
Do-it-yourself drilling rig Do-it-yourself drilling rig Do-it-yourself drilling rig Do-it-yourself drilling rig
Power regulation is carried out using a gearbox. A flange must be attached to the gearbox shaft. Attach another flange to the flange using bolts. There should be a rubber washer between these two flanges. Thanks to the rubber gasket, shock loads that appear when passing through different types of soil will be smoothed out.
Fourth step
Connect the water. The liquid must be continuously supplied to the main working tool through a drill. Without a properly organized water supply, the quality of equipment operation will decrease.
The problem mentioned above can be solved by installing a special device made from a steel pipe below the flanges. Prepare 2 holes in the pipe section with some shift in relation to each other.
Next, you need to make a groove on both ends of the pipe to accommodate ball bearings. You must also prepare an inch thread. At one end the pipe is connected to the flange, and at the other end the working elements will be installed.
In order to create additional moisture insulation for the created device, place it in a special polypropylene tee. Connect an adapter to the middle of this tee to connect the water supply hose.
Prices for augers for motor drills
Auger for motor drill
Other models of drilling rigs
In general, the assembly process for most existing types of drilling rigs remains the same. The frame and other elements of the structure under consideration are prepared according to a similar scheme. Only the main working tool of the mechanism can change.
Read the information about making different types of installations, make a suitable working tool, and then attach it to the support frame and connect it to other required elements, using the recommendations from the instructions discussed above.
Drilling rig with "chuck"
Drilling rig with a “chuck”
The main working element of such a unit is the chuck (glass). You can make such a cartridge yourself from a thick-walled pipe with a diameter of 100-120 mm. The optimal length of the working tool is 100-200 cm. Otherwise, be guided by the situation. When choosing the dimensions of the support frame, you will have to take into account the dimensions of the chuck. Think over everything so that in the future it will be convenient for you to use the finished drilling rig.
The working tool should have as much weight as possible. Make triangular points from the bottom of the pipe section. Thanks to them, the soil will be loosened more intensively and quickly.
DIY drilling rig
If you wish, you can leave the bottom of the workpiece flat, but it will need to be sharpened.
Make several holes in the top of the glass to attach the rope.
Use a strong cable to secure the chuck to the support frame. Select the length of the cable so that in the future the cartridge can freely rise and fall down. In this case, be sure to take into account the planned depth of the source.
To increase the efficiency of excavation work, you can connect the assembled installation to an electric motor. In such a situation, the cable with the cartridge will be wound on the gearbox drum.
It is possible to ensure that the face is cleared of soil by including a bailer in the structure.
Using this installation is very simple: you first manually create a recess at the drilling site with a diameter greater than the diameter of the working cartridge, and then begin to alternately raise and lower the cartridge into the hole until the required depth is reached.
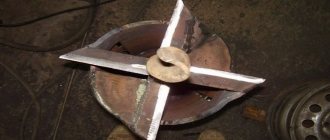
Simple screw installation
Homemade auger
The main working element of such a mechanism is a drill.
Drill auger drawing
Interturn screw ring diagram
Make a drill from a metal pipe with a diameter of 100 mm. Make a screw thread on the top of the workpiece, and install an auger drill on the opposite side of the pipe. The optimal drill diameter for a homemade unit is about 200 mm. A couple of turns is enough.
Drill disk division diagram
Attach a pair of metal knives to the ends of the workpiece by welding. You must secure them in such a way that when the installation is placed vertically, the knives are positioned at a certain angle to the soil.
Auger drill
To make it most convenient to work with such an installation, connect a piece of metal pipe 1.5 m long to the tee. Fix it by welding.
The inside of the tee must be equipped with a screw thread. Screw the tee itself onto a piece of a collapsible one and a half meter rod.
It is most convenient for two people to use such an installation - each worker can handle a one and a half meter pipe.
Drilling is performed in the following order:
- the working tool goes deep into the ground;
- 3 turns are made with the drill;
- the loosened soil is removed and removed.
Method of drilling a water well using an auger
Repeat the cycle until you reach a depression of about a meter. Afterwards, the rod will have to be extended using an additional piece of metal pipe. A coupling is used to fasten pipes.
If you plan to construct a well deeper than 800 cm, fix the structure on a tripod. At the top of such a tower there must be a hole of sufficient size for the unhindered movement of the rod.
During the drilling process, the rod will need to be periodically increased. As the length of the tool increases, the weight of the structure will also increase significantly; it will become very difficult to operate it manually. To conveniently lift the mechanism, use a winch made of metal or durable wood.
Now you know in what order simple drilling rigs are assembled and how to use such units. The knowledge gained will help you save significantly on the services of third-party drillers.
Good luck!
DIY bailer
If you have a welding machine and some skills in working with iron, you can make a bailer with your own hands in a few hours.
DIY bailer with a ball valve (without turning)
This version of the ball valve is assembled from spare parts that can be purchased in stores. A water pipe with a diameter of 89 mm was used for production. We also purchased a concentric adapter 89*57 mm, and a ball from a bearing with a diameter of 60 mm.
Everything you need to make a bailer with a ball valve
The ball fits perfectly inside the adapter and gets stuck there. But it doesn't fit tightly. To make everything fit better, the inner surface of the adapter is sanded - it fits almost perfectly.
This is what everything looks like half assembled. Below on the right is a photograph of a ball in the transition - this is how it will be inside
The narrow part of the transition is inserted into the pipe and welded. The ball is thrown inside, a stopper is welded. And the final touch is to make an attachment for the cable or twine. That's it, the do-it-yourself bailer is ready.
You may be interested in reading about how to purify water from a well.
How to make a bailer yourself at home
If you need to clean a well, but you don’t have sheet metal or welding tools for serious work on hand, there is a solution: a bailer with a valve made from a plastic bottle.
Homemade bailer with a valve from a plastic bottle
This option is suitable for cleaning a well, but not for drilling. You need a bolt, the length of which is slightly longer than the diameter of the pipe for the bailer, and a nut. Having retreated two or three centimeters from the edge of the pipe, one opposite the other, two holes are drilled. Their diameter coincides with the diameter of the bolt.
The valve is cut out of plastic. It is an ellipse. The smaller diameter of the ellipse is equal to the diameter of the pipe. You need to cut it very precisely so that when inserted inside it fits snugly against the walls. The cut valve in the middle will be attached to the bolt; for this, four holes are made in the plastic through which the wire is threaded. How it all comes together is shown in the photo below on the left.
Only such a fastening, as in the photo above, is very unreliable. After a few hits, your projectile may come off, and you will have to figure out how to get the bailer out of the hole. The best fastening option is one-piece, without seams or twists. How to do this will become clear if you watch the video. By the way, there is an important thing there - how to make hooks so that, if necessary, you can pull the bailer out of the well.
Read about organizing autonomous water supply from a borehole or well here.