The drilling rig is a whole complex of specialized equipment
, intended for drilling wells. The components of drilling equipment and design features depend on the purpose of the well, conditions, and drilling method.
Types and advantages of installations
Drilling equipment is divided into several main types, the differences between which are dimensions, configuration, and technical features. Below are the main types of equipment in question used in various fields of human activity.
The following options are available:
- Stationary;
- Mobile;
- Portable (small-sized).
The last option is MGBU
(small-sized drilling rig),
intended for domestic use
.
The most significant advantage of small-sized installations lies precisely in their compactness.
However, there are other advantages that the equipment in question is ready to boast of.
Advantages of MGBU:
- Ease of transportation;
- Use of equipment in confined spaces;
- Reducing installation or dismantling time on site;
- Insignificant cost
when compared with self-propelled drilling alternatives; - Ease of use, in preparation for work;
- Quick payback and profit generation;
- Possibility of obtaining clean water for many years;
- Ease of drilling a well;
- Availability of equipment
and components; - The engine power can be only 1 kW, due to which it is possible to drill a well in non-electrified areas, receiving power from a fuel generator;
- High speed of
well drilling; - You only need two pairs of hands for drilling;
- Compactness
; - Small dimensions, weight, etc.
The above is a list based on the main advantages that distinguish compact drilling rigs from large, self-propelled analogues.
Common models:
- MBU-50-220 “Gidrobur-1”;
- MBU-50-380 “Gidrobur-2”;
- UMBR 3 “Termite”;
- MGBU "VOSTOK".
It is worth noting that the characteristics may vary depending on the model of small-sized drilling equipment.
How to make a high-quality drilling rig yourself?
On the sites of country houses and dachas, quite often there is a need to make some holes in the soil.
The most common reason for using drilling equipment is to extract drinking water.
A particularly urgent task is to drill drinking water wells at significant depths.
Many summer residents and owners of private estates prefer to involve professionals and special drilling rigs to solve the problems under consideration, however, it is possible to obtain high-quality results without the involvement of specialists and professional equipment.
Since prices for such services start from one hundred thousand rubles and above
.
Thus, it is quite possible to make a drilling rig with your own hands
, and then carry out all the necessary work with your own hands. The relevance of handmade production lies primarily in the price.
It is quite possible to make drilling equipment yourself. So, below we offer all the information necessary for the production of the type of installation in question. First you need to prepare tools and materials.
Tools and materials:
- A hacksaw for metal, or an angle grinder with a disk for cutting metal;
- Adjustable wrench No. 1;
- Tools for cutting external inch threads - dies;
- Half-inch diameter steel pipe;
- Cast iron sanitary cross;
- A half-inch diameter squeegee.
After all the tools and materials have been collected, you can begin work, the intricacies of which will be discussed further. The procedure for manufacturing a mini drilling rig begins with preparing pipe sections of the required diameter
, which will subsequently serve as the main elements of the device.
Algorithm for creating a manually driven system:
- To fix the pipes in a cross, a thread should be cut at their ends, the length of which will be 2 cm;
- You will need to weld steel plates on the end side to several sections of pipe of varying lengths. The pointed plates will play the role of tips;
- To simplify drilling
, as well as remove soil from the work site,
a constant supply of water is provided to it
; - To solve this problem, a hose from a pump or water supply is connected to one of the holes of the cross using an adapter of the required diameter;
- Next, all parts must be installed in the holes of the cross on the thread using plumbing PVC tape or hemp fiber;
- You will need to attach the most insignificant section with a tip to the bottom of the pipe by means of a bend;
- Upon completion of drilling a well, the depth of which reaches one meter, it is necessary to replace the tip with a piece of pipe of greater length.
Of course, creating a compact drilling rig with an electric drive is an opportunity to simplify the work. An automatic drilling mechanism powered by electricity is much more efficient, works better, and makes holes in the soil faster.
General information
The swivel is designed to supply drilling fluid to a rotating drill string.
During the drilling process, the swivel is suspended from an automatic elevator or from the hook of a traveling mechanism and is connected through a flexible hose to the riser of the pressure pipeline of the drilling pumps. In this case, the leading pipe of the drill string is connected via a thread to a rotating swivel barrel equipped with a through hole for drilling fluid. During hoisting operations, the swivel with the leading pipe and flexible hose is retracted into the hole and disconnected from the traveling block. When drilling with downhole motors, a swivel is used to periodically rotate the drill string to prevent sticking. During operation, the swivel experiences static axial loads from the weight of the drill string and dynamic loads created by longitudinal vibrations of the bit and pulsation of the drilling fluid. Swivel parts in contact with the solution are subject to abrasive wear. The wear resistance of the swivel's rubbing parts is reduced as a result of heating during friction.
The following basic requirements apply to swivels:
- the transverse dimensions should not impede its free movement along the tower during extension of the drill string and tripping operations;
- wearable components and parts must be convenient for quick replacement in field conditions;
- the supply and distribution of oil must ensure effective lubrication and cooling of the rubbing parts of the swivel;
- the device for connecting to the traveling block must be reliable and convenient for quickly removing and removing the swivel from the hole.
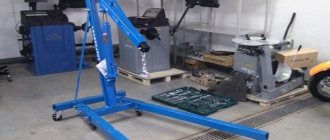
Automatic water installation design
The basis of the design of an electric drilling rig with an automated electric drive is a square hollow profile. The profile is used to make the stand, as well as the supporting parts.
The connection between the rack and the support is welded and connected via a transition pad. A section of a larger square profile with an electric motor and platform fixed to it moves along the rack.
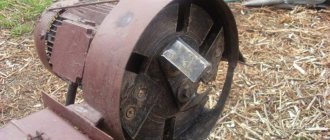
Regarding the drive power, this parameter does not exceed one horsepower. To increase power, a gearbox is used to reduce the speed
. A flange is fixed to the gearbox shaft, to which the second flange is fixed using bolts. A thick rubber washer is installed between them, designed to smooth out shock loads that may occur during operation.
Main components:
- Geared motor;
- Frame (bed);
- Switchboard;
- Winch;
- Swivel;
- Drill, drilling hoses;
- Auxiliary equipment;
- Mud motor pump.
Ensuring reliable operation of the device
with an electric drive
it is almost impossible without supplying water
to the contact area between the tool and the soil. To ensure uninterrupted water supply to the work area, you will need a special device located below the flange connection with the gasket.
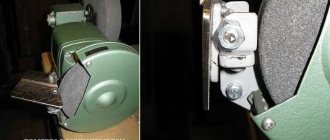
The basis of the design is a steel pipe with two non-coaxial holes
. The holes are located with a slight shift relative to each other. The pipes on both sides are grooved for mounting ball bearings. The inch thread required for connection to the flange on one side and installation of working elements on the other side is also cut. In order to ensure waterproofing of the device, the device must be placed in a polypropylene tee. Next entry How to determine and filter iron from water?
DIY drilling rig
manufactured according to the free drawings presented below. Taking into account the purchase of all components, the cost of a homemade mini drilling rig will be 15-20% of a similar finished unit.
§ Drilling rig frame
The frame stands for the drilling rig are made from DN40 pipe, wall thickness 4mm. “Wings” for the slider carriage are made of DN50, thickness 4mm. If you don’t have a 4mm wall, you can take 3.5mm. Download drawings for a water drilling rig with your own hands:
§ Swivel, drill rods and locks
At first, it is recommended to purchase a ready-made drill swivel and drill rods. In the manufacture of these parts, processing accuracy is very important, since the loads on these units are large. If you decide to order a swivel from a turner, you will need to find a qualified specialist, and preferably with modern CNC machines. The swivel and locks will require strictly defined types of steel. For locks – 45 steel. For the swivel – 40X. Download a drawing of a homemade drill swivel:
Attention! Private traders will not do high-quality hardening! After hardening, grinding will be required. You can use HDTV hardening, but this is an expensive procedure.
You can save money by purchasing ready-made units, but finding a suitable specialist will take a lot of time. But it's worth it - homemade parts are much cheaper than purchased ones. To get started, purchase parts for samples. Practice shows that turners work better when they have both drawings and real templates on hand.
If you have factory samples, it will be much easier for you to check the quality of work. For example, if a turner made drill rods (locks), then you take factory-made and home-made parts and screw them to each other - check the quality of the thread. The match must be 100%!
Do not buy spare parts by delivery. This is necessary in order not to buy a marriage - this, unfortunately, happens. And most importantly, if you order delivery from afar, you can wait more than one month.
If you make or buy locks for drill rods separately, then you can use simple suture pipes for the rods, if you drill no deeper than 30 meters (3.5 mm thick and an internal diameter of at least 40 mm). But a professional welder must weld the locks to the pipes! In vertical drilling, the loads are high.
To drill deeper than 30 meters, you need to take only thick-walled pipes (with a wall of 5-6 mm). Thin rods are not suitable for great depths - they can tear. Download the drawing of locks for drill rods:
§ Making a drill yourself
It’s not difficult to make a simple drill yourself. The drill is made from ordinary steel. If you decide to make it from alloy, then keep in mind that it is difficult to weld it! We need a specialist. If there are a lot of stones at the drilling site, then you need to buy special drills from companies, adapted for strong soils. The higher the price, the harder the alloys on the drills and the stronger the drills themselves.
§ Homemade winch and gear motor
When manufacturing a mini drilling rig, a “RA-1000” winch is used. You can take another one, but it is advisable that the carrying capacity be at least 1 ton (or better yet, more). Some drillers install two winches, one electric and the other mechanical. In the case of a drill string wedge, it is very helpful.
To make the work easier, it is advisable to buy and connect two remote controls: one for reverse and engine speed, the other for the winch. This will save a lot of effort.
A gear motor for a homemade mini drilling rig will need 60-70 rpm, with a power of 2.2 kW. A weaker one will not do. If you use a more powerful one, you will need a generator, since it will not be possible to connect to a voltage of 220 Volts. Recommended gear motor models for hydraulic drilling: 3MP 31.5/3MP 40/3MP 50.
§ The procedure for making a water drilling rig with your own hands
- Purchase of drill rods and swivel (note that the parts have the same thread, or use an adapter). To begin with, you don’t need to buy a lot, focus on a depth of 30 meters.
- Purchase of a motor-gearbox. These purchases can take a long time and there are often delays beyond your control, so it's best to buy early.
- Manufacturing of frame and drill. When making a frame, it is advisable to have a motor, a swivel and a winch on hand, since all this will need to be attached to the frame. Making a carriage without a motor yourself is also problematic, since the mounts for different motors may differ.
- We purchase the remaining components of the mini drilling rig after installing the main components on the frame.
§ Mistakes when drilling for water yourself
It is recommended to start drilling for water from shallow depths in order to gain at least a little experience. Experience in vertical drilling is the most important! You can only learn how to drill water wells through practice. The most important thing is to learn to avoid the drill string wedge. Due to inexperience, beginners often “catch a wedge” and lose drill rods. Sometimes the drill jams so much that it is impossible to pull it out even with a crane; the structure simply comes off (usually at the welding points).
Mistakes are very expensive - an expensive tool is lost. Therefore, in hydrodrilling you cannot force things and immediately make deep wells. This matter must be approached responsibly and carefully. Be sure to read literature on this topic. This work requires a lot of knowledge that cannot be conveyed in a nutshell, so self-education is mandatory.
), create a field for collecting heat from the ground when installing an earth-to-air heat pump, when installing a columnar foundation and many other construction works. A small-sized drilling rig will facilitate and significantly speed up the processes. Having some welding skills, you can do it yourself.
DIY Drilling Basics
1. Purchase of drill rods and swivel (note that the parts have the same thread, or use an adapter). To begin with, you don’t need to buy a lot, focus on a depth of 30 meters.
2. Purchase of a motor-gearbox. These purchases take a long time and there are often delays beyond your control, so it's best to buy in advance.
3. Manufacturing of frame and drill. When making a frame, it is advisable to have a motor, a swivel and a winch on hand, since all this needs to be attached to the frame. Making a carriage without a motor yourself is also problematic, since the mounts for different motors may differ.
4. We purchase the remaining components of the mini drilling rig after installing the main components on the frame.
To make a water well manually, auger or shock-rope technology is used. The hydraulic method will require a drilling rig. A collapsible model of a small-sized model can be made according to drawings from our website. And perhaps drilling water wells with your own hands will become your business.
Screw method
Working with an auger is the easiest manual method. It is used only to obtain shallow sources, the water from which will be used for technical purposes.
To perform independent drilling, you need a drill, which, when screwed into the ground, destroys the rock and grabs the soil with its blades. Periodic removal of the auger is necessary to clean it of sludge. This work is done without assistants.
In addition to the drill, you will need a tripod to which the auger is attached, and a lifting mechanism (manual with a winch or mechanized). Without these devices it is impossible to drill. Even several people will not be able to lift the drill with soil from a sufficient depth.
The greatest difficulty is drilling strictly vertically. Only a fixed drill will provide the necessary verticality, without which the pipes will be deformed. To ensure proper verticality, after passing 2 meters, you need to install a temporary metal pipe - a conductor, which will set the correct direction of movement.
The auger method can be used in soft soils. If the auger hits a moraine, you will have to repeat the process in another place. Quicksand are also more difficult. Softened soil is difficult to pull to the surface. Only an auger with blades curved towards the top helps.
To make a source in clayey and loamy soils, it is better to use the shock-rope method. This method is more labor-intensive, but reliable and simple. For work, a drill glass is used - it is a cylinder with sharpened edges.
The essence of the method is to raise the glass (in other words, the cartridge) to the height from which it is dropped. Upon impact, the cylinder becomes clogged with soil. Raising the glass to the surface, remove excess soil.
The shock-rope method is good for almost all soils. But it takes a lot of effort, so hydraulic systems are often used to lift the cartridge.
Impact-rope technology is also good because it shows when water-bearing sand will appear. When reached, a bailer with a valve is used, capable of lifting liquefied soil.
Manual hydro drilling
Drilling with water is effective for sandy soil. The problem with hydrodrilling is rocky soil. You can't get through the rocks manually; you need a percussion drilling rig.
Regardless of the method, when removing soil, you need to line the well with pipes. You will need to install a perforated filter and pump.
To make a well with your own hands without equipment using the specified technologies, you will need various tools and materials. Below we will consider the budget, pros and cons of the design of water intake sources.
Types of homemade drilling rigs
To independently drill wells (for water and not only), you need at least a small drilling rig. The depth of wells is rarely less than 20 meters and it is very difficult to do without the use of even the simplest mechanisms. If we talk about drilling techniques and types of rubble rigs, then you can make the following drilling rigs with your own hands:
The choice of the type of drilling rig for making it yourself depends on the geology of the area where they will drill, and the depth of the aquifers also affects. The most universal method is the shock-rope method. Various soils can be penetrated well using rotary equipment using water (this method is also called hydrodrilling). For different types of soil, different chisel shapes are used, and the crushed soil is washed to the surface with water.
The auger drill is the most capricious for soils, but it copes well with viscous soils - clays, loams, but with boulders and rocky soil it gets stuck.
Homemade swivels
Own assembly - who needs it?
So when do you need to assemble your own swivel, if the choice of products at a seemingly affordable price is quite large? It’s worth starting with the fact that for simple gear and small loads the prices are indeed low, but for serious mining with a load closer to 100 kg the price of the product increases by an order of magnitude or more. As an additional argument, skilled people cite the ability to precisely control quality and assemble a reliable design to their liking, while people living far from company stores have their own self-evident arguments, such as the cost of travel and reliability of delivery.
What and how to assemble a homemade swivel
In response to the question “how to make a swivel for fishing with your own hands?” Two designs are usually called: strip (single- or double-sided) and based on sections of tubes. Different models and variations differ in details and methods of application. Here are the most popular ones.
A one-sided swivel is made from a narrow (3-5 mm) copper or brass strip, with a metal thickness of 0.3-0.6 mm and pins with a large round head. The strip is bent to create a shape with a square base and long metal strips-edges. A hole is drilled in the base for threading a pin. At the ends of the strip, holes are made for attaching a fishing line or a metal ring. If the swivel is attached to a fishing line, the holes must be machined with a countersink, without sharp edges or burrs.
How to make a one-way swivel
A double-sided swivel is made in a similar way, but two pins are required, and the strip is bent so as to create a shape with two square bases (the ends of the strip are naturally overlapped, not end-to-end J) and long metal strips-edges. Holes are drilled in the square ends into which pins are threaded with their heads inward; a loop is bent from the pin along the outer edge.
How to make a double-sided swivel
Swivels made from sections of tubes are good because they hold their shape; the main difficulty is choosing a copper or brass tube of the required diameter. A ring is cut from the tube, the width of which depends on the diameter of the tube (usually 2.5-4 mm), and drilled through it, getting a pair of holes for pins - one opposite the other. The pins are also inserted from the inside, and the outside is sealed with a blind loop.
Types of homemade cable-percussion drilling rigs
When manufacturing a drilling rig for cable-percussion drilling, there are two important elements: the frame and the cup (chuck, bailer). For the simplest option, you can make a frame of three or four pipes, which are connected above the place where the drilling will take place. A block is attached there, and a flexible steel cable is thrown through it. A drill bit is tied to the end of the cable. That's the whole structure. This “installation” is activated by muscle force - the cable is pulled, then sharply lowered. The projectile gradually deepens.
To reduce physical stress, a winch is installed, and for even greater automation, a motor with a gearbox that rotates the winch shaft is installed. At the same time, it is important to come up with a system that will allow you to release the winch shaft and reset the bailer.
A tripod frame is not always convenient - it requires a large area. Moreover, for stability, the “legs” must be at an equal distance from the center. Jumpers between all supports will also not hurt. In this case, the drilling rig will stand securely. There is another version of the frame - in the form of the letter “H” with telescopic rods (pictured below).
The vertical stand is also telescopic. It allows you to change the height from which the projectile is dropped. The rest of the equipment is the same.
Watch the video to see how a cable-percussion drilling rig, made with your own hands from scrap materials, works. This design is easy to accurately replicate.
More details on how to drill and equip a water well are described.
Making a percussion drill
Before you make a drill for a well with your own hands, you should carefully familiarize yourself with the principles of impact technology. There are two options for the working device:
- A driving rod with a spear-shaped tip. Used to construct Abyssinian wells.
- A hollow bailer chisel made from a massive piece of pipe.
The operating principle of these devices is also different. The driving rod is driven deep into the ground by vertical blows on its upper end with a hammer-driver, or simply with a massive sledgehammer. The chisel itself acts as a striking mechanism. It rises to a certain height and then drops down. For ease of use of impact devices, they are placed on a frame in the form of a tripod or rectangle.
Barbell
The frame is made of metal pipes or angles. The recommended height of the structure should be at least 3-4 m so that the hammer or chisel in free fall can gain sufficient speed for deepening. The frame parts are fastened together by electric welding or with a bolted connection. The first option is simpler, but after drilling is completed, the structure will have to be cut into pieces.
This does not really matter if you do not intend to use this drilling device in the future. If you plan to continue to use this mechanism, then it is better, spending a little more time and effort, to connect the frame elements with bolts. The collapsible version will allow you to transport the drilling device and also simplify its storage.
At the top of the frame we attach blocks through which the cables will be thrown. These cables lift up the striking part of the drilling rig being created - a hammer-hammer or a chisel. Lifting is carried out either directly by hand or using a collar. The last option is best used when the mass of the impact part is very high and it is difficult to lift it by hand.
Next, we proceed to the manufacture of the impact element. To drive an Abyssinian well, it can simply be a massive piece of metal suspended on a frame using a block system. It operates on the principle of a hammer: falling from a height, it hits the top of the driven rod, deepening it into the soil. The bailer itself acts both as a striking element and as a recessed part of the machine.
Bailer
To make a bailer you will need a piece of heavy pipe with a diameter of 10-12 cm and a length of up to 1.5 m. The mass of the workpiece should be approximately 50-80 kg. This weight will allow you to easily lift the chisel using the muscle power of one or two people. And at the same time, the chisel turns out to be massive enough to go deep into the ground when dropped from a height of 3-4 m.
How to make a rotary drilling rig
The hydraulic drilling rig must have a frame that allows you to move up/down the motor to which the drill is connected through a swivel. Water is also supplied through the swivel into the column.
When making a drilling rig with your own hands, the following procedure is recommended:
The frame of the mini-drilling rig consists of three parts:
- horizontal platform;
- vertical frame;
- a movable frame (carriage) on which the motor is mounted.
The base is made from a thick-walled pipe - wall thickness 4 mm, minimum 3.5 mm. It’s better to use a profiled one with a cross-section of 40*40 mm, 50*50 mm or so, but a round one will do. When making a small drilling rig frame, precision is not important. It is important to observe geometry: vertical and horizontal, equal angles of inclination, if necessary. And the sizes are “adjusted” according to the fact. First, the lower frame is welded and measured. A vertical frame is made to fit the existing dimensions, and a carriage is made according to its dimensions.
You can make a simple fort drill yourself - they are made from ordinary steel (drawing in the photo below). If you take high-alloy steel, it is difficult to weld it to the rods. For complex and rocky soils, it is better to buy a drill from a specialized company - they have a complex shape, there are many different types.
To make work easier, connect two remote controls with reverse control. One is placed on the motor, the second on the winch. That's all, actually.
In the design of a rotary or auger drilling rig, the main thing is the swivel, but it is unrealistic to make one without experience. For those who want to make it themselves, we will post a photo and its drawing.
Device and design features
Swivels used in drilling production and deep exploration wells have a common design and differ mainly in the permissible axial load. The design differences of some components and parts of domestic and foreign swivels are due to the requirements of manufacturing and assembly, developed taking into account the production capabilities of manufacturing plants, as well as periodic modernization of swivels in order to increase their reliability and durability.
The figure shows the structure of modern swivels. The swivel body 4 is made of carbon or low-alloy steel and is a hollow casting with external side pockets for the line 12, through which the swivel is suspended from the hook of the traveling mechanism. The sling has an arched shape and a round cross-section. It is manufactured by free forging from alloy steels of grades 40XH, 38KhGN, ZOKHGSA.
At the set ends of the line, holes are bored for fingers 7 connecting the line with the swivel body. The pins are installed in the horizontal bores of the pockets and the body and are protected from falling out and turning by a locking strip 8, which fits into the end groove of the pin and is welded to the swivel body. When the leading pipe is pulled into the hole, the swivel line deviates from the vertical and takes a position convenient for disconnecting and connecting it with the hook of the traveling mechanism.
The angle of rotation of the line is limited by the walls of the pockets of the swivel body and does not exceed 45®. The lanyard pins have lubrication grooves and threaded holes for spring grease fittings. The threads of the lubrication holes are used to screw in eye bolts, with the help of which the swivel pins are pressed out.
In the swivel body, a barrel 5 with a sub 1 rotates on thrust and radial bearings to connect the swivel to the leading pipe of the drill string. The barrel is a steel cylinder with a central passage hole for flushing fluid and an outer flange for thrust bearings. The barrel rotates at the frequency of the drilling rotor and experiences loads created by the drill string and the drilling fluid injected into the well. Compared to other load-bearing units and parts, the swivel barrel is the most loaded. This places increased demands on its strength. Swivel barrels are made from shaped forgings obtained by open forging. Thanks to the use of such workpieces, material consumption and machining costs are reduced. For barrels, steel grades 40Х, 40ХН, 38ХГН are used, which acquire a more perfect crystalline structure and increased mechanical properties as a result of forging.
The axial position of the swivel barrel is fixed by thrust bearings 6 and 9. The main support of the barrel is bearing 6, loaded with the weight of the barrel and drill string when the swivel is held suspended by means of a sling. The auxiliary support of the barrel is a bearing9, which is loaded by the own weight of the body and other non-rotating parts when the swivel rests on the barrel and the swivel line is in a free state. This occurs when installing a swivel with a leading pipe into a hole and during the process of drilling a well, when, due to insufficient weight of the drill string, the load on the bit is supplemented with the weight of the swivel.
In the swivel design under consideration, a thrust bearing with short cylindrical rollers is installed in the main support of the barrel. Thanks to the shortened length, the sliding of the rollers relative to the rings when the barrel rotates is reduced. This has a beneficial effect on bearing wear and heating. Bearings with tapered and spherical rollers have a higher load capacity compared to bearings with short cylindrical rollers. Therefore, in heavily loaded swivels, thrust bearings with tapered or spherical rollers are predominantly used. To improve durability in retrofit swivels. Uralmashplant (UV-250 MA) uses tapered thrust bearings.
To center the rollers relative to the barrel, bearing 6 is equipped with an internal separator. The external separator protects the rollers from displacement under the influence of centrifugal forces. The less loaded auxiliary support uses a thrust ball bearing. The barrel is centered in the body by radial roller bearings 3 and 10. Thrust bearings are centered on a ring mounted on the barrel. The second ring is free and due to this is self-centered relative to the rolling elements of the bearing.
The axial position of the barrel and the tension of bearings 9 and 10 are adjusted by gaskets between the body 4 and the swivel cover 14. The axial tension of the lower radial bearing is adjusted by an adjusting sleeve screwed onto the swivel barrel and protected from unscrewing by locking screws. The outer ring of the bearing is held by a spring stopper installed in the annular groove of the housing. To connect the swivel to the leading pipe of the drill string, a replaceable nipple sub 1 is used, which protects the barrel threads from wear and mechanical damage.
Due to the fact that the swivel barrel and the top sub of the drive pipe have internal threads, a nipple-type sub is used to connect them. In order to prevent self-unscrewing when the bit rotates, the swivel barrel, subs and the upper end of the drive pipe have a left-hand thread. It should be recalled that the kelly sub and all other drill string connections have right-hand threads that match the direction of rotation of the bit.
The swivel body is closed by the upper 14 and lower 2 covers with central holes for the output ends of the barrel. The covers are attached to the body with screw bolts. The top cover is equipped with stands and a second flange, on which an outlet 11 is mounted for connecting the swivel to the drilling hose. From the outlet, the flushing liquid enters the bore through the intermediate device 13.
The cavity between the body 4 with covers 14, 2 and the swivel barrel 5 is filled with liquid oil to lubricate the main and lower radial bearings. The barrel cup 15 forms a separate oil bath for lubrication of the auxiliary and upper radial bearings. Oil is poured through the hole in the top cover of the housing. To drain used oil, there is a hole in the bottom cover of the housing. The oil level is checked by a control plug screwed into the seal body. Oil holes are closed with screw plugs.
Various designs of devices for connecting the outlet to the barrel have been developed. The quick-release connection of the outlet with the barrel (Fig. VII.4) consists of a free-floating pressure pipe 9, lip seals 6, 8, 10, 13 for sealing the pumped flushing liquid and union nuts 1 and 3, screwed onto the barrel 14 and sleeve 5, clamped fastening bolts between outlet 4 and the flange of the swivel cover (the cover is not shown in Fig. VII.4). The free-floating pressure pipe allows for quick replacement of seals and the pipe itself, which are worn out by abrasive particles contained in the flushing fluid. To do this, you need to unscrew the union nuts 1, 3 and, having pulled out the entire assembly, replace it with a new one or one repaired in advance.
The performance of the swivel depends on the reliability of the seals used in its movable and fixed joints. The most important are the pressure pipe seals, which serve to prevent leakage of the flushing fluid injected under high pressure. For this purpose (Fig. Ch1P.2), self-sealing radial 8, 10 and end cuffs 6, 13 made of synthetic materials that have sufficient elasticity and wear resistance are used. The collars of the cuffs are directed towards the operating pressure and therefore are pressed against the sealing surfaces with a force proportional to the pressure of the flushing fluid.
The abutting ends of the pressure pipe and the outlet are sealed with radial 8 and end 6 collars installed in the grooves of the annular bushing 7. The bushing with the collars is put on the pressure pipe and tightly pressed to the swivel outlet by means of a union nut 3. The opposite joint between the lower end of the pressure pipe and the swivel barrel is sealed four radial cuffs 10, separated by metal rings 11, and an end collar 13. The radial cuffs are installed in the cup 2 and tightened with a union nut 1, connecting the cup to the swivel barrel.
The glass rotates with the barrel, and the radial cuffs slide relative to the pressure pipe, held by friction in the upper cuff 8. The sliding causes wear of the contacting surfaces, accelerated by the abrasive effect of the flushing solution. Therefore, the lower seal of the pressure pipe, in contrast to the fixed upper one, has a multi-row design, due to which its reliability and durability are increased. The glass is equipped with a screw grease nipple for periodic lubrication of the cuffs in order to reduce wear and heating of the seal due to friction.
The cuff 10, located above the lubrication hole in the glass, prevents oil leakage during injection and protects it from external contamination. The end collar 13 rotates together with the swivel barrel and ring 12 and remains stationary relative to the mating surfaces. Inaccuracies during manufacturing and assembly are compensated for by the free-floating position of the pressure pipe. Pressure pipes are made of low-alloy case-hardening steels of grades 12ХН2А, 20ХНЗА, etc. The outer surface of pressure pipes is ground and has a hardness of HRC 56-62.
To prevent oil leakage from the oil bath of the swivel, two cuffs 4 are installed in the lower cover of its body (Fig.VII.5). The cuffs are adjacent to the sleeve 3, which serves to fix the inner race of the radial bearing 1 of the swivel barrel. The collar of the cuff is pressed against the sleeve using an annular coil spring placed on the cuff. To avoid rotation in the lid and to ensure tightness, the cuff is pressed into the bore of the lid. Self-sealing cuffs are unacceptable in this case due to insufficient pressure in the sealing cavity.
In the axial direction, the cuff is fixed with a washer 6, which is attached to the cover with bolts 5. A sealing round ring 2 prevents oil from leaking between the swivel barrel and the bushing. To reduce friction at the interface with the bushing, the cuffs are lubricated with plastic oil through oiler 7. If there is noticeable wear, the bushing is replaced with a new one. Similar cuffs are installed between the barrel and the top cover of the swivel housing.
Flat joints between the swivel body and its covers are sealed with cardboard sheets. The upper housing cover gasket is also used to regulate the axial tension of the auxiliary thrust bearing. The gasket between the cover and the swivel outlet, operating under the pressure of the flushing fluid, is made of rubberized fabric. The gaskets are tightened with bolts used to secure the mating parts of the swivel.
In the traveling mechanism of drilling rigs equipped with the ASP complex, an automatic elevator is used instead of a hook. The connection of the swivel to the automatic elevator is carried out by means of a device (Fig.VII.6), consisting of loop slings 2, an adapter bracket 3 and a traverse 5. The traverse is put on the sling 7 of the swivel and is connected to the adapter bracket by an axis 4, secured with a nut 9 and a cotter pin 10. The position of the traverse is fixed by frames 6, secured to the swivel strap with clamps 8.
The swivel is suspended from the traveling mechanism using slings 2 connecting the adapter bracket to the automatic elevator 1 mounted on the traveling block. To protect the lines from falling out, the eyes of the automatic elevator and the adapter bracket are bolted. When installing the swivel into the hole, the lines are pulled out and the automatic elevator is released to perform hoisting operations.
The simplest installation for auger drilling
If the aquifers are shallow and the soils are soft, you can get by with a mechanical drilling rig with an auger. This is the same tripod or any other frame with a block through which the cable is thrown. Only instead of a bailer or drill glass, an auger is attached to the cable. In its upper part there is a crossbar with which it is turned.
To facilitate the process, it is desirable to have a winch or at least a gate (like a well gate). But you can make a rotary drill similar to the one described above. Only the structure of the swivel will change - it is needed without a water supply outlet. The work of one of the drilling rigs, assembled by a craftsman with his own hands, from scrap materials, is shown in the next video. You can also consider the design features.
And the last point is a video on how to make an auger for a drilling rig with your own hands.
Far from large settlements, there is often a problem with water supply, which forces owners of suburban areas to organize water supply by drilling wells. Due to the technological complexity of this process, the best option is to involve specialists. However, an industrial drilling rig for water wells can be expensive, and the operation of such equipment is not always possible in limited space. In this situation, you can use small-sized drilling equipment, which can be easily placed even on a small plot of land. Moreover, it is quite possible to assemble such a device with your own hands, which will allow you to save on the services of professional drillers.
The design of small-sized drilling rigs (MSDU) depends on drilling technology, which can be of the following types:
- shock-rope;
- screw;
- rotary.
Shock-rope installation
A small-sized drilling rig for drilling wells using the percussion-rope method consists of a durable triangular structure (tripod), a rope and a metal pipe (chuck). The operating principle of such equipment is quite simple. The heavy pipe falls under its own weight and destroys the soil, simultaneously capturing it. Using a rope and a winch, the cartridge is removed to the surface for cleaning, after which the process is repeated again.
For your information. To effectively destroy rock, the mass of the pipe must be more than 80 kg.
Shock-rope MGBU
Auger installation
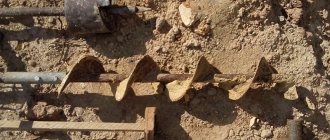
Auger drilling is used when you need to drill a shallow well in soft loamy soil. The drill is a spiral-shaped metal pipe with a cutter at the end. The cutter destroys the rock, which is delivered to the surface by a screw conveyor.
Screw technology does not use water. Therefore, this method is often called “dry” drilling. At the same time, the inability to carry out the process in particularly hard and loose soils somewhat limits the use of such equipment.
Drilling tools for auger MGBU
Rotary Drilling Rig
A drilling rig for rotary well drilling is a technologically complex device that is used for deep work in hard rock conditions. The destructive tool is a drill attached to the end of the drill string. The rotation of the column is carried out by a rotor, which is connected to the engine through a gearbox. To remove the destroyed rock, a washing liquid is pumped into the face, raising the dissolved soil to the surface.
Interesting to know. There are two washing methods: direct and reverse. In the first case, the liquid is fed into the column. In the second, on the contrary, the solution is supplied from the outside of the pipe and discharged through the internal cavity of the drill string. Thanks to the backflushing method, it is possible to achieve a higher well flow rate.
Rotary drilling with direct circulation
How to drill wells?
Access to the shallow aquifer can be done with your own hands using one of three types of drilling:
- manual;
- shock-rope;
- percussion.
The method of constructing the well is selected depending on the type of soil and the depth of the passage.
Manual well drilling
If you do not use additional equipment, a drilling tripod (tower) and a block system, you can drill a “well” to a depth of up to 20 m.
Drilling technology:
- A tripod is installed in the selected area for passage. The height of the tower should be 1-2 m higher, the length of the drill rod section.
- A shovel is used to make a recess of one or two bayonets to center and guide the passage of the cutting edge of the drill.
- To bury the drill at a depth of more than one meter, you will need the help of a partner. One person cannot continue to drill for piles.
- If difficulties arise with removing the drill from the hole, it is necessary to turn it in the opposite direction of drilling 2 - 3 turns and remove it.
- Every 500 mm of penetration it is necessary to remove the drill and clear it of soil.
- The drilling process is repeated until the drill arm reaches ground level.
- The drill rod is taken out along with the drill and extended with an additional section.
- All operations are repeated until you reach the aquifer. This is determined by the type of soil being extracted.
- After reaching a layer with water, you need to continue drilling to a solid (water-resistant) layer. This will allow the well to be filled with the maximum volume of water.
- Pumping out water containing soil can be done using a manual or submersible pump.
- After pumping out 3 - 4 buckets of muddy water, clean water should appear. If clear water does not flow, then it is necessary to increase the depth of the excavation by 1.5 - 2 meters.
Tip: Use the design capabilities of the installation to extract the maximum volume of soil, since this operation takes a lot of time.
Tools:
- tripod;
- Boer;
- hoses for pumping water;
- composite drill rod;
- pump or pump.
Percussion-rope drilling
A well made using this drilling method has a long service life of 80 years or more, increased water supply and inflow. The work process consists of destroying and crushing rock in a closed cycle with a special impactor.
Drilling process:
- The drilling rig is placed above the point for deepening the driving glass (ramp, drill bit).
- A guide recess is made for the passage of the ramp.
- Punching the first meter of the well can be done manually.
- Next, a guide is installed in the form of a steel pipe with a larger diameter than the diameter of the glass.
- The discharge of the slope into the pipe is carried out by releasing the winch; upon impact, the soil is destroyed and crushed, thereby filling the glass. The presence of a special valve prevents soil from spilling out of the projectile.
- After which the glass is lifted and the broken soil is removed.
- The cycle repeats again until you reach the aquifer.
This drilling method is labor-intensive and takes up to several weeks. Therefore, it is better to use it for drilling wells on the following types of soil:
- clay;
- on loams;
- on soft (watered) soil;
DIY drilling rig
The most effective technology is rotary. Despite the complexity of the design, such a drilling rig for wells can be assembled with your own hands. To do this you will need the following parts:
- swivel;
- drill rods;
- paddle drill;
- gearbox with motor;
- motor pump;
- water hose;
- winch;
- steel frame.
The swivel is one of the most important structural elements, performing several functions at once. Firstly, it transmits torque from the gearbox to the drilling tool. Secondly, washing liquid is supplied through it to the slaughter site. It is very important that the swivel is made of high-quality steel, so it is better to purchase a ready-made part so as not to have problems during the first drilling.
The tool for destroying rock is a bladed drill, which is connected to the main structure through drill rods. The length of one rod varies in the range of 1-2 m, and their number depends on the depth of the aquifer.
Important. In order for the installation to be used to destroy hard rocks, the drill must be made of high-strength steel.
In order for a well drilling rig to perform its function without problems, special attention should be paid to the structure frame. On the one hand, the frame must provide reliable fastening of the equipment, and on the other, it must be sufficiently stable and durable. The gearbox with the motor is placed on the moving part of the device, which moves along two guides using a winch.
MGBU for rotary drilling
Do-it-yourself water well drilling
Before starting work, to facilitate the movement of the drilling tool in the intended area, cut off the turf with a shovel and slightly loosen the surface. Using the handle-collar, rotational movements are made, and the sharp knives begin to penetrate into the ground. At certain intervals, the drill is removed to remove the cut soil. As you go deeper, in order to continue drilling, you increase the length of the rod by screwing extension parts onto the threads.
Drilling continues until they reach the aquifer. In the lower layers of the well and heavy soils, it is easier to rotate the drill with a partner.
Advantages and disadvantages of a homemade installation
A small-sized drilling rig for water wells, made by yourself, has a number of undeniable advantages. At the same time, homemade equipment is not without its drawbacks.
Advantages of homemade MGBU:
- small dimensions, allowing to maintain the integrity of the personal territory;
- long service life - the flushing liquid passes through the tool during operation, cooling it;
- a simple drilling process that can be handled alone;
- the opportunity to save on purchasing ready-made equipment or calling professional drillers.
Installation disadvantages:
- low drilling speed compared to industrial installations;
- drilling exclusively in a vertical plane to a shallow depth;
- the difficulty of drilling sandy soils;
- the need to purchase components, the price of which is directly proportional to their quality.
Considering all the pros and cons, we can draw a certain conclusion. A homemade drilling rig for water wells will be beneficial if you plan to engage in drilling work not only on your site, but also to help, for example, your fellow villagers. At the same time, the depth of groundwater in this case should not be too great. If only you need to drill a well, and the water quality must meet sanitary standards, then it is more profitable to contact a specialized company.
Improvement of the hand drill
Connecting a hand drill using a swivel to a drive mechanism greatly simplifies the drilling process. If the handle of a hand drill has to be rotated by two men, then a tool equipped with a gas drive allows you to make a hole that is not too deep alone. To drill deeper holes, you will need a stable tripod tower, a reliable industrial swivel and the help of a partner.
Of course, you can purchase a factory-made gas drill model. But a craftsman who undertakes to make a drilling tool with his own hands can make a drill connected through a swivel to the engine of a chainsaw or other home appliance.
Homemade electric drilling tool
Types of drilling rigs
To drill water wells with your own hands, several types of installations are used. They can be divided according to their operating principle:
- Drums.
- Auger drills.
- Rotary installations.
MGBU - stands for small-sized drilling rig used for drilling wells under water up to 100 meters deep. Their big advantage is their compactness and ease of movement and installation. Therefore, MGBU are used in cases where it is not possible to use large equipment.
Impact cable drilling rigs operate due to the mass of the projectile. When it is dropped into a well, the earth is destroyed due to the impact and is collected inside the pipe. A drilling rig for drilling wells based on impact technology is quite simple to manufacture and effective.
Auger installations operate on the principle of a drill. Due to rotation, the drill is buried in the soil, and the soil is released through the blades. These MGBUs are also quite effective.
Operating swivels
The duration of trouble-free operation of the drilling rig during the process of drilling a well largely depends on the correct operation of the swivel.
Before putting the swivel into operation, you must check:
- fastening the hose to the outlet and the outlet to the cover, fastening the pressure seal;
- condition of the connecting threads of the swivel barrel and safety sub; threads must not be damaged; ease of rotation of the swivel barrel, which must rotate from the force applied by one worker to a wrench with a shoulder of 1 m;
- check the oil level in the housing and, if necessary, top up in accordance with the instructions.
The new swivel must be pre-run-in under a light load for 1 - 1.5 hours. During break-in, the load should be increased gradually until the operator is convinced that the swivel is working properly.
During operation, it is necessary to periodically check the temperature of the swivel body (by touch when lowering the swivel) and the condition of the oil in the body. If the oil is contaminated and the swivel heats up above 70'C, then the oil should be drained, the housing bath should be washed with kerosene or clean spindle oil heated to 80 - 100'C, then fill with fresh oil and fill with grease. If the lower oil seal leaks oil, it is necessary to spray in grease; if the oil leakage does not stop, then replace the oil seal seal. If the pressure seal leaks drilling fluid, it is necessary to pump in grease, stopping the pumping of the solution; if the leak does not stop, replace the seal with a serviceable one, which must be prepared in advance. If there are leaks of drilling fluid in the connecting threads of the barrel and safety sub, replace the sub or swivel. Check the tightness of fasteners daily.
The swivel must be lubricated in accordance with the factory instructions.
The general condition of the swivel and drill hose is checked daily. If a malfunction is discovered, it must be corrected immediately. If it is impossible to eliminate the malfunction, the drill swivel is sent for repair, and the hose is replaced with a new one.
When transporting the swivel, the holes in the barrel sub and outlet must be closed with plugs to prevent dirt and foreign objects from getting inside the holes. The locking thread of the sub must be protected from damage by a safety sub.
Drilling hoses should be protected from damage during transportation. It is necessary to store sleeves for a long time in a dark and cool room. Prolonged exposure of the sleeve to sunlight or low temperatures leads to its premature aging.
What are the advantages of homemade MGBU
A self-made drilling rig for wells has a number of advantages:
- cost savings - from a financial point of view, a drill drill made independently is several times cheaper than a purchased one;
- simplicity of design - due to the simple device, the manufacturing process does not require the use of specific equipment or inaccessible parts. Therefore, in technical terms, a hand drill for a well is not much inferior to its factory counterparts;
- It is possible to customize the device to your needs, but in the case of purchased models, you have to be content with what you have. Or upgrade the design yourself;
- compactness and simplicity - collapsible MGBUs are easy to transport, because They are light in weight, and their small dimensions allow them to be used in any place.
Naturally, all these advantages will be valid if the drilling rig for wells is made of high quality. Therefore, its production must be approached seriously.
Making a fishing section of gum
Before we start making the working section of the fishing elastic with our own hands, let’s figure out what is included in the gear.
For me personally, the working area of the fishing elastic is all the elements located between the end of the main line and the load of the tackle. In a simple version, this is a piece of main fishing line with hooks.
Considering that the supply of the main fishing line and the fishing section of the elastic must somehow be transported, we will make a reel. To quickly rewind the fishing line when assembling the shock absorber, it is better to make it long, about 22-25 centimeters.
Let's start making the fishing section of the rubber band by winding 60-70 meters of the main fishing line of the rubber shock absorber onto a long reel. If you decide to place an industrial swivel between the area with the hooks and the supply of the main fishing line, then the fishing line can be torn off here. Then the section of fishing elastic with hooks can be made separately.
With my elastic bands I get by without unnecessary elements, so I add another ten meters to the work area. That is, the total length of the main line on my elastic bands is 70-80 meters, which allows me to use a rubber shock absorber to fish in the fall at great depths from a boat.
Considering that the length of the rubber cord (13-15 meters) is added to the size of the fishing line, the rubber fishing shock absorber as a whole is not so short. But the stock of main fishing line allows me to update the working section of the gear, equipped with hooks, once or twice during the season.
A few words about making your own reel for reeling in tackle with a fishing elastic band.
Manufacturing of screw MGBU
Auger drills for drilling wells are one of the most common for self-production. This is due to three reasons:
- Ease of manufacture.
- Low construction cost.
- Ease of use.
A hand drill for a well consists of:
- main rod with drill bit;
- removable handles;
- additional drill rods;
The tip is made quite simply. For this you will need:
- welding, grinder, hand tools;
- metal pipe, diameter 40 mm, wall thickness 3.5 mm;
- two cutting metal discs, diameter 150 and 100 mm;
- bolt and nut M20;
- drill bit for a hammer drill or drill, with a diameter of about 20 mm.
Drill device
Instructions on how to make a drill for drilling wells with your own hands:
- a piece of workpiece 500 mm is cut off;
- a drill is welded to the very bottom - it serves as a tip;
- on top, a bolt is welded;
- Now you need to make the tip. To do this, the prepared disks are cut into two parts and welded to the base of the pipe at an angle of about 35-45 degrees;
- a disk with a smaller diameter is welded to the pipe first, the larger one should be located on top - this will make drilling much easier;
- the result is the main part of the drill;
- the handle is made simply - to a pipe 50-70 cm long, a piece of round pipe 40-50 cm long is welded perpendicularly. At the same time, there is no need to jam its edges - if necessary, inserts of a smaller diameter are inserted into them. Those. the length of the lever increases and drilling becomes easier;
An auger-type drilling rig works as follows:
- the tip is screwed into the ground and gradually deepened;
- The soil cut by the blades moves to the top of the blades, so the drill must be periodically removed and the soil removed;
- as soon as the main part sinks deep enough, the hand drill for the well is expanded with additional rods;
- To do this, the upper part with the handles is removed, a new rod is attached and drilling continues.
Drill blades
Therefore, you will need to prepare these elements in advance. To connect them together, two options are usually used:
- Threaded connection.
- Cottering.
The main disadvantage of any thread is that it can become clogged. On the other hand, such a connection is very reliable. If a cotter pin is used, given the heavy load, it must be durable. The best option is to use M10 bolts.
For the manufacture of rods, the same pipe is used as for the remaining parts of the drill.
Necessary tools, equipment and materials
To make a device for manually drilling a water well, you will need to take care of the tools in advance and stock up on the following materials:
Spiral or auger drill
Circular saw blade
The parts are sharpened and welded to the rod at an angle. This is how the working part of the drilling tool is obtained. Several such blanks can be made using semicircular cutting knives of different diameters for holes for different purposes.
In order for the drill to go deep to the layers of water, it is possible to increase its length. To do this, it is necessary to make additional collapsible sections of the rod that are connected by threads. The upper part of the drill is equipped with a T-shaped handle-collar. This drilling design will allow you to make a shallow water well and any holes in the ground for foundation and other construction work without much expense or effort.
Spoon drill
This type of tool is used for drilling operations on soils prone to crumbling.
Impact-rope drilling device
The principle of operation of the percussion-rope drilling installation is based on the gradual deepening of the well by dropping a heavy pipe with a pointed end. The design of the drilling device is not complicated and can be assembled directly on site from scrap materials.
Shock-rope MGBU
A common version of the MGDU for drilling water wells with your own hands is a shock-rope installation. It is more difficult to make than a hand auger drill, but it can drill deep wells.
In addition, these devices can clean casing pipes. The same cannot be said about other types of mini installations.
Impact drilling rig for drilling wells for drinking water, consists of:
- a suspended projectile - a bailer into which soil is collected;
- rope;
- a tripod on which the bailer is suspended;
- winches.
In the simplest version, the bailer is lifted manually using a winch. However, this is quite difficult, because... The weight of the extracted soil is added to the weight of the cartridge. Therefore, to facilitate the process, an electric motor and gearbox are connected to it.
Installation operation
Principle of operation
Drilling water wells with your own hands using such MGBU is quite simple:
- deepening is made in the ground with an auger drill;
- a MGBU structure is installed above the hole;
- a bailer is attached to the rope;
- the projectile is inserted into the hole and released into free fall;
- Having reached the bottom, the cartridge crashes into the ground and a little soil is collected into it;
- the bailer rises several meters and is released down again;
- this operation is repeated 3-4 times, and then it is taken up, cleared of soil and again dumped into the well.
Thus, the drilling process is very simple but time consuming. And if you use a hand winch, the physical labor costs will also be considerable.
Self-production
To make a homemade drill for a well you will need the following tools and materials:
- grinder, welding;
- drill;
- metal pipe with a diameter of 80-100mm and a length of 1.5-2 m;
- material for the tripod frame;
- winch.
How to make a drill for drilling wells yourself:
- First, a bailer is made, since drilling wells for water with your own hands is done using the impact method, the cartridge must be heavy. The optimal weight is considered to be about 80-100 kg;
- At the top there is a fastening for the cable. You can weld a metal ring, or knock down the edges and drill a hole - this option is more reliable;
- hooks are made on the sides of the cartridge so that it is possible to reach the bailer in the event of a cable break;
- At the bottom of the pipe, teeth 3-5 cm high are cut and sharpened;
- A window is cut along the bailer to clean the insides from soil.
An important point is that the bailer is equipped with a valve that prevents soil from spilling out of the pipe. This requires:
- a metal ball with a diameter of about 2/3 of the internal diameter of the bailer;
- a conical funnel with an internal diameter slightly smaller than the prepared ball.
The valve is made in this way:
- the funnel is adjusted so that it fits tightly inside the bailer, the ball should also fit tightly into the seating hole;
- it is welded at a height of about 5-10 cm from the bottom of the pipe.
Another option is to use a reed valve. In this case, instead of a ball, a metal circle is made, which is attached to the inside of the pipe using a spring.
Making a tripod
In general, you can make a drill for shallow wells without a tripod. In this case, the projectile itself is made up to a meter long to make it easier to reach. However, this approach is quite labor-intensive, so it is better to make a homemade drill for a well with your own hands with a winch.
To do this you will need:
- metal profile pipe with a cross section of 40*40 mm;
- block;
- cable gate.
The tools you will need are a welding machine and a grinder.
Sequencing:
- First the foundation is made. It is best to make it triangular - this way the design will turn out to be pyramidal in shape;
- the base must be stable, so the length of the side is about 3 meters;
- When the workpieces are ready, you need to cut the edges at an angle. To do this, they are laid out in a triangle on a flat surface and marked;
- now blanks for the ribs are being made. A pipe length of about 4 meters will be sufficient;
- in order for the tripod to be level, the top point at which the ribs meet must be perpendicular to the center of the base;
- to do this, mark the center of the base on the plane and install a vertical stand in it - it will serve as a guide for welding the ribs;
- when the frame is ready, you need to install a block at the top, and a crank with a cable on one of the walls.
If desired, you can make a drill for a well with your own hands - a collapsible one - for this, instead of welding, bolted connections are used. This will be much more convenient; after all, the design turns out to be quite massive.
Ways to improve the tool
When drilling holes, the master may encounter a large number of plant rhizomes that lie tightly in the soil. The sharp edges of the blades will make working with the drill much easier. For ease of use, you can cut several teeth on the sloping area of the blade or round off its cutting area.
You can improve the design and make removable cutters for the drill. Thanks to them, it will be possible to drill holes of any diameter. In addition to the manufacture of spare parts, it is necessary to provide for their attachment to the collar. The easiest way is to connect them with two iron plates, which are secured by welding.
In the mounting plates, as well as in the blades, you need to drill two holes for the sides. The cutters are fastened with M6 bolts. To ensure that the bolts do not interfere with work, they must be screwed in with the threads facing up.
There is another way to improve your homemade pole drill. You can increase the efficiency of the lower end of the knob. To do this, you need to cut out a narrow metal plate (10x2 cm) and grind it into a cone shape using a grinder, making a kind of point.
There is no need to make cuts in the collar; turned metal plates are inserted into its end, fixed by welding and flattened. The result should be a peak.
There is another method for making a pike. A metal plate is cut to a length of about 17 cm and a screw is made from it, similar to a corkscrew. Further, the algorithm of actions is the same as in the described first option.
A suitable drill can act as an auger, which can easily handle wood as well as metal. Such a tool will penetrate the ground much easier and will drill a hole to the required depth without any problems.
Builders who work on dense deep layers of soil will need one piece of advice. Between the pick and the cutter you need to weld a small flat cutter. Thanks to this design, it will be possible to loosen the earth and center it when drilling. For such a part you will need 2 metal plates 3x8 cm. This trick will significantly speed up working with the tool.
Milling cutters can also be made from grinder discs, which are designed for working with stone. The circles need to be cut along the radius and the hole in the center should be expanded according to the diameter of the knob. Bending the disk with the sides apart gives the appearance of a corkscrew or auger. All that remains is to weld the part in the manner described above.
The cutter is very easy to make from a circular saw blade. The teeth of this model can easily cope with plant rhizomes and hard soil.
The master can choose how to modernize his drill independently. It is worth saying that making a drill for poles with your own hands is not a complicated process at all and requires minimal physical and financial costs from the master. The entire manufacturing process takes two hours at most.
Finally, there is one important piece of advice: before the drilling process, it is best to loosen the soil with a shovel, then the device will fit into it more easily and the work will go much faster. The recommendations given will certainly help the master make a functional and effective tool that will serve him for decades and become a very good assistant.
MGBU rotary type
A good installation option for drilling wells under water would be a rotary design. It is based on rotary drilling with simultaneous injection of fluid into the well. Thanks to this, the soil softens and it becomes easier to walk through the ground than on dry ground.
The disadvantage of such installations is that you will have to buy some basic parts, because... You won't be able to make them yourself. Therefore, before making a drill for a well, you need to purchase all the necessary equipment.
Scheme of a rotary MGBU
Making fishing elastic
Before you start making your own fishing elastic components, I would advise you to read the description of the gear on the two previous pages of the topic. Although my fishing bands are made and assembled according to approximately the same principles as many fishermen assemble their similar gear.
Perhaps the design of this fishing elastic has some features that can help fishermen cast the load further away.
Yes, the hook leads are suspended on homemade swivels made of aluminum, which prevent the leads from twisting around the main fishing line. Regarding making your own fishing elastic weight, you will also have to return to the previous page of the topic.
There are also some other, in my opinion, quite reasonable proposals in my material, which not all fishermen use in their fishing practice.
Let's say that the rubber cord on my fishing elastic bands is attached to a weight made independently from lead through a thin nylon rope. The other end of the elastic band is tied not to the fishing line itself, but to a metal washer with an outer diameter of about 18-20 mm. And so on.
Types and techniques of knitting knots
In addition to those listed above, other types of ligaments are used to attach connecting elements. When purchasing consumables, manufacturers indicate recommended tying methods on the packaging. But the number of direct producers differs sharply from the number of those selling the goods, which is reflected in the geometric characteristics of the thread. Therefore, it would be nice for the fisherman to have other options for connecting elements “at hand”.
The success of the result is also determined by other factors: for example, sudden changes in weather conditions and breakage of gear sometimes lead to unfavorable moments. Who enjoys sorting out the intricacies of knots with frozen fingers?
The following types of connections are most often used in practice. They are the most suitable for attaching a swivel. But each fisherman has his own ideas and his own capabilities. The main thing is that it is reliable, simple and beautiful. A beautifully executed connection can be considered half the key to success.
The beauty is affected by bulkiness, depending on the diameter of the thread and the number of turns. There is no clear interpretation of this concept. But you can take the amendment as a basis: smaller line diameter means more turns. When the loops are tightened, a zone of increased tension is formed, which leads to stretching and thinning of the thread fiber. The tension zone at the contact points is reduced by using the substrate and the mobility of the connection, which leads to an increase in turns. All of the above points are reflected in the nodal ligaments under consideration.
"Palomar"
- the fishing line is folded, forming a loop 10 centimeters long;
- the tip of the loop is inserted into the eye of the swivel;
- a simple knot with a swivel inside is knitted on the main double line;
- the initial loop is thrown through the swivel;
- the knot is tightened;
- the excess tip of the fishing line is trimmed to 2...2.5 mm.
"Offshore Swivel Knot"
- the end of the thread is folded in half to form a loop 12 cm long and threaded through the eye of the swivel;
- turn the loop around its axis 1 turn and attach it to the double main thread until a double loop is formed;
- pass the swivel through the formed loops 6...7 times;
- holding both branches, slowly tighten the knot, carefully moving the turns towards the eye of the swivel;
- the tip of the thread is trimmed to ~2 mm. Offshore Swivel Knot
Improved Clinch Knot
- 5...6 cm of fishing line is pulled through the eye of the swivel;
- the running end is wrapped around the main end 5...6 times and inserted into the loop between the twist and the eye;
- the running end is inserted from top to bottom into a large loop formed after twisting;
- the loops are tightened and the excess end is cut off.
Double Loop Clinch Knot
- the end of the thread 5...6 cm is pulled through the eye of the swivel;
- repeat the process, forming a small loop;
- the end of the thread wraps 3...4 times around the main thread and is inserted from the bottom up into both loops between the twist and the eye of the swivel;
- the noose tightens;
- the excess end of the thread is shortened to 2...2.5 mm.
Homer Knot
- thread the thread through the eye;
- Having covered the root, make a simple knot without tightening it;
- wrap the end of the thread around the main thread 5…6 times and thread it into the knitted loop, bypassing the loop between the twist and the eye of the swivel;
- tighten the loops;
- Trim off the excess end. Homer
"Grinner" Grenner Knot (Uini Knot)
- pass the line through the eye of the swivel:
- form a small loop;
- pass the running end through the resulting loop, wrapping the main one 6...7 times;
- tighten the knot;
- Trim off the excess end.
"Centauri Knot"
- the end of the thread is inserted through the eye of the swivel;
- 3...4 turns are performed around the main one;
- the end of the thread is threaded through the turns, starting from the swivel located on the side;
- the knot is tightened, carefully moving the knot towards the eye;
- Excess thread is cut off.
"Clinch Reinforced" Attached Clinch Knot
- the end of the cord is folded in half to form a loop 14 cm long;
- the tip of the loop 8...9 cm is inserted into the eye of the swivel and applied to the molar;
- the running end is wrapped, starting from the eye, around the main end with a loop 5…6 times;
- the tip of the cord is inserted into the remaining part of the loop;
- the loop is tightened, carefully moving the resulting turns towards the eye;
- the excess is trimmed off. Attached clinch knot
"Braided Line Knot"
- the end of the thread is folded in half to form a loop 14 cm long;
- the tip of the loop 8-9 cm is inserted into the eye of the swivel and applied to the main one;
- holding the loop and the main thread, wrap the folded thread with the end of the loop 7-8 times towards the swivel;
- the tip of the loop is passed through the loop formed between the eye and the twist;
- the knot is tightened;
- Excess thread and loops are cut off.
We tie a fishing line and a rubber cord
If you have completely made the working section of the fishing elastic, then we tie together the main fishing line and the rubber cord of the tackle. Of course, not directly.
Considering that in the process of fishing, the elastic band has to be lifted every now and then to different fishing horizons by tying on an additional float, it is better to use a metal washer for docking.
But before tying, the rubber cord is passed through a thin soft sleeve, which can be made from a piece of medical IV tubing. The main fishing line of the fishing elastic is passed through the same tube before tying it to the washer. In photo “4” the tubes are marked in red.
Next, 4-5 shoe knots are tied on a rubber cord without strong tightening, and a not very tight bandage is made over the elastic knots with nylon thread.
An elastic band made (tied) in a similar way will not burst at the site of the knot and will also not spontaneously untie. Once during the season I change the rubber cord due to wear along its entire length.
At the bottom of reservoirs there are always some foreign objects (for example, driftwood), against which the rubber rubs quite noticeably over time.
In addition, the rubber cords of fishing elastics fray greatly when fishing from the bottom on sandy soil. This happens especially noticeably when the tackle is abandoned in the current.
And, if we’re talking about casting a fishing elastic made according to these recommendations, then photo “4” (on the left) shows the fixation of the hooks in the cambric, before we decided to throw the load of gear to another place, but we are too lazy to cast it again remove the leashes (tinted scarlet).
For this reason alone, PVC tubes will not be superfluous on fishing elastic.
So, part of our stretch gear is ready for fishing. Next, we tie a load of fishing elastic to the rubber cord through a short piece of thin nylon twine.
Next, we mount leashes with hooks on homemade fishing elastic swivels. We assemble the remaining components of the rubber shock absorber.
Homemade reel for rubber leashes
One of the homemade reels for elastic leashes is shown in the picture. You can make a reel with your own hands from a sheet of foam plastic.
If you have a piece of foam plastic lying around, cut a plate from it 90-120mm long, 35-40mm wide, 8-10mm thick.
Tie the length of your homemade reel to the length of the leaders, which should wrap around the foam plate no more than one full turn.
That is, after passing the line around the leader of one side of the reel on the back plane of the foam plate, the hooks should be stuck into the side edge of the device. A few words about the design of my homemade rubber band reels, which are very simple.
To the right and left of the longitudinal center line, two grooves are cut at the ends of the foam, each pair of which (top and bottom) serves for laying a dozen of its leads of the same length and thickness.
Let's say that on the left side of your reel there will be leashes 20 centimeters long with hooks No. 6 (according to Russian numbering) wound. And on the right - leashes are wound up from a fishing line of a smaller diameter 15 centimeters long with hooks No. 5 or No. 4.5 tied to them.
To attach the loops of the finished leashes on both sides of the homemade reel, after heating over the burner of the gas stove, short pieces of bronze wire with a thickness of 2.5-3.5 mm are fused.
It is clear that the loops of a dozen identical leashes are put on one by one on their pin and are attached after turning around the reel on their foam edge.