The presence of a properly equipped drainage system for water removal allows for timely and effective removal of excess moisture from the site. Exceeding the permissible moisture concentration in the soil can lead to gradual destruction of the foundation and increased humidity in basements and semi-basements. In addition, excess moisture contributes to the intensive development of fungal colonies and mold.
This article discusses the types of drainage systems, their design and principle of operation, the sequence of installation and the features of self-installation of such systems. In addition, possible errors resulting from improper installation will be analyzed and recommendations for eliminating them will be given.
What is a drainage system and why is it needed?
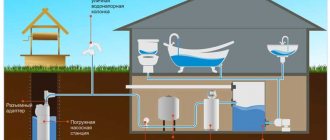
A drainage system is a complex of elements that includes special pipes or trays that are designed to drain excess moisture from the site. The water collected in a special storage tank is removed from the site into the nearest ravine or reservoir through a special drainage system. The main purpose of the drainage system on the site is to protect the foundation from the harmful effects of groundwater and ensure optimal soil moisture levels, which helps increase the yield of garden crops.
Increased soil moisture associated with shallow groundwater, heavy rainfall or intense snow melting can cause serious problems:
- The presence of excess moisture in the soil contributes to its unevenness under and around the foundation. This will not cause any problems if the house is built on a pile or pile-screw foundation, however, if the house is on a shallow foundation, there is a high probability of frost heaving during the cold season.
The frozen soil under the foundation acts on its base and pushes it upward, while the supporting structures do not experience such movement. This can lead to both the destruction of the foundation itself and the walls of the building. A similar situation may arise with paths paved with paving slabs or other material.
- high humidity promotes the spread of mold and other fungi, worsens the overall microclimate in the room and provokes colds and respiratory diseases. There have been cases where the spread of mold resulted in a building having to be demolished;
- excess moisture leads to rotting of the root system of domestic plants, which leads to a decrease in yield and their death;
- If an outbuilding or garage is located on damp ground, premature corrosion of tools, cars and other metal objects and structural elements is inevitable.
Excess water on the site and linear drainage method
The type of future structure and the implementation of the entire infrastructure depend on this parameter. Standing melt and rain water, high water, are the main reasons for the washing out of the fertile layer of soil, the erosion of the foundations of buildings and poor harvests, and sometimes the death of the entire garden as a whole. Therefore, you need to think about measures to drain water from the site first.
It is especially important to install a drainage system in areas with clay soil structure
Scheme of a closed drainage device.
Drainage is a system of underground channels that work to remove excess moisture from the site. There are two types of drainage: soil and deep. At the same time, drainage of surface water during heavy rainfall can be done using open drainages dug along the entire perimeter of the dacha, the width of the channels is 40-50 cm and the depth is 70-80 cm.
The water then flows from the drainage channels into the drainage ditch near the site. To prevent the fertile soil layer from being washed away, the garden line must be separated from the water drain. Correct installation of drainage depends on the natural slope of the land at the dacha. In the absence of a topographic plan with elevation marks, the slope is determined by the direction of water flow. When the plot slopes deeper into the dacha, you need to dig a longitudinal ditch towards the garden, and a drainage ditch along the fence.
Drainage device.
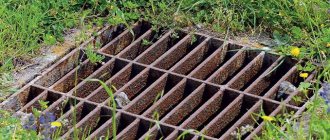
When water stagnates on flat areas of a summer cottage, where there is no slope, the task becomes more complicated, since the water does not go anywhere naturally. In this situation, it is necessary to create a more complex drainage system. If it is not appropriate to use open ditches, a drainage system with closed grooves can be installed. Linear drainage is a system of gutters connected to a sand trap. A sand trap is a reservoir for settling small debris and soil particles. The water collector is installed directly into the trench on the cement mortar, and the sand catcher is placed at the lowest collection point of the system.
After this, drainage channels are marked and laid. To avoid excessive clogging of channels and sand traps, they are covered with grates, which can be removed if necessary to clean out debris. The organization of a slope for drainage proceeds as follows: creating a soil slope, using a gutter with a structural slope, or creating a stepped drainage by laying drains in a cascade.
In what cases is a drainage device necessary?
All of the above problems associated with high soil moisture can be eliminated or prevented with the help of a properly designed drainage system that promptly removes excess moisture outside the site or into a special container. There are a number of signs that clearly indicate the need for drainage:
- after rain, puddles and dirt remain on the site for a long time;
- garden trees and house plants die for no apparent reason;
- intensive mold formation in basements;
- the soil remains moist even during short-term droughts;
- a large number of weeds that love moisture, for example, nettles or cattails;
- location of the site in a wetland or near a body of water.
Important! There are signs by which it can be clearly determined that groundwater flows no more than 1.5 m from the ground surface. With such a depth of the aquifer, a mandatory drainage system is required.
Water drainage
Before you start designing a system for draining groundwater, you need to decide where it will be drained. There are several options available to choose from.
Drainage reservoir diagram.
A savings system can be organized. This is the best option for regions with large seasonal fluctuations in humidity. For example, during a wet spring, water will accumulate, and in a dry summer it will be used for irrigation. Groundwater will be collected in containers specially designed for this purpose. They can be left on the surface or buried if desired. Water can also be collected in an artificial reservoir, but this requires more serious material and labor costs.
If your village has a common water drainage system, it makes sense to organize groundwater drainage into such a system. If there is free territory around the site, water can be diverted there, but in most cases this is impractical.
Layout of drainage pipes.
If there are no options for draining water, it will have to be stored. For this purpose, special tanks are brought to the site. As the tanks fill, the cesspool truck is called in and they are emptied.
Quite often, land owners combine several methods. For example, in the spring they accumulate water in reservoirs, use it in the summer for irrigation, and in the fall they divert what is not needed.
As a rule, the need for groundwater drainage appears only on loamy and clayey soils. Sandy soils themselves perform the function of drainage.
Types of drainage systems
Existing modifications of drainage systems can be divided into two categories:
- located on the surface;
- buried in the ground.
Surface systems
The surface drainage system can be carried out through a linear or point drainage system.
Linear drainage
Designing this type of drainage requires more time than creating a project for point systems. With the help of linear drainage, you can ensure the removal of excess moisture from the territory of the site, prevent erosion of the upper fertile layers of soil, protect garden paths from the harmful effects of water, etc. Such a drainage system is a network of open canals branched throughout the entire territory of the site, which are given a certain slope to ensure guaranteed water flow.
It is advisable to lay waste channels in places where water is most likely to stagnate. Before you begin creating a surface drainage system, it is advisable to draw up an exact diagram of the location of the drainage well and the places where excess moisture will be drained from the site. Most often, nearby reservoirs (if any) or ravines are used to drain excess water.
When designing a surface drainage system, it is necessary to carefully analyze the topography of the site, determine the areas of greatest accumulation of water and select the correct location of drainage channels. In addition, when laying the latter, it is necessary to give them a certain slope, ensuring unhindered effective drainage of water and eliminating the formation of creeks.
For loose soils, the minimum slope of the channel should be no less than 0.003, for clay-containing soils - 0.002. In addition, remember that the receiver must be located below the channel level.
Point drainage
This type of drainage is advisable to use in small areas. When constructing such systems, drainage channels are usually located under the drainage system and in lowlands. Point systems are easy to install and do not require preliminary project development.
The slope of drainage channels in a point system is usually from 0.005 to 0.01. The device provides both open and closed arrangement of the drainage channel. The open system involves laying an extensive network of channels in shallow trenches, which are filled to a depth of 20-25 cm with coarse-grained crushed stone or pebbles. The side surfaces of these ditches are located at an angle of 30° to each other, which ensures free flow of water into the canal. As for the width of the trench, for open channels it is usually from 1 to 1.5 m, the depth is from 50 to 70 cm.
The main advantage of such a drainage system is the ease of installation work. Disadvantages include questionable appearance. In addition, the presence of open canals does not allow rational use of the land resources of the site.
Important! The walls of open drainage channels can crumble and therefore require constant care and routine repairs. The use of crushed stone or pebbles can minimize this disadvantage, but will significantly reduce the channel's capacity.
Closed point drainage
This type of system involves the use of special pallets placed in trenches. The top of the moat is covered with decorative grilles. This design ensures free flow of water into the drainage channels, and also prevents clogging of the channel with leaves, soil and other objects. Due to their affordable cost, high performance properties and long service life, concrete trays and plastic trays are most widely used.
Deep systems
Deep drainage systems are divided into two categories:
- local;
- are common.
If there is general drainage, moisture is removed from the entire territory of the site. The local drainage system is designed to drain water from a specific building or object located on the site. Such objects include: residential and outbuildings, garden paths, beds, etc. Depending on the design features, local drainage systems can be:
- wall;
- ring type;
- reservoir type.
Wall-mounted
This type of drainage is advisable to use for draining melt and groundwater from basements and semi-basements built on clay and loamy soils. In addition, it performs preventive functions.
A wall drainage system is usually equipped with pipes that have filtering capabilities. To ensure efficient operation of the system, the pipes must be located above the foundation depth. The distance from the base is determined by the design features of the building.
If the foundation of the house is located too deep, then it is quite acceptable to install such a drainage system on the surface. However, the possibility of soil subsidence under the weight of structural elements should be taken into account.
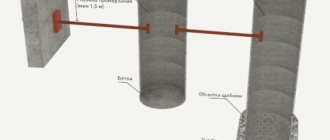
Ring drainage
This type of drainage allows for effective removal of excess water from foundation structures and basements. Such drainage is used if the general deep drainage system does not ensure the removal of excess moisture in full. Most often, this situation occurs on sandy soils.
In addition, the ring drainage system allows for efficient drainage of pressure groundwater. A ring drainage system is located below floor level along the entire perimeter of the building. This arrangement provides effective protection from moisture for residential and commercial buildings.
The functionality of the system is directly related to the area of the site and the depth of groundwater. Ring drainage can be installed after completion of general construction work.
Reservoir drainage system
Reservoir drainage systems are used to drain groundwater. The installation of such systems is carried out in parallel with the construction of the building. Typically, such a system involves connection with a tubular drain. It is advisable to install it above the ground level (containing groundwater) at the base of the building. Reservoir drainage has an underground drain, through which groundwater is collected and drained.
Formative drainage is advisable in the following cases:
- the tubular system is not able to reliably protect the building from groundwater seepage;
- the soil of the site consists of various heterogeneous rocks;
- There are flooded closed areas on the site.
Important! The main advantage of the reservoir drainage system is that it effectively removes not only groundwater, but also capillary moisture.
Installation of reservoir drainage begins with pouring sand under the building. Further, crushed stone or gravel channels are formed in this sand. The depth of such channels must be at least 0.2 m. The location of the channels depends on the topography of the site and its hydrogeological features.
Deep drainage systems are divided into three main modifications:
- combined;
- horizontal;
- vertical.
Horizontal
Horizontal deep drainage systems include: wall, ring and reservoir.
Vertical
Vertical drainage is equipped with special pumping units. The channel system is buried in the ground. Due to the complexity of design and installation, vertical drainage systems are rarely used.
Combined
As the name suggests, this drainage combines elements of horizontal and vertical drainage. Most often, such systems are used in difficult climatic zones. The high cost of installing combined drainage systems significantly reduces their distribution.
Useful tips
Here are answers to the most popular questions from readers regarding land reclamation and drainage structures.
- What material is best to cover the area?
For a rise of 20-30 cm in a small area, fertile soil can be used. If a meter-long layer of bedding is required, the base is made of compacted sand, secondary crushed stone or broken brick is placed in the middle (for drainage), and soil is laid on top. On beds and lawns you can do without crushed stone; instead of soil, paths and platforms are sprinkled with excavated soil. Experts believe that it is better to place soil from the site down. This prevents the heavy crushed stone from sinking into the light sand or the light sand from sliding off the loam.
- Are asbestos or used steel pipes suitable for closed deep drainage?
It is better to use special drainage pipes for drainage of groundwater with ready-made holes and wrapped with geofabric. Other product options quickly become clogged and the drainage fails. As a last resort, take asbestos-cement pipes with a diameter of at least 100-150 mm. To allow water to flow into them, holes are drilled or cuts are made, and to avoid silting, they are wrapped in geofabric.
- What material can be used for drainage instead of crushed stone?
In open systems it can be replaced with bundles of brushwood. Bunches with a diameter of 30 cm are formed as follows: large branches are placed in the center, and small twigs are placed on the outside. Moss is laid on top of the laid mats. On peat soils, such a system remains operational for up to 20 years.
- Is it possible to artificially lower the groundwater level?
To reduce the level of excess moisture to 5 m, a wellpoint filter unit is used. It includes a ground vacuum manifold for discharging water, pumps to reduce the pressure in it and vertical pipes, at the ends of which wellpoints are located. Sometimes expensive complexes with injection water lifts are used, which can increase the depth of groundwater to 20 m.
- Is it necessary to make a drainage well?
A well is convenient because water can be taken from it for irrigation or other needs. There is a pipe at the top from which water flows out when the container is full. If there is free space on the site, the role of a drainage reservoir can be played by a small pond, the bottom of which is filled with crushed stone and a sand-gravel mixture. Around the drainage pond you can plant moisture-loving plants and equip a recreation area.
Which pipes to choose for drainage
The vast majority of pipes used when installing a drainage system on a site have standard sizes and differ only in the material of manufacture. The most widely used materials are:
- asbestos cement;
- low-density polyethylene (HDPE);
- polyvinyl chloride (PVC).
Asbestos-cement pipes are affordable, have good physical, technical and operational characteristics and a long service life. Some restrictions on the use of this type of pipe are imposed by the content of asbestos, which can cause respiratory diseases.
PVC pipes successfully combine price and performance characteristics. They are easy to install and have a fairly long service life. Among the shortcomings is the lack of perforation.
HDPE pipes are not much different from their PVC counterparts, but they are more expensive. The slight difference in price is due to the presence of ready-made perforations, so installation can begin without additional processing.
Some types of pipes have an additional outer winding that acts as a filter to prevent clogging of the drainage.
You can save some money when installing a drainage system by making drainage holes in polyvinyl chloride pipes with your own hands and wrapping them with geofabric. The diameter of the drainage pipe is determined by the intensity of groundwater seepage and can range from 50 to 80 mm.
Types of groundwater
Few people know that groundwater levels can vary significantly even within the same year. Typically, this level reaches its minimum values in winter, when the soil completely freezes and is inaccessible for water penetration. In the spring, when heavy snowmelt begins, the groundwater level rises, because the soil during this period is literally oversaturated with moisture, and moisture in such a significant volume is precisely the source of saturation of groundwater.
A couple of types of groundwater are often considered: perched water, that is, the so-called local groundwater, and free-flowing, that is, external groundwater.
The first usually lies at depths from half a meter to three meters and can be located in patches, often in significant depressions or between layers of soil. Interestingly, during a drought, for example, in the middle of summer or in a very frosty winter, the perennial water may disappear partially or completely. Naturally, as soon as the rains come again, or the snow begins to melt, that is, the soil moisture will increase, and the high water will return to its original place.
If you identify the composition of water in perched water, it turns out that it is usually fresh with a minimal presence of minerals and can even be toxic to plants.
The second option is free-flow water; it can lie at a depth of one to five meters and is often a constant phenomenon from which the gardener cannot escape. It is these waters that cause the main inconvenience to gardeners, since they are replenished by melting snow, rain, if there is a lake, river, rivulet or even stream nearby (as mentioned above). They can be supplied by free-flow water and artesian wells, as well as condensate, which we have also already written about.
Most common aquifer location
Design Features
The efficiency of the drainage and wastewater disposal system on the site is inextricably linked to the features of the project. When choosing or creating a project yourself, special attention should be paid to the following parameters:
- depth of installation of drainage pipes;
- minimum distance between trenches intended for laying pipes;
- slope of drainage channels;
- the topography of the area where the drainage system will be installed;
- depth of aquifers;
- physical and technical properties of the special materials used.
The method of installing the drainage system is selected taking into account the geological properties of the soil at the work site. The maximum distance between equipped drainage channels should not be more than 11 m for clay soils. If work is carried out on sandy and sandy loam soils, this distance can be increased to 22-25 m. In general, the distance between the channels is inextricably linked with the depth of the drainage trench.
Important! It is advisable to select a place for drainage of drainage water in advance. For these purposes, the nearest ravine or reservoir can be used, if there is one in the immediate vicinity of the site.
The depth of the ditch intended for laying the pipe should be in the range from 0.5 to 1.2 m. This value is determined by a number of factors: the magnitude of the slope, the size of the area, its topography and other objective features. The slope for each linear meter of pipe should be in the range from 15 to 20 mm.
The throughput of a pipe is determined by its diameter. The smaller the pipe diameter, the greater the slope required to increase throughput characteristics. In addition, a small diameter drainage pipe is more susceptible to clogging.
To install any type of drainage system, you will need the following tools and building materials:
- gravel;
- crushed stone or pebbles (preferably of different fractions);
- sand;
- coconut fiber;
- set of perforated pipes;
- set of drainage wells;
- shovel.
Application of holes and ditches
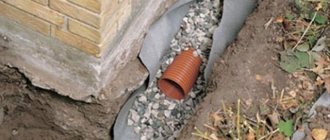
Plot with a functioning drainage system.
Many summer residents solve the problem of draining the site using a system of main pits and ditches. The pits are arranged quite simply. You need to dig holes 80-100 cm deep, 2 m wide on the surface and 50 cm at the bottom. They are prepared at the lowest points of the land. The system is very simple, but quite effective. All excess water from the site will be collected in these pits.
Organizing a ditch system is a little more difficult. The most commonly used method is based on open diversion ditches. With their help, the area will be drained from spring melt water.
Along the perimeter of the land plot, you need to dig ditches with a width and depth of 40 cm. The walls of such ditches should be beveled by approximately 20-25°. In organized gardening partnerships, the installation of such diversion ditches is, as a rule, a mandatory requirement of the administration. Among the disadvantages is that the earthen walls of the ditch will gradually crumble. In addition, they will become clogged with various small debris, and aquatic plants often appear in them.
Scheme of drainage wells.
Concrete slabs or wooden boards are usually used to strengthen the walls. You can also place a metal or concrete pallet at the bottom of the ditch. Debris and plants will need to be removed regularly. This can be done using an ordinary shovel. In most cases, a common drainage ditch serves as a water intake. She settles down along the road.
A slightly less popular method is the so-called. French drain. Similar ditches with steep walls are created on the site and filled with crushed stone or stones. There are several options for constructing such drainage: you can dig shallow ditches to drain groundwater into a well, or make a ditch as deep as the natural layer of sand, and the water will flow into it. The well of such a system will be a pit with sides of 1-1.2 m. The well can be closed or open. It can be filled with broken bricks or coarse gravel. Among the advantages of such ditches is that they do not “bloom” and do not become clogged, but after a while they can become clogged with soil washed away by water. And plants will begin to sprout in this soil. Cleaning such ditches requires more effort compared to the previously discussed ordinary diversion ditches.
A more expensive way to drain a site is to create a closed drainage system. It is installed using asbestos-cement or clay pipes. Pipes can be laid out in a herringbone pattern or in a straight line
It is important that the site has a slope sufficient for the natural flow of water. This system is well suited for areas with high groundwater levels.
Usually it is combined with drains to drain water from the base of the house. However, the design of such a system requires appropriate experience, and it is quite difficult to do it yourself.
The procedure for laying the drainage system
In order to save money, many homeowners plan to do all the installation work associated with installing the drainage system themselves. For such home craftsmen, below are step-by-step instructions for installing drainage yourself in a summer cottage or in the private sector.
Installation sequence
- At the initial stage, trenches intended for pipe laying are marked and dug. Here it is important to strictly comply with the requirements of the design documentation, if any.
- The next step is to compact the bottom and side surface of the trenches. To perform this simple operation, you can use a simple device that is easy to make on your own. For greater efficiency, sandy soils can be slightly moistened.
- Next is laying a cushion of sand and crushed stone on the bottom and side walls of the trench and thoroughly compacting it.
- The compacted surface is covered with geotextile fabric in such a way that a remainder of the fabric of at least 0.5 m is formed on both sides of the trench.
- The next step is to wash and lay gravel at the bottom of the trench. Typically, a gravel bed has a thickness of 200 to 250mm.
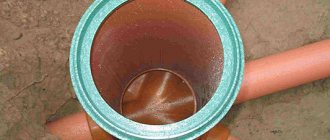
- Perforated drainage pipes are wrapped in geotextiles.
- Next, the pipe is laid on a gravel bed and connected using specially designed couplings.
- In those places where three or more pipes join, a special drainage well is installed. In addition, such wells should be installed every 50-55 m.
- After assembling the structure, the trench is filled with a layer of gravel 25-30 cm thick.
- After this, the trench is completely filled with soil. To improve aesthetic characteristics, layers of turf can be laid on top.
- It is advisable to use the water collected in drainage wells for irrigation of beds or other domestic needs.
It is very difficult to ensure the removal of excess moisture from the site. Before starting the installation of a drainage system, you need to carefully study the landscape of the site, soil features, and accurately determine the depth of the aquifers. Based on these data, you can independently, or with the help of specialists, develop a drainage system design. Only after this can installation work begin.
Vertical type drains
Such structures are represented by a well in which pumping equipment is located (pumps are used to pump out wells). As a rule, such drainages are used in the agricultural industry, and they are also actively used to drain land during the construction of highways.
When laying this system, wells and trays are used, which, as a rule, are located on a waterproof layer. In addition, such a system must be equipped with deep-well pumping elements. This drainage system is considered the most effective. And if the land on the territory of a particular site has a high coefficient of water resistance, then such a structure will not only be effective, but also quite economical.
A vertical drainage system requires a pump to pump water from wells
The depth of laying vertical drains can be different, since everything in this case depends on the level at which the groundwater is located. It can be 20 or 150 meters, depending on the characteristics of the soil on which the site is located.
Helpful information! The vertical design is represented by different types of pipes: conventional and perforated. Regular ones are located at the top of the structure, and perforated ones are located at the bottom. It is also worth noting that the holes of perforated pipes can be of different shapes.
Such borehole drainages can operate in various modes (the choice of mode is carried out based on the time of year). Do not also forget that such systems require periodic preventive inspections and cleaning of the filter, which consists of sand and gravel.
Common mistakes during installation
If the drainage system on the site is not installed correctly, it will be unable to effectively perform its functions. At a minimum, the removal of excess moisture will be carried out in an insufficient volume, however, an incorrect design of the drainage system may, instead of removing excess water, aggravate the situation. When independently designing and installing drainage, such mistakes are most often made.
Drainage installation without development of design documentation and geodetic measurements
At the preliminary stage, which includes surveying the territory and developing a project, it is necessary to clearly define the operational parameters of the future drainage system. The level of occurrence of aquifers, their pressure and direction of movement have a significant impact on the intensity of drainage and the depth of drainage trenches.
If the pipe is not deepened enough, the drainage system will constantly overflow, which will not allow the necessary reduction in groundwater levels. Laying drains to excessive depths or designing drains with inflated performance indicators will not increase the efficiency of the system, but will increase material costs.
The presence of the project will also allow optimizing and systematizing the procedure for performing installation work, ensuring the safety of existing communications, and allowing for the smooth execution of construction work, work related to landscape design and other types of work related to landscaping the site.
Incorrect choice of drainage channel slope
When laying a drainage pipe, special attention must be paid to the size and uniformity of the slope. The optimal angle of inclination for most designs is from 3 to 5 mm/mp. The uniformity of the slope is also of great importance. Even a slight violation of the uniformity and magnitude of the slope leads to a significant decrease in the efficiency of the drainage system:
- When the pipe is laid horizontally or, even worse, with a reverse slope, stagnation is inevitable in the system. This state of affairs not only does not contribute to the removal of excess moisture, but on the contrary can lead to flooding of the area;
- If the slope is excessive, the load on the drainage system increases significantly. This is fraught with intense siltation of the pipe and, clogging of the entire system, failure of individual parts and drainage units. In addition, an increase in slope entails an increase in the depth of drainage pipes, which is not always advisable
- the unevenness of the slope causes alternation of areas of stagnation with sections where drainage occurs too quickly. This deprives the stability of the drainage system and, as a result, disables it.
To give drainage pipes the necessary and uniform slope, professionals use levels and theodolites, since the use of a hydraulic or building level does not provide the necessary measurement accuracy.
Insufficient depth of drainage trenches
To reduce material costs for engineering equipment, some land owners are trying to save money by digging trenches of insufficient depth. The consequence of this is that drainage pipes get into the soil freezing zone; in addition, they do not provide effective drainage from the foundation and root system of plants.
Such savings can negate all the benefits of the drainage system. To avoid this, when installing drainage, it is necessary to be guided by the requirements of design documentation drawn up by specialists based on geodetic and other studies of the site.
How to make and install
is a Russian manufacturer that can offer drainage trays made from all types of materials existing on the modern market: fiber-reinforced concrete, polymer concrete and frost-resistant plastic.
Over the years of work in the production and supply of drainage systems, we have accumulated practical experience in cooperation with the largest domestic design and construction organizations. An innovative development path, market understanding, customer focus, our determination and consistency in achieving our goals, as well as investments made in the production of high-strength products allow us to offer a truly professional and comprehensive solution to the problem of wastewater disposal at any facility. The company's products make it possible to solve the problem of liquid elimination even in such difficult areas as: entrances to tunnels, traffic intersections, underground parking lots and passages, metro entrances, etc.
We especially emphasize that today we are the first domestic manufacturer of surface drainage systems to receive a certificate of compliance of our production with ISO 9001 quality management standards. And in addition to high-quality products, we offer drainage system design from our specialists.
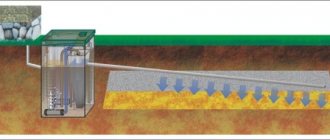
Construction of drainage trenches
Drainage trench construction diagram: 1. Fertile soil. 2. Sand. 3. Crushed stone of large fraction. 4. Geotextiles (darnite). 5. HDPE pipe D = 90 mm. 6. Wrapping the HDPE pipe with geotextile.
After the trenches have been dug, work on laying geotextiles begins. An important point in this process is that the geotextile should not consist of fabric materials, since water must pass through it freely. For this purpose, materials such as dornite and non-woven fabric are used. Geotextiles have unique properties that allow them to be used for filtration purposes.
Thanks to its excellent drainage characteristics, it, in turn, does not contribute to the leaching of small soil particles into the drainage tank, which allows maintaining the fertile soil layer. Geotextiles significantly increase the service life of the drainage system. This membrane cuts off soil particles washed away by water; as a result, they form an additional natural barrier without interfering with water drainage. Thanks to the huge number of pores per unit area, geotextiles practically do not become clogged and can last for a long time.
The next layer consists of loose coarse-grained materials: expanded clay, crushed stone, broken brick or concrete. The thickness of this layer should be at least 5 cm. This combination simplifies the design of the drainage system and minimizes water erosion of the soil on the slopes of the site.
The next step is laying the drainage pipes with the required angle of inclination. After this, the pipes are filled with the selected bulk material and wrapped in geotextiles. The result should be a “sleeve” consisting of an outer layer formed by geotextile, a middle layer of crushed stone and a center of pipes. On top of this, the rest of the trench is filled with sand and the soil is laid superficially.