When is it necessary?
Turners with considerable length of service and extensive experience will detect by ear and eye - directly during work - that the tool needs sharpening.
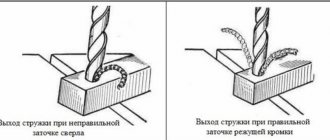
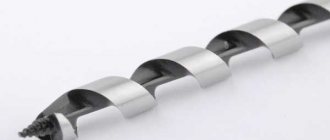
For beginners, this is also a reason to think about whether a dull drill needs to be straightened - as indicated by the following manifestations of an emerging malfunction: the drill whistles and creaks when rubbing against the edge and surface being drilled, and quickly heats up when working at medium and high speeds. Holes made by a dull drill are distinguished by irregularities - notches and potholes in the place where the working (cutting) part passed. Chips from a jagged and blunt drill come out of only one flute, and not from both, or come out at different speeds, in uneven quantities. Delayed sharpening will lead to the end of the drill breaking off, and the drilled part (or the workpiece for it) will receive additional damage. There are frequent episodes when the drill gets stuck in the metal (or alloy) being processed - steel workpieces are especially susceptible to this. High-speed steel is not a pobedit alloy and certainly not a diamond coating - it will simply break under the increased load that the master is forced to apply in order to drill out the remaining millimeters of material.
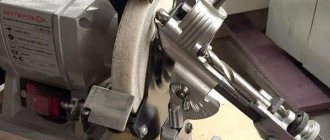
How to make a machine for sharpening twist drills
As a basis for the manufacture of a sharpening machine for spiral-type drills, you can use any serial sharpening unit that can operate without runout and withstand significant loads. When equipping such a machine with additional devices, the following requirements must be met.
- The axis of the tool rest must coincide with the axis of rotation of the grinding wheel, and it can be located with it in the same horizontal plane or be higher than it.
- All elements of the structure being created must be securely fixed to ensure the safety of sharpening work.
- The design of the device must allow sharpening of drills both manually and semi-automatically.
- The device of the tool rest should allow the drill shank to be positioned at any angle.
Assembly for sharpening drills
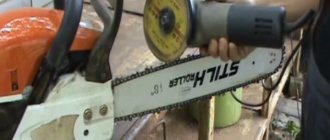
The manufacture of this device for sharpening drills does not require complex technical devices and scarce materials, which will have to be purchased additionally. All components can be found in almost any home workshop or garage. As equipment and tools with which such components will be modified before assembling the device, you can use a regular grinder and a welding machine.
Since the stop of such a device must be oscillating, which is necessary for sharpening drills in a semi-automatic mode, a loop connection should be used to fix it. When selecting a tube, bracket and bolt for the fastening unit, you should keep in mind that there should be no play in the device. The homemade product of the proposed design has two degrees of freedom.
Fixture details
The platform of such a device, on which the drill being processed is fixed, has the ability to rotate along a vertical axis, making it possible to change the sharpening angle of the tool. In addition, the tool rest, resting on a horizontal axis, can make oscillatory movements, which ensures correct articulation during sharpening.
To manufacture the structural elements of such a device, sheet metal of various thicknesses is used, namely:
- support plate – 4 mm;
- drill guide plate – 5 mm;
- other structural elements - 3 mm.
The tool rest, on the top of which the support plate is installed, must be securely fixed to the body of the sharpening machine. For this, an additional metal “cheek” is used, connected to the device bracket.
The guide plate, on the surface of which it is necessary to make a triangular groove designed to accommodate the tool being processed, is fixed on the support plate using a screw connection.
Plate guide groove
The design and design features of the drill sharpening device in question allow it to rotate at an angle of up to 90°. Thanks to this ability, you can sharpen drills using this device using almost any of the methods used today.
The drill, sharpened using such a device, fits into the guide groove and can move freely in it in the longitudinal direction. In this case, the sharpening angle of the tool does not change.
Installing the drill into the guide groove of the plate
Since the upper surface of the support plate is located slightly above the axis of rotation of the grinding wheel, when using such a device, the optimal sharpening shape of the back surface of the drill is achieved.
The process of sharpening drills using such a device is as follows.
- The tool is positioned in the guide groove of the fixture so that its cutting edge is parallel to the edge of the guide plate.
- After adjusting the position, the drill is slowly fed to the working surface of the rotating grinding wheel.
The process of working with such a device is well demonstrated in a video that is easy to find on the Internet.
Despite the simplicity of the design, such a device ensures high accuracy of sharpening, for quality control of which you don’t even need to use a template. If you fix the swing plate of this device at a fixed angle, it can also be used for sharpening drills equipped with carbide inserts.
Mini sharpening machines are at your service:
All devices are divided into two types: attachments or stops for universal tools, and independent devices of narrow specialization. Let's look at the most popular of them, from simple to complex:
Hand holder
This is just the device for those who have a steady hand and a diamond eye. In fact, it only allows you to hold the drill in a given position without fear of injuring your fingers. Angle control is visual, according to the position of the “wings” relative to any landmark. There are few advantages: instant readiness for work, compactness and price. The disadvantages are obvious: manual control of the process does not add accuracy.
Stop for electric sharpener
In fact, this element is not a special device for drills. It simply allows you to fix the tool at a certain angle. The accuracy will be higher than in the previous version. Most stops allow you to set the angle of inclination, and even have a marking scale. And yet you have to rely on firmness of hands.
There are also more advanced stands: with replaceable elements and adjustment of not only the angle, but also the height. The devices are mounted not on the emery body, but on the workbench: which makes them more versatile.
Read also: Wood engraving work
In fact, such a stop can be adapted to any electric sharpener. An additional bonus is that with the help of such a stand you can sharpen knives, cutters, screwdrivers, chisels, etc.
Semi-professional guides for all types of drills
This is a fairly advanced tool that allows you to control sharpening characteristics with micron precision. All linear parameters are securely fixed, the values are set according to the markings. The drill is mounted in the groove, accidental displacement or rotation around its axis is excluded.
For sharpening, the possibility of both linear movement and movement of the edge along the arc path is provided (for conical sharpening of large diameter drills). Linear movement (along the axis) can be controlled by a master, or a limit stop can be installed.
From the point of view of processing quality, the device has practically no shortcomings. But for proper sharpening, the operator must know the parameters of the drill. That is, there is no automation: therefore the tool belongs to the professional category.
As a development of the line - a guide with its own sharpening unit. There is no need to install a stop on the workbench and change discs. In fact, you have a semi-automatic tabletop sharpening machine.
Important note: All listed devices are designed to work with standard electric sharpeners. Therefore, before starting to process drills, it is advisable to install a special emery disc.
Electric sharpening machines
They are specialized power tools for performing a single task: sharpening twist drills.
Even a person who is far from technology can use the machine (although why does he need sharp drills?). The operator only needs to determine the diameter of the drill and immerse it in the appropriate hole. It is convenient to work, errors are practically excluded. However, all drills are sharpened with the same comb. The price to pay for ease of use is the lack of flexibility in settings. For home use - the best choice: especially if there is an additional attachment for sharpening knives and scissors.
There are versions for masters. The drill is installed taking into account the sharpening parameters, the process can be controlled by the operator.
The sharpening angle, the method of edge processing (linear or conical), and the depth of metal removal are selected. The drill is not located in a common holder, but in an individual cartridge.
Industrial sharpening equipment for a metalworking shop
During intensive use of drilling machines, a separate post is required to restore the functionality of the tool. Professional stands for sharpening drills of any diameter save time and effort, but the cost of such equipment is too high for home use.
The information obtained will help you choose a sharpening device without extra financial costs. In addition, there are replaceable attachments for hand-held power tools (for example, a drill). But this is a topic for another article.
How to sharpen drills with the correct sharpening angle without much effort and skill? Unfortunately, many of us do not succeed the first time. This device is very simple in design. Therefore, each of you will be able to repeat it. Many people know that the edges of bolts and nuts have the same angle as a standard drill sharpening. We will use this. We will not weld two nuts together to get the correct pattern. The design is a little different.
To start, you need any nut. The larger the diameter, the larger the diameter of the drill that can be sharpened in it.
The nut has 6 faces, 2 of which we need. Take a caliper and mark 4 mm from the edge of the nut. We turn the nut the other way around and make a mark on the edge that is one and a half mm larger than the first one. We make a triangle on 2 sides. Cut with a hacksaw or grinder. The result was a nut with cuts.
We weld another one. The device is almost ready. He misses the puck, which we throw into the middle. You will also need a bolt; it screws into a small nut.
The cuts in the nut have different depths, which differ by 1.5 mm. This difference is hardly noticeable to the eye. We insert the rod, fix it, and apply a ruler. The gap between the ruler and the round timber is smaller on the left than on the right. That is, the device has a certain angle. Where the gap is smaller, the master made a mark.
Sharpening device
The device is designed for sharpening blind or through drills made of cast iron and steel. This device is made taking into account the types of sharpening, as well as its size. It is easy to change the sharpening angle on the machine.
There are two types of devices that will help sharpen a drill: a household and an industrial machine. In the first case, the sharpening device takes up little space and fits perfectly into the home, but such a machine can only sharpen small drills.
Industrial machines that are made to sharpen drills with large diameters have great power. The industrial machine has a clamp and a sharpening wheel.
With this device, drill sharpening occurs under the supervision of an operator who can easily control the process. Such devices are designed for long-term operation.
What you might need to work on the device
To do this you will need the following tools:
- calipers;
- marker;
- metal vice;
- Bulgarian;
- pliers;
- welding machine;
- sharpening machine with an emery wheel.
Materials you need to have on hand for work:
- regular hex nut;
- castle nut;
- bolt of the same size and thread as the nuts;
- twist drill that requires sharpening.
Homemade sharpening devices
created according to the drawing
You can even create a suitable device with your own hands from wood. So, a beam with holes corresponding to the diameter of the drills is fixed on a horizontal surface. The holes mentioned above are made at a slight angle to obtain the required sharpening angle.
Some craftsmen prefer an electric drill equipped with appropriate attachments. Naturally, the range of such elements is small, which complicates sharpening with your own hands. As a rule, a stone and a leash are included with the nozzles. If you plan to sharpen drill bits using a specific drill, you should immediately shorten the driver.
If you wish, you can make a similar attachment for a drill yourself, following the recommendations given in the corresponding video. Such devices must be equipped with fasteners for fixing the drill.
For metal (hard alloys)
A very simple device for sharpening such drills can be made at home. For this you will need:
- Two nuts (one the larger the better, and the second should be one and a half times smaller, but so that it does not fall into the larger one) with six ribs;
- Bolt with a diameter smaller than the nut;
- The washer has a diameter smaller than the large one, but larger than the smaller nut.
First of all, you need to take a caliper and measure from the edge of the nut a fifth of the diameter of the nut, but not less than four millimeters, measure on the edge. On the opposite edge we measure one and a half times the distance.
Next, we scratch lines from the middle of the side to the measured point, so that we get a larger triangle. We do the same on the reverse side. Now use a hacksaw or grinder to cut out the triangles.
DIY Resources
The main part for such a device will be a regular nut. Its six-pointed shape, or regular hexagon, sets the angle of the edges, which corresponds to the angle of the correct sharpening of the drill. The larger the nut, the larger the drill diameter suitable for sharpening.
For this part you need to select another nut with a slightly smaller bolt, and a washer the size of this nut so that it can fit into the hole of the large nut. It's all about materials!
Brush attachment
A brush attachment for a drill or screwdriver is also an indispensable item in the household. It can be used to clean plumbing fixtures, such as toilets, bathtubs, sinks, and pipes.
The brush attachment is very effective for cleaning car rims. A soft-bristle brush at low speed will help get rid of dust.
Making the nozzle does not require much effort. It is enough to choose a brush that is suitable for the intended purpose; a toilet brush or a brush for cleaning bottles can be a good choice for this role. By holding the free end of the brush in the drill chuck, you can safely use the resulting attachment.
This is not a complete list of alternative options for using a drill or screwdriver. They can be continued ad infinitum. It all depends on the imagination and skills of the user.
How to make a machine for sharpening drills with your own hands
We will need the following materials: an abrasive disc, a switch, a motor with good power, a stand, wires, an axle and a plug. Also, for the safe use of the machine, it must have a housing, outside of which it is necessary to place an axis with an abrasive wheel for operation.
You first need to decide on the installation location of the machine, since it will be connected to an outlet.
Also, our device should be placed on a table, preferably made of metal, where the engine will need to be placed, and marks should be placed for making holes for the bolts.
An abrasive disc is placed on the motor shaft. To secure it to the shaft, you must first put on the washer, then the disk, and then the washer again. After this, you should install the fastening nut on the pre-prepared thread on the shaft.
You need to connect the wires to the starter, which should have three open contacts. The winding must be capable of connecting phase lines using two starters connected in series.
The off button should be connected to NC, and the start button will be connected to NO, and it should also be in parallel connection with two NO contacts of the starter.
When you press the power button, voltage will be applied to the winding and as a result the circuits should close. When the button is released, the voltage supplied to the starter should not be removed. When disconnected, the engine must stop.
The engine itself is a safe device, but to protect its mechanisms from dust it is necessary to make a frame that will protect it from environmental influences.
To make it, you can use a metal box or make a protective screen out of glass. It is also worth installing a casing that covers the end of the disk by a third. It will protect the worker if the abrasive disc cracks.
The procedure for making devices for sharpening drills with your own hands: drawings, video
In order for the processing of materials to be high-quality and fast, it is important to take care of the necessary sharpness of the drill.
Regular replacement of the tools used requires significant financial costs, and therefore a do-it-yourself drill sharpening device would be an excellent alternative. Moreover, making it at home is not so difficult - you just need to select suitable drawings and materials.
How important is it to use sharpening equipment?
How quickly does a drill lose its sharpness? This depends on many different factors: the material being processed, the feed speed, the presence of additional cooling, and the speed of rotation. If we are talking about working with wood, then sharpening the drill is not required as often as when working with metal.
There is no point in neglecting this procedure - it is better to spend about half an hour to return the instrument to its former sharpness than to waste time in vain. After all, work productivity decreases significantly; additional efforts have to be made, increasing pressure. But in any case, the process slows down, and accordingly, you will have to spend 2 times more time on one workpiece.
Regular purchase of new drills is only relevant if we are talking about small amounts of work. Otherwise, the level of costs begins to grow exponentially - it is much easier to learn how to sharpen them correctly on a homemade machine.
Choosing a sharpening angle
How can you tell if a drill needs replacement? As a rule, the master hears an unpleasant creaking sound, and additional efforts have to be made to process the metal. Initially, the angle of the cutting edge becomes dull.
If the necessary measures are not taken in a timely manner, the service life of the tool will be reduced by an order of magnitude - the wear process will be more active.
It is important to consider that during the sharpening process on a machine, it is necessary to select the correct angle - it depends on what materials you will be working with. In this case, it is best to follow a fairly simple rule: the harder the surface being processed, the blunter the drill angle should be.
- Plastic – 30-60.
- Wood – 40-60.
- Non-ferrous metals – 40-50.
- Hardened steel – 130-140.
If desired, you can use the universal option by sharpening the drill at an angle of 90-100 degrees. But this decision is relevant only if the quality of processing can be neglected.
How to make a simple design?
At home, it is most convenient to use a sharpening machine, which is easy to make with your own hands. Moreover, this will require only a little effort and materials that are at hand. You can choose a simple drawing - the work will take a minimum of time.
The sharpening stand consists of a base that is securely fixed and a holder designed to work with drills of different sizes, which makes this device truly universal.
To make homemade sharpening equipment, you will need the following items:
- Base - for this purpose you will need to select a board whose thickness is at least 30 mm.
- Rail - attached to the base in any convenient way (you can either glue or nail this product). Fixed at an angle of about 30 degrees. The side edge should be beveled. This element is necessary to install the holder at the desired angle.
- Holder – to create it you will need a rectangular block of wood. One edge should be beveled (approximately 60-65 degrees) - it is this part that is attached to the rail. On the other hand, you need to make holes of different sizes for all types of drills used.
- Emery wheel - used for quick and high-quality sharpening. You can also purchase a diamond wheel for this purpose - although the cost is higher, its service life is much longer.
The simplest machine is ready. The design is quite compact in size, and therefore there is no need to allocate additional space for its installation - it will probably fit successfully on one of the corners of the table.
Do-it-yourself equipment with an electric motor
If desired, you can create a more advanced design, which is much more convenient to use and requires minimal time for processing. To do this, you will need to select a suitable motor, as well as take care of the choice of housing, which will make the device safe to operate.
To manufacture such a machine, you just need to select a suitable drawing, and also adhere to the chosen algorithm of actions:
- Install the motor on the chosen base, or on a table (an electric motor from an old washing machine would be an excellent solution).
- Mark the locations of future fastenings, make holes and secure the motor.
- Attach a grained wheel to the motor shaft (you can use a special attachment on the disk, which will make the sharpening process easier and faster).
- If the diameter of the shaft differs from the dimensions of the abrasive disk, it is necessary to install a sleeve.
- Connect the wires to the starter - the latter must have at least 3 open contacts.
- Install a metal box - it is necessary to protect the equipment from dust, which will increase the life of the engine.
Read also: What kind of electricity meters are installed in the apartment
As additional protection, you can use a protective cover - it should cover 2/3 of the disk. In this case, even if the circle breaks during the work, the master will be safe.
Secrets of proper sharpening
To ensure high-quality sharpening of drills, it is not enough to select a suitable drawing and make a homemade machine.
It is also important to remember a few simple rules that will help you easily achieve the desired result:
- When processing the surface of a tool, it is important to ensure that the tip is always located in the center.
- It makes sense to practice first and only then start working - this will help you learn how to maintain the required angle and not put too much pressure on the product.
- Overheating is unacceptable - you can simply ruin the instrument, and therefore it is important to constantly cool it (if the surface is hot, you should not put it in water - first you need to let the product cool).
- It is recommended to start the process with a coarse abrasive, and then move on to a finer one.
And most importantly, always follow safety precautions - then there won’t be the slightest difficulty with the sharpening procedure.
The manufacturing process of the machine used for fast and high-quality sharpening is quite simple. It does not require significant costs, since materials that are probably at hand are perfect for its creation. At the same time, such a rack will allow you to save on frequent tool renewal, which is very profitable.
The quality and accuracy of drilling depends on the sharpness of the working tool. In addition, unlike a table knife, the drill must be sharpened correctly. Experienced mechanics can straighten the cutting edge on a regular sharpening machine by simply holding the drill in their hands (at least according to them). But this method requires skill and many years of experience. Even if you have a steady hand and an excellent eye, without understanding the process, you will simply ruin the instrument.
Features of the sharpening process
If this is your first time deciding to sharpen a part with your own hands, do the work in strict sequence.
- The back surface is treated first. So, press the drill tightly and constantly make sure that the sharpening angle remains the same. As a result of processing, the tip of the drill will resemble a regular cone.
- Next comes the turn of the cutting part.
- The last stage involves finishing the back surface. In this case, you must make sure that the size of the jumper is no more than 0.4 mm. Naturally, for a large metal drill, this parameter should be slightly larger.
If something doesn't work out right the first time, don't despair. It's best to start practicing with tools that you're unlikely to need. The main thing is to learn how to apply pressure correctly and maintain the angle. In this case, it is necessary to take into account the fact that the side parts of the drill, and not the tip, are responsible for drilling. Accordingly, the edges must be sharpened.
It is important to remember that the sharpening process produces small particles. Due to heating, they fly away in the form of sparks
It is for this reason that safety precautions must be followed. We are talking about using safety glasses and gloves. Also, when sharpening, you should make sure that the drill is securely fixed. Otherwise, it may accidentally fall out of your hands.
Recommendations for using the machine
If you decide to use an appropriate machine for sharpening, be sure to prepare your work area. In particular, we are talking about good lighting. You should also wear protective gloves and goggles.
First of all, you should decide on the required sharpening angle. It is important to position yourself so that the grinding wheel is on the right. Alignment must be performed. To do this, take the working surface with your thumb and forefinger, and the second hand holds the tail edge. The metal drill must be rotated so that the cutting edge is parallel. An important point is the elimination of nicks. All movements must be performed in a certain sequence
So, the left hand is moved down to the left, and the right hand is moved clockwise.
To properly sharpen a drill with your own hands, you need to use a suitable device. This can be a household or industrial machine, as well as an electric drill with a special attachment. If you haven't tried sharpening a drill before, check out the corresponding video first.
Manufacturing process
The peculiarity of a hex nut is that any two adjacent faces meet at an angle of 120 degrees. The apex angle of a twist drill for working on hard metals is approximately the same size. This random coincidence can be used to make a tool for sharpening a twist drill.
To do this, using a caliper and a marker on the nut, mark the cutting lines to create a triangular slot, symmetrical with respect to the diagonal connecting two opposite corners of the nut. The drill will be placed longitudinally into it before the sharpening process.
To cut out the intended triangular groove in the nut, it is clamped in a vice and, using a grinder, cuts are made along pre-drawn lines. You can use pliers to remove sawed off pieces of the nut.
Next, take a castle nut and weld it with its base to the first nut on the side of the cut groove. Moreover, it is necessary to maintain their absolute alignment, because when small-diameter drills are sharpened, the bolt, having passed through the castle nut, will begin to screw into the lower nut in order to firmly clamp the drill in its groove.
Now we screw the corresponding bolt into the castle nut, which will securely press the drill placed in the sharpening groove on the sandpaper of the sharpening machine.
All that remains is to sharpen the drill on an emery wheel, using the edges of the lower nut as a template.
To do this, we simply grind the protruding part of the drill flush with the edges of the nut, which even a first-year vocational school student can easily cope with.
After sharpening is completed, the bolt is loosened, the drill is removed from the homemade device and can be used for its intended purpose.
Review of popular models
In addition, most home craftsmen need to sharpen drills several times a month, and they prefer to do it manually. The table below shows a list of the most popular models, among which the Darex sharpening machine stands out for its price, quality and functionality.
All of the listed devices have housings and accessories made of plastic.
| № | Name | Drill diameter range (mm) | Drill fixation system | Weight, kg) | Abrasive wheel material | Average price (RUB) |
| 1 | Sturm BG6017S | 3÷10 | Conductor | 1,5 | Electrocorundum | 1 900 |
| 2 | "Instar" STCH 60090 | 3÷10 | Conductor | 2 | Electrocorundum | 2 100 |
| 3 | Parkside PSS65A1 | 3÷10 | Flat holder | 1,35 | Electrocorundum | 2 700 |
| 4 | "Diold" MZS 0.2 | 3÷13 | Cartridge | 1,9 | Electrocorundum | 3 100 |
| 5 | Darex Drill Doctor 500 X | 2.4÷12.7 | Cartridge | 2 | Diamond | 20 500 |
In addition to stores that offer new models of machines, there is also a market for used sharpening equipment. On these sites, for a very reasonable price, you can purchase professional machines from both Russian and well-known foreign manufacturers, for example, the Swiss company Meteor.
How to work with a homemade machine
When sharpening with a homemade machine, remember the following:
- the two shoulders must be the same during operation, so the drill will fit smoothly into the hole and the drilling will be done correctly;
- Before starting the machine, secure the sharpening wheel well to the pulley;
- the first treatment is carried out using a disk with a coarse abrasive; if a burr is found on the drill, the disks are changed to thin ones;
- When sharpening, maintain the desired angle all the time;
- the circle should only move along the blade in one direction;
- Do not overheat the cutter and cool it occasionally during processing. Do not immerse an overheated instrument in cold water to avoid damaging the metal;
- First sharpen one side of the drill, then carefully turn it over and process the other.
When working, it is very important to maintain the original shape of the tool and the direction of the cutting edges. Be careful not to move the tip from the center of the tip, as the tool may deviate greatly during processing.
And if after sharpening the angle of the edges is different, the drill will not be able to work properly. This can be determined with or without a template: make sure that the tip is cone-shaped. It is better to edit using special devices to prevent mistakes.
It is also very important to correctly determine when a drill needs sharpening; many cannot do this. So, the following phenomena indicate a dull drill:
- humming or grinding noise when starting to drill;
- the metal heats up quickly, sometimes the heating is accompanied by a strong odor.
If you sharpen a drill ahead of schedule, you can significantly shorten its service life and provoke an early breakdown. Therefore, the sharpening machine must not only be assembled correctly, but also used correctly only as needed.
Save
Sharpening cutters for a lathe
Turning cutters consist of two main elements - a base rod, with which the tool is secured in the machine, and a head. Metal processing is carried out by an edge formed by combining the main (back) and front surfaces. When operating a tool, angles are of paramount importance. There are several of them, in total they amount to 90°.
According to the specific application, cutters can be divided into the following types:
- boring;
- for threading;
- cross-cutting;
- for making grooves, chamfers;
- shaped.
Lathe cutters may have removable cutting inserts. Such an instrument cannot be restored. The remaining options require constant updating of cutting surfaces. Processing is carried out on machines for sharpening cutters. Large enterprises most often have permanently installed units and entire departments of specialists working on them.
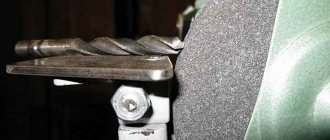
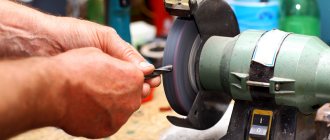
At home, this can be a manual version of the sharpener. The cutters are brought to a rotating turning circle, the progress of the process is assessed visually
In this case, it is very important to choose the right abrasive material. For tools made of carbide materials, you will need green carborundum wheels.
And cutters made of high-speed or carbon steel will recover well after sharpening with corundum wheels of medium hardness. This method of sharpening is certainly inferior to processing on electronic machines, but if certain rules are followed, it can be quite effective:
For manual sharpening of cutters, it is important to choose the right abrasive
- during sharpening, you should water the tool at the point of contact with the turning wheel;
- when sharpening using a dry method, the tool must not be immersed in water after processing - cracks will appear;
- The pressure on the abrasive wheel during processing should be the same, not strong.
After sharpening, it is necessary to fine-tune the cutters (4 mm from the edge of the cutting part): carbide tools must be refined with copper whetstone lubricated with a special paste, other types - with medium-abrasive touchstone using kerosene or machine oils.
Drawings of simple devices
The simplest devices for sharpening can be bushings, the internal diameter of which corresponds to the transverse dimensions of the drills. The sleeve is rigidly fixed into a reliable base, taking into account a certain angle. When selecting a bushing for such devices, you should pay attention to the correspondence of its internal diameter with the transverse size of the tools being sharpened. It is prohibited for the tools being processed to dangle in the sleeve, since even with a deviation of 1-2 degrees along the axis from the required values, the quality and accuracy of sharpening can significantly decrease.
Such homemade devices for sharpening drills must be equipped with clips. For their manufacture, copper or aluminum tubes are suitable, the internal diameter of which is equal to the typical size of the drilling tool used.
In some cases, the task can be simplified by installing a wooden block on this structure, in which holes must be drilled with a diameter corresponding to the tool used. One of the most important elements of such a product is the presence of a tool rest, which is necessary for:
- ensuring correct fixation of the drilling tool and the possibility of precise movement in relation to the surface of the abrasive stone;
- creating a stop point for the drill being sharpened.
Such products made from oak bars, which have holes of different sizes, are the most reliable. Thanks to them, high-quality and precise sharpening of tools is performed. The main task that must be solved by a homemade machine or similar device is the correct orientation of the cutting part of the tools being processed to obtain the accuracy of the required sharpening angle.
To make a homemade machine for sharpening drills, a number of different design variations of such equipment can be used. If you have the appropriate drawings and understand the operating principle of this equipment, you can make sharpening equipment yourself at home.
The structure consists of the following elements:
Promopore
Promopore site
Mobile platform
Fastening for drill and thrust screw Turntable
Bolts, nuts, pins, screws
There are important rules that must be observed during the operation of such a device, namely, the tool being sharpened should not rotate around its axis. In case of even a slight rotation, sharpening must be done again.
The sharpened tool must be cooled naturally. After which you should check its restored geometric parameters . You can use a template for this. It should be taken into account that each cutting edge of the drill may differ from each other by no more than a tenth of a mm. At the same time, special attention should be paid to this parameter if the drills have a small diameter.
How to choose a nozzle
Factors for selection:
- diameter compatibility with drill;
- sharpening angles;
- drill hole sizes;
- manufacturer;
- the presence of a second sharpening stone with a less common inclination.
What other attachments are there?
To make the electric drill as functional as possible, it is equipped with sharpening devices:
- circular saws;
- knives and chisels.
This is a convenient multifunctional option for home use.
Equipment
It is very convenient to use a stand so as not to hold the drill suspended; it consists of a metal body (Element A), a cover (B), a holder ring (C) and a grinding head (D). Let's see what the complete device looks like:
General information
The main criterion for correct sharpening of knives is to carry out this operation at the right angle. If you sharpen a knife by hand, it is difficult to set and maintain the sharpening angle throughout the entire process. Sharpening knives using a machine allows you to maintain the initially set sharpening angle of the blade throughout the entire work process. Built into the design of the “device” for sharpening knives, the ability to change the sanding stone to strip sandpaper allows not only sharpening the knife, but also its final “finishing”.
The sharpening angle of any blade is the angle at which the two sides of the cutting edge are located relative to each other. Its value is determined based on what the knife being sharpened will cut. If the knife is intended for trimming, or even chopping, durable materials, then the sharpening angle is made large. Cutting soft, easily wrinkled surfaces requires a smaller sharpening angle.
There are no legally established sharpening angle standards in the Russian Federation, so each knife sharpener is guided only by his own requirements. However, there are a few general values that are empirically derived.
- 8˚-10˚ - sharpening angle of the scalpel blade, razor;
- 10˚-15˚ - for cutting soft materials;
- 15˚-20˚ - sharpening kitchen knives;
- 20˚-25˚ - for blades of cutting tools (planes, planers, jointers);
- 20˚-40˚ - hunting knives are sharpened at this angle;
- 30˚-50˚ - for heavy large knives, which are used to chop rather than cut (cleaver, machete).
All knives made by hot forging go through several stages of processing after forging the workpiece: roughing, rough sharpening, fine sharpening, grinding. Such knives are expensive and are rarely used.
Household knives are produced using the stamping method and no special knowledge or equipment is required to sharpen them. However, their sharpening also requires maintaining the angle, for which the device we will discuss was created.
Why?
The essence of our homemade tool for sharpening drills is that we use the fact that the angle of the edge of the hexagonal nut is exactly what is needed to sharpen a drill for metal.
The difference in the sizes of the cut triangles makes it possible to obtain a cone-like end of the drill.
A prerequisite is that after sharpening one side of the drill, you only need to turn the drill inside the structure.
The structure itself must be left in place. If you just sharpen the other side without turning the drill, the end will be shaped like the bottom of a boat and it will be very awkward to drill with.
This is Vladimir, author of the OnlyKit channel.
I was walking into the garage one day and found a large rusty nut under my feet.
I picked it up and brought it to the garage, it wouldn’t go to waste. I wanted to make something useful out of it. After a little research on the Internet, I decided to make a device for sharpening drills. I have a sufficient number of them and quite a few of them have become dull.
First of all, you need to decide on the drill sharpening technology. There are two main meanings. The first is the angle of the cutting edge should be 120 degrees or, as in the figure below, the value of the A-angle at the tip.
And the second value B is the back angle, it should be about 8 degrees. I did the C-angle of the transverse edge by eye.
Let's return to the nut. It fits perfectly with the drill sharpening parameters, because... all its edges are located at an angle of 120 degrees.
The photo shows a new drill attached to the nut.
I'm starting to make the device. As I found out earlier, the nut itself is 120 degrees, so there is no need to look for this size. We need to decide on 8 degrees. I will take them into account during the manufacturing process.
Now I need to make V-shaped cuts in the nut. They will deviate by 8 degrees. Now we need to find out how much the deviation will be. We are looking on the Internet for a table “how to determine the angle as a percentage”
8 degrees equals 14.1 percent. The nut itself is 30 mm.
Let's remember the formula from school on how to calculate percentages. 30*14.1/100=4.23mm That is. the deviation should be 4 mm. If this is not clear to you, then at the end of the article there will be a video on the detailed assembly of this conductor. The only thing is that I was a little hasty there and did not correctly calculate the millimeters of deviation. But this did not lose its properties as a sharpening device.
Now you need to mark on one side (approximately, depends on your nut, look at it yourself) mark 1 mm,
and on the other 4 mm.
Now you need to draw the places where the V-shaped cuts will be.
On the other hand, it’s just 4 mm higher.
And I saw off the excess using an angle grinder.
As a result, we have such a through cut in the nut. But on one side the indentation is 1 mm, and on the other 4-5 mm.
Now you need to make a mount to fix the drills. I will make it from one more nut, but... I made a deep cut and the nut is falling through.
You will have to weld a washer on top, and a nut on top.
That's all. The device is ready for use.
The work area should be on one side.
Those. First, we grind down one side of the drill, and then we turn the drill over and grind down the second edge. Details in the video.
I'm starting tests. I turn on my homemade machine. An article about him is here, and a video is here.
The drill is sharpened perfectly.
120 degrees are maintained perfectly.
We begin the sharpening test. I drill a 4 mm corner.
The drill cuts into metal perfectly, there is no squeak or squeal. This means that an angle of about 8 degrees is maintained. Look at the shavings.
Well, let's finish the article for now. My goal has been achieved.
Detailed assembly video here:
I look forward to interesting comments from you: tips, photos, maybe someone has already assembled similar machines, or your own homemade products, be sure to post them.
Thanks to everyone who read it to the end and supported my channels on Zen and YouTube.
I wish you all good luck and don't get sick!
About the advantages and disadvantages of nozzles
Among the advantages, it is worth noting the efficiency indicators of such a sharpening stone mounted on a drill
It is important to remember that these tools are not intended for intensive use. Without placing excessively high demands on these devices, we can say that they are quite effective in fulfilling their intended purpose.
In other words, for home workshops, this is an ideal tool that will allow drills to be sharpened quickly and correctly at any time.
According to the experts, in addition to its advantages, the device also has disadvantages:
- Most often, attachments perform editing of the cutting part of a “squat” tool, rather than sharpening it. When using the device for full sharpening of “dead” tools, the emery wheel will last a relatively short time;
- when used, reliable fixation on the power tool is not ensured;
- often the sharpening angles are standard in the device and cannot be changed;
- there is a possibility of the rotating chuck getting caught on the internal surfaces of the adapter coupling. To exclude this, you should select the appropriate diameters and try on the device during the purchase process;
- inconvenience of holding and turning on the drill while working with one hand, and directing the drill with the other. To ensure greater comfort, it is recommended to use brackets that allow you to fix the power tool.
To sum up the advantages and disadvantages of drill attachments, we can note that they are practical when used for work in a home workshop; they are not suitable for production tasks.
Top 2. Prostormer PTET1058
Rating (2020): 4.85
574 reviews taken into account from resources: AliExpress
- Nomination
The most popular
This electric drill sharpener already has 1,250 orders and almost 600 reviews on AliExpress. In them, site users praise the device and recommend it for purchase.
- Characteristics Average price: 1912 rub.
- Power: 95 W
- Noise level: 64–75 dB
- Rotation speed: 1600 rpm
- Grinding disc diameter: 75mm
- Suitable for drill bits: 3-12mm
A stationary household sharpener, the main advantage of which is its low price with a good level of quality. PTET1058 does not require any additional accessories; you just need to connect the device to a power outlet and it will be ready for use. The device is suitable for processing most drills due to the increased diameter of the grinding disc. The main complaint from users is the complexity of the sharpening process. The set with the sharpener itself includes instructions in English, and video tutorials are also posted on the Internet, but figuring out how to properly control the sharpening angle of the drill is not so easy. Those who managed to master the intricacies of the process speak very positively about the device.
Advantages and disadvantages
- Fast connection without additional devices
- Large diameter grinding disc
- Operational sharpening
- Durable material and quality build
- Complex control and sharpening angle control
- Not suitable for the smallest drills
Method No. 1 - metal fixture
A device consisting of two nuts and a bolt
Those who have basic knowledge and skills in metalwork can make a durable device from metal.
To work you will need:
- two nuts
- bolt
- caliper
- vice
- welding machine
Step No. 1 - marking the nut
Nut marking
We make a seat for the drill. To do this, use a caliper to mark the nut, as shown in the photo above. We make markings on both sides of the nut.
Step No. 2 – cut according to the markings
We cut according to the markings
1 We clamp the workpiece in a vice, and according to the markings we make a cut with a grinder.
Nut with sawn groove for drill
2 The end result should be as shown in the photo above.
Step No. 3 - preparing the second nut
The second nut is one size smaller
Place a second smaller nut on top.
Step No. 4 - weld the nuts
We weld the nuts together
1 We fix both nuts in a vice and secure them with electric welding. Two points will be enough.
The device is ready for use
2 Screw the bolt into the whole nut. The device is ready for use.
Step No. 5 - insert the drill
Insert the drill
We insert the drill into the device and fix it with a bolt so that its tip protrudes slightly beyond the edge of the nut with the groove.
Step No. 6 – sharpen the edges
We sharpen according to the edges of the nut
1 Sharpen the drill using sandpaper or a grinder. We try not to grind off the edges of the nut.
Drill sharpening is finished
2 The drill is sharpened. The angle of 120 degrees is maintained.
VIDEO: Metal device for sharpening drills
Wow! Awesome ideas With Drill Bits
Do-it-yourself drill sharpening device: 2 options
Types of sharpening machines
To sharpen a drill with your own hands correctly, you need to use the appropriate machines. Such devices are divided into 2 groups.
- Industrial equipment has significant power. It can be used to sharpen drills with a diameter of 20 mm or more. These machines are installed at large enterprises, and sharpening is carried out in semi-automatic or fully automatic mode.
- Household machines are designed for use at home. They are also used in small production. Such equipment is characterized by mobility, average power and compact size.
Recommendations for choosing a household machine
If you are interested in the question of how to sharpen a drill for metal, then be sure to purchase the appropriate machine. An inexpensive model with average power is suitable for home use. It will allow you to sharpen small drills for metal.
Naturally, when purchasing, you need to pay attention to the noise level, as well as the design of the model. The best option would be a simple machine, because choosing the necessary parts for it will not be difficult
It is necessary to buy such devices only in specialized places, since a technical passport is included in the kit. Moreover, you will be given a warranty card.
Manufacturing process step by step
We start by marking the nut, choosing two opposite corner vertices. Using a caliper, we measure a distance of 4 mm from the edge of one vertex, and on the opposite side 1.5 mm more, that is, 5.5 mm. From these marks we mark an acute angle for the future location of the drill itself.
We make this slot with a grinder or a hacksaw. Defects can be easily corrected with a file. It should look like this (photo).
We place the next smaller nut in the center of the large nut on the side of the cuts, and weld it with electric welding. To be neat, you can clean the seams with a grinder.
We insert a washer into the large nut, and tighten a bolt into the small nut to clamp the drill. It turns out to be an improvised clamp with a holder for drills. We sharpen the drill and check its operation on a piece of metal. Drilling should be easy and relaxed.
That's all the device is - simple, functional and practical to the extreme. And most importantly, it will really come in handy, and you will no longer have to guess the angle of sharpening the drill by eye.
Video on making a device for sharpening a drill with your own hands
Stand - a device for sharpening drills for metal: design features
Depending on the scale of the tasks, they can be of different sizes. The unit is mounted on a lathe or sharpening machine using bolts. Their design consists of:
- grounds;
- a fastening element for clamping a tool;
- thrust mechanism;
- feed regulating screw;
- clamps.
There is a scale on the purchased sample; it adjusts the angle with high accuracy. If you are using an independent device, it will be more convenient to use templates of different diameters; they can be made of wood.
A simple device made from a nut for sharpening a drill at home
For production you need a minimum of available materials. Let's look at the image:
Creation instructions:
- Take two nuts of different sizes, cut out 9 mm cuts from the smaller one on three edges on each side.
- The sharpening angle should correspond to the resulting edges - 120 degrees.
- Weld the second product to the first using welding machines so that you get holes in the form of a triangle.
- Select and screw in a bolt that is the same size as the small nut. It will clamp the tool being processed.
The workpiece is inserted into such a holder. It is securely fixed with a clamp. Now you can bring the part to the abrasive wheel and not worry about cutting off too much or at the wrong angle.
Do-it-yourself drill sharpening device for drills
We told you that you can buy an attachment for an electric drill. They are usually made of plastic and have standard connectors. You can make an analogue at home, recommendations:
- make parts from metal, not plastic;
- connect the sanding wheel to the cartridge using a ring;
- the emery cone can be made on a lathe;
- The outer casing (a cover with holes of different diameters to suit the required dimensions of the tool) is best made of wood, but it can also be made of steel.
To make it easier for you to do your homemade product, let’s see what the purchased model consists of. This is explained in the video and shown by the commentator after the analysis:
Device for grinder
This power tool is also used for sharpening, this is easy to explain - installing an abrasive disk is a natural task of an angle grinder, and fastening at the desired angle to a rotating abrasive is easy to do. Let's see what it looks like:
A metal corner must be attached to the casing; it will act as a guide. The adjustment is done manually. There are also disadvantages, including the fact that the disk itself is subject to uneven load and can crumble with prolonged use.
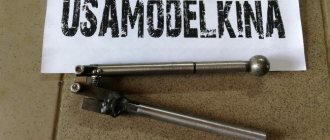
Mandrel for sharpening drills from door hinges
Another interesting home option.
Many people think that it is overly complicated. But we will consider making:
- the lower part is fixed on the hand rest;
- the upper one moves the workpiece;
- the lower finger needs to be pulled out, leaving only the upper one;
- one of the loops should be cut into two parts - one of them regulates the tilt;
- you need to weld a metal corner, cut a thread for a bolt in the drilled holes;
- Next you need to weld the lamb in order to rotate the thrust mechanism.
More detailed step-by-step instructions in the video:
Drawing of a device for sharpening drills
If we talk about those drills that are used by craftsmen at home, their cost in stores is low. But even in this case, you should not use them as a consumable for one-time use. After all, updating the drill to the best working condition will not be difficult if the master has the skill or special tools.
There are factory-made machines that are designed for sharpening, but this is a separate expense item, so most often craftsmen create such devices with their own hands.
Most of the problems are caused by drills for metal, and wooden blanks do not quickly reduce the sharpness of the cutting edges.
To make a machine for restoring the sharpness of cutting elements, the necessary control means (template) are used to check the tool.
Typically, tools for ferrous metal, carbide bronze, steel or cast iron have an edge angle of 115-125 degrees. The length of another material, these parameters are different.
for soft bronze, red copper – 125, for brass alloys – 135;
for aluminum and soft aluminum alloys, granite, ceramics and wood – 135 degrees;
for magnesium and its alloys – 85 degrees;
for plastic, textolite and silumin - from 90 to 100 degrees.
Masters, if necessary, make templates in accordance with the above data. By the way, theoretically, a single drill can be suitable for all these metals and other materials, if you sharpen different working surfaces each time.
An elementary handicraft device that is often used, bushings attached to the base. There are many drawings on the Internet for self-production. It is necessary to take into account that the tool must be well clamped, the accuracy depends on 1 degree.
If desired, you can make a large-sized holder by using aluminum or copper tubes corresponding to the standard characteristics of drills, or drill many holes in a soft metal workpiece. It is necessary that the sharpener has a comfortable hand rest to move the device and hold the stop.
This primitive sharpening machine is easy to install on a workbench or table.
The essence of the problem: there are drills, they need to be sharpened. We will use one of the sharpening methods, close to the factory ones. Too lazy to catch with your hands. Better than the monkey method - install it and you're done. It took approximately 1 hour to manufacture the device according to the finished drawing.
Read also: DIY mini grinder
A little welding work according to the template. A corner was made. We put the washer on, it’s just pressed on.
Let's try the first sharpenings, if everything is assembled correctly, we will refine and refine it, make a quick adaptation.
After sharpening the drill, we carry out a test. Two casting chips are visible, which means that sharpening was carried out correctly.
The only drawback is that one chip is longer than the other, which means they missed the length of the edges. You need to make a stop that will adjust the length
Video of the channel "Anton Fomenko".