Product Features
Single lever mixer
A single-lever mixer is a device consisting of a faucet and a lever handle, with the help of which the temperature and pressure of water are regulated.
This mechanism performs three functions:
- mixing hot and cold water;
- pressure formation;
- power change.
The operating principle of the crane is simple:
- The water temperature changes when you turn the knob.
- The flow force is adjusted by turning the lever. The higher the position, the more powerful the jet.
The one-arm faucet for washbasin consists of several elements:
- rotary handle;
- tap covers;
- mixer spout and body;
- cartridge.
Water mixing occurs inside the device using a ceramic cartridge or a ball mechanism.
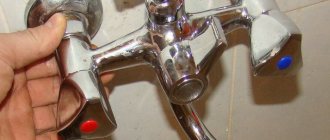
Valve tap
Classic water faucets with two spindles have been used for decades. People loved them for their reliability of design and ease of operation. Everything is very easy to set up, just turn the dials and you can select the desired temperature and acceptable water pressure.
Note. Inside the device there is a valve that regulates the flow of liquid. There are two types of mechanism.
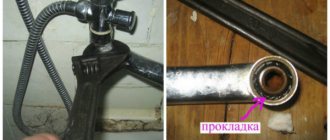
1. With rubber gasket.
2. With ceramic elements.
Crane boxes with rubber gaskets are a classic option that has a lot of disadvantages. Rubber bands wear out and become deformed during operation, which leads to water leaks.
In some cases, the faucet begins to hum and vibrate when opened. Many people have probably heard humming pipes in apartment buildings.
Locking mechanisms with ceramic plates are more reliable and durable. Such crane boxes usually rotate 90 degrees. This makes it very convenient to regulate the pressure and temperature of the liquid.
Types of faucets
Ball type design
According to the internal structure, there are two options: ball and ceramic.
Ball mechanism
Such taps are equipped with a round-shaped mixing chamber. It looks like a metal ball with three holes. Cold water flows into one of them, hot water into the second. The mixed jet comes out of the third hole. Temperature and power are adjusted by moving the ball.
Ceramic cartridge
Consists of three separate plates. At the bottom there are three holes for supplying cold and hot water and obtaining a mixed stream. Mixing occurs in the upper compartment of the cartridge.
Both models work and look the same, despite the differences in internals. The cartridge is reliably protected from limescale, the ball is resistant to impurities present in water.
Single lever mixer device and repair
We repair a single-lever mixer ourselves
Single-lever faucets attract with their laconic design and ease of control of water flow. Turning on the water, changing its temperature and pressure - all this with one turn of the handle. These devices are reliable and have a long service life—some branded ones come with a 5-year warranty. However, repair of a single-lever faucet is periodically necessary.
Types of single-lever mixers and their design
Despite the external similarity, there are two types of rotary or single-lever faucets - with a cartridge (cartridge) and ball - with a ball inside. You can repair any of them, but to do this you must first disassemble them. And so that you can not only disassemble, but also assemble, it is advisable to become familiar with the internal structure of each.
The design may be different, the structure remains the same
Cartridge mixer: structure
Cartridge mixers are so named because their shut-off and control mechanism is hidden in a special cartridge flask. In more expensive faucet models, the cartridge body is made of ceramic, in cheaper ones - from plastic. The good thing about these models is that they are easy to repair, but it is not always easy to achieve the required pressure with them - you need tighter control of the handle. But changing the water temperature is very easy - with a slight movement of the hand.
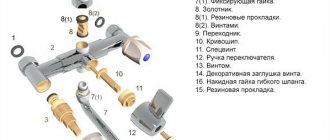
The structure of a single-lever faucet with a cartridge is simple. If you go from top to bottom:
- Switch with fixing screw.
- Locking (clamping) nut.
- Cartridge. The water flows are mixed in it, and the same device shuts off the water.
- The mixer body, which has a “seat” for the cartridge.
- Fasteners, studs and gaskets to ensure tightness.
- Spout (gander). It can be a separate part - in rotary models for the kitchen or part of the body - for sinks in the bathroom.
- If the spout is separate, gaskets are also installed below and there is also part of the body.
What does a single lever mixer with cartridge consist of?
The cartridge itself contains several (usually 4) ceramic or metal disks of a special shape. A rod is welded to the upper disk. By changing the position of the rod, we change the position of the plates relative to each other, changing the amount of water passing through the holes in the plates.
In order for the faucet/mixer to work normally, the plates are ground very tightly. For this reason, cartridge single-lever faucets are very demanding on water quality. Foreign fragments getting between the plates causes the faucet to leak or stop working altogether. To avoid this, some manufacturers install filters on the incoming pipes. But, it is better to install filters on the water supply and get clean water that can be safely supplied to household appliances.
Single lever ball mixer
It got its name from the element in which the water is mixed - a ball with cavities. The ball is usually metal, hollow inside. Its outer part is polished to a shine. The ball has three holes - two for the entry of cold and hot water, one for the exit of already mixed water. A rod is attached to the ball, which fits into a cavity in the handle. This rod with a rigidly attached ball changes the temperature of the water and its pressure.
The structure of a single-lever mixer with a ball water mixing mechanism
It is easier to adjust the parameters with such a device - the parts are well lapped, the handle moves easily. Mixers with a ball mechanism are less critical to the presence of mechanical impurities, but do not respond very well to the presence of hardness salts and excess iron. So for normal operation, pre-filtration is required here too.
How to disassemble and repair a faucet with a cartridge
Repairing a single-lever cartridge faucet often involves reassembling and cleaning the O-rings. Salts are deposited on them, debris and dirt accumulate, which is why the faucet begins to leak. To eliminate this nuisance, the mixer is disassembled, all parts are wiped of dirt (with soapy warm water), rinsed, dried, and put back in place.
Sequence of installation of parts in a cartridge single-lever mixer
Let's figure out how to disassemble a faucet with a cartridge. First, turn off the water, and then the procedure is as follows:
- Remove the decorative plug located on the handle. Just pry it out with a screwdriver.
- The mounting screw is hidden behind it. We unscrew it with a hex key and take it out.
First, unscrew the fixing screw
- Now pull up the shift lever.
- Next, a decorative washer is screwed onto the body or simply installed. We're filming it.
- Unscrew the clamping nut. It has a large diameter, so you may need an adjustable wrench or a set of open-end wrenches.
- We take out the cartridge. Let's examine it.
- Below are gaskets, fasteners and studs. You need to remember exactly the order in which they are laid out. Sometimes it even matters which side they are laid on. Therefore, be careful when disassembling.
- We unscrew the cap, preferably by hand, since it is usually made of thin metal and is easy to bend.
- We unscrew the clamping nut, there is a washer under it, remove it too.
- Access to the ball has opened. Pull the rod and take out the ball.
- Under the ball there are two saddles, with springs so that the elastic bands are pressed more tightly to the ball.
That's all. The single lever mixer with cartridge was disassembled. As you can see, there are not many details. The main working part is the cartridge. It is in it, inside, that mixing occurs.
Replacing the cartridge
The cartridge itself has a sealing gasket - a rubber seat at the bottom, which ensures a tight fit to the body. Over time, the rubber loses its elasticity and water begins to leak out. If this is the problem, you can first try to clean this ring from the salts and deposits that have formed on it. Place the cleaned part in place and check the work. If the leak does not stop, you will have to replace the cartridge.
Cartridges for “one-arm” faucets
Cartridges for mixers have different diameters, and the inlets and outlets in the lower part are located differently. Therefore, if you need to replace it, first you disassemble the mixer, get the treasured part and go to the store or market with it. You must choose exactly the same model without any deviations. At home, install the cartridge into the housing, turn it slightly until you feel that it “sits” in place. Next is assembly, it goes in reverse order.
First install the clamp nut. Actually, at this stage you can check how the new cartridge works. Turn on the water, adjust the temperature and pressure with the stem. To make it more convenient, you can put a handle on the rod. If everything is fine, continue assembly.
We disassemble and repair a single-lever ball mixer
The single-lever ball mixer was invented a little over 40 years ago. Its design is simple and reliable - there is nothing to break. If problems arise, it is only due to poor quality water - dirt particles settle on the rubber saddles on which the ball rests. The contact deteriorates, water leaks out and the faucet begins to leak.
How to disassemble a single lever ball mixer
Some ball valves are also available with a cartridge. Only inside the cartridge there are not plates, but a ball. Disassembly of this type is no different from that described above. All the difference is hidden inside the flask. There are also other types of taps. In them, the locking ball is installed directly into the rubber seat. There are some minor differences here.
The faucet lever is removed in the same way - first remove the plug, then unscrew the screw with a hexagon. Pull the lever up and remove it. Afterwards the steps are very simple and similar to those described above:
That's it, sorted it out. Next comes the repair of the single-lever mixer. In theory, the problem is that deposits have accumulated at the contact point between the ball and the seat. They need to be removed - carefully clean and wipe. There may be problems with the springs. Dirt sometimes accumulates on them too, but more often they simply lose their elasticity.
The third source of problems is the ball itself. In general, it should be made of stainless steel; accordingly, it only needs to be cleaned of deposits. In reality, this is not always the case - cheap faucets have appeared even with plastic balls or made of cheap metal. In this case, peeling of the surface or other similar troubles may occur. Such a locking element will no longer work normally. It needs to be replaced. You also go to the store with the ball and select a replacement of the appropriate size. Assembling the mixer in the reverse order: springs from the seat, the seat is out of place, there is a ball on it, etc. When assembling the entire structure, carefully center everything - misalignment will lead to rapid wear and the tap will leak again.
Repair of a single lever faucet with swivel spout
Faucets with a swivel spout are installed on sinks in the kitchen or bathroom. Periodically it starts leaking from under it. In this case, the locking mechanism is not to blame; it’s just that the gaskets have lost their elasticity or the lubricant has dried out.
Repair of a single-lever mixer with a movable spout
In this case, disassemble the mixer as described above, then remove it by pulling the spout up. Remove all old gaskets. If they are stuck, you can use a flathead screwdriver or even a knife blade. You have to remove them, but they are still replaceable. Use the removed gaskets to select new ones. It is advisable that they be made of silicone, not rubber. Silicone is more elastic, retains its properties longer, and tolerates contact with water better.
Lubricate the new gaskets with plumbing silicone grease and install them in place. Reinstall the spout. It must be pressed down well so that it rests against the union nut on the mixer body. Next is the assembly of the rest of the mechanism.
Repair of a single-lever mixer: do-it-yourself installation and repair
Single-lever taps are rapidly replacing traditional valve devices in apartments and houses. But no matter how convenient such modern plumbing may be, it periodically fails for a variety of reasons. In order not to spend money on buying a new faucet every time, it makes sense to understand the causes of breakdowns and master the independent repair of a single-lever mixer.
Features of the design of such devices
Ball, single-lever, joystick, articulated - all these are names for a mixer that is controlled by only one lever. Using such a faucet is simple and convenient: moving the lever vertically regulates the amount of water flow, and turning it horizontally sets the appropriate temperature.
This diagram allows you to understand the principle of operation of a single-lever mixer: changing the size of the hole for hot, cold and mixed water allows you to adjust its temperature and pressure with just a couple of movements
The internal structure of single-lever faucets usually comes in two types: a ball mechanism or a ceramic cartridge. The center of the ball mechanism design is the circular mixing chamber. It looks like a hollow metal ball with three holes in it.
Cold water flows into one of the holes, and hot water into the other hole. Inside the chamber, the flows are mixed and then flow to the third hole, which is connected to the mixer spout. The control lever moves the ball in such a way as to adjust the clearances in these holes, i.e. change the amount of hot and cold water entering the mixing chamber and the size of the outgoing flow.
The ceramic cartridge consists of two or three plates. At the bottom, as in the ball mixer, there are three holes with exactly the same functions: hot water, cold water, mixed flow. But mixing hot and cold water is done at the top of the device.
Both types of mixers operate approximately the same, but they react differently to operating conditions. For example, limestone deposits almost never accumulate in a ceramic cartridge. The fact is that the plates in such a device are ground to each other very tightly, the size of the gap is comparable to the parameters of the molecule.
This diagram shows in detail the structure of a single-lever ball valve. Information about the individual elements of the device helps to understand the procedure for disassembling and assembling it
But ceramics are not friendly with sand and other mechanical contaminants. A small grain of sand that gets into the faucet cavity can lead to chipping of the ceramic elements, and the entire cartridge will have to be replaced. Sand is practically not dangerous for a metal ball, but there are almost no obstacles for a raid.
The weak point of single-lever faucets is the rubber gaskets. In any case, these elements will have to be replaced at least every two years. Some buyers complain not about problems with the accuracy of temperature settings. This is a characteristic feature of inexpensive models with a small adjustment angle. Such devices break down much more often.
How to disassemble a single lever faucet?
Very often, problems with such faucets arise due to a breakdown of their internal mechanism. The algorithm of actions in this case is quite simple: the faucet must be disassembled, the damaged mechanism must be removed, replaced with a new, serviceable element, and the device must be reassembled in the reverse order.
This diagram details the disassembly procedure for a single-lever faucet with a ceramic cartridge. To carry out the work you only need a screwdriver and an adjustable wrench.
This is not a very complicated procedure, but all operations should be performed very carefully and accurately. First, of course, you need to shut off the cold and hot water pipes leading to the mixer. To disassemble the ball valve, you must:
- Use a screwdriver to remove the decorative plug.
- Unscrew and remove the fixing screw.
- Unscrew and remove the decorative nut, which serves as the cover of the mixer body.
- Unscrew the nut holding the mixer mechanism in the correct position.
- Remove the cartridge or ball mechanism from the valve body.
To remove the decorative plug, use a regular screwdriver. You should act carefully so as not to damage the element. To unscrew the fixing screw of the faucet handle, you can use a hexagon. In some models the handle fits quite tightly. It can be pryed off with the end of a screwdriver.
The mixer cover with the lever sometimes fits very tightly; you can use a screwdriver to remove it. Work should be carried out carefully so as not to scratch the body
It is not difficult to remove the mixer body cover by hand without the help of special tools. But it is more convenient to unscrew the fixing nut inside the mixer with an adjustable wrench. After this, removing the internal mechanism of the faucet will not be difficult.
It should be remembered that the sizes of these elements vary over a fairly wide range. The height of the rod can vary significantly, as can the diameter of the cartridge. There are also various options for the landing part of the mechanism. Therefore, experienced craftsmen rarely purchase a new cartridge in advance.
The nut that secures the position of the ceramic cartridge inside the mixer should be carefully unscrewed using a regular or adjustable wrench
It would be much more effective to suspend repair work at this stage, take the damaged “filling” of a single-lever faucet and go with it to a plumbing store to buy an element of exactly the same size and design.
Due to the design features of the mechanism, it cannot be adjusted or adjusted in any way; an exact match of all parameters is required.
Not all ceramic cartridges are the same size or configuration. To choose the right device, you need to take the damaged cartridge to a plumbing store
After purchasing a new cartridge, all work is performed in the reverse order: install the cartridge, put the adjusting rod on top, secure it with a screw and close it with a decorative plug. The direction of rotation for cold and hot water is usually indicated on the plug; this point must be taken into account during installation.
If the ceramic cartridge of a single-lever mixer is clogged or damaged, it should simply be replaced with a new element; washing usually does not help
When installing a ball mechanism, inexperienced plumbers sometimes confuse the location of the holes and install the mechanism incorrectly. As a result, such a mechanism will not work correctly after installation. Therefore, after disassembling the tap, you should carefully inspect the ball and remember its correct position in order to act correctly in the future.
Upon completion of the repair of the single-lever mixer tap, cold and hot water are reconnected and the quality of operation of the repaired device is checked. If you still experience problems, the cartridge may be installed incorrectly or there may be some additional damage to the faucet. The repair process for devices of this type is discussed in detail in the following video:
Overview of common breakdowns
Replacing the cartridge or ball mechanism is only one way to repair a single lever faucet. There are other failures of devices of this type, to eliminate which you will need different means and methods. The most common problems associated with joystick mixers are:
- cracked device body;
- clogged aerator;
- problems with supply pipes or flexible hose;
- incorrect position or wear of rubber gaskets;
- water leaking through the shower head;
- Problems with the flow switch on the shower hose.
Typically, diagnosing the problem is relatively easy, since each situation has characteristic symptoms. Sometimes you have to fix several breakdowns at the same time. This usually happens when using low-quality plumbing or non-compliance with the operating conditions of the mixer, which leads to increased loads.
Crack in the device body
If water is leaking from under the faucet, there is a high probability that its body is cracked or leaking somewhere. This situation can arise suddenly, for example, if a heavy object is accidentally dropped on the faucet. Sometimes gaps appear gradually, under the influence of exposure to water over a long period of time.
In any case, it is almost impossible to completely eliminate such a breakdown. The most reliable method of repair is to completely replace the body of the device, but usually the old mixer is simply dismantled and a new model is installed. A sealant is used as a temporary measure.
Usually the crack is simply covered with a suitable composition on top, for example, “cold welding”. Before starting work, you should study the instructions for using the sealant and strictly follow the manufacturer's recommendations. But a faucet repaired using such methods will look very unpresentable. Over time, the sealant will crumble and the repair will have to be repeated again and again. Therefore, after repairing the crack, you should immediately plan to purchase and install a new faucet.
Replacing a worn gasket
If the faucet is leaking from the bottom and its body is not cracked, the gaskets between the faucet and the flexible water hoses may have worn out. This problem is relatively easy to fix. First you need to shut off the flow of hot and cold water to the mixer.
If the rubber gaskets under the faucet ball mechanism are worn out or installed incorrectly, the faucet may make a lot of noise and even leak.
However, there will still be some water left in the mixer itself. You need to open the tap and drain this water. Now you should disconnect the hoses through which water enters the mixer. There are also residual waters here, so you should put a bucket below, and a rag won’t hurt to catch any accidentally spilled water.
When the flexible connections are disconnected, you need to unscrew the fixing nut, which is located under the sink and holds the faucet in the correct position. Under the nut there is a gasket. If it looks worn, cracked or warped, this is most likely the cause of the leak.
Such gaskets are sold at any plumbing store, or you can cut a suitable element from a piece of rubber. Before installing the gasket, it is recommended to clear the installation site of accumulated dirt. Then you need to reassemble the system in the reverse order: tighten the fixing nut, connect the flexible leads, restore the water supply. After this, you need to open the tap to check the operation of the device.
Problems with the aerator
A small nozzle placed on the faucet spout cuts the water flow into separate streams and artificially increases its volume. The holes in this nozzle are small; if the tap water contains contaminants, they can easily become clogged. Sometimes problems arise because the aerator is simply rusty.
The aerator - the nozzle on the faucet spout - can become clogged, which leads to a decrease in water flow. Flushing the aerator or replacing it helps solve the problem.
A characteristic sign of this problem is a decrease in water pressure at one point, for example, in the kitchen. At the same time, water flows from other taps in the same quantity. If the aerator was removed, and after that the flow of water from the mixer increased noticeably, then the cause of the breakdown can be considered precisely established.
Solving this problem is very simple. The aerator is usually easy to unscrew from the spout. After this, it needs to be washed or dirt removed in another way. You can even install a new aerator, if possible. After this, the previous water pressure will be restored. Some people refuse to use an aerator, but in this case, using the mixer will not be as comfortable.
If the pipes are clogged
Is the aerator in order, but the flow pressure has noticeably weakened? The pipes or flexible connections through which hot and cold water flows to the mixer are almost certainly clogged. This problem is especially common in older plumbing systems with metal pipes. During the corrosion process, metal particles accumulate inside, reducing or completely blocking the lumen.
If the flexible hoses through which cold and hot water are supplied to the mixer are clogged, they must be removed and cleaned or replaced with new ones.
First you should turn off the water, and then begin to repair the breakdown. With flexible hoses everything is very simple. They need to be removed, washed, cleaned and reinstalled. If the contamination is too serious, you can simply install new hoses. With pipes everything is a little more complicated. To clean them, use a “snake” cable.
In this case, the part of the pipe in which contaminants have accumulated should be disconnected from the water supply system, and after cleaning, installed in place. Sometimes such a section of the water supply is replaced and new structures are installed. If the pipes are old and get dirty often, it makes sense to think about upgrading the plumbing system and installing plastic pipes, which are much less susceptible to corrosion than metal structures.
Faucet in the bathroom
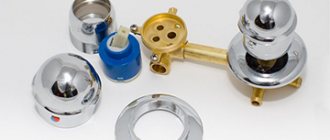
A faucet that is more complex in design than in the kitchen is usually installed on the side of the bathroom, since here, in addition to the usual spout, a shower head is used. In addition to the problems described above, there are breakdowns associated with the mechanism for switching the flow of water from the spout to the shower head and back.
The single-lever mixer, designed for installation on the side of the bathtub, is complemented by a mechanism for switching the flow to the shower head. If the gaskets of this mechanism are worn out, they must be replaced
It happens that water gradually leaks through the shower head. This indicates wear on the top gasket of the device. Fixing the problem is relatively easy. You need to remove the retaining nut and the shower hose that it holds in place. This will provide access to the top gasket.
This element is removed and replaced with a new one, which can be purchased or even cut from a rubber sheet, the thickness of which is about three to four millimeters. Of course, the installation site for the new gasket should be cleared of accumulated dirt. After repairing the faucet in the bathroom, the shower hose is put back in place and the operation of the faucet is checked.
But if problems arise with the gasket, which is located at the bottom of the faucet, it will be a little more difficult to fix the damage. Externally, this problem is expressed in the fact that the shower head control lever is not held in the correct position and falls down, preventing the water from switching.
First you need to turn off the supply of hot and cold water to the bathroom faucet, then unscrew the nut and remove the shower head. Then the adapter and the mixer spout are sequentially dismantled. To get to the gasket located below, you will have to remove the entire “stuffing” of the mixer. After this, the gasket is replaced and the device is reassembled in the reverse order.
It happens that the gaskets are not worn out, but they do not fit or are installed incorrectly. This is not uncommon when the gaskets are cut by hand. If, when opening the water, the mixer starts to make a lot of noise, it makes sense to check the condition of the gaskets. Usually it is enough to trim them or just change their position a little. If the gaskets are not at fault, the additional noise effect can usually be eliminated by installing filters.
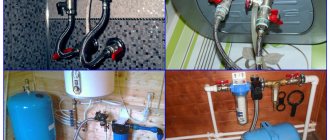
How to prevent malfunctions?
The condition of the mixer and its service life depend on several factors:
- quality of tap water;
- proper installation of the water supply system;
- quality of a specific mixer model.
Inexpensive faucets may look attractive, but they don't last long. The case and internal mechanism, made of low-quality materials, fail quickly and often. Water quality and the design of the water supply system are interdependent factors. As soon as flaws in pipe installation become obvious, they must be corrected immediately.
The presence of coarse filters can significantly increase the service life of a single-lever mixer. Don't neglect this useful device. Water hardness must be taken into account at the stage of purchasing the device. The packaging and/or the mixer data sheet indicates what water hardness the product is designed for. These data should be correlated with information about the quality of water in your own home.
The aerator is another useful factor that can positively affect the condition of the faucet. The device cuts the water flow into separate jets, which visually increases the flow volume. This allows you to reduce the amount of water flowing through the mixer, which leads to saving water and the resource of the device.
Vladimir Vladimirovich Golovanov
After graduating in 2008 Faculty of Civil Engineering, St. Petersburg State Polytechnic University, works as a plumbing equipment engineer. He has patents for inventions in the field of engineering plumbing equipment, which are being introduced into production. Author of a unique advanced training course for plumbers. Invited Russian-speaking teacher at the international university "Ontario College Certificate" with a degree in plumbing engineering.
How to disassemble a single-lever faucet for the kitchen and bathroom: main steps and useful tips
Comfortable living conditions depend on such household devices as running water. But the mixer is the most important part of such a design. If you don’t know how to disassemble a single-lever mixer, then this article is for you. This functional mechanism is designed to mix cold and hot water flows to achieve the optimal temperature. In the event of a malfunction, such a device requires urgent repair. The cause of the malfunction may be water leakage, wear of the mechanism, or a decrease in the volume of the jet. It is in situations like these that knowledge about disassembling and assembling the device is required.
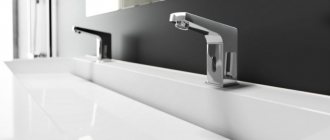
The single lever faucet is a functional and ergonomic mechanism with a modern design
What does a mixer consist of: device and types
Single-lever products come in certain types:
- The design of a bathroom mixer tap of the ball variety includes such a part as a ball. It provides passage recesses for different types of water (hot, mixed, cold). The container in the device is called mixing. The ball connects very tightly to the sealing parts. The device is started from the adjustment rod;
- In a cartridge faucet, instead of a ball, there is a cartridge of two ceramic plates. At the bottom there are holes for water to pass through, and at the top there is a hole for mixing.
Internal device with cartridge system
Single-lever models are easy to use, which is why they are so popular. With their help, the water is quickly adjusted. To decrease or increase the water pressure, the joystick moves up and down.
The disadvantages of a water tap of this type include rapid wear of rubber seals. To prevent malfunctions, these elements should be replaced every two years.
This is what a ceramic cartridge looks like
The single lever mechanism may fail if abrasive particles enter it. This is why special filters are needed to prevent clogging.
The design of kitchen and bathroom faucets is slightly different. In kitchen designs, the height of the drain is set higher. Also, such models have an additional switch that is used for a washing machine or dishwasher.
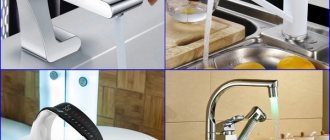
High design for kitchen
Kitchen faucets with drinking water tap. The problem of poor quality drinking water is familiar to many. In this case, you cannot do without using filters. But there are devices that make life easier. Let's talk about them.
For a bathroom, a faucet with a short spout is more suitable, as this reduces the risk of leaks. The bathroom faucets come with a shower set.
Internal structure of the mixer
Components of the system
Helpful information! For the kitchen, a mortise or vertical faucet is often used, which is mounted in the sink. It is small in size and the lever is located on the side. A small spout is not the best solution for the kitchen, so it is worth purchasing vertical faucets with a replaceable spout.
How to disassemble a single-lever mixer: malfunctions, assembly and repair
There are various faults that a single lever faucet can suffer from, which is why it is so important to know how to disassemble it. If the cartridge is not affected, then repairs will not take much time.
The following breakdowns occur with this type of mixer:
- a ball device is considered more practical than a cartridge device, but a steel ball can be subject to corrosion. At the same time, gaskets and seals wear out and water leaks. Such parts are easy to change, but if the balloon bursts, you will need to purchase a new one;
- The ceramic cartridge is resistant to poor quality water and rust. The device contains thin plates that fit tightly together. If debris gets into the gap, a chip may form;
- blockages contribute to deformation of the shutter or rubber element. In this case, you should know how to disassemble a single-lever mixer, as well as how to replace rubber parts;
- if the lever is mounted poorly, this may cause water to leak. To do this, you need to fix all the components;
- small gaps are sealed with sealant.
If there is a different water pressure, this indicates a blockage in the aerator. In this case, the device must be untwisted and rinsed thoroughly. If strong noise occurs, we can talk about poor fit of the parts. This requires disassembly and trimming of the rubber. If you need spare rings, you can make them yourself from hard rubber.
Dismantling the ball structure
Helpful information! Problems often arise due to water quality. The filtration system will increase the service life of the equipment.
How to disassemble a single-lever faucet in a bathroom: video and step-by-step disassembly
Before you decide how to disassemble the ball mixer, you need to select the appropriate equipment. You need to prepare special keys, a flat-type screwdriver, a knife, pliers and an adjustable wrench. Be sure to shut off the water supply before disassembling.
The main stages of disassembly are presented in the table.
- How to disassemble a single lever mixer? Features Single-lever type faucet design Types Disassembly instructions With ceramic cartridge Ball Replacement of cartridge…
- Bath faucet design and repair How a bathroom faucet works - anyone can figure it out The bathroom wouldn’t be a bathroom if...
- How to disassemble a single-lever kitchen faucet Do-it-yourself repair of a single-lever kitchen faucet Single-lever faucets have literally flooded the market in recent years...
- Installation of a faucet for a bathroom with a shower repair Installation of a faucet for a bathroom with a shower and its independent repair For every owner there should be…
Advantages of a single lever product
Single lever basin mixer is in great demand among buyers. It is easy to install and easy to use. Such devices look more aesthetically pleasing compared to valve taps. They are simple and functional, quickly adjust the desired water temperature and reduce its consumption.
Features of the models:
- Faucets are sensitive to the quality of tap water. Due to impurities, they often become clogged and fail.
- It is not possible to completely repair the device. The seals or cartridge must be replaced.
Installing a special filter and timely maintenance will significantly increase the service life of a single-lever faucet.
Popular models
Model “Vidima Orion”
Vidima Orion
It is installed vertically and is connected to a watering can, which is sold as a set.
Design advantages:
- chrome plated;
- ceramic cartridge;
- simple installation method;
- acceptable price.
Overall, this is a durable and reliable model.
Lemark Plus Strike
High-quality, inexpensive kitchen faucet with high spout. The neck of the tap is located at a height of 19 cm from the surface of the sink. Convenient to wash a large number of dishes at the same time. The model is made of brass with chrome plated, equipped with a ceramic cartridge, swivel spout, low noise.
IDDIS Alborg
A simple and reliable mixer made in Russia, affordable. Equipped with a ceramic cartridge that will last for a long time. Conveniently mounted on the sink thanks to the plastic stand. Securely attached to two studs.
Swivel spout, chrome plated, sound insulation.
Rossinka Silvermix
The most inexpensive faucet, it has a pleasant design and a high swivel spout. Provides a 35mm ceramic cartridge. The long gander allows you to wash large dishes. The aerator reduces water consumption by half.
Criterias of choice
To select a faucet, you must consider:
- water pressure;
- dimensions of the structure;
- style;
- finishing.
Wall-mounted and floor-mounted taps require adequate water pressure to function properly.
Dimensions are selected depending on the dimensions of the sink or bathtub.
The service life of a washbasin faucet depends on the material used. It is better to choose good models made of durable components. Devices made of brass are especially reliable. Chrome, antique gold, chrome-gold, and nickel are used as finishes.
Non-specialized information
All faucet handles, regardless of their design and construction, perform two main functions:
- Allows you to regulate the flow of water by opening or closing the locking mechanism;
- Allows you to regulate the temperature of the jet.
In addition, handles usually have a decorative function and are a decoration of a plumbing fixture. Moreover, they can have not only a unique design, but also be inlaid or made of expensive metals. Based on this, when choosing a mixer, many people pay attention not only to its design and functionality, but also to the controls. (See also the article Types of sink faucets: highlights.)
Note! Nowadays, not all faucets have handles. Some modern models are equipped with sensors, as a result of which they turn on and off automatically.
Installation methods
Single lever mixer device
You will need tools: adjustable wrenches, pliers, plumbing paste. The procedure is as follows:
- They cut off the water supply.
- They make outlets for hot and cold water, onto which connectors are screwed.
- The kit includes gaskets, flexible hoses, and fastenings.
- The connections are connected to the holes and lubricated with paste. To screw in, use pliers or an adjustable wrench.
- Round gaskets are placed on the wires, and the mixer is lowered into the hole on the sink.
- The mounting bracket is placed under the mixer from the inside of the cabinet, and the stud and nut are tightened.
- Flexible wires are screwed to the outlets, the threads on the connectors are lubricated with paste, tape is wound, and then the nuts are screwed on.
- Tighten the nuts carefully so as not to break the threads.
After installation, turn on the water and check the mixer for leaks.
How to disassemble and repair a faucet with a cartridge
Despite the fact that a single-lever kitchen faucet with a cartridge is a reliable device, it is prone to breakdowns.
Possible malfunctions of the mixer:
- Water constantly leaks from under the adjustment lever;
- when the lever is closed, water drips or flows from the spout;
- a permanent puddle near the mixer body;
- the lever does not move smoothly, sticks, does not rotate to the extreme points, difficulties arise in adjusting the pressure and temperature of the water;
- water from the tap flows in a thin stream at good pressure in the plumbing system;
- noise, hum, whistle, other extraneous sounds when opening or closing a tap.
The most common causes of problems, in particular the appearance of various noises during operation of the faucet, are wear of the ceramic plates in the cartridge, wear or loss of elasticity of the sealing rings.
To repair the device, prepare the following tools: an adjustable wrench, a flat socket wrench or wrench, a screwdriver, pliers or pliers, and a knife.
Important! Before work, turn off the water supply.
The procedure for disassembling and repairing the mixer:
- Remove the faucet plug located on the handle. To do this, just pry it slightly with a knife or flat-head screwdriver.
- Use a screwdriver to unscrew the screw located under the plug.
- Remove the mixer lever by pulling it up. Some device models require significant effort to do this.
- Remove the decorative cap.
- Unscrew the hexagon fixing nut at the top. A regular adjustable wrench will do for this.
- Remove the cartridge and check it for damage. There should be no chips, cracks, blockages, or lime deposits on it. If the cartridge is dirty, clean it, rinse it and wipe it dry before installing it. If the part is worn out, chips and cracks are visible on it, but it is replaced with a new one. To install the cartridge, simply align the protrusions on the element with the recesses in the installation socket.
- Check all sealing gaskets located in the housing. If they are worn out or hardened, replace them with new ones.
- Reassemble everything in reverse order and check the operation of the tap.
During installation, it is important not to overtighten the fixing nut, as this will lead to tight movement of the lever and compression of the housing shell. The latter provokes rapid failure of internal parts and their cracking.
Types of breakdowns
The most common problems that arise when using devices:
- cracks in the body that appear due to poor quality material or installation errors;
- clogging of the aerator occurs due to poor tap water;
- wear of the gaskets; over time, the seals wear out.
The bathtub faucet requires constant maintenance. Once or twice a year it is disassembled, cleaned, and gaskets are changed. The cause of the leak may be a small speck that has gotten under the seal.
Repair
If the washbasin faucet has become unusable, change the cartridge or gaskets:
- Shut off the valves on the pipes.
- Remove the decorative trim on the faucet handle using a screwdriver.
- Unscrew the fixing screw and nut on the cover.
- Unscrew the nut on the internal mechanism of the mixer.
- Remove the cartridge or ball mechanism and replace it with new parts.
- Carry out assembly.
The service life of the device can be increased by installing a filter and improving the water quality. Preventative cleaning and replacement of seals also contributes to this.
Step-by-step instructions for disassembling the crane
As always, before starting work you need to check the availability of tools and accessories, otherwise you will have to interrupt disassembly due to the lack of something. Prepare:
- a set of open-end wrenches or an adjustable wrench;
- an asterisk and a regular screwdriver;
- hex wrench;
- assembly knife.
You need to stock up on tools in advance
Prices for adjustable wrenches
Adjustable wrench
Important. To repair a faucet, you may need spare parts, some of which you can make yourself, while others will have to be purchased. A specific decision is made after disassembling the mechanism and inspecting the technical condition of its elements.
Step 1. To make work easier, remove the faucet from the sink. It can be fixed with two studs and a special metal washer or a large nut. The mounting method depends on the type of device and manufacturer.
First you need to remove the mixer
Step 2. Unscrew the studs; for this, they have a slot for an ordinary screwdriver.
Unscrew both studs
Practical advice. Before beginning any disassembly, prepare a clean area for storing parts. Lay them out as you remove them, assembly will be done in the opposite order.
Step 3: Remove the round rubber gasket. It prevents water from flowing down from the top surface of the sink. Such leaks occur only as a result of gross errors during installation of the mixer; during operation, the gasket does not wear out and does not lose its original properties.
Remove the rubber gasket
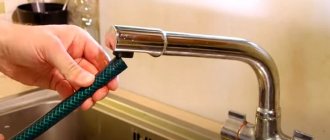
Step 4: Carefully twist two flexible hoses, one for hot water and one for cold water. There is not enough space under the sink; therefore, the hoses have a reduced diameter compared to ordinary ones. In addition, they have a small nut; while the standard ones require an 11 mm open-end wrench, here the nut size is only 8 mm. Keep this in mind when preparing your tool for disassembling your single lever faucet.
Unscrew the water supply hoses
Step 5: Use a small screwdriver or other sharp object to pry the swing arm retaining screw cap. There are red and blue marks on it, remember their position. When assembling and connecting the faucet, you must not mix up the cold and hot water hoses, otherwise the faucet will work the other way around. This is not critical, but it causes certain inconvenience during the initial periods of use; you will have to get used to the opposite algorithm for regulating water parameters.
The screw plug must be pryed off with a screwdriver
Step 6. Using a hex wrench, unscrew the lever fixing screw.
Important. Do not unscrew it all the way, otherwise problems may arise. The screw is small and easy to lose, and screwing it into place is quite a labor-intensive task - it is difficult to get into the hole at a distance, the first turns take a long time to get into place.
Release the hardware half a turn and constantly try to remove the lever. It is fixed to the rod in a small recess; complete disengagement does not require more than 1.5–2.0 turns of the screw.
Unscrew the screw and carefully remove the lever
Step 7. Unscrew the top cap on the faucet body; it is held on the external thread of the clamping nut. Remove the clamping nut that secures the cartridge in the housing. To do this, you need to use an open-end wrench.
To remove the clamping nut you will need an open-end wrench
Step 8. Remove the cartridge from the tap.
Remove the cartridge from the faucet body
The mechanism has been disassembled, now we need to inspect it to find out the cause of the problem. Unless, of course, you disassembled the device just to find out its internal structure.
Disassembling a ball mixer