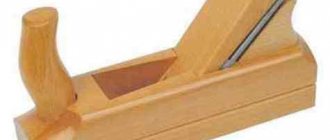
What is a plane needed and intended for?
A wood planer performs a fairly extensive range of tasks - not just planing to a flat surface.
Planing a board
The following works are possible:
- creating a groove and groove of the desired shape;
- quarter selection (specialized cutout along the edge of the part);
Quarter selection and chamfering
- creating a chamfer or changing its shape and geometry;
- facing and trimming the workpiece;
- creation and processing of flat surfaces to the required dimensions and parallelism;
- bringing the surface roughness to the required value, eliminating waviness.
With a plane you can process workpieces for roughing, finishing and finishing, and finish finished surfaces. The tool is widely used in woodworking in the following areas:
- creation and repair of furniture;
- construction (doors, windows, baseboards, trim);
- restoration work on art and antiquities.
Wherever wood and lumber are processed, a plane will be useful.
Its modern version, the electric planer, is used both at home and professionally. Processing with its help is faster and requires less muscle power. The device is perfectly mechanized - there are many structural adjustments and the ability to install a vacuum cleaner.
Types of hand planes
The typical design of this carpentry device has many varieties. Even a classic manual professional plane, which has standard dimensions, can be classified according to its design features.
- Single plane. Suitable for leveling surfaces due to the design of the single straight blade of the knife. The cutting edges have the smallest radius of curvature, so they do not leave marks on the surface.
- Double plane. It is convenient because it is equipped with a chip breaker, which ensures clean planing. Therefore, the tool is indispensable in the final processing of the product.
With the development of the craft, the types of planes acquired many modifications, each of which meets a certain number of tasks.
- Jointer. This is a hand tool for finishing the product. It differs from a plane in a long block with a double or single knife, which allows for high-quality leveling of the surface.
- Sherhebel is a narrow plane designed for notches, similar in appearance to the classic model. But the sherhebel is more massive and is distinguished by a small rounded blade, which during operation is located at an angle of 45° to the surface. This feature allows you to plan wood along and across the grain, leaving deep hollows. The main significance of this device is the rough processing of the product and the removal of the rough top layer of wood.
For flat planing
Machining flat surfaces, such as bars or boards of regular geometric shape, must be done with high precision. Deviation from straightness entails a change in the overall dimensions of the product. For this type of processing, devices with characteristic design features are provided.
- Half jointer. Unlike a standard jointer, it has a smaller base and cutter. This allows you to process both large and small products with a straight and even surface, while achieving high levels of accuracy.
- Zinubel. Designed to provide roughness, which is necessary for better adhesion of products when attached with glue. The device is equipped with a serrated blade, which can be used to plan even twisted wood and the ends of workpieces.
For figure planing
Figurative wood processing is an entire art. To create unique samples with a profile section, it is important to use first-class timber - straight-grained, with a minimum number of knots. However, the use of varieties of special-purpose carpentry planes is no less important.
- Kalevka is a type of plane designed for shaped processing of products. It has a multi-level sole and special edges on the knife. Used in the manufacture of cornices, baguettes and doorways.
- Tongue and pile pile. It is used for making grooves, tongue-and-groove joints or holes in boards connected using a tongue-and-groove system. It consists of a guide and securing pads held in place by screws.
- Gruntubel. Suitable for cleaning trapezoidal grooves along wood grains.
- The quarters and grooves are selected with a zenzube, and then they are cleaned. The knives of this tool resemble spatulas, and there is a special hole in the body for the chips to escape.
- The rebate is used for selecting and stripping quarters and has a stepped sole.
- The humpback has a convex shape of the sole part, therefore it is convenient for processing semicircular, concave or cylindrical surfaces.
What is done with a plane and its varieties
Each type of plane is designed for a specific task or nuance.
- Planer: needed to level the surface over a large area.
It is distinguished by a long sole and the presence of a double incisor. The first chip is obtained from separate pieces, the second is continuous, finishing. The good thing about the jointer is that it is suitable for almost untreated surfaces.
Jointer
- End plane: used to obtain a finishing surface of the ends.
The main difference is the short length and installation angle of the knife (21 degrees).
End plane
- Additional planer: purpose - high-quality cutting of corners along the edges of the workpiece. For this purpose, an adjustable mechanism is made. The cutting edge is made of high-hardness steel.
- Tongue (groove): used for selecting tongues - narrow grooves at a certain distance from the end.
It has a guide to strictly maintain the parallelism of the resulting groove and the side edge. The depth and width of the groove are adjustable.
Tongue and pile pile
- Zenzubel: for creating features such as long grooves and edges on wood surfaces.
Performs cutting of grooves and grooves, processing edges, quarters and folds. The selector (another name) deepens the intended groove.
Zenzubel
- Rebate: the tool is designed for making grooves for installing glass.
It differs from the usual zenzubel, which is also needed for grooves, in its sole with steps. Parts of the sole can be removable. You can install another special knife on the side - for the quarter wall.
- Sander and double sander: allow you to get a super clean surface. The knife is installed at an angle of 50 degrees (the usual value is 45 degrees).
- Kalevka: figured processing of the edges of the workpiece.
- Tsinubel: a device needed for making small depressions for further gluing of parts (technological increase in usable area).
- Primer: gives the workpiece the specified function of a trapezoidal groove - using a specially shaped knife. The groove is located across the fibers of the material.
There are other, much more specialized, varieties of planes used at the professional level. Including the creation of rounded shapes (for example, a staff gobel).
How to use a hand plane on wood correctly
The rules for using hand tools in general are almost the same as the operating instructions for an electric planer. Before work, the device is carefully inspected for defects and it is made sure that the sole is not deformed, and the cutting parts are located parallel to it.
The process of using a plane looks like this:
- A piece of wood is secured in a workbench clamp and a hand tool is placed on top of it.
- The device is firmly grasped by both handles and begins to move smoothly and with even pressure along the fixed board.
- The body is moved forward along with the tool, with the supporting leg placed forward.
As with an electric planer, when performing complex work, it is recommended to remove layers of wood gradually. This will prevent gross mistakes and protect against the appearance of snags, humps and depressions on the surface of the board.
A hand plane is convenient for planing small narrow boards in small quantities.
How to put a plane on a workbench
How to properly put down a tool when not in use is a simple question, but not everyone knows the correct answer.
During the work itself, one somehow forgets that the most important part of the plane is the knife. It is a sharp part and, when of considerable length or width, is a valuable part. Preserving it is the main task.
Regardless of how you work and which option, the plane should be placed on its side. The cutting edge is located on the side, without contacting any surface.
How to properly place a plane on a workbench
When storing, ensure that the blade is preserved. It is optimal to store in a special box or tray made of wood or plastic.
How to Set Up a Hand Planer - Seven Easy Steps
Hello, dear readers and DIYers! In this article, Kate Brown, creator of the YouTube channel "Rag 'n' Bone Brown", will show you how to perfectly set up a hand plane in seven steps.
Materials. — Thick sheet of MDF — Sandpaper — Marker, masking tape, double-sided tape — Contact glue — Rags — Abrasive polishing paste — Paraffin or wax. Tools used by the author. — Screwdriver, spray gun — Water sharpening stones Setting process. The author will tell you how to perfectly set up a hand plane in seven steps. So, step one: the sole of the plane must be perfectly flat. The easiest way to check this is to take 120 grit abrasive paper, stick it with contact glue or double-sided tape on some absolutely flat surface (in our case, an MDF board).
Now, with a permanent marker, the author applies several lines to the entire plane of the plane sole. They should be as close to each other as possible.
After this, he begins to rub the sole of the plane on the abrasive belt. While the marker is visible in some places, we can safely say that the sole is not yet completely leveled.
If the shape of the sole has too many unevennesses, then you can resort to more aggressive paper with a coarse grain, for example, 80-grit.
This is what the descent of the blade looks like after grinding and polishing.
However, small burrs may appear on the back of the cutting edge. To eliminate them, you should re-polish the back of the blade using a leather tape.
A quick test with paper shows that the blade is sharpened perfectly.
Here, in fact, are all the devices and tools necessary for self-sharpening.
Step No. 3: setting up the chipbreaker (humpback). The sharpened knife should be attached to a hump, the main function of which is to remove chips through the top of the plane.
Step #4: Install the Lever Cover. The lever cover allows you to quickly remove and replace the hump and cutting blade, each action with one click of the lever. There is a hole on the cover for an adjusting screw, which regulates the degree of tightening of the lever mechanism, and also determines how tightly the fine knife feed screw will turn.
The author prefers to adjust the adjusting screw so that the fine knife feed screw can be turned with one finger. In this case, the depth of the blade is set quite easily.
If one edge of the blade protrudes more than the other, adjust the blade angle using the side adjustment lever.
The chips from under the right and left edges have the same thickness, therefore, the knife blade is aligned exactly across the width of the entire slot.
Step No. 6: slot width and wedge adjustment.
The distance between the front of the slot and the piece of iron (cutting blade) can be arbitrarily increased or decreased, depending on how much material you are going to remove with the plane.
To set this distance, you need to remove the lever cover, the hump and the piece of iron. The exposed part of the plane is called the wedge, or frog. It is attached to the platform using several screws.
If both clamping screws are slightly loosened, you can see the opening adjustment screw from the back of the tool. If you need to move the wedge forward, the screw rotates clockwise; if you need to move the wedge back a little, the screw turns counterclockwise. In the latter position, the slot opens wider, and it becomes possible to remove thicker chips.
As for the author, he prefers to set the distance between the front wall of the slot and the knife itself to 2 mm. This always brought him excellent results.
If you find that chips get stuck in the slot during planing and have to be removed manually all the time, then this is a sure sign that the slot is too narrow and needs to be widened.
Step #7: Lubrication. This point in setting up a plane is often neglected. But in vain! This significantly simplifies the entire planing process. The author regularly lubricates the sole of the tool in between various stages of work. In addition, the lubricant protects the metal parts of the plane from rusting.
To lubricate the sole and other metal elements of the instrument, the master uses liquid lubricating wax (but you can also use a little regular vegetable oil).
That's all. By following these simple tips, you are sure to get excellent results.
I thank the author for simple but useful tips on setting up, debugging, and caring for a hand plane! Good mood, good luck, and interesting ideas to everyone!
The author's video can be found here.
Source
How to use a plane correctly
Not everyone knows exactly how to plan correctly - regardless of the type of plane. Planing is performed in this order:
Selecting the future front side.
You need to visually determine the best side - the smoothest and with the fewest defects. The presence of curvature – initial – is also assessed. Additional can be added during processing - removing layers reduces the structural strength of the workpiece.
Securing the workpiece.
The workpiece must be installed in a fixed state - otherwise how to process it? With one end you can rest it against the stop. Clamp the other end or sides. Vices, clamps, and clamps will come in handy.
Processing with a plane.
Removal of the wood layer required in depth and geometry. Movements should not be done backhanded, but carefully and confidently. The pressure applied to the tool is constant along the entire trajectory of contact with the surface being processed. Only when leaving the chip removal zone does the pressure transfer slightly to the rear handle. The plane is not lifted from the surface until the blade leaves the workpiece. Otherwise, the target surface may be damaged.
Processing with a plane
Periodic check of flatness.
When processing any surface, it is necessary to regularly inspect the result. The point is a possible departure from the intended form and the appearance of excessive depth. You can always remove the excess, but you can’t build up the removed layer.
Periodic check of curvature.
In addition to flatness, you can pay attention to the state of curvature. If a thin workpiece is being processed, the curvature may become critical or unacceptable. To do this, standard surfaces (rulers, bars) are taken and applied to the resulting surface.
Checking perpendicularity.
The execution of the second and remaining faces is most often necessary perpendicular to the first. A square is used for control - pressing it tightly and high-quality lighting will indicate the need to adjust the angle.
Marking of treated sides.
Sometimes the master forgets what each side is intended for. An inconspicuous mark will help you not to forget even after a long time.
Obtaining the required thickness.
The thickness is marked with measuring instruments or a thicknesser on parallel edges (front and back). When processing, in addition to approaching the specified value, special attention should be paid to the parallelism of the edges.
Obtaining the required width.
The width is measured relative to the resulting front end. Marking is carried out using a surface thicknesser, a height gauge, or simply a ruler at small intervals. Planing is carried out with regular control of the resulting width.
Getting the required width
The closer the workpiece becomes to the required result, the more often it is necessary to check compliance. Otherwise, a moment will come when the layer will be removed unnecessarily and it will be difficult to restore the surface.
How a manual and electric plane works
The operation of the manual device is very simple. A knife is installed on the product, positioned parallel to the sole, and secured with a screw or cam clamp. The tool is placed on the surface of the workpiece and pulled forward with force. The pressure should be placed first on the front of the device, and then on the back. Planing is carried out parallel to the wood fibers - this allows you to get even chips without unnecessary effort.
The purpose and design of an electric planer are almost the same. The difference is that the tool is equipped with a motor and runs on mains power. When turned on, the motor transmits rotation to the drum with knives, which protrudes through the sole. The blades, in motion, cut chips of the required thickness from the wood workpiece without forming depressions or grooves on the surface.
Rules for working with a plane
Any work begins with preparation. The plane as a cutting tool is prepared for work in the following order:
- disassembling the structure to check the condition of the sole and remove the existing coating (if necessary, if the tool is new);
- the sharpness of the cutting edge is checked - it is best to take it out and try it on a piece of lumber;
- the flatness of the sole is assessed - with a ruler or level, by applying it and looking at the light;
If gaps are visible (especially large ones), you can’t wait to accurately remove a thin layer of wood. Suitable for household work, but not for professional processing.
- in case of significant unevenness, the flatness of the sole is restored using sandpaper for metal;
To level the sole, you need to put the sandpaper on something very flat. After that, start moving the sole along the sandpaper in one direction (without a reverse movement).
- the working blade is checked for evenness of the edge - if there are jagged edges, the blade is sharpened;
- The structure is being reassembled.
Adjustment
When the necessary parameters have been checked, the plane should be adjusted. There is also a separate procedure for this:
- the iron is installed in relation to the sole at a certain distance (according to the recommendations for a specific model);
- the piece of iron is connected to the chipbreaker - their ends are placed next to each other and tightened with a screw;
- both elements are additionally fixed with a pressure plate;
- the plane is carried out over the workpiece for testing purposes - this will give a certain result;
- as feedback to achieve the desired result, the relative position of the planer elements is adjusted;
- special attention is paid to the cutter - its reach and symmetry of protrusion on both sides.
When the resulting surface quality and chip quality are satisfactory, work can begin. The basic rules for working with a plane are as follows:
- body position – to the right (or to the left, if the master is left-handed) of the surface being treated;
- the movements of the plane are smooth, progressive and reciprocal;
- body movements follow the plane, the grip is comfortable, arms and legs are positioned comfortably;
- for uniform processing of the material, you need to press on the front part of the plane when moving forward and the back part when moving backward;
- the amount of muscle effort is the same for moving forward and moving backward;
- The plane must be held with both hands.
Performing various types of work with an electric planer
Electric planers can be used to perform various operations:
- plan wide or narrow boards, as well as other wooden blanks;
- choose quarters;
- remove the chamfer.
Before carrying out work, you should select lumber of appropriate quality:
- without knots;
- well dried;
- without cavities filled with resin, chips and cracks (longitudinal or transverse);
- with a flat surface that does not contain depressions or protrusions;
- There should be no metal inclusions in the board or timber: nails, screws, bolts, brackets, screws, staples and others.
When using a portable method of using an electric planer, the workpiece is securely fixed on a hard surface. To do this, install at least 2 stops, but it is better to place them on all sides of the part. They also ensure free movement of the power cord so that it does not get caught. The safety of the operator partly depends on this.
Cutting a quarter using an electric planer
Selecting a quarter (removing a fold) is one of the operations performed using an electric planer. To do this, you need to install two stops:
- the first (top), which controls the movement of the tool along the workpiece in the desired direction;
- the second (lateral), which determines the depth of the quarter sampling.
The stops are adjusted to the required dimensions, following the instructions in the operating instructions for the product used. In this case, the distances are measured by focusing on the cutting edge of the blade, which occupies the upper position.
There are two ways to select a quarter:
- moving an electric plane along the workpiece;
- moving the processed wooden part along a homemade machine.
In any case, the movement of the power tool or workpiece must be at the same speed (smooth).
Removing the fold in the first case is carried out in several passes, proceeding as follows.
- On the surface of a well-fixed workpiece, using a marker or pencil, marking lines are applied that determine the depths with the width of the quarter.
- Turn on the electric plane.
- After the drum has reached full speed, the tool is brought to the workpiece. The movement begins with light pressure on the front part of the working unit, leveling the force after the sole is completely on the surface of the part and increasing it at the end.
- Perform passes until the desired sample size is achieved.
Quarter sampling scheme
To mark long workpieces, it is convenient to use a marking cord.
The second option (stationary) is more productive when it is necessary to perform significant work . They work with the workpiece slowly. After its front edge extends beyond the drum, it is intercepted with the second hand, distributing the force evenly over the part.
Sampling a quarter is a fairly complex operation that requires this kind of skill. Therefore, the following errors may occur:
- angle bevel caused by poor clamping of the workpiece;
- “ladder”, which is the result of improper installation or adjustment of the position of the knives;
- curved groove caused by the initial curvature of the side face of the workpiece.
Uneven pressure on the plane and its tilting in any direction when removing the fold leads to the appearance of bulges, roughness, and grooves. Therefore, you should constantly monitor it, which comes with experience.
Planing the surface of lumber
Planing wooden workpieces is the main function of an electric planer. When performing this operation, you must follow these recommendations.
- When processing workpieces by planing, you need to move an electric plane from the edge along the fibers (with a portable method of using the tool) or move the part along the machine, positioning it correctly.
- If the wooden structure consists of several elements, for example, it is a prefabricated panel, then the power tool is moved diagonally (at an angle of 45 degrees) to the fibers, setting a small planing depth.
- You should move the plane, evenly distributing the force and making sure that no chips get under its sole (they need to be removed in a timely manner).
- The ends of timber or boards are rarely processed, having previously set the minimum processing depth and chamfered on one side.
- In order to plan the part as efficiently as possible, it is initially taken to a greater length, and after planing, the ends are cut off.
- Each face of the workpiece is processed separately.
- When performing work on the machine, the part is fed by resting it on the side stop and grasping it in the hands.
- Wide workpieces are planed in several passes.
- The planing depth is set based on the degree of unevenness of the surface of the lumber.
- The sole of the power tool should always be parallel to the surface being worked.
- In order not to overload the electric motor, hardwood is planed at a shallow depth in several passes.
When roughing, it is allowed to move the tool across the grain of the wood. To reduce the appearance of defects to a minimum, the plane must be moved slowly, evenly distributing the working forces. Planing panel structures using homemade stationary equipment is quite difficult. In such cases, it is better to use a manual device.
The ends are planed until the edge of the chamfer is reached. To ensure that the processed workpiece is streak-free, additional passes are made with a plane along its surface, setting the knives to the minimum depth.
If vibration or other manifestations uncharacteristic of normal operation of the plane occur, you should turn it off and figure out the cause of the problem.
How to plan boards is shown in the video:
Chamfering workpieces
Chamfering is one of the additional capabilities of electric planers. A V-shaped groove on their sole is intended for this purpose. To perform chamfering, the tool is placed with this notch on the corner of the workpiece. Then the plane is moved along the part, maintaining the required slope. After the first pass, the rest can be done as normal without using a groove. In this case, the bevel angle is set using a side stop, which must constantly fit tightly to the workpiece throughout the entire operation.
When chamfering, the power tool should be held level, without distortion, so that it does not turn out to be rounded at the end.
To perform any of the considered operations with an electric planer efficiently, experience and skills are required.