Design and electrical circuit of the grinder
Over the many years of existence of such a tool as an angle grinder, its appearance, as well as its internal structure, have remained virtually unchanged. To repair an angle grinder with your own hands, you need to know the structure of its mechanical part, as well as its electrical part.
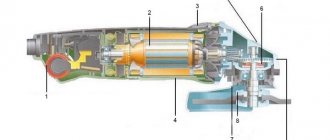
If you look at the figure below, you can see what parts the angle grinder consists of.
- Wheel for adjusting the spindle speed of the unit.
- An electric motor consisting of a rotor and a stator.
- Start button. Sometimes a soft start system is connected to it.
- Housing made of impact-resistant plastic.
- Button for fixing the spindle (used when changing tools).
- Safety coupling. Protects the engine from overload when the tool jams.
- Protective cover. Covers the tool and protects the user from flying particles of the material being processed, and also prevents injury to a person when the tool, for example, an abrasive disc, is destroyed.
- Nut that clamps the tool. It is unscrewed using a special key that comes with the power tool. There are also quick-release nuts that can be unscrewed without a key.
- The gearbox housing and the gearbox itself. It consists of a block of gears that transmit rotational movements from the rotor to the spindle with the tool.
The figure below shows the electrical circuit of the angle grinder.
The electrical part of the angle grinder has the following elements:
- electrical cable with plug for connecting to the mains;
- start button;
- stator;
- electric brushes (carbon or graphite);
- collector;
- armature (rotor).
The following figure shows the connection diagram for the angle grinder, namely its engine.
All components of an electric motor perform specific functions.
- The rotor is the shaft on which the coils and commutator are located. The rotor, rotating in the magnetic field of the stator, transmits rotational motion to the angle grinder gearbox.
- Collector. It is the part of the rotor to which all control cables are connected. Electrical signals from the control unit to the engine pass through the collector. It is to the collector that the electric brushes are connected.
- Electric brushes. Their main task is to transmit electric current from the power cable to the collector.
- Stator. It is a coil with a certain number of turns. The task of the stator is to create a magnetic field, which, interacting with the armature, sets the latter in motion.
Mechanical problems
The most common mechanical damage is bearing wear or complete destruction. Signs of a problem may include increased vibration of the angle grinder body, increased noise, and excessive heating of the body. You can remove the bearings even if there is no puller, you just need to carefully knock them out, it is advisable to heat them before doing this. After replacement, it is necessary to lubricate the bearings with lithol or cyatim.
Also, due to prolonged use of the angle grinder, the gear teeth of the gearbox often wear out or one or more teeth break, this can be determined visually. If the wear is very slight, this can be corrected with a needle file. If wear is high, the gear will have to be replaced.
Fig.6 Grinder gear
If you have to use an angle grinder frequently, do not forget about preventive maintenance of the tool, specifically cleaning components, completely replacing all lubricants, and timely replacement of worn parts.
Do not allow the angle grinder to work for a long time under load at reduced speed compared to idle speed, try to prevent the tool from jamming.
The main malfunctions of an angle grinder and their causes
According to statistics, most cases of angle grinder failure are associated with the electrical part of the device. Some damage may be minor, which allows you to repair the angle grinder yourself. But, for example, if the motor windings burn out, only a specialist can repair an angle grinder.
Grinder won't turn on
The reasons that the angle grinder does not turn on may be the following:
- the electrical plug is faulty;
- the electrical cable is faulty;
- the start button is broken;
- the contact between the power cable and the button is broken;
- break in the contact wire of the electric brush;
- severe wear of electric brushes;
- failure of the rotor or stator windings.
The angle grinder does not develop speed
The reasons why the angle grinder does not gain momentum can be different.
- Damage to the speed control unit. To check this version, you need to connect the device’s motor directly, bypassing the regulator, and check the operation of the device.
- Failure of the electrical cable due to constant kinks or mechanical damage. Because of this, the damaged wire begins to heat up under load, and engine speed drops.
- Collector contamination with dust. Contaminants must be removed with alcohol.
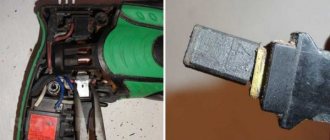
- Problems with brushes. They may be worn out or have a short contact wire as shown in the following photo.
Although the brush is half worn out, it is still fully functional. In this case, a short contact wire prevents the spring from pressing the electrode to the collector. This situation may also be the reason why the angle grinder stopped working normally.
The electric motor is heating up
The reasons why the angle grinder is heating up may be the following.
- Incorrect operating mode of the device. As a result of overloads, the electric motor can become very hot, which often leads to burnout of the windings.
- Destruction of bearings located on the armature. As a result, the rotor clings to the stator, engine operation becomes difficult, and the windings overheat. The problem is solved by replacing the bearings.
- Clogged ventilation ducts through which air flows to cool the engine. The ventilation openings must be cleared of dust.
- Damage to the impeller used to cool the engine. It is installed on the rotor, on the side opposite to the collector. If the impeller is broken, it must be replaced with a new one.
- Interturn short circuits of stator and rotor windings. It will be necessary to rewind the reels or replace these parts with new ones.
Bulgarian sparkles
If you notice strong sparking when you turn on the angle grinder in the place where the collector is located, then the reasons for this trouble may be the following.
- Damage to the armature winding: break of one or more sections of the winding, interturn short circuit. With such breakdowns, increased noise appears, engine speed drops and brushes burn.
- The contact between the collector plates and the winding is broken.
- Weak brush pressure. During long-term operation of the angle grinder, the springs overheat and can “anneal”, thereby losing their elasticity.
- Engine rotor imbalance.
- Damage to the cylindrical surface of the collector. This sometimes happens after rewinding, if the armature is not turned on a lathe, but is immediately installed in the machine. In this case, you can also observe that the brushes spark excessively.
- The insulation between the collector lamellas is broken. There may also be clogging of the track grooves with graphite or a breakdown between the lamellas.
- Bearing wear, which causes the rotor to run out, also causes the brushes to spark heavily.
- Violation of the geometry of the armature shaft. This usually happens when the electric motor is disassembled carelessly and the shaft bends.
- Wrong brand of graphite brushes installed. Brushes are selected based on the expected speed and voltage.
- Raising one or more lamellas causes the brushes to quickly burn out. This happens due to engine overheating during prolonged operation. As a result, the glass melt, which serves as the basis of the collector, softens and the lamellas begin to rise. Due to the fact that the slats are raised, the brushes wear out very quickly.
Repair of an angle grinder: diagnosis of breakdown, ways to solve the problem
Repairing an angle grinder with your own hands is a completely solvable task. The main thing is not to rush, understand the design, remember all the circumstances under which it broke, determine what could have worn out during operation, make diagnostics and begin repairing it.
Bulgarian and its operation
An angle grinder is called an angle grinder. The name of the instrument is due to the fact that it was produced in Plovdiv. It is intended for performing work on grinding or trimming hard material:
Does a good job of sharpening tools.
A grinder is a very necessary tool these days, so almost everyone has one.
There are grinding machines of different power: from 500 W to 2500, depending on the thickness of the wheel - from 115 mm to 230 mm. The most popular ones in use are angle grinders with a power of 1.2 W, and the most used disc is 125 mm thick.
Every year the choice for this construction power tool becomes wider, but the operating rules remain almost unchanged. And even if you always adhere to them, sooner or later malfunctions arise in the mechanism, which you can try to fix yourself by collecting everything you need to repair the angle grinder.
Angle grinder device
Any grinder consists of the following parts:
- rotor - part of the electric motor that rotates during operation and is controlled in speed, also called an armature;
- collector - the place on the rotor where the control winding wires are located;
- brushes - parts that serve as current conductors from the cable to the commutator winding;
- gearbox - a mechanism that acts as a drive from a rotating rotor to a spinning disk, consists of a spindle, a bearing, and two gears (a large gear and a shaft gear);
- stator – part of the electric motor in which the rotor operates;
- grinder cooling impeller;
- start button;
- electrically driven network cable;
- protection casing;
- grinder body;
- additional handle.
All these details can be divided into two parts:
- electrical;
- mechanical.
How to disassemble an angle grinder
How to disassemble an angle grinder? It's not such a complicated process. This does not require special knowledge, but everything must be done carefully and with caution. Every owner needs to know how to disassemble any working tool, because periodically it needs internal cleaning from dirt and dust, and its service life depends on this.
Nowadays on the market you can choose different types of grinders, which differ in operating parameters, size, and quality. Manufacturers are also different. Whatever model of grinding machine you buy, they all have the same model for assembling parts.
Disassembling the angle grinder will require few tools; you just need a regular screwdriver or a reversible one with a ratchet mechanism.
Having prepared the screwdriver, you can start disassembling:
- We unscrew the screws from the body and remove one side of the product.
- Remove the nut that holds the disk in place and unscrew the bolts securing the protective casing.
- Remove the brushes.
- Disconnect the wires from the engine.
- We unscrew the bolts that secure the gearbox inside and very carefully remove it; the rotor is also removed with it.
- We unscrew the bolts that hold the stator and remove it.
- We assemble the angle grinder back, put everything in place one by one in reverse order and screw it on.
When disassembling an angle grinder, it is important to remember the order in which parts are removed in order to assemble it correctly.
Typical minor damage
In the event of a malfunction, it is first necessary to eliminate elementary breakdowns:
- The grinder does not turn on. The angle grinder suddenly became faulty - it stopped turning on. In this case, you need to check the serviceability of the socket, then the plug and the power cord; perhaps the drive simply does not work due to the fact that no current flows into the product.
- The cable and plug are intact, but the drive does not work. You need to check the start button. It is easier to repair an angle grinder switch by purchasing a new button and replacing it. Since it is rarely repairable - mainly, the plastic switch rod inside breaks. If you want to experiment, you can disassemble it, numbering the contacts, and put everything back in its place so that after assembly there is no short circuit.
- The above parts are unharmed, but the angle grinder does not want to work - which means it’s time to check the brushes. Perhaps it's time to change them in the grinder. Brushes constantly heat up from work, so they wear out quickly and need to be replaced more often than other parts, and in pairs.
Major faults
Having ruled out all minor damage, you need to figure out why the tool does not want to turn on and how to repair it. Most likely, the malfunctions are serious and require additional knowledge. This happens if:
- the body is deformed;
- one of the bearings is jammed;
- the armature or stator does not work;
- the gear teeth of the gearbox are broken or worn out;
- the collector has failed;
- The control electronics sensor shows no signs of life.
If it is determined that the malfunction has occurred in the mechanical part of the angle grinder, then you need to pay attention to the condition of the large gear located on the shaft and the bushings. If the teeth are partially worn out or the shafts become wobbly, they must be replaced immediately.
The most common breakdowns
Grinder malfunctions happen quite often. Everyone who works with this tool knows about this. What goes wrong most often?
The spindle lock button is broken
Just one awkward press on the spindle lock button while the disk is rotating leads to its breakdown. Sometimes it can be broken if it is used to remove a jammed disk. To prevent this from happening, you need to use an open-end wrench inserted into special holes near the place where the disk is attached.
Broken gear teeth
It mainly occurs when jamming occurs. If you hear a rumble in the gearbox, this is a sign of just such a malfunction. When more than one tooth of a gear is broken, the grinder will not be able to cut the required material.
In order for the tool to continue working, it is necessary to change the gears, all of them, and even the bevel wheel. Before going to the store for spare parts, remember the manufacturer, model and power of the product.
The electric motor does not work
This type of breakdown occurs with angle grinders that work in places where there is a lot of dust, and when they are given a rest, they are left on the ground. Dust that gets inside spoils the winding. Large loads, especially for a small power angle grinder, result in motor failure.
If the grinder is used for cutting materials that create a lot of dust, then it is recommended to cover the ventilation holes with something.
Bearing fell out
The weakest link, and not only among grinders, are the bearings. High rotation speeds quickly wear out the mechanism. The good news is that changing the bearing is easy. Replacing a worn out bearing on an angle grinder must be done on time to avoid a breakdown that cannot be fixed.
Stator fault
This breakdown is easy to determine when the angle grinder is turned on, but the disk speed is too intense and differs from normal operation - this means that there is a turn short circuit in the stator on the winding.
Stator failure is considered the most serious; special skills are required to eliminate it.
When you have doubts about your abilities, it is better to turn to professionals so that you don’t have to buy a new tool later.
If the decision to repair it yourself is made, it begins with cutting off the frontal parts of the winding, all remnants are removed. The next step is to make a new winding according to the template. It should be identical in the number of turns, with the same density and from wire of the same thickness as the previous one.
Gearbox
Angler grinders with power less than 1100 W are usually equipped with spur gears. They are located on the stator. Grinders with higher power have helical gears. Each of the options has a cone-shaped shape; the gearbox rod of the angle grinder intersects with the stator shaft at an angle.
Repair of an angle grinder gearbox mainly consists of replacing gears. If a disc gear breaks, it is difficult to replace it because it is very firmly fixed. It is easy to disassemble the gearbox:
- you need to unscrew the nut on its side;
- carefully take the rotor housing in a vice and knock out the gearbox housing with light blows;
- change the position of the clamped rotor and knock out the bearing through a wooden board;
- Unscrew the gear from the shaft.
That's it - the gearbox is disassembled.
Speed controller
Not all models of angle grinders have a speed controller. When an angle grinder is used for cutting, it is, in principle, not needed, but if grinding is carried out, it is simply necessary. If it suddenly stops working, then most likely the board has burned out, which needs to be removed and bought the same one at a power tools store for further replacement.
Repairing an angle grinder yourself is not always possible. If suddenly something does not work out or everything is not clear, it is better to contact the service center.
Characteristic symptoms of malfunctions
Before it completely breaks down, the angle grinder gives signals about the beginning of problems.
Pay attention to the work of your assistant: you should be wary if:
- the brushes began to spark excessively;
- The grinder gets hot during operation;
- the motor hums inside the housing when the tool is turned on;
- body vibration has become significantly greater during work;
- the grinder gearbox is cracking inside;
- the sound of bearings squeaking when spinning up or periodic wedging is heard when the rotor shaft rotates;
- The angle grinder is smoking, or there is an uncharacteristic smell of burning coming from it.
In order not to buy a new grinder, you need to be careful about the operation of the tool. In case of any deviations from the usual operation, begin troubleshooting, determine the cause and repair the power tool.
Prevention of breakage of an angle grinder
The service life of a grinding machine directly depends on the owner’s care for it. Each tool needs good care, then it will work properly for a long time.
Any angle grinder will get warm during operation, but in order to postpone angle grinder repair for a long time, you must adhere to some rules in work:
- Do not overload the tool to avoid overheating and smoke.
- Do not forcefully press on it while working.
- Clean and lubricate the necessary parts inside the housing in a timely manner.
- If abnormal operation is noticeable, stop operation and inspect for problems.
- Replace wearing parts in a timely manner.
- If the grinder smokes, immediately stop working and do not turn it on again.
- Do not use the tool when processing wood-type materials.
- Hold the grinder firmly during operation so as not to drop or damage it.
By adhering to the listed simple recommendations and rules when working with a tool called an angle grinder, you can extend its service life longer than the warranty period.
Source: https://pro-instrument.com/ruchnoj/remont-bolgarki.html
How to disassemble an angle grinder for diagnostics
In order to diagnose the electrical part of the angle grinder, as well as eliminate mechanical breakdowns of the device, you will need to disassemble it. Disassembly is carried out according to the following algorithm.
- Using a wrench, remove the disk or other attachment from the spindle of the unit.
- Unscrew the handle.
- Remove the protective cover.
- Open the special windows located on the sides of the angle grinder casing and remove the electric brushes, having first disconnected the terminals.
- Unscrew the gear housing from the angle grinder motor housing.
- Pull the gear housing lightly and remove it from the housing. In this case, the gear unit will be removed along with the rotor.
- After removing the armature, the motor stator will remain in the casing, which can also be easily removed for diagnostics after unscrewing the fasteners.
- To disassemble the gearbox, unscrew the screws holding the cover. After removing the cover, you will see the gears of the gearbox.
- To remove the anchor from the angle grinder, you will need to unscrew the nut located inside the gearbox.
- In order to remove the bearing from the armature, it is recommended to use a special puller. Otherwise, the shaft may be damaged.
Reasons for strong vibrations of the grinder
The source of this problem may be:
- Poor quality of the cutting or grinding wheel, their uneven wear.
- Contamination of mechanisms or severe wear of the mechanical part - bearings, shaft seat.
- Brushes are dirty.
If your grinder stops working, if it makes noise, vibrates a lot or overheats, it is recommended to contact a service center, which will not only fix the current problem, but also diagnose all components of the tool.
Diagnostics of the electrical part of an angle grinder
As mentioned above, most often an angle grinder refuses to work due to breakdowns of the electrical part of the unit. To correctly diagnose the electrical circuits of a tool, electrical equipment repair technicians use a special device - a tester.
If you press the start button of the unit and it does not work, then in 90% of cases the cause of the breakdown is not so serious that you cannot repair the angle grinder yourself.
Experts advise adhering to the basic rule of repairing power tools: moving from simple to complex.
The first step is to check the electrical cable and the plug at its end. If it is collapsible, then unscrew it and check the reliability of the contacts. Otherwise, you will have to disassemble the angle grinder (remove the casing of the device) and “ring” the cable with a tester, and also make sure that the current is suitable for the contacts of the “Start” button. If the device shows a break, the cable should be replaced with a new one.
The situation when current flows to the button, but does not pass further (when in the on position), indicates a malfunction of the switch. The button cannot be repaired. It needs to be replaced with a new one, but first mark the contacts you are removing so that you can connect them correctly in the future. If the contacts are connected incorrectly, the motor winding may burn out.
If during the check it turns out that both the cable and the start button are in good condition, but no current is supplied to the brushes, then it is necessary to clean the contact plates of the brush holders. If this procedure is ineffective, it is recommended to replace the brushes. Next, if everything is fine with the brushes and current is flowing to them, you should check the rotor and stator for shorts and breaks.
Checking the motor armature
The electric motor rotor may have the following malfunctions: interturn short circuit and broken conductors at the lamella contacts. You can check the armature of an angle grinder with a multimeter: the device is switched to the resistance change mode, the value is set to 200 Ohms, and the resistance between two adjacent lamellas is measured using probes. Thus, it is necessary to check all pairs of lamellas. If the resistance values are the same, then the rotor winding is not damaged. Detection of other resistance values during “ringing”, as well as detection of an open circuit, indicates a malfunction in this coil. In this case, the angle grinder's anchor will need to be repaired.
Typically, conductor rupture occurs at the junction with the winding. Inspect the places where the coils are connected to the lamellas, make sure that the contacts are soldered securely.
If you do not have a measuring device, you can check the rotor using a 12 V light bulb and a battery for this purpose. The power should be between 30-40 W. The test is done as follows: apply 12 V voltage from the battery to the plug of the angle grinder, connect a light bulb to the gap in one wire, and start rotating the angle grinder spindle. If the winding is in good condition, the light will burn evenly, without blinking. With an interturn short circuit, the degree of incandescence of the light bulb filament will change. In this case, repairing the angle grinder's anchor with your own hands will be difficult, since the armature winding scheme is quite complex, and the process itself requires special equipment and knowledge. Therefore, it is recommended to entrust this operation to specialists. But the best way out of the situation would be to replace the anchor on the angle grinder with a new one.
If the light does not light up when testing the rotor, this indicates a break in the stator or a short circuit in its windings, as well as problems with the electric brushes.
Checking the motor stator
To check the stator of the angle grinder, use a multimeter, as in the previous case. The values need to be set to 20-200 Ohms and do the following. Touch one probe to the contact of the stator winding, and the second to the body of the part. If the device shows resistance, this means that a breakdown has occurred to the housing. Touch the probes to the contacts of one winding, and then to the contacts of the other. If the resistance is the same, then the coils are working. If the device shows an open circuit on one winding, it means that the stator will need to be rewinded or the part replaced with a new one.
Rewinding the stator at home without special knowledge, skills and equipment will be problematic. It is better to contact specialists who professionally rewind motors.
Nature, types of malfunctions of angle grinders (grinders) and do-it-yourself repair methods
Angle grinders (angle grinders), commonly called grinders, are considered an extremely reliable and popular tool. However, any thing sooner or later breaks and requires repair.
Repairing an angle grinder yourself is not so difficult if you have instructions on hand that indicate the procedure.
Below you can find answers to questions related to repairing the stator, rotor, gearbox and carbon brushes of an angle grinder.
Grinders are extremely common among many home craftsmen. The ability to replace working elements allows for polishing, grinding and cutting operations.
And the presence of a soft starter significantly increases the convenience and safety of work. Repairing an angle grinder is a simple job that you can do on your own.
Those who decide to do this will need an angle grinder diagram of the required type, lubrication materials, the tool itself and a step-by-step guide.
Any repair of an angle grinder on your own should begin with identifying faults. The grinder is characterized by a simple structure. When the rotor rotates through a helical gear, torque is transmitted to the spindle (shaft) of the working element. There is a polishing or grinding wheel or stone on the shaft.
The shape of the clove should also be noted. Small power angle grinders usually have gears with straight teeth. Helical designs are used in devices whose power starts from 1000 watts.
An angle grinder, like any tool, is subject to all sorts of breakdowns over time, the causes of which can be very different. They can arise not only from improper use of the device, but also due to untimely/incorrect change of carbon brushes and lubricant materials.
Regardless of the model and brand of grinder, everyone faces almost the same problems. They can be divided into electrical and mechanical. For novice repairmen who do not know how to disassemble an angle grinder, breakdowns can be divided into complex and simple.
Mechanical faults
An angle grinder is used to perform polishing, grinding or cutting operations. During operation, this tool is subjected to very significant loads. In addition, it works in difficult conditions (dust and dirt).
Heavy loads during the operation of an angle grinder during cutting significantly wear out both the gear teeth and the bearing.
The most common mechanical failure of an angle grinder is the destruction or wear of the sliding bearing on the helical gear of the gearbox.
Solving the problem is easy if there is a description, diagram and recommendations related to the repair.
Repairing sliding bearings
The most important “vulnerability” of an angle grinder is considered to be the bearings. And although there are only three of them in the entire structure, it is these elements that often cause mechanical failures. So, bearings are negatively affected by:
- maximum use;
- rotation too fast;
- insufficient volume of lubricant;
- ingress of dirt and dust particles;
- untimely/incorrect replacement of carbon brushes or their deformation.
The design of any type of grinder provides for prompt replacement of bearings.
Faults related to deformation or wear of this element suggest the occurrence of extraneous noise.
Damage is detected by checking the shaft play, that is, by rocking it to the sides when installing the tool. If there is play, then the plain bearing needs to be replaced urgently.
In order to repair the bearing, it must be pulled out of the housing and removed from the gear shaft.
This part should be removed using a special puller. The bearing can be removed from the rotor using a traditional method. To do this, you need to insert metal strips or keys into the vice. Bearings should be placed on them and, using a massive hammer and a metal adapter, knock them out from the shaft axis.
The level of wear of the gears of the gearbox can be checked by the contact patch. The gearbox is cleaned of old lubricant in advance. to the smallest gear of the part, and then turn it.
Next, you need to remove the large gear with oblique teeth and look with a magnifying glass at the contact patch, which ideally should be at least fifty percent of the tooth surface. Otherwise, the gear will need to be replaced or the tooth profile changed.
However, this breakdown can only be repaired by a specialist with extensive experience. Often cut, licked or deformed gears must be completely replaced.
We disassemble the angle grinder gearbox
In the process of repairing a gearbox, the most labor-intensive work is considered to be dismantling the gears and support bearing.
The disassembly procedure itself begins with opening the cover and disconnecting the stator and rotor. The latter is clamped in a vice in order to unscrew the nut securing the small gear.
A spindle bearing is pressed into the gear cover. In order to get it out , sometimes you need to remove the retaining ring.
If the bearing is severely deformed, it is easier to remove it with a screwdriver.
A large spindle gear can be secured in several ways:
- using a key;
- by pressing onto the spindle.
Almost all models of grinders have the same electrical circuit. Rotation from the rotor is transmitted via a gearbox directly to the working element. The rotor rotates in the stator.
The tool is controlled using a button that regulates the speed and carbon brushes that transmit voltage to the commutator.
Power supply to the equipment is provided by a connecting cable.
Electrical breakdowns
So, the most common electrical faults include:
- damage to the power cable at the entrance to the angle grinder;
- wear or deformation of carbon brushes;
- faulty start button;
- short circuit or stator break;
- short circuit or rotor breakage;
- wear or delamination of the collector lamellas.
It is recommended to determine electrical faults using a tester or other device. The grinder is characterized by a fairly simple electrical circuit that does not require special knowledge. You just need to be extremely careful and follow safety rules.
The most common cause is a broken power wire. This problem is solved by completely replacing it or excluding the section that has failed from the electrical circuit. You can detect a malfunction using an ordinary tester.
If you do not have this device, you can use a special indicator screwdriver .
Also, the stable operation of an electric tool depends on the condition of the carbon brushes. Full contact of these elements with the lamellas and the general condition affect the operation of the rotary manifold. By the way, timely replacement of these parts can prevent many breakdowns.
The level of brush wear is determined by the nature of the sparking in the area where the commutator is located. The sparking, as a rule, should be even over the entire area of the contact patch of the lamellas and carbon brushes. Sparking in a circle indicates a malfunction in the rotor chains.
only original carbon brushes in angle grinders “Home-made” products can be installed, but only for a short period of time.
Breakdowns of the start button often result in unreliable or difficult starting of the tool. The malfunction of this plan arises and disappears spontaneously.
You should not use an angle grinder with a broken activation button. This failure can lead to jamming of the working element during operation, which will entail more serious consequences. In this case, the repair consists of simply replacing the damaged part.
Involuntary spinning of the shaft may indicate stator failure. At the same time, the angle grinder will gain maximum speed. The reason here may be an interturn short circuit in the stator winding.
Many faults can only be corrected by experienced specialists. The service life of the stator can only be increased by regular lubrication, cleaning and replacement of bearings and carbon brushes.
As a rule, the stator in an angle grinder breaks very rarely. This problem can be caused by overheating of the angle grinder during operation. Failure manifests itself as significant heating of the instrument structure and the appearance of a burnt smell.
Rotor failure in an angle grinder can be a consequence of improper use of equipment, regular overheating, dust getting into the collector lamellas and untimely/incorrect replacement of carbon brushes.
First, the size of the spark at the collector increases, after which a burning aroma and smoke appear. Working with an angle grinder with a faulty gearbox is characterized by a strong hum and knocking.
Repairing a rotor, like repairing an angle grinder yourself, is a very difficult procedure. Therefore, for this purpose, it is better to contact the specialists of the service center, who will repair the Interskol angle grinder very efficiently and quickly.
Source: https://tokar.guru/instrumenty/ushm-bolgarki/osobennosti-remonta-ushm-bolgarki-svoimi-rukami.html
The Bulgarian is behaving strangely or is it just brushes. Mini review of BOSCH PWS 8 125 CE and GWS 850 CE. From experience
If the grinder does not gain momentum
, loses power or behaves strangely. Symptoms of brush failure on an angle grinder
The start button and power cord are in working condition, the grinder does not work. Check brushes and brush holders. The brushes may be broken or completely worn out. The lifespan of these devices is usually limited to several years; of course, it all depends on the intensity of use. Repair the break or replace the brushes.
Mechanical breakdowns and their elimination
Mechanical failures of angle grinders include the following.
- Worn motor armature bearings. Typically, when the bearings wear out, you may experience strong vibration while the machine is operating. In addition, grinding and other noises may be heard. Sooner or later, the bearing will collapse, and the spilled balls will fall on the gears of the gearbox. If this happens, then in addition to the bearing, the gears will also have to be replaced. Of course, it is better not to wait for this problem, but to replace it at the first sign of bearing failure. How to get to this part of the angle grinder was described above.
- Worn ball bearing or plain bearing of the gearbox. As in the previous case, when you turn on the device, vibration will be felt and noise will be heard that is unusual for the normal operation of an angle grinder. To prevent further damage to the gearbox, it is necessary to replace the faulty part.
- Reducer gear wear. Gears wear out quickly due to insufficient lubrication. For the same reason, the gearbox heats up. It is necessary to monitor the condition of the lubricant inside the gearbox and change it if necessary. How to disassemble the gearbox was described above. You need to use lubricant specially designed for angle grinder gearboxes, and you can buy it at points where this tool is sold. If for any reason the teeth of at least one gear are broken, then the entire set of gears (a pair) needs to be replaced.
Mechanical faults can also include a broken shaft lock. In order to replace the retainer, you will need to disassemble the gearbox and remove the large gear.
Source
How to replace bearings on an angle grinder
The design of angle grinders uses three plain bearings (4 bearings are installed on angle grinders with disc sizes of 180 mm or more). Two bearings are used in the design of the electric motor, due to which the armature is held in one position. The third (and fourth) bearing is used in the spindle design to center the shaft. Depending on the service life of the tool, as well as when worn, the bearings need to be replaced. The first sign that the bearings need to be replaced is the appearance of a characteristic hum when the button is pressed.
This is interesting!
To extend the service life of factory bearings, you need to do an inspection once a year - disassemble the tool, remove the lubricant, replace it with a new one. The presence of lubricant in the design of gears and bearings does not mean that it is suitable. Indeed, in the process of friction of gears against each other or bearings in which the balls rub, metal dust and metal grains are formed. If these particles accumulate in large quantities, they negatively affect the operation of rotating parts, so these accumulations must be removed along with the old lubricant in which they are located.
You can identify the need to replace bearings in order to repair an angle grinder yourself using the following signs:
- A characteristic noise is heard when starting the unit
- When disassembling the tool assembly, shaft play is detected
- Lack of lubrication on the bearing is also a reason that the part needs to be replaced
The process of replacing a bearing is not difficult to do yourself, but you will need a special puller for this. Moreover, if it is not there, then it is not necessary to buy it. Instead of a puller, you need to use a piece of pipe of the appropriate diameter, which can be used to press in a new bearing. The video shows a detailed process of how to replace the spindle bearing on an angle grinder with your own hands.
After replacement, be sure to clean the old lubricant and apply new one. Litol and Solidol can be used as a lubricant. It is better to use more suitable high temperature lubricants.
Do-it-yourself repair of grinder speeds
Angle grinder Fiolent MSHU2-9-125E with speed control. Photo VseInstruments.ru
There is always a use for an angle grinder at home, in the country, in the garage or as a professional tool in production workshops. The use of various working tools increases the functionality of the work performed . Compliance with operating rules increases the service life of the power tool. However, as with any mechanism, sooner or later malfunctions occur . Easy assembly/disassembly, availability of diagnostic and repair tools allow you to fix breakdowns yourself.
- Not gaining momentum
- Does not work
Reasons for the grinder stopped working – Reasons for the grinder not turning on – Your equipment
Why does the grinder heat up?
The electric motor overheats in the following cases:
- Incorrect operating mode. As a result of too high loads, the motor windings burn out.
- Destruction of armature bearings. The result is difficulty in operating the engine and, as a result, overheating.
- Clogged ventilation ducts through which air flows to the electric motor, acting as a cooler.
- Closing the turns of the stator and rotor windings.
The angle grinder gearbox overheats due to lack of lubrication or its poor quality.
Angle grinder device
The design of the angle grinder consists of an electric drive , the torque of which is transmitted through a gearbox to the spindle with the working tool. On professional-level grinders, additional soft starters, regulators and speed stabilizers .
Grinder device DIOLD MSHU-1.5-01 with speed control (6). Photo 220Volt
Soft start creates comfortable and safe working conditions with the angle grinder, reduces the possibility of failure of the main working elements of the angle grinder (see angle grinders with soft start). The presence of a speed control option expands the possibilities of using an angle grinder (see about angle grinder speed), creates conditions for the absence of work with overloads, which increases the duration of its continuous operation (angle grinders with speed control here).
Speed controller
A speed (speed) regulator is present in angle grinders, where the quality of the material being processed depends on the rotational speed of the tool. For example, when processed at high speeds, plastic may begin to melt due to heating. For cleaning and grinding surfaces, a working tool is used that works effectively at certain spindle speeds.
The adjustment is made manually by changing the value of the variable resistance built into the device circuit. In addition to the variable resistor, the circuit includes an electronic unit that controls the amount of current. Electronic control of this electrical parameter when the speed, and therefore power, decreases, will maintain the amount of torque on the working spindle and ensure the functioning of the angle grinder.
Electrical connection diagram for a thyristor and triac VTA 12-600, with three or two terminals
A typical electrical circuit of the angle grinder speed controller is shown in the photo:
Typical electrical circuit diagram of the speed controller. Photo source here
Here the main element is a triac (VT12) . This scheme is used to adjust the speed of high-power . The opening/closing of the triac is additionally controlled using thyristors (D83) . Therefore, the triac has three working terminals : 1,2 - ensure the passage of current from the network to the load, 3 - controls its opening/closing.
The circuit for adjusting the speed of low-power angle grinders can only be performed using thyristors . They simultaneously act both as organs that lock the chain and as controls. There is no need for a third conclusion here. The schematic diagram is shown in the photo:
Scheme of a thyristor power regulator. Photo source here
The diode bridge (VD1) makes it possible to regulate the voltage on both half-cycles of alternating current using only one thyristor.
With soft start
Some specialized ICs can have current feedback, overload protection and soft start at the same time. These qualities are possessed by the U2010B chip, which forms the basic component of the circuit presented below:
Regulator circuit on the U2010B chip. Photo source here
A special feature of the device is the absence of a tachometer, which allows you to avoid complicating the design of the angle grinder. The block is included in the circuit as an intermediate device between the electrical connector and the electric drive.
No power loss
The simplest and cheapest method of adjusting the speed of an angle grinder is based on changing the voltage . However, at low speeds the torque decreases significantly, and the angle grinder cannot perform its functions. Another method, more expensive and complex, is based on the use of microprocessor control . Information for the operation of the circuit with a microprocessor is provided by a tachometer mounted on the rotor shaft. Feedback through the tachometer provides almost 100% retention of torque when engine speed drops.
Checking and repairing the collector
To inspect the collector, it is necessary to remove the rotor, disassembling the housing and gearbox. When grooves are identified on the commutator, it is turned on a lathe, and minor damage is removed by grinding. To grind the surface of the commutator, the rotor shaft is fixed in a drill chuck, and grinding is done with glass paper. When carrying out grinding and turning work, beating and displacement of the center of the workpiece are not allowed, and before work it is necessary to remove the bearings from the rotor shaft.
After carrying out the work, you need to clean the surface with a soft cloth and remove burrs on the lamellas.
Frequent malfunctions, causes
The grinder may not gain the speed required by the regulatory regime, work with spontaneous changes, with jerks, and in extreme cases, stop rotating altogether. If there is a speed control option, it may not respond to changes in the position of the operating mode indicator.
Some types of malfunctions and methods for eliminating them are discussed in the presented videos.
Not gaining momentum
The Makita model grinder, powered by batteries, did not reach operating speed in the next video. The first reason that comes to mind is that the batteries are discharged, but this has not been confirmed. faulty brush holders were discovered . The ingress of foreign oily liquid into the brush-collector assembly caused destruction of the brushes and melting of the plastic structure of the brush holders.
The author replaced the defective one with a new brush mounting unit. Important: graphite dust from destroyed brushes should be carefully removed from the stator and rotor, the surface of the commutator should be cleaned with emery cloth and preferably polished.
Does not develop speed and smokes
The stability of the rotation speed of the spindle working shaft largely depends on the presence of malfunctions in the components of the electrical part of the angle grinder. In the next video, the stator winding burned out , as a result of which smoke occurred and the grinder stopped rotating. Stator failure can be easily determined visually : broken wires, burnt insulation.
But the rotor, although it is covered with soot, should be diagnosed using the instruments described in the article at the link “Checking the continuity of an angle grinder’s armature with your own hands.” In this case, it turned out to be suitable for further work.
The author had a used, but fully functional stator in stock, so he eliminated the defect by replacing the failed one.
It's getting warm
Poor contact in the connections of the electrical part of the angle grinders leads to strong heating of the body, the formation of increased spark strength due to deviations from the nominal values of the electrical parameters. In the next video, the contacts on the brush holders burned out. Perhaps this happened due to a violation of the location of the brushes , which led to a large formation of graphite dust and the creation of additional resistance on the commutator unit. The author suggested a more reliable connection of contacts and corrected the location of the guides for the brushes.
Loses speed under load
In the next video, the grinder spontaneously changed speed during operation, and from time to time there were jerks . At the same time, there was no option for adjusting the speed on the angle grinder. One such jerk caused the cutting disc to break . After which it was decided to find and fix the problem. Diagnostics of the electrical part when testing with a multimeter revealed that the power (start) button was .
Since such buttons are usually not suitable for repair (when disassembling it, a completely defective contact was discovered), the author found a replacement . Functionally, the new button duplicated the old one, but was slightly different in size. The author successfully chose a new location for it and the grinder restored its functionality.
Bulgarian is Not Gaining Momentum Reason
As everyone knows, nothing lasts forever, and sometimes tools from branded manufacturers break, we are not talking about the so-called “consumer goods”.
Not Bulgarian (). are no exception. By the way, angle grinders began to be called “grinder” during the Soviet Union, since at that time this tool was produced in Bulgaria, not from where the first models were supplied. The grinder, as a tool, has become very widespread due to its versatility and ease of use. There are also many varieties of non-model grinders, but the principle of operation and the device are not fundamentally different.
Therefore, having considered the device of the tool, possible malfunctions are not repair methods; of course, they can be applied to any model of an angle grinder.
The device of the grinder is relatively simple. The basis of the tool is its body, inside which there is an electric motor; the starting device is not a gear transmission to the spindle, which is used to attach various attachments.
The body is made of strong impact-resistant plastic. Based on the power, there are different dimensions and shape of the tool. Some models have an angular speed regulator, which is designed for optimal selection of speed for various types of work.
An additional component is a gearbox. The gearbox is designed to create optimal conditions for transmitting rotation from the electric motor rotor to the cutting blade, as it is also called. B there is a reduction on the output shaft of the gearbox. The correct rotation speed is not the diameter of the circle.
guarantee of the most efficient operation of the tool.
A button for replacing the working disk, when pressed, locks the disk in a certain position, preventing it from spinning during removal.
The safety clutch serves as a limiter in the event of a sudden reactive reaction. Otherwise, when the disc gets jammed in the material, the grinder itself begins to rotate sharply, which leads to injury to the worker. This clutch does not allow such rotation.
The electric motor typically consists of a stator and not a rotor. The stator is located in the guide bosses of the plastic body of the angle grinder. On the back of the stator there is a special device called a brush mechanism. The personal computer contains copper-graphite brushes. Brushes are necessary to transmit voltage to the rotor through the commutator assembly.
The rotor is located inside the stator and is not fixed in the housing in bearing units, which are inserted directly into the tool body. The front bearing assembly is usually made of a metal plate, or this plate may be made of an aluminum alloy.
The body is almost always made of aluminum alloy and does not have several threaded holes for attaching an additional handle. By screwing the handle into different holes, there is an option to change the location planes during operation.
The gearbox consists of two gears, with the help of which the direction of the output shaft changes by ninety degrees without reducing the rotation speed. The ratio of the number of teeth of the primary gear to the number of teeth of the secondary gear is called the gear ratio.
Typical malfunctions of angle grinders and methods of diagnosis and repair
The grinder suddenly stopped working . The first thing you need to do. physically disconnect from the network and manually turn the disk. If the disc does not spin or spins very slowly. immediately disassemble the instrument for visual inspection. If it turns easily, then most likely.
electricity does not reach the motor brushes. That is, the problem lies either in the power plug, or in the wire itself, or in the “Start” button mechanism. It is enough to disassemble the case and “ring” the cable with a conventional tester, or in some other way, to check for a break.
After repairing the break or replacing the wire, the angle grinder will start working.
The wire and plug are guaranteed to be intact, but the tool still does not work.
It is necessary to disassemble the trigger mechanism, and it is advisable to mark the contacts to be removed - if they are subsequently connected incorrectly, the winding may burn out or the armature may jam. Repairing the trigger mechanism is not often possible.
It’s easier and more reliable to replace the start button with any similar one with suitable power parameters. Such a button is not that expensive and you can buy it in any store of the appropriate profile.
How to repair a Bosch grinder \ Power has dropped \ Sparks a lot \ Tool repair \ GWS eight hundred fifty ce
: Group: Life channel: .
and the power cable are in working condition, the grinder does not work. Check brushes and brush holders. The brushes may be broken or completely worn out. The lifespan of these devices is usually limited to several years; of course, it all depends on the intensity of use. Repair the break or replace the brushes.
Next come more serious faults, and therefore repairs require certain knowledge and skills.
— breakage or licking of gear teeth of the gearbox; — jamming of bearings; — failure of the armature or stator; — failure of the control electronics; — failure of the collector;
— deformation of the body;
Source: https://ctln.ru/bolgarka-ne-nabiraet-oboroty-prichina/
DIY power regulator
The speed controller is installed mainly on professional angle grinders , the price of which is prohibitive for many users. In addition, many of the functional capabilities of professional grinders turn out to be unclaimed in everyday life. However, it is not uncommon for the nature of the work performed, even at home, to require the selection of the required speed of the working spindle. The option of installing a speed controller of your own production on an angle grinder is quite realistic.
The simplest regulator, based on voltage changes, is not at all difficult to assemble if you have some knowledge of work related to electrical technology. Components for the circuit : triacs, thyristors, capacitors, resistors are freely available in specialized stores. How to install such a block on an angle grinder is described in the following video. The speed control device is made as a separate unit located outside the grinder. The author installed a voltmeter on it for the convenience of monitoring the operating voltage , since with readings of about 50 V and below, the grinder may stop due to a lack of torque under load.
If you have doubts about making the regulator yourself, you can purchase a ready-made unit . This is what the author of the next video did. to mount the device in a separate box of suitable size from a housing with a lid, which already had holes for the wires to exit. Like any “Chinese” product, after careful inspection it had to be modified. For more reliable cooling, the contact points between the triac and the radiator are treated with a thermal conductive compound in order to eliminate gaps and better fit to each other. Still, 2 kW is quite a lot of power, requiring compliance with all technical standards. Testing carried out using stripping brushes (cord brushes) showed the effective operation of the working tool when selecting the optimal speed using the regulator.
Does not work
Failure of the speed controller is not a rare occurrence. The grinder may not respond to scrolling the mode setting wheel , as happens in the following video. In such cases, you should first of all inspect both the external contacts, connecting the regulator with the electrical circuit of the angle grinder, and the wiring of the internal components of the electronic circuit. In the absence of visible violations, the main cause of regulator malfunction is usually the failure of the triac . It operates in the most difficult conditions at elevated temperatures and violation of the cooling mode is the main cause of failure. To replace it, it is necessary to unsolder it from the board and install a new one with the same or similar characteristics.
Using a continuity test, the author, in addition to the triac, identified a breakdown of the capacitor plates and a burnt track of the variable resistor. Knowledge and ability to work with electronic circuits made it possible to repair the speed controller board by replacing all faulty elements.
The design of a speed controller with feedback , where a signal about the value of the rotation speed of the electric drive rotor is sent to the control microcircuit, takes place on one of the Makita models in the following video. a magnet attached to one of the ends of the rotor, using spring and retaining rings . Its absence paralyzes the work of the regulator. This defect was discovered by the author of the video, who corrected it by installing a new magnet.
How to check
Installing a hand-made speed controller, or a “Chinese” model, inside the body of an angle grinder requires considerable effort . Therefore, before assembly, you should check its functionality. Why are two wires inserted into a separate portable power socket? One of the wires is connected to the board pin, the other to one of the two wires of the network cable. The second power wire is connected to the regulator board to create a closed electrical circuit where the regulator is connected to the power load. To check the functionality of the regulator, it is enough to connect a test light and, based on the change or non-change in the degree of incandescence, draw conclusions about the possible installation of the regulator on the angle grinder.
Works jerkily
Instability of the electrical parameters of the angle grinder can cause jerky operation and spontaneous changes in shaft speed. The most common reason for such operation is a violation of the stator or rotor windings , the presence of breaks and interturn short circuits in them. Some violations of the contact group of an electrical circuit change its resistance during operation and cause deviations in current and voltage from the nominal values. Therefore, when searching for causes, you should call the entire electrical part of the angle grinder . Deviations in the operation of the components of electronic units, for example, in the speed controller, can also cause the grinder shaft to operate jerkily. The best option here is to replace the entire electronic board.
Source
Troubleshooting
Repairing a faulty tool should not be a hassle, blind disassembly, in the hope that it should work now. Before starting repairs, it is necessary to accurately identify the actions or inactions that preceded the breakdown. It happens that when the grinder went into the closet it worked perfectly, and then suddenly stopped working. In this case, it is not its excessive use that is to blame, but coking with dust that got inside the instrument, which after lying for a long time and shaking led to a failure. Every error has its own name. Therefore, to identify the problem, a cause-and-effect relationship must be established. In addition, this approach will prevent the risk of replacing serviceable parts, which will save money.
The main reasons for the breakdown of the angle grinder can be identified:
- violation of the integrity of the network cable - fracture, chafing, eating of insulation by rodents. Before use, it is recommended to inspect the power cord for damage or cuts.
- as was said, dusting of the internal space of the instrument. The work process involves a lot of dust, which, like a vacuum cleaner, is sucked into the grinder. Over time, the unit components and buttons become clogged, and performance is impaired. If the angle grinder is stored in a room with high humidity, then the collected dirt, dust, and debris begins to take on an increasingly durable form, which becomes a threat to the integrity of the entire tool system. After regular work, it is necessary to clean it with a brush, and in terms of prevention, periodically open the body of the angle grinder for full maintenance.
- High humidity also leads to oxidation of contacts and affects the engine, which will subsequently lead to disruption of the normal operation of the tool.
- Non-compliance with operating rules is often the main cause of failure of any tool. If we saw, then until we win, if we drill, then until our hands begin to burn. The grinder is intended not only for processing metal, but also for cutting stone, concrete, brick, granite, etc. In each case, the time required to use the tool is different. The load varies depending on the density of the material. Excessive effort will certainly make itself felt later.
Reasons why parking sensors do not work and ways to solve them
If your parking sensors do not work, the reason may be a problem with the sensors, control unit or display system. Or, there was a problem with the wiring.
Wiring not working
If your parking sensors suddenly stop beeping, you should start looking for what the reason is with the wiring. A break or interruption could have occurred in some place. Other reasons include loose or oxidized contacts, torn insulation, and a broken main power cable.
If the parking sensors do not work and do not turn on when you engage, specifically, reverse gear, the wire that powers the system from the reverse lights is probably broken. A similar reason could happen to the cables leading to the turn signals or brake lights (if the front sensor does not work).
Grinder stator repair
The reason for the failure of the grinder stator can be determined. To do this, you need to pay attention to interruptions in work. The rotor can develop speeds exceeding the permissible ones, which will indicate an interturn short circuit in the winding. Many breakdowns can only be repaired in service centers, but for uninterrupted operation, timely cleaning, lubrication, and replacement of brushes and bearings can be carried out.
Failure of the stator of a Makita angle grinder rarely occurs, and the cause may be constant overheating of the angle grinder. In this case, the case becomes very hot, and a burning smell appears in the ventilation ducts. There may be a short circuit or break in the stator winding, so it is difficult to determine the malfunction and repair the device without special instruments. To repair an angle grinder with your own hands or replace the stator, you must carry out the following steps:
Dismantling the angle grinder gearbox;- Dismantling the rotor after removing the fastening bar;
- Removing the stator protection;
- Unscrewing the stator mounting screws in the housing;
- Removing the handle cover and disconnecting the power wires;
- Removing the stator.
The stator is tightly installed in the housing, so the removal process may be accompanied by light blows of the mallet on the housing. Most often, the stator must be replaced, but sometimes hobbyists can do the rewinding themselves.
Diagnostics
You can check the functionality of the sensors tactilely. Firstly, when activated, if you lightly touch them, you should feel a slight vibration. Secondly, rhythmic clicking sounds can often be heard. As a last resort, the sensors are dismantled and each one is checked with a multimeter.
The self-diagnosis option will help you find out whether the electronic unit is working normally. Forcefully launch it through the settings and wait for the result.
If your device does not have this function, you will have to observe and test the parking sensors, as they say, “in battle.” Place any non-dangerous obstacle and check whether the radar will work and detect its presence in its sensitivity zone.
Common Causes
Parking sensor malfunctions occur due to a malfunction of the main components of the device.
Sources:
https://obrabotkametalla.info/instrument/osnovnye-neispravnosti-i-remont-boLGarki-svoimi-rukami https://ice-people.ru/boLGark-2/perestala-rabotat-boLGarka-prichiny-ne-vklyuchaetsya-boLGarka -prichiny-vasha-texnika.html https://avtodigitals.ru/ne-rabotaet-parktronik-prichiny/