general information
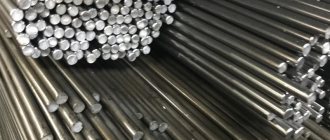
Many home craftsmen are accustomed to thinking that welding should be used only when two metal workpieces need to be connected. However, having a welding inverter and electrodes in your hands, you can perform not only welding, but also metal cutting. This technology is useful if you need to make a hole in a workpiece.
You don't need to be a professional to make a hole in metal with an electrode. It is enough to know the operating principle of the inverter and be able to apply it in practice. The cutting process is simpler and faster than welding, since there are no such high requirements for the quality of the seam. With practice, you can achieve a fairly smooth cut with neat edges. Therefore, cutting is suitable even for those who have never used a welding inverter.
How to weld a hole in thin metal
Welding thin metal even with an inverter machine often causes certain difficulties even for experienced welders. The fact is that here you will have to be guided by completely different rules than when connecting elements of significant thickness to each other.
First of all, it should be noted that it is strictly forbidden to heat thin metal too much, as it will burn out and holes will appear in its structure. In this regard, when welding fairly thin sheets of metal, the electrode is moved as quickly as possible, without deflecting it to the side.
Another difficulty associated with welding relatively thin metal is the need to use low currents, which means that you will have to weld with a short arc. If even a slight separation occurs, the arc will go out. In some cases, difficulties arise even with ignition, so you will need to use devices with good current-voltage properties; the device should also allow smooth adjustment of the current, especially when welding with argon.
How to weld thin metal
Welding thin metal is a challenge even for some experienced welders. Beginners in welding generally have a hard time. The rules that apply here are completely different from those when welding thick products: there are many features and difficulties, which makes it more difficult to select modes and electrodes. It’s easier to do this with semi-automatic welding machines, but they are quite rare in everyday life; inverters are much more common. We will talk about welding thin metal with an inverter.
And the first difficulty when welding metal of small thickness is that you cannot heat it too much: it will burn out and holes will form. Therefore, they work according to the principle “the faster, the better” and there is no talk of any trajectories of electrode movement at all. Thin sheet metal is welded by passing the electrode in one direction - along the seam without any deviations.
When welding thin metals, the sheets overheat and bend
The second difficulty is that you need to work at low currents, and this leads to the fact that the arc has to be short. With a slight separation, it simply goes out. There may also be problems with arc ignition, so use devices with a good current-voltage characteristic (no-load voltage above 70 V) and smooth adjustment of the welding current, which starts from 10 A.
Another trouble: with strong heating, the geometry of thin sheets changes: they bend in waves. It is very difficult to get rid of this shortcoming. The only option is to try not to overheat or remove heat (read about the method with heat-dissipating pads below).
When butt welding thin sheets of metal, their edges are carefully processed and cleaned. The presence of dirt and rust will make welding even more problematic. Therefore, carefully align and clean everything. The sheets are placed very close to one another - without a gap. The parts are fixed with clamps, clamps and other devices. Then the parts are tacked every 7-10 cm with short seams - tacks. They will prevent the parts from shifting and are less likely to bend.
If you clean the edges well, you can get a good seam
What should you have on hand?
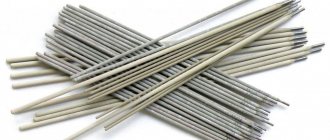
To make a hole in metal, you must have an inverter, electrodes, as well as a hammer and a brush with metal bristles.
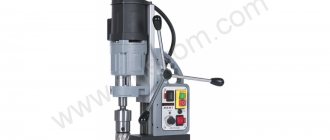
Inverters come in different types: cheap and expensive, professional and household, powerful and not very powerful. In essence, it does not matter which inverter you use for cutting. The main thing is that it is in good order.
As for electrodes, there is a wide choice. Previously, cutting was performed with the same electrodes as welding. But now there are many brands on sale that are designed specifically for cutting. They are all good in their own way. The most popular brand of cutting electrodes is OZR. They provide a more or less even cut and allow you to get the job done quite quickly.
If you decide to use conventional electrodes for welding, then be prepared that the cut will not be the most aesthetically pleasing, and the work itself will proceed more slowly, and the arc will burn unstably.
Welding current
What about welding current? As you, I hope, have already understood, the higher the welding current, the more energy is transferred to the welding zone, the stronger and deeper the metal melts and the thicker the products you can join. And to transmit a greater current, a thicker conductor is needed. Accordingly, we can reach a direct relationship: metal thickness - electrode thickness - current strength. Welding machines are often marked with signs corresponding to the thickness of the electrode and the welding current. I recommend that you do not take such tables as dogma - they are just a starting point to guide you. For household use, a current of up to 160A is sufficient, which allows you to use a 4 mm electrode. In my memory, I very rarely used this diameter of electrodes. Basically it is 2 and 3 mm. There is also a diameter of 2.5 mm for electrodes of the UONI-13/45, 15/55, NIAT-3M brands (types for carbon steels). Approximately the strength of the welding current can be determined by the formula: I=Kdel. Where K is an experimental coefficient equal to 40-60 mm for electrodes made of low-carbon steel and 35-40 mm for electrodes with a rod made of high-alloy steel, and del is the diameter of your electrode.
| Metal thickness, mm | 2 | 3 | 4 — 5 | 4 — 5 | 5 — 10 | 5 — 10 |
| Electrode diameter, mm | 2 | 3 | 3 | 4 | 4 | 5 |
| Welding current strength, A | 40 — 80 | 80 — 120 | 100 — 150 | 160 — 200 | 160 — 210 | 180 or more |
We carry out cutting
Light the arc. This can be done in two ways: by tapping the end of the electrode on the surface of the metal or by striking it, as if lighting a match. The first method is easier. If you have never used a welding inverter before, we recommend starting with tapping.
Adjust the current on the inverter. The current strength is selected based on the thickness of the workpiece and the diameter of the electrode. We recommend that you first set the setting as if you were just welding, and then add about 30% more of the set amperage.
Next you need to mark the edges of the future hole. Use a chemical pencil for this. It's great for marking and is easy to see when cutting. If the hole is small (a couple of centimeters in diameter), then cutting can be done immediately. If there is a lot of work, then it is better to make the hole smaller and then gradually expand it.
Guide the electrode perpendicular to the workpiece. Do not tilt it too far when cutting. The process itself is very similar to regular welding, so you shouldn't have any difficulties.
How to burn a hole with an electrode in thick metal?
Welding thin metal even with an inverter machine often causes certain difficulties even for experienced welders. The fact is that here you will have to be guided by completely different rules than when connecting elements of significant thickness to each other.
First of all, it should be noted that it is strictly forbidden to heat thin metal too much, as it will burn out and holes will appear in its structure. In this regard, when welding fairly thin sheets of metal, the electrode is moved as quickly as possible, without deflecting it to the side.
Another difficulty associated with welding relatively thin metal is the need to use low currents, which means that you will have to weld with a short arc. If even a slight separation occurs, the arc will go out. In some cases, difficulties arise even with ignition, so you will need to use devices with good current-voltage properties; the device should also allow smooth adjustment of the current, especially when welding with argon.
Features of welding thin metal using an inverter
A semi-automatic inverter device allows you to get the highest quality connection, which will be quite strong and durable.
If a person does not have sufficient experience in using semi-automatic welding, then it is best for him to gain some experience in the field of welding thick elements, only after that move on to joining thin metal. The fact is that the thinner the steel, the more difficult it will be to obtain a reliable seam.
The main positive characteristic of semi-automatic welding equipment is their ability to work ideally at low currents and low voltages.
The thickness of the electrodes for argon welding should not be too large - their maximum diameter will be about 2.5 mm. The inverter allows you to very quickly adjust the current strength. This is done using one handle, and the current will be in the range from 10 to 200 A. The thinner the electrode is taken and the thinner the workpieces being welded, the lower the current strength will be optimal.
Work technology
To thoroughly understand how to weld thin metal with an inverter, you first need to find out what methods of work are available. Many professionals recommend holding the electrode at a slight angle to the workpiece. The flanging method is useful here, when the edges of the parts are slightly bent and begin to be connected with the shortest seams every 10-15 cm. After the elements are fixed, you should go along the entire length of the seam from top to bottom.
Welding thin metal with an inverter often leads to the formation of burns (especially if the work is carried out without interruption). To prevent the appearance of such a defect, the arc can be torn off for one second. After this, it is returned to the same place and carried a few millimeters further. This method is more time-consuming, however, the welding of metal parts is of better quality.
The molten metal will cool down somewhat during the absence of the arc. This will be clearly visible by the change in color of the seam. The main thing in this technology is to prevent the arc from breaking off for too long, otherwise the steel will cool down too much.
If it is possible to use a spot weld, then when welding thin parts it is better to use it.
Its essence is to create small tacks at a short distance from each other, which will hold the parts in one place.
How to properly weld galvanized sheets?
Galvanized or galvanized steel is a thin sheet of metal that has been hot-dip treated with an element such as zinc during the manufacturing process. If there is a need to connect such elements, the zinc coating on the welded edges will need to be completely cleaned off. They do this in one of the following ways:
- Remove the layer mechanically - using an angle grinder and an abrasive disc, a metal brush or sandpaper;
- Burn it out by welding - zinc evaporates at a temperature of about 900 degrees, so you need to pass the electrode twice along the seam being formed. However, in this case, it must be remembered that zinc vapor is extremely toxic, so such work is allowed to be carried out either in the open air or in a room with good ventilation.
After each pass with the electrode, it is necessary to remove the flux from the surface of the workpiece. When the zinc is completely removed, the actual metal begins to be welded. To obtain the highest quality connection, you should use two types of electrodes.
To obtain a reliable welded joint, it is necessary to correctly select a parameter such as polarity, and it can be direct or reverse:
- Direct polarity ensures that the temperature is not too high, and heat will flow into the thickness of the metal into a narrow but deep area;
- Reverse polarity provides a higher temperature, and the melting region will not be too deep, but very wide.
Source: https://metall1000.ru/kak-prozhech-dyrku-elektrodom-v-tolstom-metalle/
For cutting metal
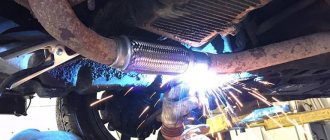
In the future, using the position of the electrode, you can successfully cut steel. Molten metal is removed from the cut site by arc pressure and its own weight. Sometimes it is additionally blown out with a stream of air.
In this way, by exceeding the welding current by up to 30% and using ordinary welding electrodes, metal parts can be cut. True, the quality of the resulting walls will be low, and the edges will be melted and covered with slag. For further use, they will have to be processed with mechanical tools. But in many cases this is simply not required.
note
Although cutting is simpler than welding, it also has its own characteristics that need to be taken into account. We will list the main ones.
First of all, be prepared that this method of cutting metal is unlikely to provide a perfectly straight cut line. If you need an impeccable result, use plasma cutting technology. Cutting with electrodes is suitable for home use when quality is not so important.
When cutting thin workpieces, increase the amperage. If cutting electrodes are not available, welding rods can be used. But their use makes cutting a little more difficult. Some craftsmen use welding electrodes that are no longer suitable for welding work.
In essence, the type of electrode is not that important. What's more important is its diameter. Remember: the thicker the metal, the larger the diameter of the electrode. For thin metal workpieces, 3 mm electrodes can be used.
Stages of work
Before starting work, be sure to check the serviceability of the cables used.
Experienced welders advise beginners to wrap the holder cable along the forearm, helping to hold it by pressing the hand to the body. As a result, the hand remains relatively free and relaxed, which will lead to less fatigue.
The arc is ignited either by tapping or striking the electrode on the metal surface. Despite the complexity of the description and terms used, the skill of igniting and subsequently maintaining an arc appears immediately, literally after the second or third attempt.
It is a fair statement that the cutting process is simpler than welding, and therefore does not impose any excessive demands on the quality of work. To master the basics of using an inverter, metal cutting is optimal. With some practice, the edges of the cut become smooth and even.
The current on the inverter is set based on the size of the electrodes, the thickness of the steel and the type of cut, of which there are four types:
- separation cutting. The sheet of material is installed in a position that creates conditions for unimpeded flow from the cut site. With vertical cutting, the process is performed from top to bottom. When the metal is positioned horizontally, it is advisable to cut from the edge. For large sheet sizes, it is permissible to start cutting in the middle, having previously made a hole. The best option is to use an electrode whose diameter is greater than the thickness of the metal being cut. In this case, the electrode is positioned perpendicular to the plane of the sheet and moves along the line of the planned cut;
- surface cutting. It is used much less frequently and is used to make grooves on the metal surface, as well as to remove defects. The electrode should be inclined to the surface by 5-10 degrees. Its movement is carried out with partial immersion into the cavity formed during the cutting process. If a wide groove is required, it is enough to perform transverse vibrations of the required size when moving the electrode;
- cutting holes. The process is quite simple - first a small hole is made, which is gradually expanded to the desired size. In this case, the position of the electrode is almost perpendicular to the metal surface, with minor deviations allowed.
When cutting metal using a welding inverter, the following points must be taken into account:
- the technology does not allow for accurate cutting lines (as with plasma cutting), which seriously limits the scope of application;
- cutting thin metal requires high current strength;
- In the absence of special electrodes designed for cutting metal, ordinary ones can be used. Often even old ones that are unsuitable for welding are used. The main requirement is the required diameter of the electrodes (for a thin sheet the so-called three is used, that is, the diameter of the electrode is 3 mm, for metal of large thickness - four and five, that is, the diameter of the electrodes is 4 and 5 mm, respectively).
Using the above recommendations and rules will allow you to master metal cutting on your own quickly and without problems.
Required tools and equipment
During the work process you will need:
- a welding inverter (transformer), which produces a current of a given strength necessary to create a welding arc;
- metal hammer;
- cleaning brush;
- electrical wires with couplings;
- electrodes and holders for them.
For cutting metal, it is advisable to use electrodes that are marked with the OZR marking. They are distinguished by a special coating with a certain heat resistance, ensuring high productivity and good quality of the cutting strip. When used, a stable arc is formed, which creates the required amount of heat. Special OZR electrodes allow cutting with direct or alternating current from any spatial position.
Welding cutting is a process of increased danger to humans. Failure to comply with safety precautions and lack of necessary equipment can result in electric shock. Visible and ultraviolet rays have a negative effect on the eyes. Harmful substances released during cutting affect the functioning of the respiratory tract. There is a risk of getting burns to the surface of the skin from hot metal. Therefore, during the cutting process it is necessary to ensure:
- reliable protection of the metal body of the welding machine;
- the presence of exhaust ventilation in the room;
- special protective clothing: canvas overalls, mittens, protective mask with dark lenses, shoes with rubber soles, respirator.
When cutting metal in a confined space, it is advisable to have an assistant watch the worker’s actions from outside, ready to help in an extreme situation.
Metal cutting by welding, welding machine, burning
Now let's speculate - what happens if we take an electrode with a diameter of 2 mm for a sheet of steel 2 mm, and set the current to about 100A, which usually corresponds to an electrode diameter of 3 mm? What will happen is that the electrode and steel will begin to actively melt and evaporate. The electrode will have to be supplied very intensively to the welding zone. You won't get any bath, but you will get the so-called. through burning. It seems like a nuisance, but let’s turn it into a good thing - we’ll start moving the electrode progressively, controlling the occurrence of burnout. And lo and behold, we cut steel! Moreover, in this way you can cut a fairly thick-walled sheet. Of course, the quality of the edges will be much lower than when cutting with an angle grinder (grinder), but this method is sometimes quite applicable when high demands on the quality of the edges are not made. The current for cutting metal is usually 25-30% higher than the current required for welding.
Electrode position during welding. Electrode holder, holder
You insert the electrode into an electrode holder (welders call it a 'holder'). It should be comfortable, lightweight, and have grooves for installing the electrode at different angles. There are many different electrode holders in design and application. As a rule, well-known manufacturers equip welding machines with quite decent electrode holders, and you do not need to think about their modifications. When you insert the electrode into the holder, be sure to check (by rocking) that it is securely fastened in the holder. Otherwise, sparking will occur at the attachment point and your arc will either be unstable or not ignite at all.
So how do we hold the electrode? In relation to the seam plane, it can be at an angle of 30-60° from the vertical, or at a right angle. When making vertical seams from bottom to top, the angle should be 45-50° down from the horizontal. If from top to bottom - 10-20° down from the horizontal. In addition, the process is determined by the direction of movement. When welding at an angle 'forward' (away from you), the depth of penetration decreases, the height of the convexity of the seam decreases, but the width of the seam noticeably increases, which makes it possible to recommend this position for joining metals of small thickness. In this case, the melt and slag moves ahead of the electrode. This method has a number of disadvantages - for example, a lot of liquid slag accumulates in front of the electrode, it flows onto the metal and interferes with maintaining the arc. Lack of penetration and slag inclusions are possible. In this case, it is necessary to align the position of the electrode to vertical.
Generally speaking, you will observe how the metal flow and arc 'repel' the melt in the weld puddle and will observe differences at different electrode positions.
'Right angle' welding (the electrode moves away from you) allows the liquid slag to follow the weld pool, covering the liquid weld metal just behind the electrode. This ensures the formation of a high-quality roller.
In addition, when welding with rutile-coated electrodes, the inclination of the electrode towards the future weld should always be greater than for electrodes with a basic coating.
The most common way is ' backwards
‘.
When welding 'back angle', the penetration depth and the height of the convex increase, but the width decreases. Heating of the edges is insufficient, so failure of fusion and formation of pores are possible. If the electrode is tilted excessively, you will see how, under the influence of the arc, the slag is pushed out of the bath, exposing the metal.
Welding with an inverter in various spatial positions
In everyday life and at work, there are situations when parts need to be connected to each other not at the joint, but in a different way. The seams can be on the wall or even on the ceiling. Each position has its own nuances that a beginner who is trying to master welding with an inverter needs to know. If you practice a little purposefully in each form, you can easily master them.
How to properly weld metal with an inverter
To work with welding, the following protective elements are required:
- Gloves are made of rough material, but in no case are rubber.
- Welding helmet with a filter, which is selected depending on the value of the welding current. It is more convenient to use a “chameleon” mask, since the filter installed in it recognizes the arc and is darkened to suit its size. It is worth noting that at low temperatures the filter does not have time to work in time, and at temperatures below 100 degrees this mask will not protect.
- Clothing, which should be made of natural dense and non-flammable material, cover the neck and arms.
- Closed shoes made of genuine leather and thick soles.
It is necessary to prepare a safe place for welding:
- Free space, absence of everything unnecessary.
- Good lighting.
- The work is performed standing on a wooden floor, which protects against electric shock.
READ Conversion of 18 Volt Screwdriver Battery
After this, you need to adjust the welding current (depending on the thickness of the metal and parts) and select an electrode (2-5 mm). Usually the strength of this current is indicated on the device body. Electrodes must be selected based on the brand of welding materials. Next, connect the ground terminal to the surface to be welded.
To obtain a reliable and high-quality connection, the metal should be prepared before starting work. Use a metal brush to remove rust from the edges, which need to be treated with a solvent (gasoline, white spirit). It is important to prevent the presence of grease and paint materials on the edges.
For beginners, it is better to make a seam in the form of a roller on a metal sheet with a large thickness. The sheet must be placed horizontally on the table. A straight line is drawn on it with chalk as a guide in the work along which the roller will be laid. To start welding, you need to ignite the arc. You can do this in 2 ways:
You can strike and hold the arc in both ways. Next comes the welding process itself, which produces a weld seam. Metal deposits on top of the seam must be removed by tapping with a small hammer or hard object. The ability to control the length of the arc will provide excellent results.
- electrode inclination angle;
- diagram of transverse and longitudinal movements;
- speed of electrode movement.
Direct and reverse polarity when welding with an inverter
Let's consider polarity when welding with an inverter. With a DC connection, the movement of electrons is constant, which reduces spattering of molten metal. The seam is of high quality and neat.
The device has a choice of polarity. What is polarity is the direction of movement of electrons depending on the connection of cables to equipment connectors.
- Reverse polarity when welding with an inverter - minus on the workpiece, plus on the electrode. The current flows from minus to plus (from the workpiece to the electrode). The electrode heats up more. Used for welding thin metals, the risk of burn-through is reduced.
- Straight polarity - minus on the electrode, plus on the workpiece. Current moves from the electrode to the workpiece. The metal heats up more than the electrode. Used for welding thick metals from 3 mm and cutting with an inverter.
The polarity is indicated on the pack of electrodes; these instructions will help you correctly connect the wires to the equipment.