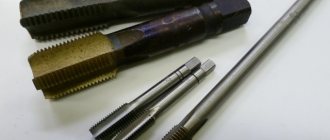
Extension cord for feather drill.
There's a problem. It is necessary to drill timber walls at the dacha with a 22mm tip drill (for electrics). The thickness of the wall including the cladding is 17-19cm. A regular feather drill allows you to drill to a depth of approximately 13cm. An extension cord is required. Couldn't find it for sale anywhere in Moscow. Many sellers don’t even know that such things exist. Question: Is it possible to use a bit extension as a drill bit extension? Do they have the same mounting dimensions?
Dmitriy65 wrote: Do they have the same landing dimensions?
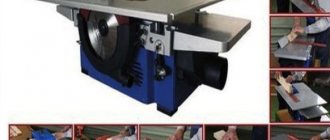
There are different feather drills. Others fit perfectly into adapters. Only an adapter like the one in the picture will be inconvenient - it will not hold the drill when removed, and the drill will remain in the wall. Needed with fixation. There are other feather drills, they will generally hang too loosely in the 1/4″ adapter.
Dmitriy65 wrote: Couldn't find it on sale anywhere in Moscow
Leroy-Merlin sells extension adapters for Anchor drill bits. 59 rubles, length - about 20 cm.
Dmitriy65 wrote: The thickness of the wall including the cladding is 17-19cm
.. can’t you just use a spiral one?? without any adapters.. Length up to 450.. yes, there are also short ones like 20 cm. They pass the tree perfectly..
2Dmitriy65 You need to look at the markets. There are 30cm extensions. True, they are from a series of one-offs and mostly in sets. Personally, I welded a piece of a pin. But there f35 had to be chewed 40cm.
Ruslan1111 wrote: Personally, I welded a piece of a stud
Where, to the tail of the drill?
Suever wrote: Where, to the tail of the drill
I also didn’t want to go to the store 20 km away. and here the welding is at hand (I assembled the heating), the drill costs a penny, grab it and go for it.
helmutivan wrote: .. but you can’t just use a spiral one?? without any adapters.. Length up to 450.. yes, there are also short ones like 20cm. They pass the tree perfectly..
Not convenient. You will have to buy too many different sizes. And I don’t know if a screwdriver will pull it. I used Makita to drill with a diameter of 35 in 150 timber. It goes without problems, but the length is not enough.
Suever wrote: Where, to the tail of the drill
Similarly, I bought a twist drill of the required size, the smallest 200 mm and welded it to the 10 mm fittings and got a twist drill 1 meter long. even if you want to find it, you won’t find it.
drilled ties for the formwork. There is 800 mm minimum size
alex_k wrote: even if you want to find it, you won’t find it.
I guess sometimes you have to get out of it.
alex_k wrote: drilled ties for the formwork. There is 800 mm minimum size
I also drilled, but made do with a short (regular) metal drill.
So what's the point? Are the shanks of the drill bit and the bits different or the same?
npn wrote: Leroy-Merlin sells extension adapters for Anchor drill bits. 59 rubles, length - about 20 cm.
Ruslan1111 wrote: you need to look at the markets. There are 30cm extension cords. True, they are from a series of one-time ones and mostly in sets.
I used this Enkor: the drill and extension are misaligned - the beating is crazy! Summary: cal.
Dmitriy65 wrote: Are the shanks of the feather drill and the bits different or the same?
npn wrote: Others fit perfectly into the adapters.
Dmitriy65 wrote: So what's the point?
Anchor extension + Encor drill (as the most budget option). Or another drill that (the tail) will fit into the Anchor extension.
Give it up, for occasional one-time work, no problem. There are options for welding the reinforcement to the tail, and no one complains about the beating. And this is all done on a machine, in the centers.
Ruman › Blog › How to drill spot welding correctly. Tools and accessories
Novice bodybuilders often wonder how to properly remove a part (fender, sill) when replacing it, if this element is not attached with bolts or screws, but with factory spot welding. Here you need to immediately decide why it is needed. If you take it off and throw it away, then you don’t need to think long, but just use an angle grinder or a chisel and chop as you want, but not everywhere...
In places where the repair part is placed under the metal, for example, the threshold slides under the middle pillar and under the wings at the front and rear, this is where you need to carefully drill out the spots for spot welding.
Not knowing about the existence of special devices, I sharpened simple drills evenly so that they cut the metal around the welding point from resistance welding, oh, I had a lot of trouble with them, I’ll tell you. But let’s not talk about sad things, but let’s move on to the procedure of removing the threshold (for replacement) using special drills for drilling out spot welding.
To remove the threshold I use:
- an angle grinder (small) with a speed regulator, a cutting disc (1.2 mm thick - the optimal thickness for working with car metal) and an angle grinder with a cleaning disk (6 mm thick), - pliers, - a finely sharpened chisel, - a crown for drilling spot welding, - a drill, - a core, - a drill with a diameter of 2 mm (3 is possible), this is not essential, - a screwdriver.
Ask why so many things? The answer is quite simple - so as not to rearrange the drills, and not to change the discs on the grinder.
So, let's start removing the threshold. First, you need to drill out those places where a new threshold will subsequently be installed - the middle pillar, the boot of the rear and front (if it is not removable) wing.
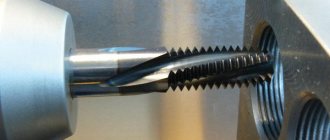
For this we need special drills for drilling spot welding. This entire device is called a “crown with a mandrel for drilling spot welding.” The crown is those “teeth” that cut the metal, and the mandrel is the thickening on it to impart rigidity and hold two oppositely located crowns.
It is problematic to buy them in a simple tool store. Therefore, I order such crowns from the online store.
As you can see, you can use both a drill and a crown, but for myself I chose and use a crown, which I’ll tell you about.
Why a crown and not a drill?
How can I tell you? This is an amateur thing, and besides, there is one nuance - the guide tip on the drill does not always cut through the hardened part of the spot weld, and you need to drill it with another drill so that it goes deep enough to cut off the top iron. Chaotic? Well how could I...
The price of a branded crown is more than a thousand rubles, Chinese (Taiwanese) from 130 rubles. I worked with both, and I’ll tell you a secret that I preferred the Chinese ones. Branded ones are sharper and hold an edge longer, but are more fragile and break at the slightest careless movement (misalignment).
The Chinese ones are not so susceptible to crumbling, and they hold an edge quite well. There is one drawback, this is the sticking of the guide rod. But if you had a branded one, like I did, then later you can simply put Chinese crowns on the shank. By the way, they are (it turns out) on sale separately from the shank. In the photo it is 9.5 mm, I also have 8 mm, I have never seen a smaller one. This device itself is dismountable - the crown is removed (unscrewed - the thread is normal) and, as you have already noticed, the cutting edge is on both sides, if one side is damaged, we turn it over and continue working.
In the center in front, there is a guide pin, it is on a spring, and when pressed it sinks. Don’t be alarmed if you suddenly start drilling and the edge doesn’t reach the metal because of the pin - it’s adjustable. There is a bolt in the shank for a flat-head screwdriver (marked with an arrow in the photo below), use it to adjust the pin so that the edge plunges into the metal to the depth of one layer thickness. Drilling technology
You insert this device into a drill, a drill for drilling spot welding, it is better to use one with a speed controller or one that has a lot of power at low speeds.
znak Don't rush to drill right away! First, find all the welding points and mark them. It happens that the guide pin jumps out of the cored point, which often leads to breakage of the crown.
They advised me to drill out the core points, now if the core makes a shallow depression, I use a drill with a diameter of 2-3 mm to deepen it (in order not to rearrange the drills, I use a screwdriver for this purpose).
Now you can drill out the spots from the spot welding.
Set the rotation speed on the drill to low, no more than 800 rpm, the bit should rest against the metal, strictly perpendicular, so that all the teeth are completely pressed against the metal. The crown will cut the iron around the weld point, and the weld will remain on the metal underneath.
Now you can cut off the threshold with a thin chisel (I use an old chisel) and pick out (if necessary, chop) the drilled iron. It is advisable to carry out the process of removing the threshold in the sequence I indicated. I'll explain why. If you first cut off the entire threshold and leave only those places where you need to drill, then you will definitely break the crown, because there will be no stop, and the metal will play and bend even from slight pressure.
Moving a little away from the topic of drilling out spot welds using a crown and drill, I will continue about removing the threshold.
If you are not going to use the threshold in the future as a donor, then you do not need to drill out all the points, but only those that I mentioned above. You can remove the rest as your imagination allows - cut it off with a grinder, chop it off with a chisel or an ax.
I cut everything closely with a grinder or cut it off with a chisel, cut through the fastening points with the remaining (not drilled points) with a grinder (to the depth of the metal sheet), and then use pliers to tear off the welding points. It's faster and more convenient than all the methods I've tried before.
After installing a new threshold, simply boil it through the already prepared holes, clean it and putty. That's all, go for it, you will succeed.
And I also found one useful video, like without special. tools for drilling spot welding can be done with little effort.
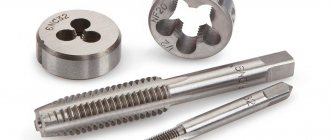
Content:
- 1. Drill type
- 2. Shank
- 3. Material of manufacture
- 4. Sharpening angle
- 5. Accuracy
- 6. Cutting direction
- 7. Dimensions
- 8. Which manufacturers can you trust?
To drill steel, cast iron, and non-ferrous metals, you need to choose the right equipment. After all, drills designed to work with soft materials will not cope with hard ones or will be subject to excessive wear. It is important to consider the specific tool and type of work performed. What type of metal drill is needed, how to choose it for the material being processed, and what other nuances need to be taken into account - we’ll tell you about everything in order.
How to make a 90 degree hole in wood using a drill
Knowledge and practical application of drilling techniques is basic in the field of repair. It is necessary to know not only the general rules, but also the nuances when working with various materials, for example, metal, wood, brick, tile and others.
When working with a drill, you must follow safety precautions
Shank
The part of the drill bit that is held in the chuck of a drill or drill press. Depending on its shape, metal drills are installed on tools with a certain type of fastening equipment. Let's list the most common ones.
- Cylindrical is the most common type of shank. The drill is used primarily in key chucks. It does not have good torque transmission, as it can slip in the chuck, but it is less susceptible to jamming.
- Hexagonal - fixed in a three-jaw chuck or 1/4-inch mounting hole. Due to the rigid positioning of all faces of the shank in the grooves, confident retention is ensured and the drill does not rotate during rotation.
- Conical - has the shape of a truncated cone, usually used in drilling machines. It is selected into the holder according to diameter, length and structural features. This can be found out from the labeling. For example, KM is a Morse cone; next to the letter designation there should be a number from 0 to 7, which determines the diameter of the shank. For better retention in the spindle, such drills may have threads or claws on the shank.
Features of drill extensions
In the process of construction work, the necessary tools are drills and drills. Currently, there are a large number of different models of nozzles depending on the size and type of shank. Some samples may not be suitable for all drills. In such cases, special extension cords are often used to connect to the unit socket. Today we will talk about the features of such additional tools and what types they can be.
Material of manufacture
A cutting tool will easily make a hole in a metal workpiece if its structure is harder than the structure of the metal being processed. In this regard, drills are made from various materials and are subjected to special processing. Most of the equipment is made of high-speed steel , as indicated in the marking by the letter P or HSS for imported products. The additional content of other metals is marked separately, for example, K6 indicates the content of cobalt , M3 - molybdenum . This gives the drill strength and allows it to work with hard materials. For example, with a cobalt content of 5%, the service life of the cutting tool increases by 3 times . This drill can work with workpieces made of alloy and stainless steel with a tensile strength of up to 1000 N/sq.mm. When choosing a drill for metal, it is important to take into account the presence of a protective coating, which also gives the product special performance characteristics. Titanium nitride coating (HSS-TiN) reduces heating of the working part during operation - this equipment can be used to drill cast iron, alloyed and non-alloyed steel with a strength of up to 1100 N/sq.mm. These drills are easily recognized by their golden color. A three-layer coating of titanium, aluminum, nitride (HSS-TiAlN) provides even greater wear resistance, and the service life of the equipment is increased by 5 times. Such drills are less susceptible to wear from friction and retain their quality even when heated to 700 °C. Suitable for the same materials as titanium nitride coated drills. The cutting tool may also undergo special treatment. Steam-oxidized drills are used for working with non-ferrous metals, alloy and carbon steel with a strength of up to 800 N/sq.mm. They can be recognized by their black color. Products that have undergone roller rolling and heat treatment have low durability, so they are used for working with mild steels. Ground drills have good durability and small radial runout, excellent for alloyed and non-alloyed steel with a strength of up to 900 N/sq.mm, as well as cast iron. Carbide cutting tools , which can withstand heavy loads and heat, have the best characteristics in terms of hardness and wear resistance Suitable for processing heat-resistant and stainless steels, as well as titanium alloys.
Use of lubricants
When drilling through hardened steel, serious friction occurs. That is why it is recommended to purchase and use various lubricants. Among the features of this processing method, we note the following points:
- First, the drilling area is processed. A small amount of lubricant is applied to the surface where the hole will be located.
- Oil is added to the cutting edge. To process hardened steel, a small amount of the substance is required, but it must be added from time to time, since it scatters when the tool rotates.
- During work, it is recommended to take breaks to cool the cutting surface and the surface being processed.
Lubricating steel with special oil
Special oil not only simplifies drilling, but also increases the service life of the tool used.
This is because oil can reduce the temperature of the cutting edge.
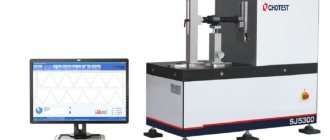
Accuracy
All metal drills are manufactured according to three accuracy classes. Products of normal accuracy include equipment marked B and B1, and high-precision products - A1. High-precision drills are necessary for delicate work, when it is important to make a hole with an accuracy of a fraction of a millimeter. They allow you to make holes of 10 - 13 quality, B1 drills - 14 quality, B - 15 quality. Products marked A1 are more expensive, so their purchase will be rational only when it is necessary to comply with production tolerances. To make holes without strict accuracy requirements, you can use conventional equipment.
Subtleties of drilling for various materials
The technique of drilling any material has its own subtleties that the repairman must take into account.
Each material has its own drilling technique
Vertical or horizontal hole
When starting to make a hole, it is necessary to firmly secure the canvas. This can be done using a workbench or a vice. You can also use a dowel.
The drilling process is as follows:
- The drill is switched to drilling mode.
- Set the speed. In this case, it is worth remembering the main rule: the smaller the diameter of the nozzle, the higher the speed should be.
- If a through hole is needed, then a wooden block is placed under the material.
- If it is necessary to make a blind hole, then the parameters of its depth and diameter must correspond to the screw for screwing in.
- The tool must only be used at right angles. After the end is fixed in the block, the drill must be switched to maximum power.
To make a horizontal hole, you only need to move the workpiece.
Hole perpendicular to surface or at an angle
To make a perpendicular hole, you will need a protractor or square. If the work is done at home, it is recommended to place a regular CD disc under the product, so that the reflection of the disc equipment coincides with the piece that is visible. In this case, the perpendicularity of the hole will be maintained.
Those who are interested in how to drill a hole at 90 degrees with a drill should choose a vice as a means of fixation. The part is pressed tightly so that the drill can be screwed in perpendicularly.
How to drill metal
In this case, it is important to choose the right drill bits. Conventional ones can be used for metals that are not too hard, such as copper, but for stainless steel you should choose products made from titanium carbide.
Important! Even the most experienced workers make the most common mistake when drilling metal - they perform the work at too many revolutions. In reality, it is better to choose medium speed.
There are also a few other key points to consider:
- before drilling a thin iron plate, it is fixed between two pieces of wood;
- to facilitate the drilling process and cool the drills, it is recommended to use lubricating oil;
- if it is necessary to make a hole in a metal pipe, it must be firmly secured and a wooden beam placed inside so that the pipe does not flatten during operation.
For drilling metal, it is best to choose a diamond drill bit.
How to drill concrete
In everyday life, every man encounters concrete drilling when it is necessary to hang a picture or hanging shelves on the walls to decorate the house. Of course, it is best to choose a hammer drill or impact drill in this case, however, if the wall thickness is no more than 12 cm, then you can use a regular drill.
For the job to be successful, you should consider these tips:
- before starting work, you need to make sure that there are no communication systems at the drilling site;
- you should choose parts made of hard metals or alloys.
- If during drilling you encounter dense areas of concrete, it is best to break them with a punch.
How to drill wood
Wood is the most pliable material that is easy to sand and lends itself well to drilling. To work with a drill, you will need special attachments.
Many repairmen are interested in the question of how to drill a perpendicular hole in wood with a drill. It should be noted that the process is not complicated. Initially, you need to make markings with a pencil to determine the points for drilling. Then, turn the drill on at full power and drill a hole.
Wood is the easiest material to drill
How to make a groove in a wooden board
To make a groove in wood, you can choose a simple scheme:
- around the wood drill, mark the holes so that their middle is at a distance of approximately ½ of the diameter of the drill;
- then drill the marked holes with a depth of no more than 3 mm;
- all holes are deepened;
- use a file to remove all irregularities.
Important! Knowing how to drill a hole straight in wood with a drill and choosing the right drill bit, the job can be completed in a matter of minutes.
How to drill a brick
To drill into a brick wall, proceed as follows:
- perform marking;
- Place an old drill or core on the marked points, hit it with a hammer several times to form a depression;
- place a drill in the drill and turn it on impact mode;
- Drill holes using smooth movements.
Drilling tiles
When working with tiles, the impact mode of the drill should be used with caution. It is best to turn it off before work, otherwise chips will form on the tiles.
If you need to make a small hole, then you should choose a special drill for working with tiles and glass. They drill the hole until it stops. Next, change the equipment to a concrete drill and continue working.
It is impossible to drill tiles using the impact mode of the drill.
Dimensions
When purchasing a metal drill, take into account its length and diameter. Manufacturers usually indicate two lengths - the total length and the length of the working part. Depending on the second value, the drilling depth is determined. For example, a tool with a length of 280 mm has a working length of 160 mm. The diameter of the working part determines the size of the hole that can be obtained. For example, for twist drills this parameter can be 6, 8, 10 mm and, as a rule, corresponds to the diameter of the shank. For countersinks, the diameter of the widest part is indicated, for example, 12.4 or 20.5 mm, while the diameter of the shank may be smaller.
Homemade feather drills for wood
Hello, dear visitors of the site “Visiting Samodelkin”. Today I want to talk about how easy it is to make feather drills for wood.
The other day I needed to drill large diameter holes in chipboard, namely 40 and 20 mm. And then it turned out that I didn’t have the necessary drills.
No. Of course I have many different feather drills. Both regular ones and some fake ones. But, the trouble is that I was now working at home in the basement, and my drills are on the other side of the city, namely, at the construction site where I last used them.
Which manufacturers can you trust?
So, metal drills: which are better - branded or nameless? If you want to buy reliable equipment that will last a long time and will not break, undoubtedly, preference should be given to branded products. This may be equipment from well-known power tool manufacturers. For example, Bosch offers drills from the Standardline and Topline , the latter featuring improved performance characteristics and a long service life. M-Force cutting tools, which are characterized by high cutting speed, are popular with the manufacturer Makita . Particular attention should be paid to the Extreme 2 from Dewalt. They drill faster and more accurately than others, since the process begins immediately when the tip contacts the metal. The wedge-shaped structure of the drill guarantees high resistance to damage. Thanks to the longitudinal edges on the shank, it does not rotate in the chuck, which allows for better transmission of torque. Among domestic manufacturers, metal drills are offered by Interskol and Zubr. You can purchase equipment from manufacturers of metal-cutting tools, such as GRIFF, PRACTIKA, ATTACK. Such products are of good quality, and their price is noticeably lower than equipment from well-known brands.
Our catalog contains more than 3,000 items of metal drills, so it’s easy to find what you need for the job. Use the convenient selection form in the section - set the necessary parameters of the products, and the system will give you suitable options. You can buy products individually and in sets. Place your order now!
General principles of drilling
Drilling holes is the most common activity of a repairman, so it is important to know a few basic rules that will allow you to avoid mistakes when carrying out repair work:
- Choosing the right tools. There are many drill bits available in stores that specialize in selling repair items. Each is used for a specific type of material, so you should not choose a brick drill for drilling wood.
- Definition of markup. The markings are indicated on the material using a marker. To prevent the drill from sliding on the material, paper tape should be placed under the marker.
- Determining the optimal drilling speed. In this case, both the material and the diameter of the blade matter. If drills with a diameter of no more than 3 mm are used, then all manipulations should be carried out at low speeds.
Important! The drill should not be skewed in any direction.
Repair work should be carried out with gloves
How to make a mega drill for a drill with your own hands
A drill is a universal tool; it comes with a large number of attachments of different sizes. There are also bits for drilling large holes in various materials. But here’s the problem: the drilling depth in them is limited by the size of the nozzle. But what if you need to make not just a large, but also a deep hole, for example, at least 30 centimeters deep? Finding such a drill is almost impossible. At best, you will have to select a hole using regular long drills, and the result in this case will be far from perfect. But not everything is so hopeless! Take advantage of the experience of the YouTube master under the pseudonym GOOD_WOOD.
What are they?
Extension cords can be of many different types. The following options for such construction accessories can be distinguished.
Most often, these extension cords are made of durable carbon steel.
A separate group includes special flexible extensions for drills. Often the main part is made of soft black plastic. Sometimes this material is made with a slight relief. At the ends of the plastic there are metal tips, including a hexagonal shank.
Today you can find entire sets in which, in addition to the plastic extension itself, there is also a set of several different attachments - each of them is designed for a specific type of drill. If necessary, they can be easily replaced.
Such options are considered more practical and easy to use compared to rigid structures that are sold individually.
You can also select the SDS extender separately. It has a cylindrical shape. At one end of the product there is a thin spiral-shaped part, at the other end there is a hexagonal thin shank. This model is only used in conjunction with impact drilling tools with crowns. Such devices can be suitable for drilling brick surfaces, natural or artificial stone, and concrete surfaces. The drilling depth with such a construction accessory can be approximately 300 millimeters.
What is needed to make a megadrill
The first thing you need to select for making a homemade tool is a pipe of a suitable diameter.
PHOTO: YouTube.com To make the tool, you also need a metal rod that is fixed in the drill chuck. It could be a piece of metal reinforcement
PHOTO: YouTube.com The last thing you need to find is a piece of metal to make the plug. The author used the remainder of a square pipe for this. From it he cut a plug to the size of the pipe
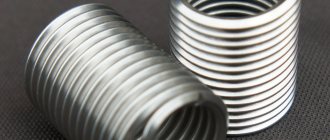
Homemade drill made from stainless steel and a metal pin
There are two ways to make a feather drill. For the first option, you need stainless steel (about 2 mm thick), a metal pin - 8-10 mm in diameter and an M6 bolt.
List of necessary actions to obtain the tool:
- Draw a diagram of the future drill on a small piece of sheet metal.
- Use an angle grinder to cut the workpiece.
- Cut off a piece of the required size from the metal pin.
- Place the workpiece against the rod and determine the approximate depth of the slot.
- Check whether the future pen fits into the pin hole.
- On the surface of the metal workpiece, in the middle, use a felt-tip pen to draw the width of the rod. Make holes along these marks.
- Attach the feather to the tip of the rod using an M6 bolt (you can use a thinner one). To do this, use a drill to make a recess in the pin, which will be located at right angles to the slot. Drill the top of the rod to the beginning of the hole. I made a bolt thread in the lower half. Insert the feather into the pin and measure the middle, then remove it from the rod, and at this point use a drill to cut a hole 6 mm in diameter.
- Sharpen the resulting drill with sandpaper or a grinder. Use what you have on hand.
Making the tool will take no more than 30 minutes.
How to use a homemade drill
There are no difficulties in controlling a large drill. Just fix it in the drill chuck and work.
PHOTO: YouTube.com This drill can easily cut through wood, even large trunks
PHOTO: YouTube.com The holes are large and deep, the drill is easily removed and does not jam. You can drill a very deep hole if you constantly clear the homemade drill from any material that has gotten inside.
PHOTO: YouTube.com And for quick cleaning of the drill, those two extra holes in the plug are just what you need. Use another rod to push the stuck material out of the pipe
You can use such a large drill for different purposes. There are no difficulties in its manufacture, except that you just need the ability to use a welding machine. The power reserve of such a drill is much greater than a standard factory core bit, which takes a maximum of 5 cm at a time. The only disadvantage of this drill, like other core drills, is the inability to drill blind holes in hard materials.
If you harden this drill, you can make holes in concrete, for example, for water pipes. For hardening, it is better to use a spring steel pipe. It’s not easy to find one, but the results when working with concrete will be impressive.
If you need to make a blind hole, then there is another option for a homemade feather drill:
What it is?
A drill extension is a small, elongated structure that allows you to extend the product and make deeper through holes in various materials. In this case, any extension should be slightly smaller in diameter compared to the drill itself. In addition, when working with such an additional accessory, you should carefully adjust the cutting modes when drilling.
Today, such extensions are produced separately, designed for certain types of drills (feather models, for impact drilling edges). They may differ significantly from each other in some design features, which must be taken into account when choosing the appropriate option. These drill bit accessories are most often made from a quality steel base. But there are also some models made from special types of plastic. On average, the total length of these products can be approximately 140-155 millimeters.
Additional parts for the drill are quite easy to attach. They usually have hex shanks, which can be secured in the socket of the electrical unit with one movement and can be easily removed. Many models provide the ability to quickly replace such equipment.
How to drill metal, drill review, tips
Cylindrical metal drills
The diameter of drills can be completely different, ranging from 0.5mm to huge conical drills over 80mm. The drill pitch is usually 0.1 mm, sometimes drills with a pitch of 0.05 are found. This means that it is possible to drill exactly the hole diameter that you need.
An ordinary standard drill most often has a chuck that clamps drills from 1.5 to 13 mm, less often up to 16 mm, sometimes up to 10 mm (low-power). If you need to clamp a drill of a smaller diameter, you need to purchase a special chuck for small diameters. Very rarely does such a need arise in everyday life; most often, holes of this diameter are needed when drilling and soldering microcircuits. If you need a hole larger than 13mm, you will need a drill with a counterbored shank, i.e. The diameter of the shank of such a drill is smaller than the diameter of the cutting part itself. But the drill will also need decent power (from 800 W); turning such drills is not easy for a motor. And it is advisable for the drill chuck to have a key and not a quick-release chuck, since the clamp is noticeably more powerful. An article about choosing a drill.
Holes of large diameters can only be made on special machines; such drills have a conical shank, not a cylindrical shank like ordinary ones. The shank has 5 taper sizes. And the larger the diameter of the drill, the larger the cone (shank). For example, drills from 6-10mm have the first cone, 12-22mm - the second, the largest - the fifth. There are also drills that have the ability to drill with conical drills; for example, they produce such a model. It is quite possible to drill a hole up to 22 mm; the cone of such a drill will be the second. This model is also equipped with a chuck for conventional cylindrical drills, its power is 1200 W.
Conical drill bits for metal
How to drill metal correctly? This must be done at low speeds (up to 1000/min), otherwise the drills will quickly roll (dull). You need to start carefully; you can first use a center punch so that the drill does not move at the beginning of drilling.
About choosing a quality ax for home and construction sites.
The standard drill length is sometimes not enough, which is why manufacturers produce extended series. For example: a standard 6mm drill is 90mm long, while an extended drill is 140mm. This increases the price, and very significantly, by about 3 times, although the length is less than 2 times.
Quality and grades of drill steels: most often on sale there are drills made of steel R6M5, less often R18, these are less dull, but the cost is higher, sometimes with cobalt, these have the letter “K” in the marking, for example: R6M5K5. There are still drills made in the USSR with such characteristics that have a quality mark on the shank.
Drill with cobalt photo
Sometimes, to perform particularly precise work, appropriate drills are required with minimal error. If ordinary ones can have an error of up to 0.05 mm, then with high-precision ones this figure is reduced to a minimum. For home purposes this is not at all necessary. There is such a need in high-precision production.
Left-handed drills (twisted in the other direction) are necessary to drill out a broken bolt inside the workpiece. Very rarely used, the price is about twice as high.
There is also a type called a step drill for metal. It is very convenient for drilling holes of various diameters from 4-36mm in sheet metal. Made from high speed steel. It has a herringbone shape, with a pitch of 2mm. The maximum thickness of metal that can be drilled with such a drill is 5mm (recommended by manufacturers). Judging by the reviews, after 3mm it is quite difficult. Sometimes it has a cobalt coating, which improves wear resistance and prevents corrosion. For example, they produce “Fit”.
Step drill for metal
Drill for thread. If you need to drill a hole for tapping, you need to know a little diagram of how to do it. For example, for an M6 thread (6mm): you will need a 5mm drill. Why this size? Each thread has its own pitch (the distance between the threads). The M6 thread has pitch 1. You need to subtract the pitch from the resulting thread. Those. from 6-1=5. Thread pitch table: M3 – 0.5 M4 – 0.7 M5 – 0.8 M6 – 1 M7 – 1 M8 – 1.25 M9 – 1.25 M10 – 1.5 M12 – 1.75 M14 – 2 M16 – 2 M18 – 2.5 M20 – 2.5 M22 – 2.5 M24 – 3 M30 – 3.5 For M20 thread it turns out like this: 20-2.5 = 17.5 You will need a 17.5 drill. These are the main thread steps; the step may be different from the main one. The carving is also small. An article about how to cut threads correctly.
How to lengthen a metal drill with your own hands
To lengthen a metal drill yourself, use one of three methods.
Simple welding
For this drill extension method you will need:
a steel cylindrical rod of the same diameter of the required length;
a piece of metal corner;
Make chamfers at the end of the drill and one of the ends of the rod.
Place the tool and rod in the metal corner and align them with each other.
Gradually turning the workpieces, weld the drill to the metal rod.
Process the seam until all irregularities are removed.
Shank extension. Method 1
For this drill extension technology, you will need a rod whose diameter is 2–3 mm less than the diameter of the shank. The general principle is this.
A hole is made in the shank of the drill for an internal thread.
Cut it with a tap.
An external thread is cut on the metal rod.
The parts are twisted together.
For greater reliability, the joint can be welded and cleaned.
Shank extension. Method 2
This method of extending the drill will require a rod whose diameter is larger than the diameter of the shank. To work you will need a lathe. The technology looks like this.
On a lathe, the diameter of the shank part is slightly reduced.
A hole is drilled in the rod to insert the tool.
The shank is fixed in the rod and the joint is welded.
On a lathe, the diameters of the old drill and the extended shank are equalized.
In this article we will talk about the features of using machines and the above-mentioned devices.
Greetings, dear readers! In this article we will talk in detail about thread rolling rollers.
In this article we will talk in detail about technologies for processing blanks and products made of hardened metals
We will pay special attention to the following main issues
In this article we will tell you what standard diameters and sizes the most common spiral and core drills for metal have.
The rotation speed of the metal cutter and other cutting parameters are set individually for each operation.
Mechanics and other craftsmen are often faced with the need to cut a circle in metal. This can be done in various ways. We will talk about them in this article.
In this article we will talk about all the features of metal turning.
In this article we will tell you everything about metal burrs.
In this article we will talk about the types of boring cutters, their purpose and design features.
A turning cutter is the main tool that is used for processing workpieces on lathes. It is he who contacts the part and gives it the required shape. In this article we will talk in as much detail as possible about the design features and classification of cutters. After studying the information, you will be able to choose a tool for a particular operation without any problems.
How to drill holes for hinges? Forstner, of course!
Many home craftsmen have encountered a problem when they need to drill a hole of a fairly large diameter in a tree, but the most important thing is that the edges of the hole are even, smooth and neat. How to do it?
You probably know that there are hole saws for large diameter holes, but their cut edges leave much to be desired. Therefore, if you are faced with such a problem, then your choice is a Forstner drill (Photo):
- Even and smooth holes
- Convenient to “drill” into wood
- Quite long service life
- Wide range of sizes (up to 60 mm in diameter)
- It is possible to “extend” the drill using special extensions
- Not particularly expensive (up to 100-150 rubles for the largest diameter)
It is designed to be used with a drill. The tip is widened, the drill itself looks more like a milling cutter. Using it you can drill holes with straight and smooth edges. Most often, this is necessary in cases where the hole will be “in plain sight” and not covered by anything. Very often, such drills are used when you need to drill grooves (blind holes) for door hinges (which are found in all modern furniture).
The main advantage is that when working, you get “blind” holes, because the drill tip has practically no centering point (just a couple of millimeters), and the bottom of the hole turns out to be flat. For example, one of my friends has long wanted to make a stand for glasses (with special recesses for them). I don’t know why he needed this, he said so that the glasses wouldn’t fall or roll around. Something like a cup holder. And with the help of a Forstner drill, he made beautiful, even indentations in the wood.
The standard size range starts from 10 mm. Of course, such small drills are rarely used; larger diameters are most often used. For example, to drill “blind” holes in wood/chipboard for inserting hinges, you need to use a diameter of 35 mm. There are also very large ones on sale (50, 55, 60 mm), although quite rarely, this is most likely due to the fact that people prefer to drill such holes with hole saws.
The length of the drill is small, 10 centimeters, so sometimes it becomes necessary to lengthen it. There are extensions specifically for this purpose, most often 300 mm. So if you need to drill a thick, deep hole (for example, to lay a 1″ pipe through a wooden wall), then before you run out to buy a long screw drill (which, if large in diameter, is very expensive), consider buying a drill and an extension, so It will be cheaper, and the work will be done the same way.
A short and clear video of how this tool works:
I would also like to note that drills with pobedite tips are available for sale specifically for working on chipboard (laminated wood). The tip is made of hard metal, which practically does not wear out and always remains sharp. Such a drill practically does not become dull and will serve for a long time. Of course, its cost will be higher than the price of a conventional drill without tipped carbide.
Sometimes people ask: “Which is better, a Forstner drill or a feather drill?” If you consider that the price of the first one is almost 2 times higher, then of course it is better, smoother cut edges, a beautiful, even hole. On the other hand, why overpay when you need to make a couple of holes? In such cases, use cheaper feather.
Useful information about wood chips - you can look at my article, you will find something useful for yourself.
Well, when you need to drill a hole with a flat bottom, you can’t use anything other than Forstner. So buy drills based on the task assigned to it and there is no need to overpay.
Useful drilling techniques
A variety of technologies can be used to work with hardened steel. The most common technologies are characterized by the following features:
- Surface treatment with acid. This technology is characterized by long-term use, since it takes quite a lot of time to reduce the surface hardness. Sulfuric, perchloric or other acid can be used for etching. The procedure involves creating a lip that will contain the substance used in the cutting zone. After prolonged exposure, the metal becomes softer, and it will be possible to drill using the conventional version.
- You can use a welding machine to achieve your goal. When exposed to high temperatures, the metal becomes softer, which greatly simplifies the procedure.
- Most often, a special drill is used. There are versions on sale that can be used for processing hardened steel. In their manufacture, metal with increased resistance to wear and high temperatures is used. However, the complexity of manufacturing and some other points determine that the cost of a special tool is quite high.
Drill selection
Twist drills, which are represented by a vertical rod with two grooves, have become quite widespread. Due to the specific arrangement of the grooves, a cutting edge is formed. Among the features of the choice, we note the following points:
- The pobedite drill bit has become quite widespread. It can be used to work with various hardened alloys. However, a surface with too high hardness cannot be processed with such a tool.
- The choice is also made based on diameter. It is worth considering that it is quite difficult to obtain a large diameter hole. The larger diameter version is much more expensive due to the use of a large amount of material in its manufacture.
- Attention is also paid to the sharpening angle, the purpose of the product and the type of material used in manufacturing. For example, cobalt versions are characterized by higher resistance to high temperatures.
- It is recommended to pay attention to products exclusively from well-known manufacturers. This is due to the fact that Chinese versions are manufactured using low-quality materials. However, such an offer is much cheaper and can be used for short-term or one-time work.
- When choosing a drill, you can be guided by the markings. It can be used to determine which materials were used in production. The diameter of the hole that can be obtained when using the tool is also indicated.
Drill for hardened steel
In a specialized store you can find almost everything you need to carry out the work. However, the fairly high cost of the product and some other factors determine that some decide to make a drill themselves from scrap materials. Similar work can be done if you have the required tools.