Living in a private house requires the presence of an autonomous sewer system. It consists of internal wiring, external piping and a storage tank (or VOC). For residents of holiday villages or houses of temporary (seasonal) residence, such a method of collecting and partially processing waste as a cesspool from a barrel remains relevant.
We will try to find out how effective it is to use a storage device and how to create a cesspool with your own hands.
- Construction of pits and trenches
Characteristics of a bathroom using a container
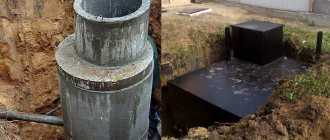
Pit for a toilet from a barrel
One of the most successful design schemes for a cesspool for a toilet in a country house is one where a container without a bottom is installed in the pit. The advantage of this option is that there is no need to pump out the accumulated liquid, since it is absorbed into the soil. Due to the small amount of waste, they have time to penetrate into the ground. Moreover, their volume should not exceed 1 m3 per day. If you neglect this recommendation, waste will accumulate in the cesspool from the container. This will lead to the formation of an unpleasant odor in the area.
Container filled with crushed stone
This option for arranging a cesspool is not suitable for dachas where the groundwater level is high. In this case, all sewage will penetrate into the soil, where it will contaminate the drinking source.
Therefore, the best way out of this situation is to install a volumetric sealed barrel. It will act as a septic tank.
In this case, it is necessary to regularly pump out the liquid using special equipment. To avoid doing this too often, you need to install a large capacity container.
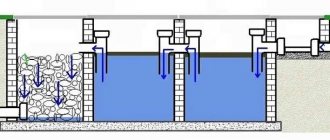
To reduce the size of the septic tank, in this case it is recommended to install a complex structure.
It involves installing two or even three containers where waste will accumulate. Moreover, the last of them can be made without a bottom.
In this case, it is necessary to additionally use aerobic or anaerobic strains of microorganisms. They are added to the first container, where they break down biological waste. As a result, solid particles settle to the bottom. The already purified liquid is transferred to the next container. It, passing through an additional filtration layer of sand, enters the soil without polluting it.
Also, when choosing a scheme for arranging a cesspool, you need to choose the right material from which the barrel will be made. It is best to use metal or plastic containers. Each of these types of materials has its own advantages and disadvantages that must be taken into account before the installation process.
What points should be considered during construction?
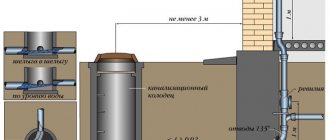
- According to SNIP, the location of the barrel must be at least 5 m away from the house and at least 2 m away from the fence.
- The depth of the hole under the container should not exceed three meters, because the hose of the sewer machine is seven meters long. Four meters will be on the surface and only three will sink into the barrel. A deeper placement will lead to the fact that the vacuum cleaner will be able to pump out only the upper part of the drains, because the hose simply will not reach the bottom.
- Before plunging the barrel into the hole, you need to turn it around so that the hatch is next to the path or entrance to the site. In a word, provide the sewer truck with free access to the hatch.
If the hatch closes the barrel too tightly, it is necessary to provide a ventilation pipe with a diameter of 100 mm. They take it out about half a meter above ground level. This precaution is necessary to remove methane that appears during the decomposition reaction of sewage. In completely sealed conditions, the gas may explode.
When installing, place the barrel with a slight slope towards the hatch to make it easier to pump out sewage
- It is better to select a barrel designed for a large volume of wastewater. Light weight containers run the risk of being pushed out by soil, especially heaving soil. This kind of trouble can only be avoided by placing the barrel on a hard surface (concrete pad) and securing it carefully.
Metal containers - advantages and disadvantages
Metal containers that you can install yourself have a number of significant disadvantages that directly affect the durability of the constructed structure. These include:
Metal barrel
- low corrosion resistance of the material. After 3-4 years, such a container becomes unsuitable for use, since it is impossible to repair it;
- in most cases, this option for arranging a cesspool can be expensive. Metal containers are quite expensive;
- complexity of installation. If you use a large container with massive walls, it is quite difficult to install it without the help of special equipment;
- You can only use containers whose wall thickness reaches 15-16 mm. They are often very difficult to find.
The advantages of this material include their resistance to frequent temperature changes. It is not afraid of severe frosts when deep layers of soil freeze. Also, such a container is heavy, which will more securely fix it in the ground.
Where can I find a suitable barrel?
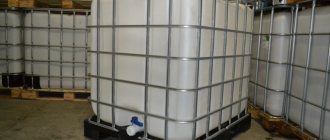
The easiest option is to buy a ready-made one made of plastic.
It already contains all the necessary elements for a septic tank: a hatch, a ventilation hole, etc. In addition, the plastic is not subject to rotting or corrosion. If the water consumption is too high, it is recommended to install several barrels, connecting them together.
Ready-made plastic containers vary in cubic capacity, so finding the right size is easy
If funds do not allow you to “fork out” for a finished container, then you can get by with a 200-liter metal barrel. But be prepared that under the conditions of biological reactions, iron will quickly fail, and you will have to look for a new container. In addition, with active use of water, such a pit fills up instantly, and at least once a week you will have to pump it out.
The best option would be to find a ready-made container from a decommissioned vehicle. As a rule, barrels that were used on railways or in cars for transporting chemical liquids, gasoline, etc. have a wall thickness of 16 mm.
Such a cesspool can survive several generations of its owners.
Plastic containers
When constructing a cesspool with your own hands, plastic is considered a better material than metal.
It has many advantages:
Plastic barrel
- long service life. Plastic can be used for arranging a cesspool for a toilet in a country house for 40 years;
- due to their light weight, these containers are very easy to install without the help of outsiders or special equipment;
- plastic is resistant to the harmful effects of biological fluids or special chemical compounds that are used to process waste;
- prevents wastewater from penetrating through the walls of the container into the soil;
- the cost of such a container is quite low;
- The plastic is very durable and will not collapse under pressure from soil or runoff.
The disadvantages of this material include its instability to low temperatures. To fix this, the plastic walls of the container must be insulated with a layer of mineral wool. Also, a plastic barrel can float due to its light weight.
To prevent this, its walls must be securely fixed in the ground.
Options for barrels for cesspools
The buyer can choose from two types of barrels – iron and polymer.
Pros and cons of an iron barrel
Metal barrels have high strength and impressive weight. It is worth considering that metal does not tolerate constant moisture. Without sufficient treatment, corrosion eats away a steel septic tank in 3-4 years. For its installation it is necessary to use lifting equipment.
To avoid metal rotting (corrosion), before installing an iron barrel for sewage, it is worth performing a number of waterproofing works:
- For external use, polymer coating waterproofing can be used. The good thing about it is that, thanks to its plasticity, it can be applied to any surface shape.
- The inner surface should be treated with liquid applied materials. In some options, summer residents use nitro paint, but this method is inferior to processing with factory materials.
Among other waterproofing methods, domestic manufacturers offer injection materials. These are two- or three-component compositions based on polyurethane resin. Their advantages include good adhesion (adhesion) of materials to the surface of the barrel, good water-repellent characteristics and the strength of the material itself. The disadvantages are the high toxicity of the components.
To treat a barrel with elastic injection material, it is necessary to take care of additional protection.
For more competent handling of resins, it is advisable to have special skills in handling such insulation.
Advantages of a polymer barrel
Plastic barrels for drainage pits are easy to use. They are already equipped with a ventilation hole, a convenient manhole cover, holes for installing PVC sewer pipes and much more. In addition, unlike iron ones, they are light in weight and do not require additional equipment during installation.
The barrel material is not exposed to external influences from acids and alkalis of soil water, which solves the problem of its replacement. A huge number of shapes and volumes by displacement allows you to choose the PVC sewer container necessary for your needs. Its inner surface is resistant to aggressive environments.
When laying out a project for a sealed drainage pit, it is worth considering that a closed system is more profitable, since wastewater does not enter the ground and does not cause environmental pollution.
Accumulating wastewater can create underground mudflow pillows and destroy the foundations of nearby buildings. In this case, the only disadvantage of a closed sewer pit will be the constant pumping out of slurry. But if you take into account all the advantages, it’s not difficult to come to terms with this fact.
How to choose the right place to install a bathroom?
Cesspool from a barrel
When choosing a place to install a toilet with your own hands in the country, you must adhere to the following rules:
- the cesspool must be located at a distance of at least 10 m from residential buildings. This is due to the fact that biological waste, penetrating into the soil, can cause the formation of fungus and an unpleasant odor inside the building. This also negatively affects the strength of the foundation, which is located in an overly humid environment;
- do not place it in close proximity to other outbuildings for non-residential purposes. This can also cause the formation of high humidity in the room, the formation of fungus, mold and unpleasant odors;
Location of the cesspool on the site - taking into account the prevailing wind directions on the site, place the outdoor bathroom on the leeward side;
- the location of the cesspool with a container should be located at a distance of 10 m from the water supply system, and at a distance of 20 m from the well with drinking water;
- the distance from the bathroom with a cesspool from the tank to the fence that borders the area should be at least 1 m.
Design and preparation of tools
It is necessary to plan the volume of the sump in accordance with sanitary standards. For a family of 5 people, the volume of the receiver will be 4000-5000 cubic meters. m. According to sanitary standards, the volume of the cesspool must exceed the amount of liquid consumed by all family members in 3 days. In this case, water consumption per person is set at 200 liters per day, including cooking and hygiene procedures.
To build a cesspool from a barrel you will need:
- storage tank;
- pipes and connecting fittings, sealant;
- shovel, pickaxe, winch, bucket and wheelbarrow for moving soil;
- broken bricks, gravel, crushed stone, sand for backfilling;
- cement and a container for mixing it;
- Bulgarian;
- geotextile for wrapping joints.
During installation, you can use ready-made drawings and projects, or prepare your own diagram, taking into account individual parameters, dimensions of structures, and site.
The first stage is the arrangement of a cesspool from a container
When constructing an outdoor toilet from a plastic barrel with your own hands, you must first dig a pit of suitable dimensions. In this case, the use of a galvanized metal container is also allowed. But you need to take into account that it has a much shorter service life.
The pit for a toilet that you build yourself should have a depth that is 25-30 cm greater than the height of the container. This is necessary to create a filtration field, which will help clean the waste, and clean liquid without harmful impurities will be absorbed into the soil. Also, this pit should be 10-20 cm wider than the tank. This gap is needed to fix the tank inside the pit.
Cesspool for a round container
When the hole is dug, fill its bottom with a layer of fine crushed stone 20 cm thick. Lay sand on top by another 10-15 cm. In this case, each layer must be carefully compacted so that no voids form. After this, you need to install a barrel without a bottom so that its upper edge rises 7-8 cm above the ground surface. In the future, this will greatly facilitate dismantling the container.
You need to fill the sides of the walls with crushed stone. It should reach 2/3 of the height of the container. Place a layer of clay on top to the ground level. When the hole is completely filled, cover the surface of the soil with fine gravel. Also, add an additional layer of sand on top, reaching the level of the top edge of the container.
Metal barrels
Metal sewer barrel
Such containers have been used quite widely for a number of years. The main reason was that metal barrels for sewage, as well as tanks of various sizes, were quite easy to purchase at residual value during the collapse of many industrial enterprises.
At the present stage, purchasing a metal container of significant volume is quite problematic and expensive, so most often standard household 200-250 liter metal barrels are used to install small drainage pits.
Due to the fact that the volume of such a sewerage structure will be limited, the feasibility of using such material exists only when constructing a pit on a summer cottage, where permanent residence is not expected and the volume of wastewater will be insignificant.
These barrels are highly durable and can withstand significant mechanical loads.
But it is worth considering that metal structures also have a number of disadvantages that significantly limit their scope of application:
Metal barrel
- Low resistance to corrosion and rotting. Most household barrels are made of thin sheet metal, which, together with the aggressive properties of sewage and groundwater, significantly reduces the working life of the sewer storage device.
- The limited volume will lead to the need to constantly remove collected wastewater from the pit. At the same time, the issue of their disposal will definitely arise; it is inappropriate to call sewage disposal equipment for 200 liters.
By and large, metal household barrels can be used as casing for a small drainage well. In this case, you can even dock 2-3 barrels, which will increase the volume of the device. The metal will prevent the pit walls from crumbling, and the removed bottom and staggered holes will ensure moisture filtration.
Of course, using a metal tank will allow you to build a septic tank that meets all the requirements. Some manufacturers produce similar installations, but such a device will have significant weight, which entails the need to use lifting equipment during installation.
Pouring the foundation
In parallel with installing a container without a bottom with your own hands, or after that, you need to start building a foundation for the future toilet. This construction phase consists of the following processes:
- Using a garden drill, dig a hole in the corners of the future structure. Its depth should be 06-0.8 m, and its diameter should be 0.2 m. Holes should be made at the corners of the bathroom.
- Insert a pipe into the hole, which will act as formwork. It should rise 15-20 cm above the ground surface.
- Using a building level, you need to check the correct installation of the formwork, which will be the key to the successful construction of the entire structure.
Installation of formwork for foundation pillars - One rod of reinforcement must be inserted inside the recess to strengthen the foundation structure.
- Prepare the concrete mixture. To do this, use cement, sand and gravel in a ratio of 1:3:5.
- Pour this mixture into the recesses and wait a few days for the concrete to reach sufficient strength.
- While the concrete is still wet, install a metal pin in the middle. It should rise 10 cm above the surface of the foundation, and its other part should be deepened into the concrete mixture by 10-12 cm.
Construction of the above-ground part of the street toilet
After constructing the foundation for the outdoor toilet with your own hands and installing the container, you need to start building the booth. This process consists of the following steps:
- You need to lay a piece of roofing felt on the surface of the foundation.
- A wooden beam measuring 100x100 mm should be used for the bottom frame of the base under the floor. Before this, it must be treated with an antiseptic solution.
- To build a reliable foundation, install the bars around the perimeter of the structure and in the middle of the long side of the structure, attach them with nuts, after placing them on metal pins.
- Using 40 mm thick boards, build the floor of the future toilet. In this case, it is necessary to leave a hole under the toilet where the container is located.
Floor of the future toilet - Attach 4 wooden columns to the corners of the base. Two of them should have a height of 2 m, and the other two should have a height of 2.2 m. Choose bars with a cross section of 100x50 mm. They need to be attached using metal corners and wooden spacers. Before final installation of the frame, check the verticality of the posts.
- On the front wall under the doors, install additional columns of the same section. The width of the opening should be 0.7 m and the height 1.97.
- Fasten the racks on the other side with a vertical jumper at a level of 1.77 m, which will also serve as the base for the roof.
Country toilet frame diagram - Along the structure, leaning on the installed jumpers, attach two rafter legs.
- As roof sheathing, use 40 mm thick boards, which must be attached to the rafters using regular nails.
- Using screws, install an OSB sheet to the lattice covering, which will act as a base for the roofing material.
- Use soft bitumen shingles or roofing felt as a covering. It is necessary to choose materials that will not create additional load on the structure.
- For wall cladding, use a tongue-and-groove or half-tongue board 2-4 cm thick.
- To prevent the inside of the building from being hot in summer and cold in winter, you need to make thermal insulation with your own hands. To do this, install foam sheets in the inner plane of the frame. After this, you need to additionally sew up the walls with another layer of board.
Ready-made country toilet lined with wood - Apply a special impregnation to all wooden elements, which will protect their surface from the harmful effects of moisture and other negative environmental factors. You can also additionally use fire retardants.
- Install doors on the curtains. You can equip them with a small window to illuminate the interior space during the daytime.
Interior design of an outdoor bathroom
Before carrying out interior work indoors, you need to lay a cable for the lighting device. You can do this yourself by entering the electrical wiring through a mast, which should be attached to the back wall of the bathroom. At the same time, its height is 2.5 m. Cable routing should be done in an open way. The wire cross-section must be at least 2.5 mm2. For lighting, use a lamp with a power of 40 W or less.
Design option for a country toilet
To construct the seat, use bars with a cross-section of 30x60 cm. Build a frame 400 mm high from them, and attach them using self-tapping screws. The finished structure must be sheathed with plywood or OSB board. In this case, you must remember to leave a hole in the place where the plastic container is installed. The final step is to attach the seat with lid, which is used for a regular toilet. When everything is ready, paint the interior and exterior of the bathroom with paint or varnish, which will extend its life and help keep the wood in its original condition.
In this simple way, you can build an outdoor toilet yourself, using an ordinary container made of plastic or metal.