Internal sewerage design stage
Creating a preliminary diagram will protect you from errors during installation work. The installation of internal sewerage in a house or on a site can be carried out without approval from special authorities. A common violation is considered to be incorrect calculation of the distance of the drainage pit from the house, narrowing of sanitary boundaries. The drainage and supply of water in the system should not intersect with each other. The main mistakes when arranging internal sewerage are considered to be incorrect installation of ventilation, incorrect selection of cross-section for pipes, and failure to comply with the slope of the pipeline.
Attention! To avoid violation of sanitary zones, you can install sewer pipes and water supply on the street on both sides of the residential building.
The axonometric diagram is most often performed by specialists. Professionals calculate the hydraulic parameters of the internal sewerage system and the pipeline that runs outside the building. Today, 3D modeling is widely used to create diagrams. This method gives an accurate idea of the passage of pipes, helps in the selection of pipes, components, fasteners and determines the type of installation work.
To reduce the risks associated with improper placement of tubes, it is worth contacting specialists. If you wish, you can make an internal wiring diagram with your own hands, having previously studied the requirements of SNiP, technical features of internal sewerage, types of circuits, and learned how to choose plumbing equipment.
Wiring diagrams and their calculations
According to these standards, before installing a sewer system, they first draw a general diagram, then draw up a plan for the layout of interfloor pipes and their runs. The locations of all control devices and connection points of individual sections and their branches must be marked on them.
The wiring diagram and plan must be drawn up taking into account the design features of the room in which it is laid.
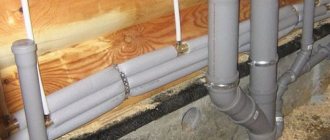
Spans of internal sewerage are laid starting from the plumbing fixture towards their entry into the general drainage system of the house. In private homes, pipes are usually hidden under the floor. This is explained by the need to save space and the need to preserve the design of the room. In two- or three-story houses, the sewerage system is laid above the floor covering.
For design calculations of parameters of pipe products, it is recommended, along with the manual method, to use computer programs that automatically take into account the following SNiP requirements:
- Sewer pipes in utility rooms are laid openly and in a horizontal plane. Using the closed method, they are installed either under the floor or in the walls of buildings.
- If you need to change the direction of laying pipes, then use transition elements of a special design - fittings.
- The sewer branches are connected to the riser using oblique crosses and special tees.
- Inspection hatches are installed on the opposite side of the inspection wells.
- In toilet rooms, sewer pipes are installed with waterproofing installed on the floor covering.
Correct location of main sewerage units
The overall sewage system of a house depends on the arrangement of each element of the system. To choose a storage tank for wastewater, you need to take into account the number of family members and plumbing fixtures from which used water is drained in a house, bathhouse or garage, etc.
Types of sewerage systems are determined depending on their location and the functions they perform:
- The internal sewerage system consists of pipes running from plumbing fixtures to the street.
- The external sewerage system is a network of pipes running from residential and utility rooms to treatment facilities.
- Treatment facilities , storage wells, filtration field.
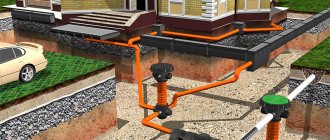
At the design stage of the internal sewerage plan, it is necessary to consider the design features of external networks and the type of treatment facility. The sewer system of a private house also includes storm drains, which drain runoff from rain and melting snow from buildings and roads through gutters.
Attention! If possible, it is better to connect to a centralized sewerage network.
How does forced sewer work?
In the bathroom, often behind the sink or toilet, there is a special tank with a pump and a device for grinding waste. Once here, the feces are crushed by the blades of the grinder motor. It is worth noting that the vast majority of motors operate silently. Next, the treated fecal matter is moved under the action of a pump into the sewer system, and, if necessary, into a septic tank or treatment facility. In such cases, the main line is mounted from pipes with a diameter of 18-40 mm. In this way, wastewater can be transported over a distance of up to one hundred meters. If at the end of this path it is necessary to raise contaminated water to the level of the treatment device, then if the height of the rise does not exceed 5-7 meters, the pump can also do this.
What to consider when developing a diagram
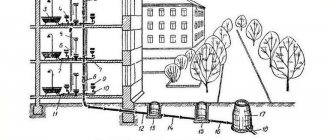
Different types of sewage systems are suitable for different types of residential buildings. For dachas with small houses, a simple system is used, which consists of a riser with a pipe from a toilet with a bathtub. Houses with several floors have sewerage in the form of many pipelines connected to one or two risers. The layouts for each home will be different.
To determine the features of the sewer system in a particular case, you need to know the answers to the following points:
What type of treatment plant is best equipped?- Is it possible to join the central sewer main?
- How much waste liquid will the treatment structure process per day?
- What type of sewage system will be installed according to the time of use: seasonal or permanent.
- Type of thermal insulation for pipes.
- What material should the pipeline be installed in the house from?
- What type of wastewater disposal is planned: using a gravity organization or using a pump.
Additional questions will certainly arise when drawing up a diagram, when the choice of the type of wiring or material for its arrangement arises.
Attention! To transport liquid through pipes by gravity, the pipes are laid with an inclination, which is directed from the plumbing and appliances to the riser.
External pipes are also laid with an angle of inclination in the direction from the building to the drainage pit or biological treatment station.
Nuances that are taken into account when arranging the internal sewer system:
- The diameter of the pipes used must correspond to the volume of transported wastewater.
- When laying pipes, the principle of serial connection is adhered to.
- It is necessary to think through the scheme in such a way that there are as few turns and sharp corners as possible.
- Think over the ventilation system.
- Places for inspection hatches are determined in advance.
- Select a material for thermal insulation of pipes laid in cold areas.
When laying a long pipeline, the angle of inclination is maintained using a special circulation pump.
Types of sewer systems
General information
The sewer system consists of three parts
- External
- Internal
- Stormwater
Each type of drainage system has its own installation rules.
Internal sewerage
The internal drainage system consists of a main riser, ventilation, point-to-point distribution, and a point of discharge of wastewater from the home into the external sewer system.
The main riser is installed in the vast majority of cases in the toilet. The riser can be installed open or hidden (in a wall or box).
Pipes are connected to the riser into which water is discharged from plumbing fixtures (washing machine, sink, washbasin, dishwasher, shower, bathtub, etc.).
Ventilation is a fan pipe, which is a continuation of the riser. It is displayed on the roof of the house.
The outlet pipe from the riser passes through the foundation of the house, below the freezing level of the soil, where it is connected to the external sewage system.
Attention
In order for the sewage system in the house to work without failures, before installation it is necessary to draw up its diagram in accordance with SNiP.
After creating the diagram, you should count the number of elements.
Choose what material the system will be mounted from. Currently, plastic pipes are in demand on the market. Thanks to its qualities
- Strength
- Ease
- Resistance to aggressive environments
- Easy installation
- No corrosion or rotting
Gray polypropylene products are ideal for installing a drain system.
Will be required
- Pipes with a cross-section of 50mm for wiring (50mm is the minimum permissible cross-section).
- Pipes cross section 100-110 mm, for riser and ventilation
- Siphons (water seals) for waste pipes
- Fitting
- Shut-off valves
- Clamps and fasteners
- Inspection wells
- Stubs
It would be a good idea to install elements such as an air seal and a check valve.
Vacuum water seal for ventilation stops the appearance of unpleasant odors.
A non-return sewer valve will prevent drainage from overflowing from plumbing fixtures in the event of a serious blockage.
Attention
All pipes located horizontally are installed at a slope, from the drain to the riser.
The diameter of horizontal hoses, more than 110 mm, is used extremely rarely when arranging the internal sewage system of a cottage.
Installation rules
- The toilet is always connected to the riser by a separate pipe.
- All other plumbing fixtures can be connected to one pipe
- The toilet connection point should be the lowest compared to others. This is the rule for each floor.
- Ventilation is mandatory
- The cross-section of the pipe must correspond to the diameter of the plumbing fixture pipe
- The riser and outer pipe must be the same diameter.
- The maximum permissible distance from the toilet to the riser is 1 m.
- A distance of up to 3 m is allowed from other plumbing fixtures. Attention, if the length of the pipe from the device to the riser is more than 3 m, products with a larger diameter should be used.
- If possible, minimize the number of turns on the highway. The turn should be made smoothly.
Important. Sometimes it happens that it is not possible to connect to one central pipeline; in such cases, several risers are installed.
Inspections are installed on the riser and underwater pipes. They are necessary for quick detection of violations and maintenance.
All joints must be sealed.
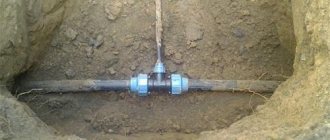
The pipe from the riser, in the plinth or basement, is laid through the wall in a special sleeve. The sleeve should extend beyond the wall on each side by at least 15cm.
External sewerage
The arrangement of external sewerage is done in compliance with building codes and regulations No. 2.04.03-85.
The external sewer line consists of
- Pipes
- Perepadnoy inspection wells (installed in places where the laying level differs by more than 50 cm.) If the height of the difference is more than 3 m, a stepped transition is made.
- Nodal. Must be installed at intersections of several pipes.
- Audit. On straight sections of the network. With a cross-section of 110mm pipes, it is installed every 15m.
- Turning. It is installed at the turns of the system.
Attention
The diameter of the inspection well depends on whether it will be necessary to descend into it for repairs and maintenance. If immersion is required, the diameter of the well must be at least a meter.
- Place of waste discharge. Most often, country houses do not have the opportunity to connect to a centralized sewer system; for this reason, septic tanks are installed.
About septic tanks.
There are several types of storage devices
- Single chamber
- Multi-chamber
- Multi-chamber with post-treatment system
They are also divided into volatile and non-volatile.
A septic tank of any type can be purchased ready-made or constructed independently.
Important
The rules for installing any septic tank are the same.
Installation is carried out on the territory selected in accordance with the SNiP resolution
- Distance from residential building to storage tank 5 m
- At least 3 m from green spaces
- 30 m from the drinking water intake point
- 50m to the nearest natural reservoir
- 10m from a river or stream
- 5m from the road
- At least 5 m from neighbors' fence
Installation
- A pit of the required size is organized
- Digging a trench for a sewer pipe
- The bottom of the pit is covered with a layer of a mixture of sand and crushed stone. Levels out. If necessary, a screed is made
- A slope is created in the trench using sand
- A septic tank is being installed or assembled independently
- Pipes are being laid
- Manholes are being installed
- Connection to the septic tank is made
- Pipes and septic tank are insulated
- Backfilling in progress
- To install wastewater treatment systems, infiltrators, drainage wells or filtration fields are installed.
- If a volatile septic tank is selected, then the cable for connecting the compressor should be laid together with the sewer pipes, having previously insulated it in a small-diameter corrugated pipe.
Attention
All septic tanks must be equipped with ventilation.
Pipes are laid at an angle
The joining of parts and all connecting seams is done with sealant
The drive must have a tight sealed lid.
Storm drain
Stormwater in the cottage is organized according to a previously drawn up and approved project by the appropriate authority.
Removal of excess moisture from the site is necessary to protect the foundation and road surfaces.
Storm sewerage is installed according to SNiP 2.04.01-85
The storm drainage system consists of three parts
- Surface drainage
- Roof drainage
- Hidden water drainage system
Roof drainage
Highway elements
- Drainage gutters
- Drainpipes
- Fasteners
- Clamps
- Stubs
- Funnels
- Gutter Connectors
- Pipe connector
- Knee
- External corner
- Internal corner
The diameter of the gutters is directly related to the size of the slope area. The larger the area, the larger the cross-section of the gutter. Roof drainage can be assembled from steel, plastic, and copper elements. The choice depends on the wishes of the owner. Drainpipes are installed on the façade of the building, above point rainwater inlets.
Surface storm drain
Excess moisture is removed from the surface of the site using drainage trays. The trays are installed below the surface level by 0.5 cm.
Installation of trays is done at a slope from the house to the discharge point.
For installation you will need
- Drainage trays through which liquid is transported
- Sand traps. Necessary for filtering.
- Plugs. Installed on dead ends.
- Lattices. They cover the trays, serve as a filter and protect against injury.
- Sealant for processing connecting seams.
- Cement for fixing trays.
Installation
Ditches are dug according to the diagram.
The bottom of the trench is filled with a mixture of sand and crushed stone. Leveled taking into account the slope, for gravity flow.
Trays are installed.
The seams are treated with sealant.
The trays on the sides are filled with solution.
Grilles are installed.
Hidden storm drainage system
By hidden system we mean pipes laid in the ground from point storm water inlets and drains at the foundation.
The system includes
- Perforated pipes to drain water from the foundation
- Point storm water inlets installed under drainpipes.
- Storm water inlets mounted as an independent element (well suited for a parking lot, gazebo, or any flat surface) are installed at the lowest point.
- Inspection wells.
- Pipes for transporting water.
- Sealant
- Crushed stone
- Cement
- Sand
Important
Stormwater inlets installed along the perimeter of the building are connected from the highest point to the lowest. It is necessary to make a slope for gravity.
Drainage around the foundation may not always be part of the storm drain system. It can be installed when laying the foundation or after construction, as a separate system.
All storm water inlets are connected by pipes.
Inspection wells are installed at turning points and at the intersection of pipes.
Water discharge is done at one point.
Fluid disposal options
- Off-site
- To the collector
- To a storage facility for subsequent use or removal.
A properly installed sewerage system guarantees comfortable living and a long service life of the system elements.
How to determine the schema type
The sewer pipeline and water supply pipeline are installed at the same time, so these distributions are planned together.
When generalizing the general rules that must be followed in the scheme, the following patterns and requirements will appear:
- Accounting for general descriptive data for water supply and sewerage depending on the requirements of SNiP.
- Taking into account the explication of premises containing explanations for the project, where wet areas with the type of waterproofing are noted.
- An indication of the volume of water passing through water supply and sewer systems.
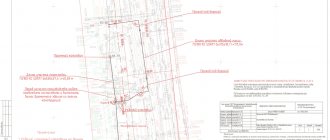
- Description of the location of pipes on each floor, definition of an axonometric diagram.
- Description of the location of sewer pipes on each floor.
- Specification accounting, that is, a list of components for water supply and sewerage with exact quantities or footage.
It is impossible to calculate the components for the system without a diagram on which all connections and turns are drawn.
Attention! The diagram shows in detail the sections of each pipe, the height at which the elements are installed in relation to the level of the finished floor, as well as the installation locations of collectors and plumbing fixtures.
If you create a detailed and accurate sewerage diagram and purchase modern materials, you can independently cope with the arrangement of the systems. As a rule, when building new cottages or dachas, the owners order diagrams from specialists, then carry out the installation work with their own hands.
Features of internal sewage system arrangement
The drainage system inside the house has a standard design: horizontal pipes extend from a vertical riser. The riser accumulates all the drains, so the cross-section of the tube is larger than that of conventional pipes. The risers from the riser are directed to the sewer system outside the building, whose pipes are even larger. Through pipes, water flows into septic tanks or storage wells, etc.
The riser is placed in a certain place according to the rules, at a certain distance from the lines connected to it. Wet areas are located next to each other, for example, a toilet next to the bathroom, or a kitchen next to the toilet. Often a toilet and a bath are located in the same room.
Reference! It is economical and practical to locate wet areas close to each other because they require the least amount of building materials.
If you place the sewer pipe close to the riser, then wastewater can flow to it by gravity, and you will not have to install a circulation pump.
It is customary to install the riser near the exit of sewer pipes from the building. The closest plumbing fixture to the riser is the toilet. Separating the toilet from the riser, for example, a bathtub, will lead to constant suction of the siphon during flushing of the toilet. Pipes must be laid at a slope to ensure gravity flow; the slope parameter directly depends on the cross-section of the pipes used. The requirements specified in SNiP should not be violated.
Dachas, as a rule, have wiring with a minimum number of devices connected to it. This is a toilet, sink, shower.
Buildings where people live all year round are equipped with a large number of appliances, for example, several baths, toilets, bidets, Jacuzzis, washing machines, dishwashers, etc. The design of the system will not eliminate turns, but it is recommended to reduce them to a minimum. Areas with turns and changes are considered clog-prone areas. Sharper turns must be located in an accessible place or masked if there is a service hatch.
Reference! Rotation of the pipeline at right angles is performed using two components having an angle of 45 degrees; if there is space, the rotation is ensured by three elbows of 30 degrees.
Wet zones should be located a maximum of a partition apart from each other; this is also planned when drawing up the diagram. If you place the parts of the sewer nearby, this will ensure longer quality operation of the system. SNiP 02.04.01-85 specifies requirements for the installation of sewer and water pipes, which must be studied to avoid mistakes.
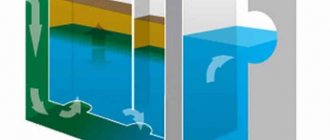
The essence of autonomous sewage system Topas
In the production of Topas septic tanks, foamed polypropylene is used; additionally, storage chambers are equipped with stiffeners. This production technology makes it possible to achieve the following device parameters:
- High strength characteristics.
- Installation of the system in any weather conditions.
- The system works even in winter.
- Independence of soil type and groundwater level.
Let us note some advantages of autonomous sewerage:
- high level of water purification;
- there is no need to develop additional aeration areas;
- long service life;
- compact size, which allows you to install a septic tank in a minimum space;
- environmental friendliness;
- ease of maintenance with a minimum of labor and financial costs and does not require calling out special equipment;
- secondary processing products can be used as fertilizer, and purified water for watering plantings;
- no foreign odors or noise;
- absolute tightness of the structure.
It is worth noting the disadvantages of the system , although it is difficult to call them disadvantages:
- dependence on electricity;
- high cost of the product, but over time the costs will pay off;
- For installation, you will need to call a team of specialists, although independent installation is possible.
Step-by-step instructions for sewer installation
As a rule, sewerage installation work has its own patterns, each stage is arranged in a logical order. In some cases, the stages are swapped depending on the layout of the building and the readiness of the rooms.
Basic steps:
- Installation of an outlet that connects external and internal sewage systems. The pipe is placed in a special sleeve, which performs a protective and heat-insulating function, and is passed through the wall. There should be no joints in the wall in this area.
- Installation of a riser, which is a vertical pipe passing through the floors of all floors of the building. As a rule, the house has one riser. Provided that the internal network has a length of more than ten meters, then it is worth equipping a second riser.
- Installation of bends, which are pipes running from the plumbing to the riser. The cross-section of the pipe under the toilet is about 110 millimeters, other pipes should have a diameter of 50 millimeters.
- Connecting plumbing pipes and passing system tests.
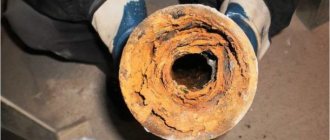
What materials are best to use for pipes
Metal pipes and components are no longer popular. Even the riser is made not of cast iron, but of light, practical polymer pipes: gray PVC, white or light gray polypropylene. Plastic pipes are smooth inside the product and resist high temperatures and the negative effects of waste water. The pipes are easy to install and clean if necessary.
How to install ventilation
According to SNiP rules, internal sewerage must have ventilation. To protect the house from gas emissions from sewer pipes, it is necessary to install a drain pipe.
Reference! The ventilation pipe is called a fan pipe and is a vertical device, very similar to a riser. The pipe is routed through the roof of the building so that the gas escapes outside.
If the house is two-story or lower, the load on the sewer pipes is not great, then you can do without a drain pipe. In other cases, its installation is mandatory in order to maintain healthy indoor air and not to disturb the pressure in the system, due to which water may escape from the water seal.
Installation of risers and branches
Internal sewerage cannot be installed without laying branches from the common riser. It is located in the toilet or bathroom. According to current regulations, it has a closed or open design.
Requirements for installation of the riser:
- The pipes must be intact along the entire length of the structure (their diameter is chosen taking into account the expected volume of wastewater).
- The laying is carried out vertically, the minimum deviation is 2 mm per 2-meter span.
- Each of the risers is equipped with ventilation opening onto the roof (to a height of 2 meters).
- The exits are equipped with inspection hatches and tees used for cleaning pipes (picture on the left).
If there are no special indentations on the riser, revisions are made on the first and last floors.
In other cases, the following places are chosen for their installation:
- at the initial section of branches connected to several devices without inspection hatches (if there are more than 3 of them);
- on road turns;
- on horizontal sections (hatches every 8 meters).