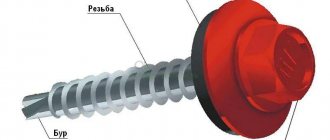
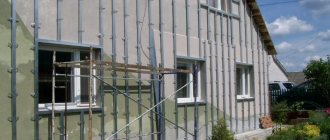
If you like neat and stylish corrugated roofing, then this article is for you. It is important not only to choose the right quality coating, but also to secure it correctly. Then the metal roof will serve for a long time, without bothering you with the periodic need for local repairs.
How to attach corrugated sheeting to the roof with self-tapping screws and how difficult is it? There are really a lot of subtleties and nuances here: starting from the choice of suitable screws and ending with the puzzle of which wave of the sheet to attach them to - top or bottom. Let's figure it out.
What is corrugated sheeting and what types of it exist?
First, let's explain what corrugated sheeting is and what subtypes it is divided into. This material is rolled steel sheets with a wavy profile, the width and height of the projections of which are regulated by standards. Thanks to this shape, the profiled sheet has significant rigidity with a small metal thickness.
Profiled sheets
To protect against corrosion, corrugated sheets are coated on the outside with protective materials - galvanized or polymer film. The latter gives the material a certain color.
Features of various corrugated sheet coatings
There are three main types of profiled sheets, each of which is suitable for creating certain structural elements of a building. Let's get acquainted with this classification of material using the table below.
Table. Main brands of profiled sheets.
| C – wall profiled sheet | Thin sheets with low height profiled parts. They are used in the construction of fences, simple canopies and walls that do not bear a significant load. It is not advisable to use it for roof cladding - the material is not strong enough and in winter it can bend under the thickness of snow and ice. |
| NS – load-bearing-wall profiled sheet, also called universal | Steel sheets with average strength characteristics can be simultaneously used both as wall and load-bearing corrugated sheeting, but in the latter case there is a limitation on permissible loads. It can be used as a material for roof cladding, but only if the amount of snow falling in the area where the house is located is not too large. |
| N – load-bearing profiled sheet | Profiled sheets with great thickness and high profile. They are more expensive, but at the same time have increased strength. Used to create load-bearing structures. Recommended for roof cladding. |
The quality of the purchased material is one of the most important components of the strength and reliability of the roof. Therefore, here are a few simple rules that will help you choose good corrugated sheeting.
- Know the manufacturer of the material you plan to use - study the reviews, find out if any of your friends or neighbors have used this corrugated sheet.
- Be sure to check the main dimensions of the profiled sheets - length, width and height of the corrugation.
- Ensure that the material has been stored under appropriate conditions and is free of dents, scratches and other defects that could compromise the protective coating of the steel sheets.
- Check the quality and integrity of the packaging for the corrugated sheet.
- If you have any doubts about the quality of the profiled sheet, ask for certificates and other documents confirming the quality of the material and compliance with standards.
What to do before installation
Before you begin installing a metal profile roof, you need to do some more work, namely:
Fastening the roofing sheeting with self-tapping screws.
Calculate the material. To determine the number of sheets, it is necessary to measure the roof slope, its sheathing, and diagonals. When performing all calculations according to the drawings, it is necessary to duplicate all measurements to take into account the error if the roof has a non-rectangular shape. It works best if the length of the corrugated sheet corresponds to the slope, then you will not have to provide additional sealing, and the fastening of the metal profile itself will be less labor-intensive. During measurements, it must be taken into account that all profiled sheets located in the first row must protrude 4 centimeters beyond the cornice. Provide waterproofing and ventilation. Before fixing the corrugated sheeting, it is necessary to ensure proper waterproofing by installing it along the entire sheathing. Laying a waterproofing layer is necessary to avoid the formation of condensation or leaks. Ventilation is installed to prevent moisture from accumulating. There can be no exceptions here; ventilation with waterproofing must be arranged regardless of the steepness or flatness of the slopes. Leave 2 centimeters between the waterproofing layer and the corrugated sheet. To do this, several slats are laid on top of the waterproofing.
It is important to place them so that this layer of air can be ventilated freely from the eaves itself. Choose a sheathing. Before starting work, you need to consider a very important point
If various additional elements are located in the roof itself: chimneys, ventilation shafts or fire hatches, the sheathing around it must be reinforced with additional bars. There are no standards regarding sheathing thickness, so it is possible to use many different combinations, which are affected by the length of the screws or corrugated sheeting. The main thing is that the cross-section of the bars is no less than 32x100 millimeters. The board that goes along the very eaves must be much thicker than the upper bars.
Laying waterproofing
Before carrying out installation work, you should carry out. Lay the layer on the rafter structure. It will protect the roof from moisture. The next step is to create the sheathing. After this, it will be possible to lay the profiled material.
When waterproofing a corrugated roof, it is necessary to take into account the type of roof:
Attention: When using film, remember that one side contains the manufacturer's markings. This side should be on top when laying the material. Do not turn the film over so as not to lose its basic properties.
Rules for cutting corrugated sheets
In the process of laying a roof from corrugated sheets, many home owners are faced with a seemingly simple question - what tool should they use to cut this material into pieces of the sizes they need? Most often, people use an angle grinder for this purpose, better known as an “grinder” - a tool that is found in almost every home. But if you study the instructions for the profiled steel decking, you may find a clause there that does not recommend or even prohibits the use of an angle grinder for cutting the material. Otherwise, the warranty for corrugated sheets is considered invalid. Why is this so?
Bulgarian
The thing is that the angle grinder gets very hot during the process. As a result, the metal at the cut site may melt, and with it the outer protective coating. The width of the damaged area can reach 3, 5 or even more millimeters. And this, at first glance, insignificant value is enough to begin the process of corrosion on the edge of the sheet and gradual deterioration of the corrugated sheet. In addition, flying sparks can cause minor damage to the protective coating even far from the edge of the cut - after a few years, red spots may appear in their place.
An example of why it is undesirable to use a grinder to cut profiled steel sheets
Therefore, it is undesirable to use a grinder for cutting corrugated sheets (unless we are talking about laying a temporary roof, for a couple of years, no more). But if you don’t have other tools, try to use thin cutting wheels - in this case, damage can be minimized and the likelihood of material damage can be reduced.
Cutting discs for grinders - explanation of markings
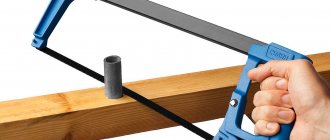
Another available tool suitable for this task is hand shears or a metal saw. They are cheap, you can get them almost anywhere and when cutting they do not have the same impact on the corrugated sheet as an angle grinder. But at the same time they have their drawbacks. Firstly, cutting profiled steel sheets using hand tools is a long and tedious task. Secondly, when handling a saw or hand-held metal shears, you will need a certain skill and accuracy to make an even cut line without burrs and similar defects.
Cutting with scissors for metal
A good option for a tool for cutting corrugated sheets for roofing would be a circular saw at low speeds and with a special blade designed for this task. There is another alternative - a jigsaw with a metal blade. But with it you can only cut corrugated sheets with a low corrugation height normally - otherwise the sheet will break and suffer a lot of mechanical damage.
Circular saw for metal
An excellent option in terms of cut quality and speed of work is to use special guillotines (quite expensive) and electric metal shears. But at the same time, they are a specialized tool that you are unlikely to use often.
Corrugated roof structure: sheathing and waterproofing
The construction of the roof begins with the installation of the rafter system and sheathing. The roof truss system made of corrugated sheets is installed in the same way as for roofs made of other materials. Differences appear at the stage of installing the sheathing. Under corrugated sheeting, it is made of wooden beams with a section of 40x40 mm or edged boards, 100 mm wide and 30 mm thick. Board sheathing will cost a little more, but it is more reliable and will last much longer.
The roof sheathing made of corrugated sheets can be continuous or thinned out. The technology for constructing a roof from corrugated sheets involves installing continuous sheathing in the area of the roof overhangs, as well as in places of various junctions. Continuous sheathing is also performed in the ridge area.
Before installation, all parts of the sheathing are treated with fire retardants and antiseptic compounds. No matter how sealed the roof covering is, the moisture contained in the outside air, over time, can lead to rotting of the wood and subsequent destruction of the roof sheathing.
Before installing the sheathing, wooden counter-lattice bars are nailed along the rafter legs. They serve to attach the waterproofing membrane and create a ventilation gap under the roofing.
Waterproofing under the roof is of great importance. Condensation inevitably appears on the inner surface of a metal profiled sheet when the outside air temperature changes. Waterproofing gets in the way of the resulting moisture, drops of which fall on its surface and flow into the gutters.
Waterproofing under the roof is of great importance.
Condensation inevitably appears on the inner surface of a metal profiled sheet when the outside air temperature changes. 1 - corrugated sheet; 2 - lathing made of wooden boards; 3 — counter-lattice; 4 - vapor-permeable waterproofing membrane; 5 - vapor barrier; 6 - finishing of the attic floor; 7 - rafters; 8 - frame sheathing under the rafters; 9 - thermal insulation; 10 - second layer of thermal insulation.
The wooden sheathing board is attached to the counter-lattice at a certain distance called a pitch. The size of this step depends on the angle of inclination of the roof and the brand of corrugated sheeting used for the roofing. The table below shows the pitch of the sheathing for some brands of corrugated sheeting, depending on the design of the rafter system and the slope of the roof.
Advantages of metal profiles
The advantages of products made from metal profiles, in comparison with wood, plastic, ceramic and other analogues, have allowed them to become the main building material in their segment. The following positive properties of the material are distinguished:
- Reliability, durability and strength. These qualities of the metal were inherited by products made from it. In addition, frame materials are distinguished by the presence of stiffeners, and sheet panels have a metal thickness sufficient to withstand significant loads.
- Resistant to corrosion, sunlight and other external influences. Almost all products that are intended for outdoor use have a protective coating made of zinc or polymers. If it is not damaged during transportation or installation, the metal profile will last for decades without losing its original appearance.
- Convenience and ease of installation of metal profiles. Fastening metal products does not require special knowledge. Any craftsman who knows how to use universal tools can handle this work: a screwdriver, a grinder, a hacksaw.
- Price/quality is the best indicator among analogues. Low cost with all the variety of choice distinguishes metal profile products from alternative options.
How to properly attach corrugated sheets
When laying the material on a wooden sheathing, it is fastened with self-tapping screws at the rate of 6-8 fasteners per 1 square meter. m.
You should also adhere to some well-known rules:
It is not recommended to screw in screws “for profit”, so the hole is drilled with a drill with an increase in diameter by 0.5 mm from the size of the self-tapping screw. Fastening must be done strictly at right angles with the sheets tightly pressed to the sheathing. If some changes are necessary, you should decide in advance how to bend the corrugated sheet, because if at this stage the structure is displaced or the seal is skewed, then when attaching the self-tapping screw, a through hole will be formed.
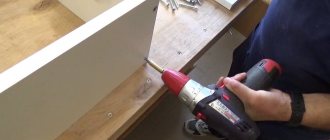
For convenience, you can tighten the screws with a screwdriver or drill. The screws are made of a special material, so they are easily attached to metal sheathing.
Common installation errors
The main problems arise when trying to save on fasteners and the grade of corrugated sheets and using sheets with insufficient rigidity. Weak fixation or screwing of metal with self-tapping screws with weak corrosion protection leads to failure or deformation of the pitched roof.
In addition, violations include:
Place sheet joints against prevailing wind currents.- Violation of the fastening sequence, for example, joining adjacent sheets after they are pulled to the sheathing.
- Cutting sheets with a grinder and abrasive wheels.
- Deviations from recommended overlaps.
- Walking on the material during installation without special shoes.
- Lack of sheathing under heavy add-ons. elements (antennas, gutters, solar panels).
- Errors in screwing self-tapping screws, including screwing in at an oblique angle, over-pressing or under-twisting. When screwed in correctly, the hardware rod is positioned strictly perpendicular, and the sealing layer is compressed from 2 mm to 1 mm, not otherwise.
- Raising and fixing profiled sheets during strong gusts of wind.
You will find more recommendations for arranging a pitched roof for a private house with your own hands here, and from this article you will learn how to build this type of roof for an extension.
Features of metal corrugated sheets
Steel sheets are galvanized to ensure proper cathodic protection of the entire surface and give it anti-corrosion properties. Nowadays, corrugated sheeting is a multi-layer structure, which is created to maximum resist various natural surprises.
Synthetic plastics with resins are organic polymers that are used during the production of polymer coatings. To give profiled sheets a more decorative appearance, they are supplemented with various additives and pigments that perform important protective functions.
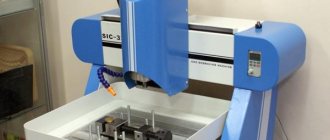
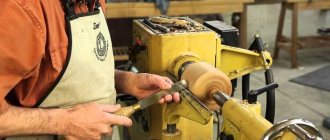
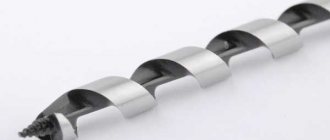
To obtain a wavy or trapezoidal configuration of the finished sheet, you need to use a specialized device called a sheet bender. It provides the opportunity to select the desired width or height of the waves, the main purpose of which is to add durability to the entire roof.
It is known that a roof made of such a profile has many advantages, because this material is:
When planning to do most roofing work with your own hands, you should pay attention to this material, because once you understand the main nuances, it will be very easy to install
Price
Profiled sheets, the price of which is quite reasonable, are considered a common material today. For a square meter of profiled sheet C21 you will have to pay 174 rubles, while the thickness will be 0.4 millimeters. Corrugated sheet C10 costs 154 rubles. per square meter, the thickness remains the same. It is important to remember about consumables, for example, a roofing screw will cost 2 rubles. a piece. If you decide to use corrugated sheets for roofing work, the price of this material should interest you. Once you know it, you can compare it with the cost of other materials. Sometimes this allows you to make the right choice.
It not only serves as a reliable support for the house, but also creates its aesthetic appearance. After all, the material has a wide variety of colors. Therefore, today the demand for this roofing is growing rapidly. Many people wonder what the construction of a corrugated roof should be like. In our article we will answer this and many other questions.
The material in the article will be useful to you, even if you do not plan to carry out roofing work in the near future. But if the technology for installing a roof made of corrugated sheets is known, you can easily evaluate the work of the roofer.
Installing a roof on a roof
Before covering the roof with a metal profile, it is necessary to raise it using logs. It is necessary that three people participate in this process. The rise to the top is carried out one module at a time.
In windy weather, installation work should be stopped due to the large “windage” of the profile!
Installation of metal profiles on the roof begins from the end of the roof. If a metal profile is being laid on a roof with a drainage groove, then it is necessary that the next profile sheet to be laid overlaps the groove of the previous one.
The profile sheets are mounted perpendicular to the cornice. The first sheet deserves special attention - the accuracy of the location of the entire roof as a whole depends on its correct installation.
On gable roofs, installation begins from the right or left end, on hip roofs - installation is carried out from the middle of the hip. To control the horizontality of the roof slopes, a cord is pulled along the eaves, with the help of which the lower edges of the metal profile sheets are aligned.
Instructions for installing a metal profile may conditionally consist of the following operations:
- the first sheet is temporarily attached with a self-tapping screw in the center at the ridge girder of the roof;
- the next profile is laid and aligned at the eaves overhang with the previous sheet and temporarily attached, similarly to the first sheet;
- metal profile sheets are fastened together with 4.8×19 mm self-tapping screws at the top of the wave at a distance of 500 mm;
- after installing three or four sheets, they are aligned along the roof eaves line, after which the final fastening occurs.
Metal profile sheets at the ridge and overhang are attached to the sheathing through the bottom of the wave with 4.8x38 mm self-tapping screws in every second wave, at the end edges into each sheath along the bottom of the sheet. In the middle, fastening occurs in a checkerboard pattern at the rate of 4-8 screws per 1 square meter.
For long roof slopes, multi-row installation of modules is used. Fastening between the sheets occurs at each bottom of the profile along with simultaneous fixation to the sheathing. There are two versions:
- First, the first sheet of the first row is laid. Then the first sheet of metal profile of the second row is placed and fastened. Next, install and attach the second sheet of the first row and the second sheet of the second row. The result is a “picture” of four sheets. Then a second “picture” is made and laid with a side overlap of the first “picture”. The method is used for metal profiles with a drainage groove.
- A block consisting of three sheets of metal profile is mounted. The two sheets of the first row are laid and connected to each other, then the first sheet in the second row is joined and attached to them. The resulting structure is aligned with the cornice and secured. Then the second block is attached to it in a similar way. This technique is applicable to sheets without drainage grooves, because the sheets of the first row are covered with sheets of the second row.
Roof structure
The technology for constructing a roof made of corrugated sheets is quite simple; having studied it, it is possible to perform the roofing of an individual residential or
with your own hands. If permanent residence of people is planned in the attic or attic, then the coating must be insulated. Let's take a closer look at the technology of installing insulated and cold coverings. The lathing for corrugated sheets is made from edged boards with a cross-section of at least 22x100 mm; generally, a 32x100 mm board or a 40x40 mm beam is used. The lathing is nailed onto the counter-lattice, with a certain step depending on the grade of sheet and other indicators that were discussed earlier. It is better to make continuous lathing under the profiled sheet on overhangs, at the ridge and in the junction area. The counter-lattice is bars that are nailed along the rafters. The counter-lattice secures the wind-hydroprotective membrane, which is laid between it and the rafters, and also creates a gap, ensuring ventilation of the under-roof space. This is a very important point, since condensation inevitably accumulates on the inside of the profiled sheets, droplets of moisture accumulating on the cold metal. Ventilation should be carried out through special gaps on the ridge and eaves sections of the roof. If the coating is insulated, then the next step is effective thermal insulation, which is laid between the rafters and hemmed on the side of the premises with boards or plasterboard; a vapor barrier must be provided between the insulation and the inner lining.
Corrugated sheet fastening
Fastening the corrugated sheeting is a key point in the construction of the roof. The strength of the coating depends not only on how correctly the corrugated sheet is laid
No less important is the quality of fastening of the sheets. Let's try to figure out how to properly attach corrugated sheets
Screw sizes
The corrugated sheet is usually attached to a wooden sheathing. In this case, special screws are used - roofing self-tapping screws with the following dimensions (in mm): the diameter varies in the range from 4.8 to 6.3, and the length can range from 20 to 250. The metal profile is always fastened through the lower wave, that is to the place where the profile is adjacent to the sheathing. The length of the screws is selected on the basis that the threaded part of the hardware should be approximately equal to the total thickness of the materials being connected. However, the self-tapping screw should not penetrate through the sheathing. The photo below clearly shows that the threaded part is smaller than the thickness of the frame.
The corrugated sheet is attached to the purlins using long self-tapping screws in order to properly secure the sheet. Such fastening, as a rule, causes difficulties, so it is recommended to take into account the width of the profile wave when calculating the sheathing.
Design
The head of the roofing screws looks like a press washer. The height of the sides should be sufficient so that they are firmly and correctly held in the screwdriver bit during the screwing process. The hardware is equipped with a special sealing washer. Neoprene rubber prevents leaks in the places where the profiles are fixed. The cap is insulated not only from below, but also from above with a special anti-corrosion coating. Corrugated sheeting can also be fastened using screws with a flat head. It is necessary to install rubber gaskets under it. The end of the screws is shaped like a drill bit, so there is no need to pre-drill the metal sheets or purlins. For greater accuracy of fastening, it is recommended to first punch the fastening point.
Laying insulation
Pay special attention to the insulation of corrugated roofing. Waterproofing and thermal insulation contribute to the formation of the so-called under the profile sheets.
When laying roof insulation, the type of roof should be taken into account. When installing a warm roof, you should use slab and matte insulation. In this case, there is no need to leave a gap between the layers of heat and. The process of laying two materials is carried out between the rafters.
When constructing a ceiling made of corrugated cold roofing, a ventilated space should be created. To reduce condensation, apply a layer of vapor barrier material to the insulation.
How to install a metal profile for drywall to walls and ceilings
To fasten the metal frame strips to the wall, direct hangers are used, which are screwed through special holes with self-tapping screws. The hangers are attached to the concrete wall with anchors or dowels, the holes for which are made with a hammer drill. The frequency of installation of hangers is 600 mm. When performing installation, you should control the line of their attachment.
In exceptional cases, as an alternative, you can use sections of 60x27 mm profile, bending them in the shape of the letter “L”. Some experts argue that this method is even better - it fixes the bar more rigidly.
Sometimes, when installing a frame made of a metal profile for plasterboard, it is necessary to lower it to a much greater distance than standard hangers allow. What to do in this case?
For these purposes, a system of sliding suspensions is used, which consists of three elements:
- two knitting needles;
- bracket;
- elastic holder.
One spoke is attached to the ceiling, and the second is adjusted to the desired height. The bracket is inserted directly into the profile and fixed.
Features of attaching corrugated sheeting to the sheathing with step-by-step instructions
The ideal covering option for the roof of a country house is a metal profile, which is particularly durable and fully copes with all assigned functions. A very important point is the implementation of the sheathing under the metal profile, since it must be perfectly level, ensuring clear installation of the future protective structure. It must correspond to the wave and angle of inclination of the roofing material, which determine the step size. Often it is approximately 30-50 cm. However, for a small angle of inclination, the sheathing is made of solid wood. A continuous sheathing of boards requires a gap of about 10 mm between them to take into account possible deformation of the wood.
Stages of attaching corrugated sheeting to the sheathing with a description:
- Initially, you need to arrange all the sheets in the appropriate order. It should be taken into account that the amount of overlap depends on the existing angle of inclination of the roof (see figure).
- Roofing screws are the main fasteners. This choice is focused on insulation under the self-tapping screw, thanks to which guaranteed protection against all kinds of influences is provided. The figure schematically shows the correct fastening of the screws.
- The process of installing sheets is carried out parallel to the roofing cornice.
- All screws must be screwed into the profile cavity of the sheet, except for the roof ridge, where fastening is also carried out in the upper part of the profile.
- To manually screw in self-tapping screws, you need to calculate your efforts so as not to damage the insulation layer, but at the same time screw the material tightly.
Scheme of fixing corrugated sheets with self-tapping screws
The order of laying profiled sheets is selected taking into account the presence or absence of a drainage groove on them and the size of the slope (the less the worker moves along the fixed covering, the better).
If it is necessary to install coverings with drainage grooves, then a vertical scheme is considered optimal (the second sheet is attached on top of the first on the slope with partial tightening of the screws, after which they are both covered with the third and fourth sheets, the block is aligned with the eaves and finally screwed on).
In other cases, the material is laid in blocks of 3 pieces. (2 lower and 1 upper). Standard fastener diagram:
In the bottom row, hardware is screwed into each bottom ridge.- In the second row (with an indent to the next sheathing strip or from 30 to 50 cm when fixing the covering to a solid flooring), self-tapping screws are screwed into the second and every third lower ridge.
- In the third and subsequent ones - in the first and every third.
- When installing the top sheet, the pattern is repeated.
- When sealing and strengthening the joint, the hardware is screwed in at a distance of 10 cm from the bottom and in increments of 50 cm.
What is good about corrugated sheets?
The wide popularity of corrugated sheets has objective reasons. They line the walls of buildings, landscape fences, finish roofs, and more. Roofing sheets have a reinforced formula and are able to withstand enormous loads. For formwork, flat roofs and other high-strength structures, load-bearing corrugated sheets are used. Thanks to the fairly high stiffening ribs, this material is able to withstand even heavy loads. The material is convenient and easy to work with, it is lightweight, but at the same time durable, so you can limit yourself to constructing a lightweight rafter system. Thanks to this, the construction of the roof can be completed in a relatively short period. Fastening corrugated sheeting to the roof is permissible even at small roof inclination angles. Undoubtedly, this is another advantage of this material, since not every coating can be laid with such a slope.
Modern technologies used in the production of this sheet material provide various options for anti-corrosion protection, which is why this roof is more durable. Even a non-professional can figure out how to attach a metal profile, since the sheets can be easily cut and screwed on with screws. There are no problems with installation, even in severe frosts, which is undoubtedly very valuable. We can talk for a long time about its advantages, but we must not forget that the reliability and service life of a roofing structure is to a small extent determined by its proper fastening. It’s probably not difficult to imagine how to attach corrugated sheeting to the roof. But if you do not take into account the nuances, then problems will not keep you waiting: the roof will begin to lose shape and leak. Therefore, it is better to prevent this state of affairs.
Advice from professionals
- Installing corrugated sheets is actually not very difficult. However, in practice, beginners may have difficulties. And they are mainly related to the intricacies of fastening profiled sheets.
- The screws are screwed in strictly at an angle of 90˚ without any distortions, while the gasket must be level.
- Experienced craftsmen never completely screw the first sheet of metal profile until several more have been laid. The fact is that, if necessary, it will be much easier to deploy or promote an entire block.
- When attaching metal profiles to metal purlins, self-tapping screws can be replaced with combined rivets.
- The corrugated sheet is attached to the upper and lower lathing in each of the waves, while the intermediate ones can be attached through the wave.
- As for longitudinal joints, the distance between fasteners in this case should not exceed half a meter.
- When calculating the required number of self-tapping screws, it is assumed that 5–8 pieces are consumed per 1 m2.
- The joints of corrugated sheets are fraught with the potential danger of leaks, so they need to be pressed as best as possible. To do this, fasteners in the corrugations, which are closest to the joint, are made with an offset: on the top sheet, the center of the fastener is shifted by 5 mm towards the joint, and on the bottom, on the contrary, away from the joint.
- Self-tapping screws are usually screwed in with a screwdriver, but if you decide to do it manually, you need to follow the rule:
- The screw cannot be overtightened, as this will damage the insulation.
- It is impossible not to tighten it, otherwise the roof will leak in this place.
- Profiled sheets should absolutely not be cut with a grinder, since the abrasive wheel during the cutting process can destroy the protective layers of the material. The best tool for this is electric scissors, a jigsaw or a hacksaw.
- The cut edge is protected from corrosion by a layer of enamel for the polymer surface.
Use only high-quality fasteners in your work. The rubber gasket on cheap self-tapping screws very quickly cracks and deforms, resulting in a leaky roof. A branded self-tapping screw can be distinguished by the identification mark on the head.
A month or two after completion of installation, it is advisable to re-tighten the screws to prevent possible loosening of the fasteners.
It is quite possible to cover the roof with corrugated sheets yourself, but only if you strictly follow the instructions.
How to choose the right material
All corrugated sheets are conventionally divided into several classes, which are designated as follows:
- N - used only for permanent coverings, floors and formwork, it is considered the most suitable option;
- C – intended for walls, it is often used when installing fences;
- NS – combined, it can be used for fencing or flooring.
It is very important to choose the most suitable brand. It is clear that N is considered the most reliable and durable among all, its thickness is not too large, there are several additional stiffening ribs, and the corrugation itself is quite high
NS is also sometimes used for laying roofing, but this type is more suitable for roofs that are not subject to heavy loads. The cost of brand N is slightly higher than C or NS, but all costs are quickly justified by the durability of use.
Profiled sheeting N can withstand enormous loads, so it is possible to increase the step between the sheathing strips. It turns out that you can use less fasteners and it will cost much less.
When talking about deck thickness, there are a few things to consider. If the roof has a fairly high pitch angle, then it can be covered with NS sheets, because they are a little thinner and cost much less. However, if the roof is quite flat, then it is better not to save money or take risks. With a flat surface, the load on it increases significantly, so the larger the waves and the thicker the profile, the safer the entire structure will be.
How to attach a metal profile to a wall
When repairing and finishing walls, plasterboard sheets are often used. The relative cheapness of this material and its good soundproofing and thermal characteristics make it suitable for quickly carrying out work on leveling walls and ceiling surfaces. Installation of drywall is simple and can be done independently. Since drywall is usually attached to a metal frame, the main difficulty is how to secure the metal profile to the wall in such a way as to ensure the reliability of the structure even on an uneven surface.
Type of metal profile used and method of fastening
When performing wall cladding work, it is best to use metal profile PN 28/27, which comes in one set with metal profile PP 60/27. The lathing made from the latter should be positioned slightly away from the wall to ensure unimpeded installation of electrical wiring and other utilities.
It is necessary to fasten the metal profile on direct hangers, and the optimal distance between the fastening points should be about 1 m. This value can be varied somewhat, but the technology for using direct hangers prohibits increasing the step length beyond 1.5 m.
Metal profile installation process
Before attaching the metal profile to the wall, it is necessary to carefully measure it and break down the surface for installation of hangers. To do this, marks are made in increments of 60 cm, through which vertical lines are drawn using a level. There will be several suspensions on each line. For example, if the ceiling height is 2.5 m, then three pieces will be enough. The distances between individual lines must be the same.
Installation of metal profiles begins from the perimeter of the walls. To do this, guide profile slats PN 28/27 of the required length are prepared, cut with metal scissors. Each element is pre-fixed to the wall with self-adhesive tape. Drill the wall with a hammer drill directly through the metal profile. If the rail already has prepared holes, then you should drill through them. The structure is fixed with dowels.
To install the PP 60/27 metal profile, you need to prepare long slats almost to the height of the ceiling. These elements are inserted into the guides, and the hangers are bent so as to touch the metal profile shelves. After which the entire structure under the level is attached to the wall surface. Having finished installing the metal frame, you can proceed to installing the drywall itself.
Characteristics of metal profiles
Key positive factors when using metal profile roofing:
- low specific gravity;
- increased safety due to fire resistance;
- corrosion resistance due to polymer and oxide coating;
- wide range of colors;
- mechanical strength;
- range of sizes;
- affordable price.
Metal profiles are produced with a thickness of 0.4 to 1.0 mm from galvanized steel with or without polymer coating.
Three labeling options are used depending on its purpose:
- C – wall profile. Used for fences, partitions and walls, as well as for light roofing. Wave height 8-44 mm;
- N – profile for load-bearing structures. Used for permanent roofing and interfloor slabs. Wave height 57-114 mm;
- NS is a universal profile for roofs and walls. Wave height 35 and 44 mm.
If the length of the roof slope requires the installation of sheets in several rows, then before attaching the metal profile to the roof, it is necessary to determine the overlap of the sheets.
The horizontal overlap is made on the sheathing and depends on the angle of inclination of the roof slope:
- with a roof slope angle of 12-15°, the minimum required overlap is 200 mm;
- with a tilt of 15-30°, the overlap limits are 150-200 mm;
- in the case where the slope of the roof slope is more than 30°, the overlap can be 100-150 mm;
- If the roof slope angle is less than 12°, the vertical and horizontal overlaps should be sealed using silicone or thiokol sealant.
The vertical overlap is made in half a wave for steeper roofs, one wave and two waves for flatter roofs (the recommended overlap must be checked with the manufacturer).
Nuances of the work
Having determined the dimensions of the roof, you can calculate how much material will be needed for the work. When you visit the store, you will find that the sheets are usable and full width. Depending on these numbers, calculations can be made. First, the roof area is determined, and then the useful area of one sheet. Then the first value must be divided by the second, this will allow you to understand how much material you need to purchase. When purchasing, you must remember that a high profile height will be able to provide the surface with the ability to endure heavy loads. If we are talking about a private house, then it is best to use corrugated sheeting of 35 millimeters, its thickness should be approximately 0.6-0.7 millimeters. Roofing work with corrugated sheeting of a smaller profile height is carried out taking into account the installation of sheathing, between the elements of which a smaller step must be ensured. This will allow for greater rigidity and high structural strength.
If different parapets and chimneys will pass through the roof, separate sheathing should be installed under them. For the chimney, it is located with a deviation of 15 centimeters. You cannot start work during rain, as the boards may get wet, which will lead to their deformation when drying.
How a video can help when installing a galvanized profile under drywall
More recently, the installation of gypsum boards was carried out on not entirely reliable wooden blocks. Making connections in such a design was a very difficult process. Today's metal frames are much more reliable, they are easier to assemble due to the wide selection of hardware components available for them.
At first glance, a novice developer may have many questions, including how to connect several drywall profiles or how to assemble a two-level frame with your own hands. Not only books on construction, but also video materials prepared by experienced craftsmen will help you solve your problems.
Having studied such tips in detail, every more or less capable person will be able to do both simple room renovations and complete complex home improvement projects. In addition to creative pleasure and experience, you will receive tangible financial savings.