Types of boilers
Modern boilers come in two types, which differ significantly in the principle of heating water:
- Flow-through - heats water as it is used. The volume of hot water produced by such a water heater is unlimited. At the same time, its power consumption is very high.
- Storage - they have a reservoir in which the water is heated by heating elements. The temperature of the water in the tank is maintained at a fixed level constantly.
The choice of a boiler with different storage tank volumes is based on several rules:
- 10-15 l - such a boiler will provide hot water for small household needs (for example, a washbasin);
- 50 l - this volume will be quite enough to supply hot water to the shower;
- 80-100 l - this volume of hot water can satisfy all needs (bath, shower, kitchen sink).
Storage boilers are more in demand in everyday life. And this is quite justified, because they will provide hot water to several points at once. In addition, there will always be a supply of water in the house.
Preparatory work
Connecting a boiler to a water supply with your own hands is not a very difficult task, which any self-respecting owner can cope with.
Preparatory work for connecting the boiler includes:
- Detailed study of the instructions supplied with the boiler.
- Installing a boiler on the wall.
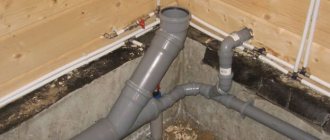
- Supply of water pipes to the boiler. If the boiler is located near a water supply, and an open one at that, the task is simplified and this point can be omitted. Otherwise, the water supply must be connected to the boiler using metal-plastic or polypropylene pipes.
Installed instantaneous water heater - Preparing the necessary tools: tape measure, pipe cutter, soldering iron for plastic pipes or welding, adjustable wrench.
- Purchase of related materials: shut-off valves, fittings, tees, pipes or flexible connecting hoses, American women, flax tow and fum tape.
Advice. When choosing related fittings, keep in mind that cheap, low-quality materials will not last long.
Installation of a storage water heater
Storage type boilers are more common equipment. This is explained by the fact that they are cheaper and do not require the use of powerful electrical wiring.
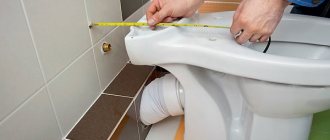
Installing a boiler with your own hands begins with marking the place of its attachment. The distance between the water heater fastening elements is measured. It is transferred to the wall. 2 holes are drilled (depending on the boiler model, 4 holes may be needed), dowels are inserted into them and hooks are screwed in. The boiler is hung on hooks.
The connection of the boiler to the water supply system is carried out depending on whether the elements connecting the pipes to the water heater are removed or not. If the connection point has already been prepared, then to connect the pipes to the inlet and outlet of the equipment, you can use flexible hoses that are equipped with rubber seals.
Installation of a storage water heater involves the use of a valve, which reduces excess pressure in the system. It is recommended to use a tee, which is placed in front of the shut-off valve. A tap is connected to the tee, which is designed to drain water during boiler maintenance.
If there are no conclusions, they need to be drawn. If there are plastic pipes, inserting connecting elements takes a maximum of 15-20 minutes. If the pipes are made of metal, then in addition to the tees, you will need a die, which should match the diameter of the pipe in size. In some cases, an adapter of the appropriate size will be required.
The sequence of actions is as follows:
- the water supply is turned off;
- at the place where the tee is attached, the pipes are cut;
- the thread is cut using a die;
- the threads are wrapped with tow;
- tees (or adapters) are connected to the pipe;
- Cranes are being installed.
Having connected cold water, you need to connect the boiler outlet to a tap that will regulate the supply of hot water. Having connected the water supply, the hot and cold water taps are opened. Wait until all the air comes out of the hot water tap and water starts flowing. All connections are immediately inspected for leaks.
After all the air has been bled off, the boiler is connected to the electrical network. The source can be either a socket or a separate machine. The normal supply of voltage will be indicated by a sensor that lights up on the boiler. Temperature adjustment is carried out according to the equipment operating instructions.
General diagram of connection to the water supply system
Connecting a boiler to a water supply from any type of pipe is carried out according to one general scheme.
Attention! All work on connecting the boiler to the water supply begins with shutting off the water supply to the apartment.
Cold water supply (from top to bottom):
- Installing an “American” connection to the water supply pipe of a boiler is one of the simplest and most reliable options for connecting a boiler. If it is necessary to dismantle the water heater, you can disconnect it from the water supply in a few minutes.
- Installation of a brass tee with a tap for draining water. This part is not a prerequisite when connecting the boiler. But for the convenience of draining water from the boiler, this is an excellent and durable option.
- Installation of a security system is a prerequisite for connecting the boiler to the water supply. The system includes:
Water supply diagram to the boiler
- non-return valve - will prevent the outflow of hot water from the boiler in the event of a drop in the pressure of the cold water supply or its complete absence;
- safety valve - if the pressure inside the boiler tank increases, excess water is automatically released through this valve to reduce the internal pressure.
Attention! The security system included with the water heater is not always reliable. To protect yourself from trouble, purchase a reliable check valve and “stall” valve.
The importance of a security system cannot be overestimated. So, the absence of a check valve in the event of a water supply shutdown (for example, main line repair) will lead to emptying of the tank. In this case, the heating elements will still heat up, which will lead to their failure.
The safety valve is no less important in the system. Let's say the thermostat in the boiler has failed. In this case, the heating elements will not automatically turn off and the water temperature in the tank can reach 100º. The pressure in the tank will rapidly increase, which will ultimately lead to an explosion of the boiler.
Safety valve in the system
- If low-quality, hard water is supplied to the water supply after the stop tap, it is necessary to install a cleaning filter. Its presence will protect the boiler capacity from scale and water scale deposits, which will significantly extend its service life.
- Installation of shut-off valve. Its purpose is to shut off the water supply to the boiler during its maintenance or repair, while water will be supplied to other points.
- If the pressure in the water supply “jumps,” experienced craftsmen recommend installing a pressure reducer. If it is already installed at the water inlet into a house or apartment, there is no need to duplicate the installation.
- Inserting a tee into an existing cold water supply pipe.
Hot water outlet (top to bottom):
- Installation of an “American” coupling on the hot water pipe of a boiler.
- Installation of a ball valve to allow water to drain from the boiler (if such a valve is already installed in another location, there is no need to duplicate it).
- Connection to hot water distribution in an apartment or house.
Attention! All connections of parts must be made using flax tow with fum tape or a special sealant paste.
Insertion into a metal-plastic pipe . The easiest way to insert. In the right place, the pipe is cut with a cutter and, using suitable fittings, a tee is mounted on it, from which cold water will be supplied to the boiler. Metal-plastic pipes are already losing their popularity. Outwardly, they do not look very aesthetically pleasing, and their service life is not very long.
Insertion into a polypropylene pipe . This type of insertion is more labor-intensive and costly, but at the same time the most reliable. A tee with an “American” coupling for connection is mounted using a special soldering iron. Having cut a piece of pipe in the right place with special scissors, it is necessary to maintain the alignment of its two parts. Otherwise, it will not be possible to solder the tee.
Connection diagram of the boiler to the water supply
Insertion into a metal pipe . Such an insertion will require certain skills in working with bends and couplings. If it is possible to cut a thread on a cut pipe, the tee is installed using a regular plumbing fitting or coupling. If metal pipes are located in such a way that it is not possible to use a flatware for cutting threads, they resort to using a special clamp with a threaded outlet, popularly known as a “vampire”. The procedure for working with a “vampire”:
- The metal pipe must be thoroughly cleaned of old paint.
- Drill a hole in the pipe at the insertion point. The diameter of the hole in the pipe must match the hole in the coupling.
- The vampire coupling is mounted on a metal pipe through a rubber gasket and secured with coupling bolts. The holes in the pipe and coupling must match.
Attention! A large hole drilled in a pipe will compromise the strength characteristics of the pipe; small - in a short time it will become clogged with dirt.
General rules for installation
There are certain rules for the installation and use of units. For example, the issue with choosing a boiler has already been resolved, and a wall-mounted electric unit has been purchased. Before installing it, you need to follow some recommendations.
First you need to select the location where this device will be mounted. The device must be installed so that all work related to the unit can be easily accessible.
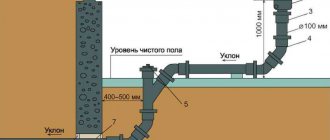
Before installing a hot water tank, it is necessary to evaluate the water supply pipe system . It is necessary to replace old ones with new ones, especially in the insertion area of the device. It can be located either on the floor or on the wall, so it must be strong.
Tanks, as a rule, are 100, 200 or more liters, and the wall should not be made of plasterboard. If your house has wooden partitions, you need to make sure they are strong. Before installing the unit, it is necessary to check the wiring, since the device is equipped with powerful heating elements. Because of this, it must withstand the specified load.
To install a boiler in an apartment, you need to make a separate line from the meter, and you need to place a switch in front of the unit. The permissible wire cross-section in this case is 2.5 mm.
Starting water and testing
When the connection of the boiler to the water supply is completed, you need to fill it with water, while simultaneously checking the tightness of all connections.
- Open the hot water tap to remove air from the boiler tank.
- Open the shut-off valve on the cold branch.
- When the supply of cold water begins, you need to carefully inspect all joints for leaks. If leaks are found, they are repaired before the boiler is filled with water.
- If water flows from the “hot” tap, it means the boiler is full and the hot water tap can be closed.
Boiler operation diagram
After filling the boiler with water, you can connect it to the power supply and enjoy the availability of hot water.
Installing a boiler with your own hands is not difficult at all. The main thing is to follow all safety rules when connecting it to communications, so that its further operation will be without unpleasant “surprises”.
Do-it-yourself boiler installation: video
How to install a boiler: photo
Features of using a flow-type water heater
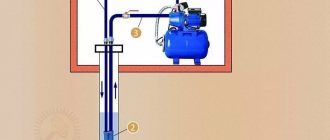
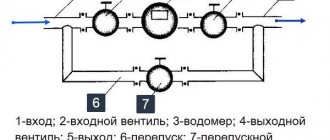
In the case of a stationary installation of an instantaneous water heater, a scheme of simultaneous supply and intake of water is used. Installation is carried out in parallel to the water supply system of a private house or apartment. This method involves installing tees together with valves on each pipe. Thanks to this, if necessary, a flow-type heater can be completely excluded from the indoor water supply system.
The cold water pipe is connected to the boiler inlet, and from the outlet of the device is connected to the hot pipe using a reinforced hose
When installing a water heater in an apartment building, it is important to close the hot water valve on the central riser to prevent the heated liquid from entering the water supply of the neighboring apartment
As you can see, installing a boiler of both flow-through and storage type is quite simple and, quite possible, with your own hands. And if anyone still has questions, the article provides a detailed video on inserting a water heater into a water supply system and connecting it to the AC network.