Frequent causes of breakdown
If, when diagnosing a well pump, it turns out that everything is in order with the cable, then the cause of the malfunction lies in the electric motor. In this case, the product will have to be disassembled all the way to the engine compartment, remove the stator or rotor and rewind the winding
As for Vodomet pumps or units of other brands, the causes of failure can often be:
- silting of the impeller;
- power cable break;
- failure of the rotor or stator.
To diagnose the problem yourself, you should adhere to the following rules:
- First, the unit must be removed from the well and a test run must be performed. If the shaft rotates, then the problem lies in the impeller. It must be cleaned of sludge and the unit can be assembled and used further.
- If the Vodomet pump does not even turn on during a test run, then you first need to check the power cable with a tester. To do this, check the voltage at the engine compartment terminals. If it is, then the cable is intact. Otherwise, you will have to replace it with a new cable.
- If, when diagnosing a well pump, it turns out that everything is in order with the cable, then the cause of the malfunction lies in the electric motor. In this case, the product will have to be disassembled all the way to the engine compartment, remove the stator or rotor and rewind the winding.
Electrical problems
If the submersible fecal pump does not have protection against dry running, then the windings of the mechanism may burn out. A clear sign may be the humming of the switched on unit and strong heating/melting of the cable. In this case, when carrying out repairs, you will have to replace the winding, which, by the way, can be clearly seen without disassembling the device.
Important: to avoid complex repairs of the fecal unit, it is worth periodically washing the pump in clean water and pumping it. This will prevent parts of the mechanism from sticking to particles of feces. In addition, try to avoid exceeding the size of the fractions that the pump can pump.
Pump doesn't work
The reasons may be the following: depressurization of the housing, burnt-out motor windings, broken blades after contact with large solid particles. Check for leaks by immersing the pump in a bucket, and also check the voltage at the outlets. Then unscrew the bolts and remove the housing. Rotate the motor shaft for large particles. If the engine is seized due to large inclusions, they should be removed and, if possible, the destroyed working rings should be replaced. If the impeller and blades are damaged, they should be replaced.
Next, check the electrical. Disconnect the power cord from the engine and, if melted parts are found, replace the entire cord and plug. You should also check if there is a break in the motor winding. If this is found, it is better to entrust the repair to a specialist.
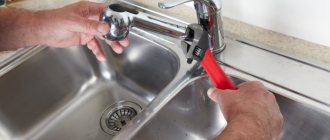
How to disassemble a pump for repair
To repair any pumping equipment with your own hands, you need to learn how to disassemble it
To repair any pumping equipment with your own hands, you need to learn how to disassemble it. We will look at how to do this using the example of the Vodomet pump. Disassembly is carried out in the following sequence:
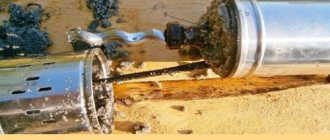
- At the inlet pipe, it is necessary to unscrew the cylinder with the perforated bottom. This is a coarse filter that protects the product from sand and siltation.
- Next, with your own hands, all washers, disks and “cups” are removed from the shaft on the pump unit motor. To make it easier for you to put the removed products back in the desired order, lay them out next to each other in the order in which you remove them.
- After this, it is necessary to remove the motor retaining ring from the Vodomet well pump. This part covers the engine compartment lid. To do this you need to use a mallet. Using this tool, we move the engine down, then pull the cord and return it back. After such manipulations, the o-ring will move. After this, the retaining ring is moved towards the housing with a screwdriver. As a result, the stopper will become skewed and will be easy to remove.
- Next, disconnect the wiring and open the engine compartment lid. After this, using a mallet and a screwdriver, you can remove the motor from the housing.
As a result of this disassembly, you can easily wash and clean the impeller and all its component elements. The engine can be taken for diagnostics and repair to a specialized workshop. After cleaning and repair, assembly occurs in the reverse order.
Diagnosis of pump failures
Like any equipment, Gilex pumps break down, and they need to be fixed as soon as possible so as not to be left without water, especially in the summer. The pump is a fairly simple mechanism that is not very complicated. Its design includes:
- Engine.
- Frame.
- Contacts.
- Working wheel.
- Shaft.
- Shaft seal.
- Impeller and other elements.
When interacting with each other, they gradually wear out, which may require their repair. Gilex surface pumps are assembled with hydraulic accumulators and installed in a separate room, which contributes to their greater safety, in contrast to the submersible pumps of the Gileks - Vodomet line, which are constantly in the water and removed for the winter, which subsequently complicates their use.
Tip: The relative simplicity of the design allows you to repair the units yourself. The main thing is not to make a mistake that could increase material costs.
It is quite easy to diagnose the most common breakdowns:
- If the pump does not respond when connecting electricity, you need to check the contacts and supply wire. In this case, the device is disassembled and the contacts are diagnosed with a tester. If there is no signal on one of them, it means it is damaged.
- An unnatural color of the element or it may be damp can also indicate its unsuitability. If the reaction is positive, you need to look for the cause in the cable, it may be broken. This often applies to submersible pumps, where the cable is suspended and poorly protected.
- Uneven operation, clicks, or “choking” of the unit indicate problems with the impeller or even the motor. In this case, it is necessary to disassemble the pump and carefully inspect all elements. The impeller may have cracked, or the bearings may have failed.
- If the engine fails, the problem must be looked for in it.
Tip: The Gilex pump engine is a rather delicate mechanism, especially in submersible models. If its winding is burned out, then replacing it is not so easy. Therefore, it is better to use a new motor, which the Gilex company supplies as spare parts for its products.
- Due to the occurrence of “dry running”, the surface pump in the Gilex - Jumbo stations can wear out very much and even burn out.
- Very often in such models there are malfunctions related to pressure in the system. In this case, the reasons may be:
- malfunctions in the pressure switch. It's quite easy to check and configure;
- problems with the hydraulic accumulator. Here the membrane containing air may rupture or be otherwise damaged. In this case, partial disassembly of the tank is necessary. A lack of air in the membrane leads to the creation of an imbalance in the entire system, which means a drop in pressure.
- The pump broke down, which happens quite rarely. Usually the working elements fail and the device cannot cope with pumping, which is accompanied by a slight hum, weak pressure, and poor rotation of the impeller.
Repair of the Gilex Jumbo pumping station.
How to repair submersible models of Gilex pumps
Repair of surface pumps and submersible pumps differs from each other. The repair sequence for the submersible device is as follows:
- The unit is pulled out and dried.
- The upper housing or cover is removed.
- The water intake mechanisms are removed, for which it is better to use a vice. But you must be careful when working, the body is hollow inside, which makes it weak.
- The pump part is disassembled. If a breakdown is detected at this stage, it can be repaired, otherwise you will have to move towards the engine.
- The plastic corkscrew ring is removed and the motor is pulled out.
- The wires are carefully pulled out and their condition is assessed.
- Upon completion of the repair, non-toxic oil is poured into the engine and the pump is assembled in the reverse order.
Advice: The oil in the engine should be harmless. Glycerin is best suited for this, as it does not pollute the surrounding liquid.
When disassembling the pump, problems can be resolved quite easily:
- Problem contacts are wiped with alcohol or soldered.
- Broken wires are replaced with new ones.
- Damaged consumables or rotating parts must only be replaced. They cost more to repair than they cost.
- It is better to leave engine repairs to a specialist who will disassemble, clean and repair it. In addition, it will provide a guarantee for a certain period.
How Gilex surface pumps are repaired
Surface pumps Gilex
If signs of pump failure appear, it is necessary to remove its housing and check all systems. The order of work is as follows:
- The equipment is disconnected from electricity and the hydraulic accumulator, and the liquid in the hose is drained.
- The back of the case is unscrewed.
- Its moving parts are removed.
- The pump chamber is disassembled.
- The impeller and seals are removed.
- The engine is carefully pulled out.
- Wires are controlled.
- After completing the repair work on the pump, it is reassembled in the reverse order.
This type of device can be repaired at any stage. Their body is one-piece, which makes it easier to remove the pump, and the parts do not have to be removed and disconnected sequentially. If problems arise with the impeller or consumables, they simply need to be replaced. Contacts can be accessed through the engine camera, which is the main problem, but it's not difficult. The hydraulic accumulator is disassembled by disconnecting the hose and unscrewing the plate. After this, the membrane is pulled out. It is not advisable to make the relay yourself; it can be easily damaged. The video in this article shows how to repair any Gilex pump. Timely repair of any equipment is the key to its long operation in good condition.
Criteria for choosing a drainage pump
Let's summarize how to choose a drainage pump. When purchasing the necessary unit, focus on the following points:
- Equipment operating conditions. Although drainage pumps can easily handle pumping wastewater, technical characteristics are limited by the degree of contamination (it should not exceed permissible parameters). In other words, large stones, a high percentage of sand in the liquid, silt and dirt can negatively affect the operation of the unit. That is, to eliminate flooding in basements, you can use a conventional drainage pump. But if you need to drain a reservoir, a solid platform with a flat surface is placed under the bottom of the pump. And if the work area is a construction site, then it is optimal to resort to the help of a powerful fecal pump with a grinder.
A drainage pump can drain even a pond
- Arithmetic calculations. When calculating the required power of the equipment, keep in mind that 1 meter of vertical length is equal to 10 horizontal meters. This means that if your sewer pit is 5 m deep, then the length of the hose should not be more than 50 m. In this case, the drainage speed will be low, although drainage pumps operate in conditions of constantly rising water. In order for the pump to cope with its task flawlessly, add to the height of the rise of the drains the length by which the outlet pipe will be laid horizontally along the surface of the earth. If even then the pressure is not optimal, an “allowance” of length should be added - approximately 3 m.
The lower the lifting height of the wastewater, the more efficient the pump is.
Pro tip:
When choosing a drainage pump, mainly pay attention to its power. Only this parameter determines the optimal use of this or that equipment
- Selection of the drainage pump model is made depending on the condition of the surface where the drainage pump will be installed. It is best to install the drainage pump in a pit, the depth of which is from 40 to 60 cm. This will protect against water getting onto the basement floor. The pump can then be equipped with a vertical float mechanism, which will turn on the equipment as the recess is filled, leaving the floor dry. If it is possible to organize a pit with a width and length of 50 cm or more, any type of float will do.
A pump with a float will not allow maximum drainage
When it is necessary to drain the tank as much as possible, a special drainage pump is needed, which is mounted on a hard surface. In this case, a float is not needed, since it will start working only when the wastewater level is at least a few cm. In all other cases, conventional models will cope with the task.
Prevention and maintenance of the drainage pump
In order for the pumping unit to last a long time and not create major problems, you must follow the manufacturer’s recommendations. This applies to installation and operation rules.
Once a year, the drainage pumps must be opened and cleaned of stuck dirt and debris inside the compartments of the device. At the same time, parts are checked for wear. This primarily concerns the protective mesh located inside the suction pipe and the impeller. The latter has special requirements: it should not be smaller in size. This affects the performance of the unit. If the impeller parameters become smaller, it must be replaced.
Be sure to check the float during the maintenance process, open the terminal box in which the contacts are cleaned. The supply wire is checked for kinks and broken wires. Please note that even simple cleaning of the internal cavities of the drainage pump will increase its service life several times.
Malfunctions and repairs
Most pump products from different brands often face the same problems
Most pump products from different brands often face the same problems. We will list the most common ones and indicate what needs to be done to fix the problem:
- The hum of the motor is heard, but the unit does not pump water. This means that the device operates “dry” (without water). If you are sure that the equipment is installed correctly and the problem is not related to the debit of the hydraulic structure, then the likely cause of the malfunction may be loosening of the nuts securing the shock absorber, wear of the rubber parts (valve) or a broken rod. To troubleshoot the problem, do the following:
- Find the shock absorber of the pumping equipment. There are two nuts on the rod that secure it. They must be tightened all the way, and for greater reliability, it is better to lock the topmost nut.
- If the valve is worn out, it must be replaced with a new product. This malfunction occurs if the unit pumps heavily contaminated water. To prevent this from happening, use a coarse filter on the inlet pipe.
- If the rod breaks, the device cannot be repaired, so you will have to buy a new pump.
- During startup of the device, the plugs are knocked out. This may occur due to winding combustion or a faulty electrical cable. You should start searching for the problem by testing the cable. If it malfunctions, the cable must be replaced. If it is in order, then the problem lies in a burnt-out winding. You can try replacing the old coil with a new product or taking the unit to a service center to rewind the winding.
- During operation, the pump gets very hot and vibrates. Both problems are related to the operation of the device “dry”. The thing is that water cools the body of the device well, but if it operates outside this environment, it quickly overheats, which causes the magnet to peel off and the piston to stop. To repair the device, do the following:
- The unit is disassembled and, by tapping on the body, the installation location of the magnet is found.
- Then all the parts are removed from the body, and a notch of vertical and horizontal strips 2 mm deep is made on the inner surface using a grinder.
- After this, the place with the notch is lubricated with a good moisture-resistant glue or sealant.
- The magnet must be pressed well into this glue.
- When the adhesive has dried, the device can be assembled.
- Low pressure may be due to the gap left in the vibrator being too small. To adjust it do the following:
- First you need to check the tightness of the nuts on the rod, the integrity of the rubber valve, and also make sure that there is no break in the rod.
- If everything is normal, then you need to increase the gap for water penetration. To do this, screw the required number of washers onto the vibrator. Their number may vary and depends on the required pressure and stroke of the pumping equipment.
Video instructions for repairing the “Vikhr” well pump:
Reasons why shutdown does not work
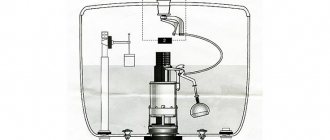
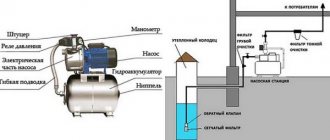
To identify the reason why the system does not turn off, it is necessary to check the readings of the station pressure gauge . If an additional control pressure gauge is installed, then its readings are also included.
If the pressure gauges show a pressure less than that set for shutdown, then the reasons must be sought in the operation of the plumbing system or pump. If the pressure gauge readings are higher than the shutdown value, the fault is most likely in the relay itself.
Troubleshooting should begin with the most likely causes, moving from simple situations to more complex ones.
First you need to check the operation of the pumping station with the water supply turned off . If it quickly builds up pressure and turns off, the station is working: the problem is in the water supply - there is a water leak somewhere.
If the pump runs for a long time and cannot create pressure, or the pressure increases extremely slowly, the reason is the operation of the station.
H2O leak
What to do:
check all water points, identify water flow, pay attention to the equipment connected to the water supply and sewerage, turn off all water taps;- check the water supply for water leaks, to do this, turn off all water taps, turn off the pump and monitor the water pressure - if the water pressure decreases, begin to identify the leak by inspection;
- if a leak is not detected, but there is an underground part of the pipeline, disconnect the underground part from the house or facility where it is connected and pressurize it with the existing pressure; if the pressure decreases, there is a leak in the underground part of the pipeline.
Low supply voltage
How to proceed:
- Check the supply voltage of the pump while it is running. The voltage drop should not be below 200 - 190 Volts. At low voltage, the electric motor will not be able to develop the declared power and provide sufficient impeller speed. This will increase the operating current, which is not desirable and can even be dangerous for the electric motor.
- Compare the low voltage value with the voltage level at the input to the house. If the difference is more than 10 Volts, the cross-section of the wires of the cable feeding the station should be increased. If the voltage is low at the entrance to the house, then the problem can be solved by installing a voltage stabilizer equal to or greater than the pump power.
- If the temperature of the electric motor housing exceeds 60 - 70 0C, you should check the current value when the pump is running. At current values higher than the nameplate parameters, the electric motor must be checked for an interturn short circuit. This can only be done in an electrical laboratory.
Insufficient vacuum in the suction pipeline of a home well
What to do:
Check the condition of the filter on the suction path, if installed.
Remove deposits and rinse. Check the condition of the sealing gasket and replace if necessary. Assemble the filter according to the instructions.- As an option, start the pump without installing the filter element in the filter housing.
The filter housing must be assembled. If a shutdown occurs, it means that the pump cannot create the necessary vacuum for suction. And even a small obstacle, in the form of a filter element, leads to long-term operation of the station. Identify the cause of insufficient vacuum in the suction tract. - If the pump does not create pressure at all, the reason is the lack of water in the suction path. It is necessary to fill it with water, not forgetting to bleed the air from the pump itself, and turn it on again. If the situation repeats, check the reasons for the lack of water.
- Check the serviceability of the check valve on the suction path. Water poured into the suction pipe must not escape.
- Check the depth to the water surface in a home well or well if the pumping station operates from these sources. Including when the pump is running, since the level decreases during operation. The actual suction depth, when the pump is running, must be less than the maximum suction height indicated in the passport for the pumping station. You can check it with a nylon rope with a weight attached.
- For pumping stations with an ejector, check the serviceability and tightness of the ejector. As well as the flow of water into the ejector discharge pipeline.
- Check the tightness of all connections on the suction pipe. As an option, apply a temporary bandage made from strips of fabric impregnated with a viscous composition. A medical adhesive plaster is best.
Malfunction of the impeller or other elements
Step-by-step instruction:
check the functionality of the pump, to do this, shut off or disconnect the suction pipeline, and connect the pump to draw water from a tank equal to half or slightly more than the capacity of the hydraulic accumulator; if the pressure does not reach the set upper shutdown threshold, the cause of the malfunction lies in the pump;- disassemble the pump housing, check the impeller and the condition of the seal - due to wear of the blades, the pump may not provide the required upper pressure value, wear of the suction pipe of the impeller in the part adjacent to the housing can also lead to a decrease in pressure - in this case, replace the worn one impeller;
- as a temporary option, you can reduce the upper pressure level in the relay to a value at which the pump will turn off stably and quickly enough, no more than 10 seconds, in the absence of water flow;
- replace the oil seal on the shaft or seal the stuffing box in the pump housing if there are traces of leaks.
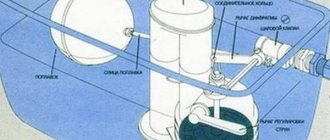
Malfunction of the disconnecting device and contacts
If the relay does not turn off the pump when the pressure is above the shutdown threshold, then the fault is in the relay itself.
The reason may be:
- Contacts sticking. Upon examination, many traces of sparking, with black spots, are visible on the surface of the contacts. The surface itself has bumps from the influx of metal and depressions in places where contacts have burned out. In this case, you should clean the contact surfaces with fine sandpaper. It is not recommended to remove a significant layer of metal from the contacts, since their surface is coated with silver to reduce resistance.
- A hole in the inlet fitting clogged with dirt may prevent water from passing into the working chamber of the relay and not create real pressure on the membrane. The hole needs to be cleaned.
- Damage to the relay membrane. In this case, water may leak from the relay. May cause short circuit. Remove the membrane cover and inspect the condition of the membrane. If necessary, replace the membrane.
- In some cases, the adjustment mechanisms may be damaged by corrosion. For this reason, the shut-off plate, which is pressed by a small spring responsible for the upper pressure value, may not operate. It is necessary to restore the functionality of the mechanism. To do this, clean the plate from corrosion, rubbing areas and those with traces of corrosion, cover with lithol or similar grease. After assembling the mechanism, configure the relay according to the on and off pressure levels.
If no faults are found in the disconnecting device:
Reset the upper cut-off pressure value using a small spring.
Loosen the spring, perhaps completely. In this state of the small spring, the difference in pressure of the upper value will differ from the lower level by approximately 1.0 bar.- You can also weaken the large spring, lowering the pressure level at which the relay turns on the pump.
In this case, at the same time there will be a decrease in the upper pressure level, at which the station must turn off. After checking the operation of the pump, if it begins to turn off, make final adjustments to the upper and lower pressure levels. - If servicing and reconfiguring the relay does not produce results, the relay should be replaced.
If the pump still does not turn off, you should continue to look for other possible causes. It is possible that several factors may have contributed to the failure of the pump.
Operating principle of the drainage pump
The drainage pump, pumping out wastewater, removes it from the building to an external sewer or to a treatment facility located away from the house. Often the place for installing pumps is a recess from which water must be pumped out.
For high-quality pump operation, the content of fibrous inclusions should be minimal, and the largest size of solid particles should not exceed 5 mm. As for the installation depth, the smaller it is, the better, because in emergency cases it is easier to organize quick access to the equipment.
It is worth focusing on the fact that the operation of drainage pumps in wastewater, which is characterized by elevated temperatures, is limited to a certain time, since the motor is cooled by releasing heat into the pumped liquid. Many unit manufacturers indicate a maximum temperature of 50 C
Naturally, there is qualified equipment designed to operate in special, non-standard conditions, but we will not dwell on it in detail.
The principle of movement of wastewater inside the drainage pump
What distinguishes a drainage pump from a fecal pump?
The drainage pump is capable of operating in environments with solid particles
The purpose of drainage pumps is to pump out and remove water and wastewater with foreign impurities from various reservoirs: pits, mines, drainage pits, domestic sewer pipelines, industrial systems and other treatment plants. With their help, you can pump out and drain fecal wastewater, servicing multi-story buildings, and also use the equipment in case of flooding of basements.
Although both drainage and fecal pumps operate in similar environments, there is a fundamental difference between them - for each type, the permissible size of solid impurities in wastewater is determined. For drainage pumps, these are particles with a diameter of 3 ÷ 12 mm (depending on the model of the unit) and up to 120 mm (these pumps are capable of pumping out large volumes of sewage).
Fecal pumps operate in liquids where solid inclusions are either completely absent or their size is small. Due to this feature, the equipment is equipped with knives and other cutting mechanisms that play the role of a suspension grinder. The pump impeller can be semi-open, single-channel or vortex.
Design and repair features
Pumps of the Vodomet and Vikhr brands are in great demand due to their simplicity of design and easy repair of the downhole unit. The basis of any submersible pumping product is a compact cylindrical body
Pumps of the Vodomet and Vikhr brands are in great demand due to their simplicity of design and easy repair of the downhole unit. The basis of any submersible pumping product is a compact cylindrical body. It is in this housing that the engine with an impeller mounted on its shaft is located. In this case, the impeller is separated from the engine compartment using a special liner. The shaft passes through it.
Before starting to repair deep-well borehole pumps, it is necessary to assess the serviceability of its main components. To do this, do the following:
- First, check the piston for damage and deformation. It should be straight and even.
- Then the patency of the suction opening is assessed. It is considered to be in good condition if air, penetrating from the suction pipe, passes freely from both sides.
- It is also worth measuring the distance between the piston and the magnets of the coils with your own hands. Normally, it should be within 0.4-0.5 cm. If this value is greater, the coils in the device may break. If the clearance decreases, the engine may overheat.
- In addition, in “Water Jet” units and other similar models, it is necessary to measure the distance from the valve closing the inlet to the device body. Normally, it should be from 0.7 to 0.8 cm. This will allow the liquid to flow freely from the unit in the absence of pressure.
- You also need to make sure that malfunctions in the operation of the downhole unit are not caused by critical voltage surges. Therefore, using a special device you need to measure the voltage in the network. It should be within 200-240 V.
How to identify the cause of a drain pump malfunction?
Before searching for the cause of the breakdown, you need to thoroughly rinse the pump. After that, try to turn it on again: perhaps it was not broken and there is no need to repair it, it could simply be clogged with particles of feces. If flushing does not help, then you need to discard all other simple failure options that do not require disassembling the drain pump.
For example, these options may include:
- A sudden power outage in the house (oddly enough, but most often the cause of the “breakdown” is precisely this).
- Cable break (this option is also possible: check the entire cable for integrity, also check the plug and the socket itself or the extension cord to which the pump is connected).
If all this does not help to find the cause of the pump failure, then you will have to disassemble the pump. You can try to do the repair yourself.
Repair of drainage pumps
The faults listed above for the drainage pump cannot always be corrected on your own. You can independently fix a weakened shock absorber, release or replace the float, eliminate mechanical damage that resulted in jamming of the impeller, and replace the power cable.
The simplest of all this will be securing the shock absorber. To do this, you will need to disassemble the device body and tighten the loose nuts on the mounting bolts. It is imperative to lock the top nut to prevent further loosening. It will take some time to replace the power cable. Replacing the condenser is possible in some drainage models.
Other faults are practically impossible to eliminate without the involvement of service workshops. For example, if a rod is broken, it is easier and sometimes cheaper to purchase new equipment than to disassemble it and try to repair it. Replacing a valve is a difficult and unprofitable undertaking to solve the problem on your own. Replacement of a burnt winding should be carried out in specialized workshops.
Disassembling the Belamos DWP CS drainage pump
The most common causes of breakdowns
If there is a need to repair pumping equipment, it is necessary to find out the probable cause of its failure, which are often:
- Failure to comply with the terms of periodic inspection and repair of equipment.
- The equipment was not operated correctly. During operation of the device, its operating parameters were exceeded.
- The pumped liquid contains solid impurities larger than required.
- Long-term use of the pump in dry mode.
- The equipment was installed incorrectly or poorly.
- The hydraulic accumulator and relay are out of order, and there is no filter.
When the first hint of a breakdown appears, you should immediately check the following components of the device: The ideal distance between the electromagnetic coils and the piston should be set from 0.4 to 0.5 cm. If these distances are not observed, the coils will beat if the gap is too large and the motor will overheat if the gap is too small.
Draining a reservoir with a drainage pump
The piston must not have mechanical damage or defects, its condition must be elastic. The valve covering the inlet holes must have a gap between the body of 0.7 to 0.8 mm. Air should flow freely when blowing on the intake side. It often happens that poor pump performance is not due to its breakdown. There may be power outages in the network.
Therefore, before you begin disassembling the device, make sure that the mains voltage matches, which should be 220-240 V. It should be noted that for long-term and reliable operation of the pumping equipment, it is necessary to carry out timely technical inspection and maintenance of the device and follow the rules of technical operation.
Types of breakdowns and ways to fix them
Operating principle of a float switch
Failures can be divided into simple and complex. The latter cannot be corrected with your own hands. For example, repair an electric motor. The simple category includes faults that can be fixed without contacting a service center. Usually this is replacing a failed part with a new one or simply cleaning the insides of the pumping unit.
A trivial situation - the drainage pump with a float switch does not work - it does not turn on when necessary.
Causes:
- The electrical power cable has failed. This often happens when it is bent, twisted, or one of the terminals of the device comes loose during transportation. It is not always possible to find a break, so the optimal solution is to replace it with a new wire. It is important to correctly open the terminal box cover. Underneath there is a rubber gasket that creates a hermetically sealed connection to the box. If the cuff tears, you will have to change that too. The main task when replacing the power cable is to accurately connect the cores of the new wire to the terminals. Nothing can be confused.
- One reason has to do with the float switch itself. It works on the principle of a lever, which either connects the terminals to each other, which supplies power to the electric motor, or disconnects them. It often happens that the contact surfaces of the terminals become covered with dirt or rust. They just need to be cleaned by any means, for which you will have to disassemble the drainage pump with an external float, clean the terminals and reassemble the device.
- Sometimes the wire that connects the float to the pump breaks. To check whether this is actually the case, you need to install a new wire in parallel and try to turn on the pump. If it works, the problem is in the cable. It needs to be replaced.
The reasons are actually simple. But you don’t always have to deal with them yourself. A device located in water will create big problems with its opening due to rusted fasteners. Therefore, it is better to take it to a service center.
If the water is too dirty, the pump may become clogged.
Second breakdown: the electric motor hums, but the pump does not pump water . Causes:
- the supply pipeline is clogged;
- excessive wear of the impeller or complete fracture of the blades;
- the size of the impurity in the pumped water is larger than the passport size;
- The network voltage has dropped.
The first problem is easy to solve. You need to lift the pump from the well, unscrew the supply hose and rinse it with water pressure. The second can be solved with more complex manipulations - you will have to replace the impeller with a new one by opening the liquid suction chamber. The problem with voltage drop is solved by installing a step-up transformer in the power supply network.
Third trouble: the pump hums, but does not spin . This is one of the complex failures, which is based on jamming of bearings. If you are not a pumping equipment repair specialist, you will not be able to eliminate this problem with your own hands. But there is another reason, no less unpleasant. One of the motor windings may burn out. It will have to be replaced with a new one or repaired in terms of installing new windings (all without exception, even undamaged ones).
When you turn on the drainage pump, the automatic switch knocks out . There are two reasons:
- short circuit between the turns of the motor winding;
- short circuit between the cores of the supply cable.
It is impossible to cope with the first reason on your own. The pump will have to be taken to a service center. As practice shows, even in the center, craftsmen do not take up the task of rewinding the motor. Therefore, the best option is to purchase a new pump. The second problem can be solved on your own. The main thing is to accurately determine that it is the reason the machine is knocked out. To do this, you can use a multimeter to check the wire for resistance.
To avoid serious damage, it is recommended to periodically inspect the equipment and carry out preventative maintenance.
Subtleties of repairing units of different brands
Since there are models of pumping equipment from different manufacturers on sale, differing in strength and design features, the repair and operation of such devices must be carried out taking into account the model
Since there are models of pumping equipment from different manufacturers on sale, differing in strength and design features, the repair and operation of such devices must be carried out taking into account the model. Since you could choose not a “Water Cannon” or a “Whirlwind” as a well unit, but a model of another brand, we decided to list the weaknesses of the most common pumping products, as well as the features of their repair:
- Most Grundfos models have special motor insulation and built-in valves. Therefore, sometimes it is necessary to change the thermal insulation seals of the motor. This work can only be done by a professional.
- Gilex brand pumps often experience fluid leakage from the electric motor. To repair, it is necessary to replace the fluid with a similar product. This can only be done at a special service center.
- The most popular is the domestic pump “Malysh”. Although the price for service repairs is quite reasonable, it is not difficult to repair this device yourself. A common problem is that the unit makes a lot of noise after switching on, but does not pump water. This usually occurs due to a rupture in the central axis on which the membrane and anchor are installed. Typically, disassembling the unit allows you to quickly identify the problem. The axle needs to be replaced. You can learn more about repairing the “Malysh” pump from the video below:
- The Aquarius well pump quite often overheats during operation. This is especially true for units installed in shallow wells. However, since the repair of such equipment can amount to about half of its cost, if an inexpensive pump breaks down, it is easier to buy a new device.
- The Vodomet and Whirlwind pumps are fairly reliable equipment that, if used correctly, can last for a long time without breakdowns. If used incorrectly, the units can become clogged with silt and sand. For repairs, you will need to change the pump part.
- Rucheyok pumping equipment is also famous for its ability to overheat. And this despite the design in compliance with European standards. According to the manufacturer's instructions, the device can work without stopping for 7 hours, but in practice this will cause overheating. Therefore, it is recommended to give the pump a break after 2-3 hours of operation.
The main causes of breakdowns of Grundfos Sololift2 pumps. As noted in the previous article, in most cases, Grundfos Sololift2 pumping equipment fails due to the fault of the user, since he does not follow the basic operating rules. And cases where the device can be repaired under warranty account for only 5-7% of the total. 7 reasons why the Grundfos Sololift2 model may fail. Equipment may break down due to engine combustion due to jamming of the impeller or cutting mechanism. This usually occurs due to objects such as paper clips, shoelaces, pieces of fabric, etc. getting inside. The device jams, but still continues to work (overloaded).
Thermal protection turns it off when it gets hot, but after a while it cools down and turns on again. After several such overheatings, one of the motor windings burns out, and the equipment no longer turns on. In this case, the electric motor needs to be replaced. Elevated temperature water flow.
Let's assume that the device is connected to the dishwasher. Quite often it happens that boiling water is poured into it. As a result, the Sololift2 model overheats and then breaks down. Replacing the engine will not solve the problem.
In this case, it is necessary to install the high-temperature model C-3, which is designed specifically for sinks and washing machines. Presence of thick and adhesive liquids in the drain. When carrying out renovation work indoors, glue and paint are usually drained into the toilet. As a result, the pump part becomes overgrown with adhesive deposits and cannot rotate normally (it gets stuck, or even stops completely).
Sololift does not turn off
The engine begins to overheat and then burns out. To restore operation, you will need to replace the engine, but in the future you should avoid draining such liquids. Pipeline clogged. This causes the equipment to try to pump out fluid too often, causing the engine to overheat. In this case, it is necessary to monitor the cleanliness of the pipelines. Defrosting the device.
This usually happens when the Grundfos Sololift2 model is left in an unheated room for the winter. The water freezes over time, the ice deforms the pump part, and the device stops working. In this case, the pump part will need to be replaced. Moisture ingress.
Sololift
If water gets into the electrical part of the device, it will burn. Replacing it solves this problem only partially. You also need to determine the cause of water getting inside the pump and eliminate it. Late cleaning. Over many years of operation of the Grundfos Sololift2 model, the elements of the drain chamber gradually become clogged.
If the pressure sensor becomes clogged, the device will turn on too frequently. In this case, you should order pump service, i.e. cleaning it to restore functionality. In case of a malfunction of the Grundfos Sololift2 pumping equipment or its incorrect operation, you can contact our company.
To do this, just call us at the numbers listed on the website. YOU CAN CONSULT OR PLACE AN ORDER IN ANY CONVENIENT WAY. Drilling wells for water and water supply. Repair of pumping equipment, autonomous sewage system (SPS)
see also
- Sololift malfunctions
The main causes of breakdowns of Grundfos Sololift2 pumps. As noted in the previous article, in most cases Grundfos pumping equipment...
- How to clean Sololift Grundfos
7 main faults of Grundfos Sololift2. Sololift2 pumps, like any other devices, can fail. In order not to cause...
- Sololift Grundfos (repair)
Repair of Sololift pumps. Timely Sololift maintenance, the cost of which is significantly less than repairs, will allow you to maintain…
- Grundfos Sololift
Grundfos Sololift2 WC-1. WARRANTY – 2 YEARS! It is a compact, ready-to-install, automatic sewage pumping unit with…
- Sololift Grundfoss
Sololift Grundfos pumps for kitchen sinks. Among the Grundfos sololifts, which provide forced drainage of wastewater from plumbing equipment and…
Tags: Grundfos Sololift2, turn off, in this case, Grundfos model, sololift
Criteria for selecting drainage pumps
There are several rules that should be followed when choosing a device: It is necessary to take into account the type of liquid being pumped - here they pay attention to the size of the fractions in dirty water. You need to carefully familiarize yourself with the main parameters of the drainage unit in order to choose a specific model.
- pressure – this value for equipment of average productivity is 7-10 meters. In some models it reaches more than 30 meters. Data regarding pump pressure depend on the distance over which the liquid is planned to be supplied;
- productivity - the choice depends on the volume of the tank. For example, for a capacity of 40 “cubes”, a device with 10 cubic meters of productivity per hour is sufficient. For industrial purposes, more efficient pumps are needed - about 100 m³ / hour or more;
- immersion depth of the device - the maximum value reaches 5 -15 meters, and the minimum - 0.3 - 0.9 meters.
It should be remembered: when the unit is operating, its pumping part must be under water.
In addition, you need to know what factors determine the lifespan of the pump:
- the quality of the materials from which the equipment elements are made;
- the temperature of the pumped dirty water should not be more than +50°C;
- drain passage diameter;
- presence of protection against possible overheating. Typically, a thermal relay is built into the pump (it will turn off the power if the liquid temperature becomes critical) and a float switch.
Types of drainage pumps
Such units for pumping out dirty water and wastewater can be surface or submersible according to their purpose (read: “Drainage pump for dirty water - which is better, surface or submersible”).
The drainage pump has two pipes:
- inlet - for collecting dirty water from the waste tank;
- output - necessary to drain the liquid outside the container.
During operation of the device, it is necessary to ensure that no water gets into it (read: “How the drainage pump works, what is the purpose of the drainage pump and the principle of its operation”). Otherwise, the unit may fail and then you will need to repair the drainage pump yourself or with the help of a specialist. Pumping out wastewater should be done faster than the level in the well rises. The pumps are connected to the sewer system via pipes. To do this, measure the diameter of the sewer pipe with an accuracy of one millimeter.
The advantage of surface pumps is their mobility - they can be easily and quickly moved to another location.
Submersible drainage pumps
. This type of device is used when it is necessary to clean deep tanks and in case of large-scale flooding to pump out excess water. The unit is lowered into a well or container, from where the liquid needs to be pumped out (for more details: “Drainage pump for a well: how to choose”). Suction is produced through holes in the bottom of the device, and not through inlet hoses. To prevent large impurities from entering the impeller of the device, the pump has strainers.
The use of float switches allows you to automatically turn on the device when there is a large number of drains. The possibility of a short circuit when the device is immersed in liquid can be avoided due to the presence of high-quality electrical insulation. If it is necessary to pump out or pump liquid with large fractions, experts recommend using fecal (sewage) pumps that have special cutting and chopping elements. They are capable of pumping and processing wastewater containing large-sized waste. The most optimal solution would be to purchase an automatic sewerage station, which will allow the operation of bathrooms that do not have a connection to centralized wastewater systems.
Repair of pumps and pumping equipment in Moscow
Pumps are amazing mechanisms, a product of the inquisitiveness and intelligence of the human mind. The evolutionary development of this branch of technological progress is simply amazing. Pumps have come a long way from mechanical piston-type pumps powered by the hardworking ancient Greeks, from the Archimedean screw turned by an equally hardworking donkey. Cam pumps and sine pumps have become commonplace, capable of pumping product with whole berries, or even halves of peaches. We are no longer surprised by a peristaltic pump or a pneumatic pump for lubricants, which, in fact, are not liquids in the usual human perception. Diffusion pumps pump out air with a vacuum - just imagine - (10-5) Pa!!!
– practically a cosmic vacuum!!! And the more complex the mechanisms become, the more sophisticated their connection diagrams, the more stringent the requirements for the qualifications of installers and operators, the more complicating life with their breakdowns are pumps whose task is the opposite.
Very often situations arise when the normal operation of an entire enterprise or cottage community depends on the correct operation of one mechanism (a pump, for example). Losses from downtime during pump repairs can be immeasurably greater than the cost of the unit. In these cases, of course, it is better to include a backup pump in the system or keep it in stock, but most often this is not done for a number of reasons, the main one of which is our traditional hope for chance.
So, faced with a pump breakdown, the consumer wonders what can be done in this situation. There are not many options:
№1.
Do without this pump and, accordingly, the level of convenience regulated by its use.
Well, for example, the pump in your well has broken down. Unpleasant - yes, but still not a disaster, you can even carry a bucket of water for tea...
Figure 1. Samovar and bucket
Or a mini-gas station at a small transport enterprise - you can, in extreme cases, find a long-discarded hose for refueling manually, from a barrel... but everyone understands that this is a temporary and forced measure. And then we have to proceed to option number 2...
№2.
Try to repair the pump yourself.
First
The rule in this case is to see if the pump is connected to the mains. (well, is there voltage in it) There are frequent cases of calls to the service center with understandable indignation - “We lowered the pump into the well, but it doesn’t work!!!” When asked if the pump is plugged in, “OH!” and short beeps. Folk tales (aka jokes) often hit you not in the eye, but in the eye - the story of how a girl complained about a non-working refrigerator, and when she was told to check if the plug was plugged into the socket, she promised to check by first going for a flashlight. In no case does this indicate technical illiteracy or stupidity, just simple inattention and a stressful situation. This is the simplest case of service support.
Second
rule - NEVER inspect or disassemble a pump connected to the electrical network.
Third
- which should have been before point 1. - Read the Passport (Figures 2,3,4), Operating Instructions, User Manual. Any pump has a book that comes with it, it may not be very colorful, the text is almost completely devoid of any entertainment component, but there is undoubtedly some benefit from it.
Figure 3. Sample pump passport Figure 3. Sample pump passport
Figure 4. Sample pump passport
The passports are written by factory specialists. Precisely so that the user has fewer difficulties. Temperature conditions of operation, continuous operation time, requirements for starting and protective equipment - this is all in the instructions. Passport compilers try to highlight key phrases ( !!!!!! ) or ( in font
) or combined – (
THIS IS IMPORTANT!!!!
).
Often these efforts go in vain, an example of a dialogue from a service center: N.A. (Ampika pumps) - Tell me, have you read the passport? Client - From cover to cover, I swear. ON THE. — What kind of engine protection circuit breaker did you have? Client - Which machine?
When they give him an excerpt from the passport - “Warranty repairs are not subject to damage caused by improper connection to the electrical network, lack of reliable protection, defective installation, incorrect adjustment and operation without water. FEATURES: The warranty is not valid if the pump has been disassembled, repaired independently or damaged by customers. Claims for burnt-out electric motors will not be accepted if the recommended motor protection circuit breaker has not been installed in the circuit.
“—there are no more questions left.
And then, when buying a new pump, he will definitely supply an AZD, an essentially inexpensive thing that will save your, often very expensive, pumping unit in any emergency. Sometimes a well pump would get full of sand, because the installers, when lowering it, did not take into account that it was not supposed to rest against the bottom, and the prudent owner had a machine gun and did not allow the pump to be covered with a copper basin. And after washing and cleaning, such a pump continues to work for a long, long time. If there were no AZD - and hello, repairs are impractical, not economically profitable, and keep this pump for spare parts...
Figure 5. Examples of pump failures due to overheating and lack of a motor protection circuit breaker.
Figure 6 clearly shows the consequences of a “loss” of one phase of the power supply of a three-phase asynchronous general industrial electric motor. The naked eye can see that of the windings connected to three phases, for every two that are burned out, there is one that survives (this phase “fell out”), evenly alternating in a circle, according to the number of poles. The engine was overloaded in two phases, overheated and burned out. A phase control relay can save you from such a breakdown, turning off the power supply when phases are misaligned or “lost,” but it must be placed in a box. That is, in an amicable way, you need to power the electric motors through a full-fledged pump control panel (made to order for specific technical conditions).
Figure 6. Example of winding burnout due to the absence of a motor protection circuit breaker.
Failures resulting from inattentive reading of data sheets concern not only electric-driven pumps, but also pump units driven by an internal combustion engine. Below is an example of a motor pump breakdown, the unscrupulous owner of which did not fill the oil before the first start. The motor pump did not work for ten minutes and showed a “fist of friendship” (the connecting rod pierced the cylinder block). This is not an isolated case, therefore ( we repeat
) you should carefully read the operating instructions, and pay special attention to the first start-up. Most motor pumps that have not been filled with oil or the factory preservative has not been replaced are not able to operate for more than ten to fifteen minutes.
Figure 7. An example of an internal combustion engine failure on a motor pump due to operation without oil.
Fourth
— Never hesitate to consult a specialist before purchasing a pump. This can be extremely helpful. Often, in a conversation, a caring specialist can catch small moments that will critically affect the life of the pump. So one company bought mechanical seals for pumps typically used for clean water. I bought it often, but little by little, without raising any special questions. After purchasing the 6th or 7th pump, the question arose - how many pumps do you have? The client was surprised and said - alone... And only after a series of leading, clarifying questions it turned out that they pumped recycled water, after cutting the tiles, with a great amount of abrasive. After he was given a special end with a friction pair for abrasive, for (so far) 7-8 months. This client has not been announced to us, everything works correctly.
Nothing lasts forever in the world; any equipment requires care and attention. Find out what is critical for the pump, what actions are required with it, and what can be done to make the pump work longer. But you need to approach any equipment critically - you won’t be able to quickly pump a diesel tank with a hand pump, and they don’t last for 10 years... Pumping a lake with a baby is not an option. And if the pump has worked for 5-7 years, this is a very good indicator. But sometimes pumps still fail...
Figure 8. Example of pump failure due to pumping liquid with a large amount of solids.
№3.
Contact the service center (hereinafter referred to as “SC”)
It’s clear that pulling a branch out of a pump or flushing a sand-clogged pump is a task that any normal man can handle. But people also come to us for repairs with such “breakdowns.” Often, after disassembling the pump and not finding the reason for its failure, they bring the pump to us in the form of a construction kit with almost all the parts. It happens that the disassembly process is carried out with a hammer and a gas wrench, which causes much more damage to the pump than the initial malfunction.
A) Decide - the cost of inspecting any pump is 1000 rubles. – is it worth repairing a manual pump for a barrel (for example FX-18), if the cost of a new one is 1500 rubles? It is unlikely that the pump is so dear to you that you would need to restore it regardless of the costs.
B) Determine whether the engine is intact. From experience, most often, if the motor windings are burned out, the cost of repair will be close to the cost of a new pump - do you need it??
C) Most of the factories with which we work trust our service center with the initial inspection and diagnosis of pumps, however, some pumps have to be sent to the factory, and there the acceptance is usually strictly bureaucratic: traces of self-disassembly of the pump are the main reason for refusal of warranty repairs.
D) Sometimes the disassembly and reassembly of the pump is done professionally, beautifully and clearly, but, assuming that the pump diagram is understood by the repairman better than by the designer, unnecessary parts remain during assembly. In such a case, for example, the small O-rings were not installed on the bolts on the submersible pump (Figure 3). The result is logical - water in the engine... with all that flowing in, if such a paraphrase is permissible.
Figure 9. Example of a seal not installed during assembly.
There are two ways to repair any equipment -
1st, most widely used:
• disassembly with mandatory fixation (records, photos) • defective parts • restoration in the form as seen by the master (cleaning, washing, grinding, polishing, restoration of shape, tightness, etc.) • replacement of broken parts • reassembly in reverse order • trial run • testing
2nd, less commonly used: • disassembly with mandatory fixation (records, photos) • understanding of the mechanics of fluid movement in the pump • understanding of the influence of geometry, movement and properties of each pump part on its operation • analysis of the cause of pump failure • restoration • test run • testing
More often in our work we use the 2nd method, but many faults are already familiar, and their analysis does not take much time. However, disassembling almost any pump is a painstaking task and not always easy. Repair is a voluntary matter; if you do it yourself, prepare to search for spare parts yourself and to the fact that you will need special equipment and accessories.
We are ready for repairs of any complexity; we have experience, equipment, and spare parts.
Figure 10. Service center Ampika pumps
When the client, having disassembled and “fixed” the pump, falls into a stupor - “We did everything as it was, but it still doesn’t work!!!” - then he brings the pump to us. And in 99% of cases we find that subtlety, that little thing that needs to be corrected and we start spinning something that didn’t spin, pumping something that didn’t swing!