What it is?
This is equipment that allows you to automatically deliver liquid through a pipeline from an existing source to the consumer’s home. The water pumping system maintains the same pressure throughout the day.
What does it consist of?
- Water pump.
- Hydraulic accumulator.
- Automation.
Water supply stations differ in technical characteristics. Before making a choice, be sure to study the product data sheet.
Principle of operation
The unit is equipped with a cylindrical hydraulic accumulator (hereinafter referred to as HA). Its internal part is divided into two by an elastic membrane. One of the halves is filled with gas under a certain pressure. When water enters, it enters the adjacent chamber. As the container fills, the membrane slowly stretches. The gas in the adjacent chamber is compressed, resulting in pressure.
All work is accompanied by corresponding readings on the device. As soon as four atmospheres are reached, the sensor sends a command to turn off the pump and the liquid stops pumping.
Connecting a deep-well pump to a hydraulic accumulator allows you to organize equal pressure while the tap is open, and liquids flow from the tank. As soon as it drops, the sensor turns on the pump and the liquid begins to flow into the reservoir. When the tap is closed, the pump will continue to operate until the required pressure is reached. As you can see, the design of the unit is relatively simple.
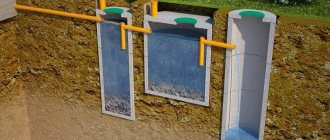
Choosing an installation location
Pumping stations are installed near a water source - a well or a well - in a specially equipped pit - a caisson. The second option is in a utility room in the house. The third is on a shelf in the well (this number will not work with a well), and the fourth is in the underground.
Installing a pumping station in the underground - the noise from its operation may be too audible
How to Determine Suction Depth
When choosing a location, they are primarily guided by the technical characteristics - the maximum suction depth of the pump (from where the pump can lift water). The thing is that the maximum lifting depth of pumping stations is 8-9 meters.
Suction depth - the distance from the water surface to the pump. The supply pipeline can be lowered to any depth; it will pump water from the level of the water surface.
Wells often have a greater depth than 8-9 meters. In this case, you will have to use other equipment - a submersible pump or a pumping station with an ejector. In this case, water can be supplied from 20-30 meters, which is usually sufficient. The disadvantage of this solution is expensive equipment.
Suction depth is a characteristic that determines the installation method
If you are just a meter short of being able to install conventional equipment, you can install the station in a well or above a well. In the well, a shelf is attached to the wall; in the case of a well, the pit is deepened.
When making calculations, do not forget that the water level “floats” - in summer it usually drops. If your suction depth is on the verge, there may simply be no water during this period. Later, when the level rises, water supply will be restored.
Security Considerations
Another point that must be taken into account is the safety of the equipment. If you plan to install a pumping station near a permanent residence, there are fewer problems - you can choose any option, even in a small shed. There is only one condition - it should not freeze in winter.
Installing a pumping station in a barn is suitable for permanent residence and insulation/heating conditions for the winter
If this is a dacha where people do not live permanently, the matter is more complicated - you need to arrange a room that does not catch the eye. The safest way to install a pumping station is in the house. Although they can take it away in this case too.
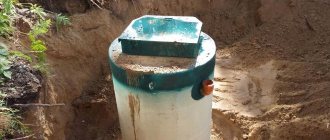
The second place where you can install a pumping station is a buried camouflaged caisson.
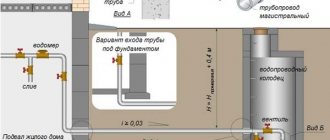
Installation diagram of a pumping station in a well
The third is on a shelf in the well. Only in this case there is no need to make a traditional well house. You need a steel lid that can be locked with a reliable lock (weld hinges to the ring, make slits in the lid on which to hang the locks). Although, a good cover may also be hidden under the house. Only the design needs to be thought out so that it does not interfere.
Convenience and operating conditions
Installing a pumping station in the house is good for everyone, except that the equipment is noisy during operation. If there is a separate room with good sound insulation and this is possible according to the technical characteristics, no problem. Often a similar room is made in the basement or on the ground floor. If there is no basement, you can make a box in the underground. Access to it is through the hatch. In addition to sound insulation, this box must also have good thermal insulation - the operating temperature range starts from +5°C.
To reduce the noise level, the station can be placed on thick rubber to dampen vibration (created by the cooling fan). In this case, it is even possible to install it in the house, but the sound will certainly still be there.
Caisson made of concrete rings
If you choose to install a pumping station in a caisson, it should also be insulated and also waterproof. Usually, ready-made reinforced concrete containers are used for these purposes, but a caisson can be made from concrete rings (like a well). Place the ring with the bottom down, and the ring with the lid on top. Another option is to build it out of brick and fill the floor with concrete. But this method is suitable for dry areas - the groundwater level should be one meter below the depth of the caisson.
The depth of the caisson is such that the equipment is installed below the freezing level. Insulation foam polystyrene. Better - extruded. Then at the same time you also get waterproofing.
For a caisson made of concrete rings, it is convenient to use a shell (if you find a suitable diameter). But you can also slab polystyrene foam, cut into strips and glue it. For rectangular pits and structures, slabs are suitable that can be glued to the walls using bitumen mastic. Coat the wall, apply insulation, you can additionally secure it with a pair of nails/dowels.
Device types
- Superficial.
- Submersible.
In most cases, surface devices are used.
They are mounted on a frame. It has a hydraulic accumulator and automation. The pump has two outlets for pumping/supplying into a private home. Surface type units have the following advantages and disadvantages:
Pros:
- Ideal for sources with small diameter.
- The optimal solution for wells whose depth is no more than ten meters.
Minuses:
- If the water level drops, problems will arise.
Submersible well units are ideal for deep wells.
Automation and other equipment, except the pump, remain on the surface. This system allows you to lift water from a depth of about 50 m. Pros:
- If it is not possible to dig a well, then a submersible installation will allow you to lift liquid from deep wells.
Minus:
- Air in the line makes it difficult to start the pump. Therefore, it is necessary to install a check valve on the supply pipe.
Basic installation and connection diagrams
When assembling a water supply system, various connection schemes for pumping stations in a private house can be used.
The most common schemes are:
- Diagram of direct connection of the device to the supply pipeline.
- Scheme with a storage tank.
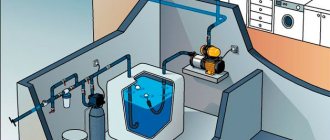
Direct connection involves placing the station between the water intake and the in-house pipeline. Water is directly sucked from the well and supplied to the consumer. With this installation scheme, the equipment is located in a heated room - in the basement or basement. This is due to the fear of low temperatures. Freezing of water inside the device can cause its failure.
However, in regions with relatively mild winters, it is possible to place a water pumping station directly at the top of the well. To do this, a well buried in the ground is built above it, which is insulated to prevent the water inside the pipeline from freezing. If necessary, it is possible to use an electric heating wire. We will discuss all aspects of choosing an installation location in more detail below.
The connection diagram for a station with a storage tank looks slightly different. Water from the source is not supplied directly to the in-house system, but to a special volumetric storage tank. The pumping station itself is located between the storage tank and the internal pipeline. Water is pumped to the water collection points by the station pump from the storage tank.
Thus, in this scheme two pumps are used:
- A deep-well pump pumping water into the storage tank.
- A pumping station that supplies water from a storage tank to the water supply system.
The advantage of the scheme with a storage tank is the presence of a sufficiently large amount of water in it. The volume of the tank can be several hundred liters, and even cubic meters, and the average volume of the station’s damper tank is 20-50 liters. Also, a similar version of the water supply system is suitable for artesian wells, when one way or another it is necessary to use a deep pump.
Types of hydraulic accumulators
- Closed.
- Open.
By closed we mean an oval container in which there is a rubber diaphragm that creates pressure in the system. Such a device will cost more. All the features of this device were discussed above.
As for the open hydraulic accumulator, it is very demanding during operation, but it is easier to install. It’s quite possible to make it yourself. The essence of the purpose is the same as that of a water tower.
An open HA is mounted mainly at the highest point.
It is important to know! In order to create a pressure of up to 0.7 bar in a system with an open HA, it should be installed at a height of 7 meters.
If this requirement is not met, the system is additionally equipped with pumps, which makes it more expensive and more complex.
Design and principle of operation of the hydraulic accumulator
Hydraulic accumulators are metal tanks, usually with a volume of 20 to 100 liters. They have an inlet and an outlet. These devices are designed to maintain operating pressure in the water supply network when the pump is turned off.
To do this, there is a rubber membrane inside the metal tank, which stretches when the container is filled with water. When the pump turns off, the membrane, due to the compression force, pushes the water contained in the tank into the network. Thus, the pressure necessary for the operation of plumbing fixtures is maintained in the plumbing system.
How to choose for a private house or cottage?
Technical characteristics that will tell you which pumping station to choose.
| Options | Description |
| Performance | Determined by the power of the device. It is important to know the real capabilities of the source (flow rate). The performance is indicated in the data sheet. The optimal solution would be an installation with a capacity of up to 6 thousand l/hour |
| Power | Several factors are taken into account: the length of the route from the mirror to the pump, the number of shut-off valves (points), the height of the water rise and the resource of the source. Household water appliances have a power of 0.6 to 1.5 W |
| Hydraulic accumulator | The larger its volume, the higher the price. It is necessary to understand that if its volume is large, the pump will not turn on so often, and during a power outage there will be a sufficient supply of water. A smaller number of cycles of its activation significantly affects the duration of operation. In addition to installing it, you need to know how to connect a submersible pump to a HA |
| Intake depth and water supply height | It takes into account how far the device will be installed from the well, that is, the horizontal section. The resistance in the pipes, coarse filter and valve (return) is also taken into account. Therefore, the device for the well must have a power reserve of 15% |
| Housing material | Water units for wells have different housings: cast iron, stainless steel, metal and thick PVC. The polypropylene body does not rust and does not make much noise. In case of mechanical impact, the plastic may crack. Some types of stations have a steel body. It makes a lot of noise and can resonate. Cast iron ones are almost silent. It is believed that the best devices are made of stainless steel. Their high cost is fully compensated by their quality. |
| Filter | It is an important element that can protect the pump from the penetration of various particles |
| Protection against dry running and overheating | Automation will significantly extend their service life. If there is no water in the supply pipeline (for various reasons), a special relay sends a signal to turn off the pump. Additionally, the device is equipped with an overheating relay. Especially relevant in case of high water consumption at high speeds |
| Automation | The automatic submersible device eliminates intervention and control over the system. It is important to set it up correctly. If it will be used in a house or country house seasonally, then it is better to use manual control. Therefore, before connecting the automation, decide what is best for you |
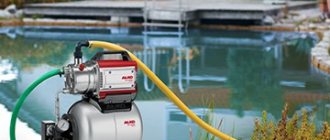
What to consider when choosing a water pumping station
The first thing you need to pay attention to when purchasing a station is the power of the pump. The water pressure in the system and its flow rate depend on this indicator. The water supply parameter should be close to the maximum volume of consumption at all water points. As a rule, this indicator is averaged rather roughly and all models are adapted to a nominal flow rate of 1.5-9 m3/h.
Water pumping station
The pressure indicator is also entered into the station characteristics table separately. In the passport it is indicated as the distance over which the pump supplies water. But in fact, this parameter means the pressure that the station is capable of creating. So, the indicated pressure of 40 m shows that the pump will create a pressure of 4 atmospheres under ideal conditions. Since during operation there are some pressure losses on the pipeline layout, as well as water rising to a certain height, this figure will be significantly lower.
Important! A powerful device does not always justify the investment in it. As a rule, the productivity of such a system will exceed the filling of the well. In order to avoid this, it is necessary to take into account the parameters of the well. The shorter the distance to the source of water intake and the higher the level of occurrence of the water resource, the less power the purchased device should have.
Also, when choosing a water pumping station, it is necessary to take into account the autonomy of the unit. This will be needed by users living in areas with power supply problems. To ensure uninterrupted operation of the pump, you can additionally install a generator or solar battery on the site.
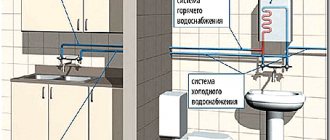
Water supply installation
We suggest you study the installation features. There are several important criteria:
- Electricity. The selected location must be accessible to connect the device to electricity. Often, a caisson is installed near the source, and electricity is supplied to it.
- Location. The hydraulic system is installed at a distance that will allow the pump to operate without load. That is, those must be taken into account. characteristics of the unit. It is important to take into account the depth of the water surface and the length from the pump to the tap.
- Immersion depth. It’s good if you can install it in a warm place. Otherwise, a caisson is installed. It is made at a depth that is inaccessible to frost in your area. A natural change of air must be ensured to prevent the formation of condensation.
- Soundproofing. If the system is installed inside the house, the room should be properly soundproofed. Otherwise, the operation of the device will interfere with a calm and quiet life.
Please note! The unit must not be leaned against a wall, as vibration will be transmitted to the room above. Therefore, installation is only on the floor.
Installation errors
Incorrect installation leads to malfunctions. Common mistakes:
- Wrong choice of equipment. A heavy-duty pump is installed that has greater productivity than the well's flow rate.
- No filter. Because of this, sand gets into the system, which can destroy important structural elements.
- Significant waste of water. You need to understand which system to choose. If the consumption is expected to be 3 cubic meters per hour, then you should not take more, otherwise the unit will wear out. This option provides a different connection scheme for a submersible pump with a hydraulic accumulator, which reduces the frequency of pump activation.
- Anticipate power surges. If the power goes out frequently, this can damage the installation.
- The well system is selected based on capacity.
- Selecting a smaller pipe diameter than the thread on the device.
- Buying a small cross-section cable. An incorrect choice will result in engine overheating.
- Lack of RCD. The station for supplying water from a well must be equipped with an individual automatic power shut-off system.
- Lack of measuring instruments: sensors, etc.
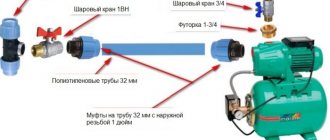
How to assemble and connect a household system to a well?
It is necessary to prepare all the components: pump, accumulator, automation, pipe, cable, filter, check valve and adapters.
Knowing the connection diagram, you will understand the sequence in which the installation should be assembled:
- A HA is attached to the pumping apparatus for the well.
- The pump is connected through a special adapter.
- An automation system is mounted on the same adapter: dry running relay, sensors, etc. It is important to know how to properly configure the automation for its correct operation.
- A check valve and a coarse strainer are attached to the end of the pipeline, and all this is lowered into the source.
- Additionally, you can mount a check valve in front of the hydraulic accumulator in case the first one fails.
- A hydraulic station with an electric drive necessarily requires the installation of an individual RCD.
- Before connecting the unit to the well and starting it up, it is important to make wiring around the house and install shut-off valves.
The water supply device itself from the well is installed in a clean and dry basement, on a rubber gasket to level out possible vibration. This option is suitable for a summer residence.
Advice! In addition to the coarse filter, the well station can be equipped with a system for retaining fine fractions. The quality of the water influences the decision. The fine filter is mounted on the surface.
Pump installation technology
After the location for installation has been selected, installation work begins, which is carried out in several stages.
Carrying out preparatory work
The pumping unit will need a solid base, which can be made of wood, brick or concrete.
The surface on which the equipment is installed must be level. The pump vibrates during operation, which negatively affects the base and can lead to leaks. To do this, strapping and reinforcement are done, and to reduce vibration, it is recommended to place rubber gaskets directly under the supports.
Assembling the water intake unit
The following options are possible:
- Standard connection diagram when it comes to a station with a surface-type pump, provided there is a built-in ejector. In this case, the assembly is a check valve on which a strainer is installed. They are connected to the system through a coupling.
- Installation equipped with an external ejector. In this case, a check valve equipped with a mesh filter is installed on the ejector, and 2 pipes are connected on top.
- A submersible pump, the design of which includes a coarse filter. A check valve is also used here, but it has its own characteristics. Since the device weighs a lot, you need to secure it to a strong cable, and the knot is lowered so that it is separated from the bottom of the source by at least 0.5 m.
Installation of station surface elements
There are different installation schemes for such equipment. The choice is made depending on what type of unit is used for pumping water. But the basic rule is that any device can be included in the circuit only if it is installed through ball valves and check valves. In this case, individual components and parts of the system can be changed or repaired without draining all the water.
Installation diagram.
Although theoretically such a possibility should also be provided for. For this purpose, a tap must be made using a tee to which the drain valve is connected.
In addition, we must not forget about water purification. A coarse filter must be installed on the supply pipeline. And on the pressure line that goes to the consumer there is a fine filter.
First launch of the station
Since the power of the electric motor is large, it is recommended that a separate power supply be provided for this equipment. A grounding device and installation of a voltage stabilizer are required.
Before starting, you need to check the pressure in the air chamber of the accumulator. The value largely depends on the capacity of the hydraulic tank. For example, if it is 20-30 l, then the pressure is 1.4-1.7 bar. If the volume of the hydraulic tank exceeds 50 l, the corresponding pressure indicator should be 1.7-1.9 bar.
An important point is that before starting the station for the first time, the working part of the system is filled with water. There are 2 options here:
- Unscrew the plug from the filler hole
- If the pipeline includes a funnel, then it is more convenient to use it.
Filling of water is carried out until it begins to pour out.
The launch itself is carried out in the following sequence:
- Connect the pump to the electrical network.
- Open the valve on the filler funnel slightly to allow any remaining air to escape.
- Turn on the unit.
- If necessary, make additional adjustments to the pressure switch and hydraulic accumulator.
2-3 minutes after startup, water should flow from the outlet. If this does not happen, you need to turn off the unit, add fluid and start it up again.
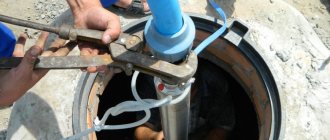
How to properly assemble and connect the system to a well?
Below is a diagram of connecting a hydraulic accumulator to a household submersible pump; let’s look at the main features step by step:
- Before connecting a deep-well pump to an installed hydraulic accumulator, the pump itself should be placed in the well.
- The pump is lowered by a steel cable. A power cable and a pipe for pumping out liquid must be connected to it.
- The water level sensor must be immersed. It will transmit information to the control unit.
- The installed control unit will have a relay and dry-running protection. If the water level drops, a signal is sent to turn off/on the device.
- Afterwards the HA with an air valve is installed. Its installation is carried out in a dry and warm place, inaccessible to frost.
- To prevent the pressure in the accumulator from dropping, a check valve must be installed.
- After this, the pipeline is led to the water intake points and into the house.
First start
Having completed the installation of a water station, you should take a responsible approach to its first start-up. To do this, follow the instructions:
- Unscrew the plug in the pump body and fill it with liquid.
- The suction pipe is filling. Make sure the liquid has filled the entire space.
- Check the pressure in the accumulator; it should not drop. If it falls, it means the check valve is not holding. You can increase it with a car pump. If the pressure is too high, it releases through the nipple.
- After filling the system, close the cap tightly.
- Connect the pump to the mains.
- Remove air from the equipment by opening the valve slightly.
- To do this, the unit must operate for about three minutes. Water will begin to flow through the outlet.
- If the liquid does not flow out, add water to the pump and repeat the procedure.
To start correctly, it is important to know how the device works.
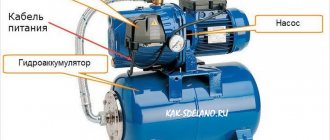
Features of pumping equipment
Pumping stations have standard equipment. The unit consists of the following parts:
1.hydraulic accumulator, which is the main part of the device. Protects against water hammer when liquid is supplied to the tank.
2. surface pumping equipment, with the help of which water is drawn from the source.
3.an electric motor in which an electrical wire is connected to a mechanism to control the pressure.
4.monometer, which controls the pressure in the station.
5. relay that controls the pressure level. The device automatically adjusts, starts working on its own, if the pressure drops, and when it reaches the maximum, it turns off itself.
Tips for use
It is necessary to adhere to the following rules and recommendations for operating the installation:
- Check the pressure in the system once every 30 days.
- Check the pressure before starting after a long pause.
- Periodically clean the coarse filter, lowered directly into the source.
- The system must be installed in a dry and warm place, protected from frost and moisture.
- The laid pipeline must be insulated and protected from freezing.
- If the unit will not be used in winter, the system should be completely drained of water.
Connection sequence
Connection to a well and borehole
First, let's look at how to properly connect a pumping station to a well or well. In this case, we will pay attention specifically to the two-pipe connection diagram, since it is more complex. We work in this order:
- First, we assemble the ejector with our own hands. As a rule, this is a monolithic unit made of cast iron, which has three outlets.
- We install a coarse filter made of propylene mesh at the lower outlet of the ejector.
- There is a plastic socket at the top of the cast iron structure. You need to put a squeegee of the required length with a diameter of 32 mm on it.
- Next, you need to assemble a squeegee to fit the diameter of the pipeline. Usually two parts with adapters are enough for this.
- A bronze coupling is installed at the outlet of this outlet. With its help, the transition to the polyethylene pipe will be made.
Attention: It is very important to carefully seal all connections. To do this, you can use sealing paste or flax.
- Next, trenches are dug from the hydraulic structure to the house below the freezing point of the soil.
- Water pipes are laid in the trenches.
- A cap is installed at the exit of the well casing. If you can't find it, you can use a knee with a smooth angle.
- To connect the ejector to the water supply pipeline, couplings are used.
- Before lowering the second end of the pipe, it must be passed through the elbow at a right angle.
- Polyurethane foam is used to seal the space. After this, the pipe can be connected to an adapter (angular), and it, in turn, must be connected to the outer part of the water supply.
- Now you can lower the ejector into the well. In this case, the immersion depth must be determined in advance, taking into account the elevation of the top of the casing pipe.
- The head is fixed to the casing using reinforced sanitary tape.
Features of connecting to the water supply
If there are centralized water supply networks near your home, then the pumping station can be connected to them. Typically, the need for such a connection arises when the pressure in the system is too low, which does not allow the heating equipment to function efficiently and correctly. This situation can arise for several reasons:
- the hydrogeological conditions of the area have changed;
- outdated equipment is used;
- As the number of residents has increased, water consumption needs have become greater.
It is important to know: before connecting the pumping unit, you must purchase and install a storage tank or accumulator.
To connect to the central water supply you need to perform the following sequence of actions:
- The place where the pipeline will be disconnected is selected in advance. After stopping the water supply, the water supply is divided into two parts.
- So the part that comes from the city highway is connected to the storage tank.
- The liquid from this tank must flow through pipes to the pumping unit. A pipeline leading to a residential building is connected to the outlet from the pump.
- Next, the electrical wiring is laid and connected.
- After this, you can perform a test run, configure and adjust the equipment.
The main thing in setting up a pumping unit is to select the correct pressure in the system. To adjust the equipment, a small amount of water (about 2 liters) is poured into a special hole on the pump unit. Now you need to open the tap and measure the pressure in the system at which the pump turns off and on.
Attention: the optimal pressure to turn off the device should be within 2.5-3 bar, and the maximum pressure to turn on the pump should be 1.5-1.8 bar.
If the pressure at which the unit operates does not fall within the specified limits, it is necessary to adjust the device. It's very easy to do this:
- The cover on the pressure switch opens.
- To adjust the device shut-off pressure, use a screw marked “DR”. It needs to be twisted towards decreasing or increasing depending on the results.
- To adjust the switching pressure, you need to turn the screw marked “P”.
- After adjustment, the cover on the relay is put in place.
Also, do not forget that the long-term and proper operation of pumping equipment is affected by the composition of the water, namely various admixtures of sand and clay. To protect the equipment from impurities, a filter is installed at the suction inlet of the station.
Important: so that installing a filter does not lead to a decrease in pressure in the system and a decrease in pressure, it is necessary to systematically clean it. If the filter becomes so dirty that it stops passing water through it, this can lead to breakdown of the pumping equipment.
Popular models
Now we invite you to familiarize yourself with the list of which system is better. Let's compare several units according to parameters and different price categories. This will help you choose a device for your garden.
| Manufacturer | Description |
| Quattro Elementi Automatico 801 | From 6 thousand rubles. Chinese manufacturer. At a low cost, a solid service life is observed. The package includes a check valve, filter, etc. The installation is also equipped with automation, resulting in an ideal unit. Productivity – 3.2 m3/hour |
| GARDENA 3000/4 | From 10 thousand rubles. It is distinguished by its silent operation, low weight and high-quality body. Among the disadvantages is the plastic tee installed inside the pump. It often breaks down. The outlet/inlet pipes have weak threads. Productivity – 2.8 m3/hour |
| GILEKS Water cannon PROF 55/90 House | Cost from 25 thousand. Easy to install. An obvious disadvantage is the short lifespan with regular use, about four years. Productivity – 3.3 m3/hour |
| Wilo HMP 603 1 | Cost from 30 thousand. The high price is fully justified by the excellent quality of the installation. Additionally, you should purchase a dry running relay. Otherwise a great option. Productivity – 8.1 m3/hour |
| ESPA Aquabox 350 TP 15 4 M | Cost from 80 thousand rubles. Ensures uniform and stable water supply. Automation increases operating comfort. The price is fully justified by its technical characteristics. Productivity – 3.6 m3/hour |