How to glue grinder tape
How to glue grinder tape. How to glue tape on a grinder.
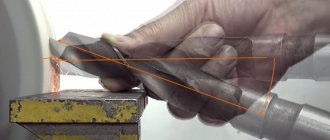
To glue the tapes, I use a wooden guide into which the ends of the tape are inserted for centering. The tape prepared for gluing (cut ends at 45 degrees) is inserted into the device with the abrasive at the top. They are fixed with a strip of metallized Moment tape. Next, remove the tape from the device, turn it over and insert the tape, grain side down, into the device. Mark the length of the gluing, degrease and apply Marathon glue (same as Moment, only for shoes). We first prepare the fabric backing. Raincoat fabric is an excellent choice (I don’t know what it’s called correctly, but it looks like bologna (its thickness is 0.1 mm) but not so slippery). A piece of backing measuring 8*6 cm is cut out. Glue is applied, wait 10 minutes, firmly apply the backing to the tape in the device, and smooth it out. Then we take out our tape, lay it on a piece of rubber, take a mallet and tap the gluing area. Then we cut off the edges, singe it with a lighter, remove the tape from the front part and lay it down for 24 hours for final gluing (so that the glue dries).
To work, you will need Marathon glue (the same as Moment, only for shoes), a wooden guide, metallized tape, a backing that is ideal for a raincoat fabric (I don’t know what it’s called correctly, but it looks like bologna (its thickness is 0.1 mm. ) but not so slippery). And a piece of rubber.
Belt grinding machines allow you to remove the effects of corrosion, paint residues, and carry out the operation of grinding surfaces made of various materials (metallic and non-metallic structures). The element for carrying out such work is a sanding belt. Manufacturers offer a wide range of such products. The belt for the grinder is selected based on the requirements for solving the tasks, the quality of processing, and the type of material being processed.
Sequencing
The main stages of this work are:
- Sandpaper cutting.
- Installing a sheet of metal in a vice.
- Trimming the ends of the tape.
- Removing abrasive from its corner.
- The final stage is gluing.
Let's look at each of them in more detail.
Trimming
The tape is cut with any tool, you can use ordinary scissors. Before starting preparation, you need to make a cut line on it using a ruler and pencil (it is required that it be as even as possible).
Having completed the preparation stage, you can begin cutting.
Installing the support in a vice
During the entire gluing process, it will be convenient if a thick piece of metal is inserted into a vice; corners will need to be laid out on it during preparation and gluing. Therefore, you need to firmly secure it in them.
Note! The metal sheet must be made of a material capable of withstanding the temperature of the gas burner.
Preparing the corners of the tape
The end of the sandpaper is laid out on the prepared area. It needs to be cut at an angle. At a distance of 3-4 cm from the edge, draw an oblique line with a pencil.
Note! For better stability, you can place a magnet on top of the paper.
The second end is simply cut at a similar angle.
Removing abrasive
At a distance from the edge of the prepared end to approximately 4 cm, it is necessary to remove the dust from the sandpaper.
You need to prepare a tape with the same thickness, about 10cm in length.
Next, the algorithm of actions is as follows:
- the gas burner adjusts the fire supply under the metal “table”,
- it heats up simultaneously with the sheet of paper placed on it,
- when everything is warm enough, the burner turns off,
- the hot corner must be coated well with a silicone corner to the drawn line,
- A piece of sandpaper is firmly applied on top and secured firmly (you can put some kind of press.
After some time (5-10 minutes), the load is removed. You need to tear off the second piece, which has stuck tightly and, having been torn off, will take on all the abrasive, cleaning the edge of the desired tape.
Gluing
When the gluing area is ready, it can be fastened to the second end.
The manipulations will be similar to the previous stage:
- The site and material are heated using a gas burner.
- A hot, clean area is coated with silicone.
- The second end is overlapped on top.
- A load is placed on the resulting circle, under which the joint will dry out.
When all the material has cooled and dried, a full-fledged grinder belt will be ready and can be used.
This way you can get an excellent homemade belt for your sanding machine. This method is the fastest, unlike other similar ones, since silicone dries much faster than the glue used in similar methods. You just need to have the tools and material for this.
Types of grinder belts
Sanding belts for grinders are classified according to the following indicators:
- purpose (type of operation performed, quality of processing);
- geometric parameters (length and width);
- permissible speed;
- type of abrasive;
- method of applying an abrasive coating;
- the company producing such products;
- cost.
Based on the type of operations performed, grinder products are divided into four categories:
- pre-processing (creation of finished forms or blanks);
- rough surface treatment;
- preparatory operation before final grinding;
- fine or final polishing.
Read also: Hexagon name in geometry
Each operation uses its own sanding belt. The solution to the first problem is carried out using a rough (stripping) tape of grade P24. For roughing, smaller grades P36 are used. Preparatory operations are carried out on P80–P120 belts. Finishing is carried out using belts of the smallest abrasive. For this purpose, diamond tapes of grades A3k0–A100 can be used.
The permissible speed of movement of the grinder belt is determined by the substrate material and the strength of the entire structure. A durable fabric or synthetic fiber-guided base is used as a substrate.
Based on the type of sanding material and the method of its application, the abrasive belt is divided into categories.
The following is applied to the surface as abrasive chips:
- natural stone (for example, silicon carbide or garnet);
- ceramic chips;
- alumina;
- diamond chips.
It is applied to the surface in two ways: open or closed. Each of them provides a certain degree of coverage of the substrate. The first applies abrasive to no more than 60% of the surface of the abrasive material. The second provides full coverage.
The geometric dimensions of the grinder abrasive belt depend on the technical characteristics of the grinding machine. The main parameters are length and width. All of them are standardized and have several established sizes. They are available in two widths: 50 and 100 millimeters. Length is a more variable value and is equal to 610, 915, 1230, 1600, 1800 millimeters. For some specialized machines, a belt of a given size is produced: 2000 mm with a width of 50 mm.
Depending on the characteristics, a choice is made for processing wood, metal, and polymer surfaces. In some cases, sanding tape is used to polish the surface.
Which grinder belt to choose.
There are many sanding belts on the market that vary in price and quality. Abrasives from the most well-known manufacturers will be taken as examples.
If we consider the budget niche, then we should focus on the products of the BAZ Belgorod Abrasive Plant. Their products are quite cheap compared to other manufacturers. This manufacturer also has ribbons with ceramics. They are quite “aggressive” and are designed for processing hard, hardened steels. But the products of this manufacturer wear out quite quickly and begin to heat up. Metal dust cokes on the belt and begins to tear grooves on the workpiece being processed. This happens on all tapes, regardless of the manufacturer, but on products produced by BAZ everything happens much faster.
Better quality abrasives are produced by VSM and 3M. They have different series of grinder abrasives that are designed to completely finish the workpiece, from roughing to polishing. VSM products offer a good balance between price and quality. Products from 3M are distinguished by their high quality, wear resistance and high price. Products from 3M are better than VSM tapes, but their price is 30 percent more.
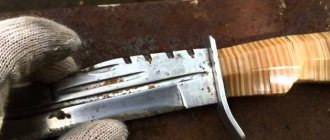
Below is a kit that can be used to process any steel. For example, process a blade and bring it to its final state.
On the Internet, many advise starting processing using P24 abrasive grain. This is the largest grain, which is intended for rough peeling of the workpiece. But it is better to start processing with finer grain P40 or P36. Logically, a large grain should process the material faster, but in practice, a large grain processes faster, and a belt with such grain shrinks faster than with P40 grain. P40 grain works more accurately; after processing, there are fewer deep marks on the workpiece, which are then difficult to remove.
For example, let's take products from the VSM company with P40 grain of the XK880Y series or from the 3M company of the Cubitron 2 series. These are series with ceramics for rough processing of material. Afterwards you will need a ribbon with P80 grain. The P80 abrasive removes the risks left from the P40 grain. Next, select abrasive grain P120. Belts with grain P60 and P100 are available for sale. But in order to save money, we skip them. It is not necessary to use all the grains in order.
At this stage, ceramics are no longer needed. Other abrasives are required for finishing.
As experienced experts advise, if you finished on ceramics with P120 grit, then you should also switch to a softer abrasive with 120 grit, but in order to save money, you can start with P180 grit.
The next series is the kk712x from VSM. The grain material is corundum compact grain, also called compound. This abrasive removes risks from the previous grain well, without leaving behind large marks. With other abrasives, there is a problem when P160 grain leaves marks on the workpiece, which are then difficult to remove. This most likely happens due to the fact that the tape cokes; there are no such problems with this abrasive. The only drawback of the compounds is that they quickly become unusable.
After the P180 compound, the next tape is the same series, but the P220 grain. In principle, you can end there; the blade will already have a marketable appearance, but it can be improved. For example, someone needs polishing. We choose the sk772t series and P320 grain. This is also a compound, but a finishing one. Its processing purity is higher. After P320, we move on to P400 abrasive and then P800.
If you want to get a mirror, then you should then use dialux pastes.
Above we presented a set for processing ordinary and hardened steels, but you need to understand that this set is not suitable for all cases. You need to know that each material has its own abrasive to process.
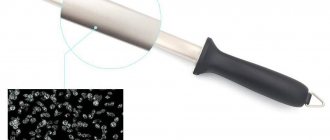
Advice
Buy a rubber pencil. It removes coking dust on the sanding belt, and it lasts at least 2 times longer.
It is also important to understand that the shorter it is in length, the faster it wears out.
Rubber pencil.
What you should know when choosing a tape
To obtain good polishing quality, it is necessary to navigate the grinder parameters, equipment characteristics and features of the surface being processed. When selecting a sample, it is necessary to analyze the following parameters:
- what type of product is needed (coarse, medium, fine or diamond abrasive);
- calculate the belt speed (it must withstand a shaft rotation speed of more than 1500 rpm);
- determine what abrasive resistance the selected specimen has;
- find out the value of the maximum permissible elongation and tensile strength (products with an indicator of at least 15% are considered good);
- on what basis the abrasive is applied (by what method and its composition);
- use the marking to determine the length of the tape;
- whether the width of the belt suits the dimensions of the machine used.
Read also: Channel 14 weight 1 meter GOST
Calculation of parameters and assessment of the main characteristics of the grinder must be made before purchasing the product. This will get rid of problems that may arise when replacing it or using it incorrectly.
How to glue tape with your own hands
The retail chain sells various abrasives ready-to-use. They can be in rolls or already glued to a specific size. However, it is not always possible to find the required copy. Sometimes it becomes necessary to replace a failed tape during operation with a serviceable one. In these cases, the abrasive strip is made independently. This is a simple process, but requires knowledge of the gluing procedure, the availability of appropriate glue and accuracy. To solve this problem you will need:
- tape for gluing abrasive materials;
- glue (the choice is quite wide: from specialized to universal);
- degreasing liquid (gasoline or white spirit);
- a clamp or weight for compressing the glued parts while the glue dries.
Gluing is carried out in several stages:
- Mark a strip of abrasive for the grinder along its length. It should be noted that to make the connection stronger, the joint of the strip is glued at an angle. The angle of inclination may vary. The larger it is, the longer the contact length.
- Cut out the backing. Its length depends on the selected material. It determines the reliability of gluing.
- Degrease all surfaces that are planned to be glued. The quality of processing affects the final result.
- Gently press the substrate and parts of the abrasive strip. It is advisable to place the joint under a press or use a clamp. If this is not possible, use any load.
- After completion of the work, the structure is left under load for several hours. The required time, procedure and rules for working with a specific glue sample are given in the instructions or written on the packaging.
If gluing is carried out carefully, a homemade strip will last no less than a product manufactured at a specialized enterprise.
Grinding machines of this class have wide capabilities. For a more complete analysis of their application, it is advisable to generalize the experience of a large number of users. Share your opinion in the comments, this will reveal additional grinder opportunities.
Read also: DIY devices for cutting logs with a chainsaw
All owners of a grinder (Grinder) sooner or later face the problem of lack of sanding belts, so I want to offer you a simple and affordable method for gluing them yourself. The advantages of this method: the ability to glue tape of non-standard length/width, availability of consumables, low cost. So let's go.
- The sandpaper itself;
- Glue moment or equivalent;
- Silk ribbon (used to decorate cars at weddings, sold in fabric stores and the like).
Mark and cut out a piece of sandpaper to the required size.
Cut the ribbon to the required size.
To pre-join the sandpaper, we glue several strips of masking tape onto the abrasive side.
We connect the sandpaper (make sure that everything is smooth and without gaps) and for greater reliability we apply several dots of superglue (which is cyanoacrylate).
As soon as the points have set, we proceed to the simplest degreasing. We degrease both the sandpaper and the tape.
Next, generously coat the sandpaper and tape with glue (special attention to the joint and edges) and connect.
Just connect it evenly and not as in the photo