Often the desire to make their home even more attractive and interesting prompts owners to use very rare and intricate materials in their work. Previously, vinyl records and metal alloys, matchboxes and scorched wood, textiles and leatherette, and much more were used for decoration: an experienced craftsman will find a use for everything. Today, polymer plexiglass has gained wide popularity, which can be used both for decorative purposes and as a material for creating intricate devices for household use. Thanks to a creative approach, skillful hands and certain knowledge, you can create truly unique objects from organic glass, which will later become your pride and home decoration.
A little about the material
The named material is a polymer alloy that has high strength and at the same time maximum ductility (subject to the use of high temperatures). The composition of plexiglass includes amorphous polymers, which mainly consist of unfolded and linear macromolecules. This composition of the material allows us to achieve its absolute transparency, strength and lightness.
A new material that significantly expanded the capabilities of builders and designers
The advantages of plexiglass used as a material for creating decorative interior elements are:
Therefore, organic glass is becoming increasingly in demand among jacks of all trades.
It is worth noting that completely different intricate little things can be created from plexiglass. These can be cute bookcases and fancy shelves, small aquariums or pots for indoor plants, semicircular partitions in the room or simple tabletops. In some cases, it may be necessary to bend the plexiglass at a given angle.
You can carry out this task at home, following the basic rules for working with plexiglass.
Several principles of working with plexiglass
Before you start melting and bending plexiglass, you need to learn several principles that will help you complete the work as efficiently as possible and without unnecessary waste of material.
- So, to form a part of the required size, it is necessary to cut a piece of material with the desired parameters from a whole plexiglass sheet. This will result in economical material consumption and higher productivity of work performed.
- For work, you must use only clean plexiglass. For these purposes, it is recommended to wash the material.
It is important not to use abrasive materials to clean plexiglass. Only a soft cloth and natural drying of the polymer fabric. Otherwise, noticeable and unsightly scratches and stains will form on the plexiglass, which spoil the appearance of the material and reduce its transparency.
- After washing the plexiglass, do not immediately begin bending work. Let the material dry. This will take at least a day in a dry room at room temperature. Or blow dry at 80 degrees Celsius.
The principle for calculating the time for drying plexiglass using a hairdryer should be as follows: 1 hour per 1 mm of material thickness in each section.
- When starting to heat plexiglass in order to deform it at the desired angle, keep in mind that heat treatment of the material must be carried out on the opposite side relative to the bending angle. That is, we heat the top of the material and bend it down.
- To bend plexiglass, it is enough to use a heating temperature of 150 degrees, and to melt the material and pour it into prepared forms, you need a temperature of at least 170 degrees.
Important: to properly bend plexiglass at home, you need to heat an area of the material three times greater than its thickness. That is, if your plexiglass has a thickness of 3 mm, then in order to bend it evenly and beautifully, you need to heat up such an area along the line of the intended bend, the width of which will be equal to 9 mm. With this thickness of plexiglass, it will be sufficient to treat it with a heat device on one side of the material. If the thickness of the plexiglass exceeds 5 mm, then it will need to be heated on both sides along the intended fold line.
- After bending the plexiglass, it is important to let it cool naturally. Do not use water or cold air as a coolant. This may cause damage to the finished product in the form of cracks, bubbles, etc.
Gluing
In order to glue plexiglass, it is recommended to use special adhesives. The best adhesive is made from plexiglass shavings, which are dissolved in 5% dichloroethane.
Among the advantages of this adhesive composition, it is worth highlighting quick drying, reliable adhesion and transparency after complete drying, therefore, even if you apply the glue carelessly, it will remain unnoticeable.
In order to be able to carefully glue the workpieces, they must first be cleaned of dirt and dust and only then begin to apply glue.
Processing plexiglass at home is not at all difficult; the main thing is to study the features of working with this material and you can begin the intended actions.
Ways to bend at home
Necessary materials
In order to give the plexiglass the desired configuration, you can use one of several popular methods:
- Heating the material using a hair dryer;
- By boiling;
- Using nichrome wire.
Depending on the method of bending the plexiglass, you will need a heating element (a hair dryer, nichrome wire or a saucepan with boiling water). In addition, prepare:
- Hacksaw for metal;
- Vise for reliable fixation of the plexiglass plate;
- Shape for bending (pipe, block, tabletop, etc.);
- Abrasive material for grinding the edges of the product;
- A little water (to cool the material while cutting it).
Preparatory work
If your future product requires the use of a small piece of plexiglass, then you first need to cut it off from the overall fabric. To do this, securely fix the plexiglass in a vice and cut the required piece with a hacksaw. In the places of fixation, do not forget to lay soft material that will prevent damage to the plexiglass.
To cut plexiglass, you can use either a hand saw or a jigsaw.
Important: use only a sharp hacksaw.
Otherwise, the material may be damaged and deformed. Cool the cutting line with water while cutting plexiglass. This will avoid overheating of the plexiglass and its possible melting.
If a crack appears on the material during cutting, do not worry. You can remove it with a little trick: treat the edges of the split with chilled acetic acid. By shearing the plexiglass at the split site, allow acetic acid to penetrate deeper into the pores of the material. Then squeeze the plexiglass at the crack. The material will melt and the polished crack will not be noticeable.
Bending by boiling method
This is the easiest way to bend plexiglass, requiring virtually no additional tools.
Remember to use protective gloves to avoid burns.
5. Leave the part formed from plexiglass until it cools completely.
Using a hair dryer
If you have to bend a fairly large piece of plexiglass, then use a hair dryer for this purpose. Its power will allow you to process a large area of organic polymer material in an extremely short time.
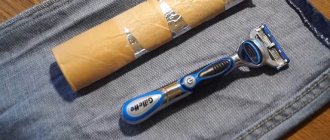
Using nichrome wire
Using nichrome wire carefully stretched under plexiglass, you can bend the material in a straight line without effort. To do this you need to do the following:
Video: bending plexiglass with nichrome wire
We bring to your attention a short video that will clearly demonstrate how to bend plexiglass using nichrome wire.
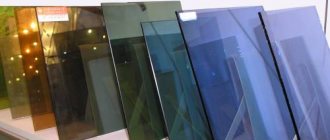
Plex) is a transparent plastic that looks very much like glass, but compared to glass it has more advantages:
- Twice lighter in weight;
- Stronger and more impact resistant;
- Has the best thermal insulation properties;
- More transparent.
Acrylic has two major drawbacks: it is more expensive and, when exposed to direct fire, it begins to melt and burn. Also, when working with it, it is necessary to avoid heating, since acrylic does not react well to high temperatures and this can lead to significant stress in the material, which, in turn, can lead to the formation of cracks.
Plexiglas cutting
This is one of the most accessible methods of processing this material, because it is quite possible to do without a special tool. You can use a cutter; if you don’t have such a tool, you can make it yourself, it’s not difficult. You can use a hacksaw or a circular saw, or an electric jigsaw will also work.
When you decide to cut plexiglass, do not forget that when using electrical appliances, the material can quickly heat up and melt, so you need to work with short breaks or cool the cutting tool.
Before you start cutting plexiglass, you need to clean its surface from any existing contaminants, also think about how you will work, because to get an even cut, you need to firmly fasten the material.
If you need to make a curved cut, use a nichrome thread for this; a hot spring will also work.
How to cut?
Plexiglas is usually protected with film on both sides. It is recommended to leave the acrylic in a protective film throughout the processing process to protect the finish.
There are several ways to cut plexiglass, but regardless of the method you use, you must always ensure that the cutting tool does not become a source of heat. One method of cutting is to use a cut-off machine, preferably with a 10-tooth-per-inch carbide blade. Plex can also be cut using a CNR milling machine, carbon dioxide (CO2) laser technology or a thin supersonic water jet. Please note that the edge finish will vary depending on the cutting method.
Choose a machine blade that is specifically designed for cutting acrylic. The teeth of the blade should be smooth, thin and evenly distributed at the same height. Make sure that the blade contacts the material at a constant speed, as changes in speed can cause the edge of the material to melt.
Thin pieces of acrylic (1/8 inch ≈ 3mm thick or less) can be cut like glass using an engraving knife, metal scriber, awl or mounting knife and finally broken apart carefully. Please note that if you need to make a long cut, this method will not work, as it leaves edges that are not flat enough, which are then difficult to glue.
Methods for processing plexiglass
Acrylic glass is very easy to process and does not require any special equipment (standard tools for wood or metal working are sufficient) or any special skills.
Cutting.
Plexiglass is easy to cut, even manually (with an ordinary hacksaw); you can use cutters, jigsaws and cutters, bow and band saws for cutting. You can make cuts up to 3 mm deep on the sheets. The sheet is cut repeatedly with a scorer along a ruler or a curved template along a not too small radius, and then breaks. Straight cuts can be easily broken at the edge of the table. The fracture must be processed accordingly (eg scrapes).
For precise cutting, it is preferable to use a circular saw with a speed of 2500-3000 rpm. when using a disc blade with a diameter of 25 cm with straight teeth reinforced with carbide. An exhaust hood must be provided at the workplace (to remove chips and gas). Vibration during cutting should be avoided. To avoid overheating of plexiglass when cutting, it is necessary to provide cooling. Heat can be removed with an air jet, as well as with water or paraffin (cooling lubricants cannot be used for metals). The cutting surfaces of the tools must be sharpened (to avoid obtaining poor-quality cut surfaces and overheating of the material due to increased friction).
It is advisable to cut plexiglass without removing the protective film (paper) to protect it from accidental scratching. Film (paper) is also very convenient for marking contour cutting and holes.
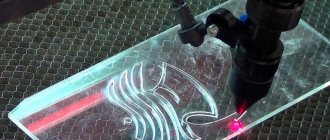
Laser cutting is used to obtain polished ends of acrylic glass and ultra-precise cutting dimensions, as well as to cut out letters and other complex contour parts.
Milling.
For milling plexiglass, standard milling machines with high cutting speeds with multi-bladed cylindrical or coarse-toothed double-edged cutters are used. Using milling equipment, you can process cut edges, make roundings and create curved surfaces, and also remove an edge from a molded part.
Drilling.
Drilling holes is done with ordinary tools and does not cause problems. Twist drill: point angle 60-90°, rake angle 4-90°, back angle at least 3°. When performing work, it is necessary to constantly remove chips from the surface being treated, removing the drill from the hole being drilled as often as possible, which is recommended to be periodically irrigated with water. When drilling thin sheets, it is recommended to use a hard, smooth spacer to avoid breaking out the bottom edge of the hole.
Gluing.
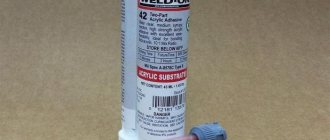
Solvents are suitable for gluing acrylic glass, however, due to their high toxicity, we suggest you use special and universal adhesives: universal instant adhesive based on cyacrine “RAPID”; two-component polymerization adhesive based on methyl methacrylate “AGOVIT” (supplied with a hardener and dye); one-component adhesive based on methyl methacrylate “COSMOFEN PMMA”, etc.
Polishing.
Acrylic glass is polished using a grinding wheel, followed by polishing paste (Goya), using a belt polishing machine or using an oxygen-acetylene torch (this procedure, however, requires special skill).
Plexiglas can be welded.
Flexion.
Bending of sheets “in a straight line” is carried out using the simplest equipment such as “Thermostrun” (linear electric resistors) at temperatures above 130C. Both cast and extruded plexiglass are subject to bending.
Using an industrial hair dryer, you can preheat the sheet to the molding temperature and give it a certain shape (this applies to fairly simple products).
In the manufacture of complex bas-relief and full-volume illuminated advertising products, hot molding is carried out in various ways: blowing, vacuum forming, stamping, etc. The molding temperature, depending on the brand and manufacturer, is in the range of 130-180 C. This process requires special equipment - drying chambers, presses, compressors, etc. The shrinkage of the material depends on the brand of plexiglass and is determined by its manufacturer.
Applying drawings and inscriptions on sheets using the engraving technique. Such products, made of transparent plexiglass, are especially impressive when backlit at the end (edge-lit technology).
Cleaning plexiglass.
To clean plexiglass, you should use water with household detergents added to it, finishing the cleaning by wiping the surfaces with damp suede. Avoid using solvents and abrasives.
Plexiglas, like all plastics, is subject to reversible linear thermal deformation under the influence of temperature changes (summer-winter). The change in sheet size is 3-5 mm/l.m. This must be taken into account when using plexiglass outdoors, especially when making large-sized structures: avoid rigid fastening, if possible use a “floating” fastening in the profile, when fastening with self-tapping screws, make the holes in the sheet slightly larger than the diameter of the self-tapping screw.
To buy plexiglass, check out the prices.
How to drill?
Acrylic lends itself well to drilling, but it is necessary to avoid heating and rough handling of the material during drilling. The heat generated by the drill can lead to melting or cracking, and any careless movement of the material near the drill can lead to breaks.
Use specially ground and polished drill bits designed for acrylic, or reshape a regular twist drill bit on a sander so it can be used for drilling in resin. The shape of a twist drill can be changed by grinding the edges of the drill on both sides so that a scraping action is created when drilling. If the drill is properly sharpened and operated at the correct speed, long, curly stripes will be achieved during the machining process.
Drill speed is also an important factor. Set the drill press to 500 to 1000 rpm. Always
Start and end processing at a slow speed. If you are going to drill several holes, let the tool cool down from time to time to avoid heating up the acrylic.
You can put a piece of plywood under the bottom of the acrylic sheet to give the drill more space and not touch the plexiglass when the tool slows down. To prevent cracking, do not machine too close to the edge (1.5 hole diameters from the center would be considered too close).
How to cut, drill, process and glue plexiglass?
Plexiglas (acrylic glass, acrylic, plex) is a transparent plastic that looks very similar to glass, but compared to glass it has more advantages:
- Twice lighter in weight;
- Has the best thermal insulation properties;
- More transparent.
Stronger and more impact resistant;
Acrylic has two major drawbacks: it is more expensive and, when exposed to direct fire, it begins to melt and burn. Also, when working with it, it is necessary to avoid heating, since acrylic does not react well to high temperatures and this can lead to significant stress in the material, which, in turn, can lead to the formation of cracks.
How to glue?
To achieve strong adhesion and transparent seams, it is recommended to use solvent-based adhesive. When working with this glue, make sure that the room is well ventilated and away from sources of heat and fire. Also, follow the manufacturer's instructions and be sure to wear safety glasses and protective clothing.
The capillary method of gluing acrylic is the most popular. To achieve perfect bonding, check that the surfaces of the elements are well connected and are flat, straight and clean. Connect the parts using adhesive tape or a clamp, and keep the connection horizontal so that the glue does not leak out.
Carefully apply glue along the edges. When gluing edges that form a square corner, apply glue to the inside edge. When gluing flat edges, apply glue to both sides if possible.
For best results, use a bottle with a needle applicator. It will take at least 30 minutes for the parts to stick together, but to achieve maximum strength - from 24 to 48 hours.