Construction specialists are well aware that one of the most problematic issues that arise when laying pipes is the method of overcoming artificial barriers. Such obstacles can be a variety of structures located along the route of the future pipeline (fences, sewer lines, roads, etc.). Generally speaking, the issue of digging trenches in such places (with subsequent laying of pipes in it) in the presence of an object that creates an increased load on the ground is specifically stipulated in the SNiP requirements. This is explained by the fact that such an operation can cause a collapse of the earth and destruction of the structure located above it. Do-it-yourself trenchless pipe laying becomes especially important when crossing routes with heavy traffic (including railways). It is in such situations that the so-called “puncture” of the earth is used, eliminating the possibility of unexpected soil subsidence at the work site.
How to make a puncture under the road yourself
Often, in order to lay utilities that involve installing a pipeline, it is necessary to overcome an obstacle such as a road.
This type of work, such as a puncture under the road, is required in cases where it is necessary to install water supply across the road to a country house or summer cottage.
This method allows you to lay pipes of different diameters so that water or gas flows into the house. In addition, a puncture under the road is one of the universal methods of wiring energy cables.
How to lay a pipe under the road: methods
A direct puncture is not the only way to pass an obstacle without any losses. When laying highways use:
To determine how to lay a pipe under the road and which option to prefer, you need to pay attention to a number of factors. These include:
Another point under consideration is the economic feasibility of using a particular method. Since the main requirement in this case is to preserve the integrity of the road section, more often the choice is made on a “puncture”. This method is gradually replacing all other pipe laying technologies.
What tools will you need?
You can do a puncture under the road yourself. Before starting work, you must prepare the following set of materials and tools:
- apparatus for performing welding work and a grinder;
- sledgehammer;
- steel reinforcement or rods, the diameter of which must be 25 millimeters or more, and the length must exceed the width of the road by ten centimeters;
- cuttings of steel pipe of the required diameter and the same length as the rods;
- pump with a plastic tube with a diameter of 12 millimeters;
- a barrel designed for two hundred liters;
- funnel with a two-meter hose.
In addition to tools, you will need remarkable physical strength and patience.
Step-by-step execution of work
First stage.
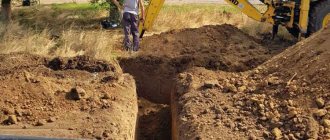
First you need to dig holes on both sides of the road. Their depth should be equal to the depth of the installed pipe. You need to add another 20 centimeters to this figure to make it convenient to work.
All subsequent work is carried out from the pit. It continues the trench and its length must be no less than the minimum length of the section of prepared pipe, which must be driven into the ground using a sledgehammer.
The receiving pit should have the same dimensions. It should have enough space for comfortable placement. Approximate dimensions may be 60 by 60 centimeters. As a rule, this is quite enough.
Second phase.
Mark the axis of the future hole. To do this, take a steel rod, sharpen it with a grinder, like a pike, and drive it into the ground in the place where the pipe will pass. The length of the rod should not be more than two meters. Otherwise, it will simply bend. Having driven in a section, weld the next one to its end, and repeat these steps until the rod appears in the receiving pit.
The fittings or steel rod indicate the direction for driving the pipe. During work, you may encounter the bar hitting a stone. In this case, you don’t have to take it out of the ground, since this is practically impossible, but simply retreat some distance and start working again.
Third stage.
At this stage we plug the pipe. But before this, you need to make a special nozzle from a larger diameter pipe so that the driven pipe does not flatten.
In addition, the edge of the pipe that will go into the ground must be made sharp using a grinder or even teeth cut into it.
After completing the preparatory work, place the steel pipe on the rod. Then put on the attachment and hit this structure two or three times. After this, remove the nozzle, push a thin plastic tube into the pipe until it stops and turn on the pump. It is best to put a coupling on the tube, with the help of which its diameter will be narrowed in order to increase the pressure of the water flow.
Do not forget to prepare for the fact that all the washed-out soil will flow in the opposite direction, that is, towards you. Therefore, it is better to prepare a pit in advance and install a barrel in it into which all the dirt will drain.
In order for the soil to fall into the barrel, you will need a funnel onto which you need to put a two-meter hose. A funnel can be made from a five-liter bottle by simply cutting off the bottom.
After the receiving barrel is almost completely filled, the pump can be placed in it, but not at the very bottom, but only in the middle. To prevent the pump from breaking, it must be protected with a filter. A small plastic bucket with small diameter holes drilled in it is also suitable as a filter.
Fourth stage.
After washing some of the soil out of the pipe, take the sledgehammer again and repeat the third step. When the entire pipe goes into the soil, you need to weld the next section to it and repeat the entire cycle until the pipe appears on the other side of the road.
When the job is completed, the guide pin will be free of soil. It can be reused, which cannot be said about the pipe that was driven into the ground. It can no longer be used for its intended purpose, since the quality of welding during such work could suffer. Therefore, a steel pipe is used as an insulating casing for a pipe that has a smaller diameter and is made of other materials.
This method has proven effective when using steel pipe with a diameter of 57 millimeters. A PVC pipe for water supply was then installed into it, the diameter of which was 32 millimeters.
Of course, you can use pipes with a larger diameter, but then you will need to either drain the waste water into a prepared trench or install a container with a large volume.
How to make a puncture under the road with your own hands
Owners of land plots and their own houses know how difficult it is to lay communications if along the way you need to overcome some kind of obstacle: a stream, an asphalt path, a building, a roadway, etc. You can entrust this work to specialists, but horizontal drilling is expensive. Now we will figure out how to save money and make a horizontal puncture of the soil under the road with our own hands. It's not that difficult, and you'll end up saving 30% to 50% of the cost compared to hiring a drilling specialist.
In this article we will not give recommendations on tools or consumables - for now we will analyze the technology of trenchless laying of communications. In total, it involves making a horizontal hole in the ground (by compacting it), in order to then stretch a pipeline into this hole.
Choose the appropriate communication method
There are several methods that allow you to lay underground communications: direct puncture, the punching method, tunneling using shields and horizontal directional drilling, etc. The choice of method depends on:
- length of necessary communication,
- puncture diameter,
- nature of the soil (presence of rocks, natural groundwater)
- the nature of the development on your site
- the presence of existing underground communications
- your construction budget
Comparative table of methods for trenchless laying of communications
Please note that the choice of a trenchless pipe laying method depends on the diameter and length of the pipeline, physical and mechanical properties and hydrogeological conditions of the soil being developed and the equipment used. It may be advisable to use a different installation option in your area.
Do-it-yourself puncture technology under the road:
- Mark the route for laying communications under the obstacle. On both sides of the obstacle, dig working pits of the required depth (slightly greater than the depth of the puncture itself under the communications). The width of the starting pit should be such that a worker with a reinforcement rod of up to 2 meters can fit into it.
- From the starting pit, start driving in a reinforcement rod along the expected puncture line - it will act as a guide, and at the same time help you find out if there are any underground obstacles (stones, etc.). Drive the rod until its end appears from the side of the finishing pit. If the length of the rod is not enough, weld the next rod. Keep in mind that it is better to use rods no longer than 2 meters, otherwise they will be deformed under impacts even before entering the ground.
- Having laid the reinforcement as a guide, put a pipe on it and start driving it in. To make the pipe cut through the soil more easily, install a toothed nozzle on the leading end, and a glass nozzle on the other end (which is struck). As the pipe moves into the ground, soil will begin to accumulate and compact inside - it can be easily washed out with a water pump.
Safety precautions: should you pierce yourself?
Let us immediately note in what cases you should not make a puncture under the road with your own hands: if the length of the required route is more than 10 meters, and also when the territory already has underground communications or difficult to pass areas.
On sandy, clay and other soft soils, you can take a chance and do everything yourself if you have studied the area well enough. But in any case, you must prepare, study the technical part of the issue and be confident in your abilities.
When to pierce manually:
- You have an engineering or construction education or extensive practical experience in these areas to properly assess risks.
- You have agreed on a project for the construction or reconstruction of a house with a plan for future communications, and you have been approved for the work.
- You are confident in your physical strength (especially when it comes to mechanical punctures) or have several assistants.
- You have all the necessary tools: jack, drill, pneumatic punch or mini HDD installation, welding machine, etc. (the choice of tools depends on the method of laying communications).
- You are willing to put in the effort, spend time learning the technology, and do everything yourself to save on costs.
- You have examined the soil and are sure that it is suitable for the chosen puncture method. There are no underground communications in the required area.
- The length of the underground route, which will be carried out using the puncture method, does not exceed 10 meters.
If you have doubts or do not want to carefully study drilling methods, engage in soil research and other preparatory work, which may take several weeks, it is better to contact specialists. Qualified workers will complete the task within 2-3 days without damaging the landscaped area. At the same time, the companies provide a lifetime guarantee on their work, which means there is no need to worry about subsidence or soil collapse.
What should be done before laying the pipeline?
Development of the project and its approval is the first stage that the owners must complete. Any construction project must have a detailed, accurate plan for laying communications.
Getting approval
Preliminary coordination with local administration authorities will avoid all problems in the future:
An “amateur” connection to the highway without project approval can lead to the same result.
DIY trenchless pipe laying
- 1 Techniques for laying pipeline lines
- 2 Advantages of the “puncture” technique
- 3 How to make a puncture yourself
- 4 Videos
- 5 Photos
Construction specialists are well aware that one of the most problematic issues that arise when laying pipes is the method of overcoming artificial barriers. Such obstacles can be a variety of structures located along the route of the future pipeline (fences, sewer lines, roads, etc.). Generally speaking, the issue of digging trenches in such places (with subsequent laying of pipes in it) in the presence of an object that creates an increased load on the ground is specifically stipulated in the SNiP requirements. This is explained by the fact that such an operation can cause a collapse of the earth and destruction of the structure located above it. Do-it-yourself trenchless pipe laying becomes especially important when crossing routes with heavy traffic (including railways). It is in such situations that the so-called “puncture” of the earth is used, eliminating the possibility of unexpected soil subsidence at the work site.
Techniques for laying pipeline lines
Puncture under the road
One of the most used methods for laying pipes is puncture, used when working in clay and loamy soils (with pipes with a diameter of up to 550 mm). Let us immediately note that the length of the section laid in this way should not be more than 60 meters. In addition, in such a situation you cannot do without special equipment (winches and jacks, in particular).
The use of this method has undoubted advantages, thanks to which it is possible to carry out all the work without destroying the roadway (or any other building structure). Indeed, in this situation, you are laying a pipeline directly under structures or structures located on the surface of the earth.
A prerequisite for the use of this technique is to take into account the main risks associated with the possible shedding (erosion) of soil layers at the site of the pipeline. In all such cases, it is necessary to take into account not only the quality of the earth's composition, but also the depth of groundwater in the area of the proposed installation.
Recently, a method of laying pipes that does not involve digging any trenches has become increasingly popular among builders and is gradually replacing other options for their installation. Experts consider “puncture” the most reliable method and associate this with such advantages as:
- Preservation of the integrity of the area “pierced” by puncturing the soil.
- No threat to communications located in the neighborhood.
- Possibility of refusing special (heavy) construction equipment.
Horizontal directional drilling method
When the width of the road surface exceeds 10 meters, it is better to use another technology - horizontal directional drilling, or HDD for short. The maximum pipe diameter for this operation is 1200 mm, but private developers do not need such figures. It is possible to lay any highways - both metal and plastic. For horizontal directional drilling, the master will need a special drilling rig designed for this job.
It is installed in the place on the side of the road where the entrance to the pipeline route will be located under the road. To drill a hole, a monitor and locators are used: this equipment will make it possible to avoid even minimal deviations from the given trajectory. HDD is a method that is used to lay communications under any (artificial, natural) objects, at any depth.
Laying a pipeline using a drilling rig also consists of several stages.
The last stage is stretching the pipeline. To do this, attach a nozzle with a swivel to the pipe using a hinged earring, which will prevent rotation of the element. The other end of the swivel is connected to the rimmer, after which the pipeline is pulled into the well.
Yes, this is a possible alternative, but it will require additional investment. If anyone is wondering how much it will cost to rent equipment, they say that “hiring” the installation along with the staff will cost on average 1000-1400 rubles per hour. Prices, of course, can rise.
How to make a puncture yourself
Self-puncture of the soil
The practical implementation of the method of trenchless pipe laying with your own hands is possible only over a relatively short area (no more than ten meters), as well as if you are in good physical shape, which would allow you to perform heavy work operations. As for the equipment necessary for such work, you will definitely need the following simple tool:
- a simple welding machine;
- ordinary "grinder";
- small sledgehammer;
- reinforcement no thicker than 20 millimeters;
- steel pipe of your chosen diameter (several pieces);
- pump equipped with a plastic pipe;
- plastic barrel with a neck (capacity up to 200 liters);
- funnel with a hose up to 2 meters long.
The trenching process usually includes the following steps:
- Preparing a ditch on both sides of the route (with a margin of 12-13 cm). When digging it, the axis of the pipe that you plan to lay is outlined.
- After this, a pipe blank is taken and the end that is intended for driving into the ground is sharpened. In this case, it is best to cut teeth on it using a grinder.
- As you carry out all these operations (after each successive pushing of the pipe), you should wash out the soil from its hollow part.
- After each successive “rinsing” of the pipe, you should continue plugging it in with a sledgehammer.
Does it make sense to do the work yourself?
Before making a final decision on how to lay a pipe under the road, you need to think about the feasibility of this undertaking. If the tunnel is more than 10 meters long, then in this case it is better to avoid the “feat”, since the process will take a lot of time and effort.
The same conclusion can be drawn if there are other underground communications on the site, or if there are difficult-to-pass areas on the territory. Soft soil (sandy, clay) will simplify the task somewhat, but you need to know well not only your site, but also all the features of the stages.
Do-it-yourself piercing can be considered if:
If you have any doubts about your own abilities, and the preparatory work, which may take several weeks, is not inspiring, then it is better to turn to professionals. They will complete the task in a few days. A 100% guarantee of the safety of the road surface and route is another advantage; it still cannot be provided by independent work.
How to lay a pipe under the road? It’s not easy if the master and his assistants chose thankless manual labor and the same tools. It’s easy and fast if most of the work is done by special equipment and professionals. Many craftsmen who decide to make a gasket without the help of equipment encounter unexpected problems. Therefore, it seems that it makes sense to donate a small amount (1000-1500 rubles), but at least avoid unnecessary headaches.
Video
The technique for puncturing the soil can be seen here:
Pipeline pushing method - diagram
Drilling method
Shield penetration method
Completed puncture
Types of punctures
Depending on the mechanisms used and the principle of laying a channel for laying pipes, the following types of puncture are distinguished:
- pushing;
- horizontal directional drilling (HDD);
- auger drilling;
- hydropuncture;
- vibration puncture
For convenience of work, two pits (pits) are dug at opposite ends of the path of the pipe being laid - the initial and final.
Punching
This type of puncture is performed as follows:
- A directional drilling unit is placed in the initial pit, consisting of a frame with hydraulic cylinders that drive a carriage with a drill string - interconnected rods.
- The first to be installed in the carriage is a rod with a working head in the form of a sharp cone.
- Using an oil station (a gasoline engine with oil pumps), hydraulic cylinders forcefully press the first rod into the wall of the pit.
- After most of the first rod has disappeared into the soil, the carriage is pulled back using hydraulic cylinders. Using a threaded connection, screw the next one to the end of the rod, secure it in the carriage and repeat the pushing process.
- When the working head of the first rod of the drill string appears in the final pit, it is removed and a device for fastening and pulling the pipe is installed.
- By pulling out the pipe attached to the first rod, it is laid in the channel (case) drilled in this way.
When laying a polyethylene water pipe in winter, during the pulling phase, it is heated with a blowtorch or torch. This is necessary so that the polyethylene becomes more flexible, does not crack or deform when passing through the channel drilled for it.
Horizontal directional drilling
This method is widely used when laying water supply networks with a diameter of up to 200 mm. The puncture is carried out by special self-propelled units on caterpillar tracks, capable of working in conditions of limited space and marshy soil.
Advantages of the method
The popularity and demand for this method of laying water pipes is explained by the following advantages:
- Efficiency of work - compared to digging an open trench, puncturing takes 3-4 times less time.
- Low labor intensity - puncturing does not require significant physical effort and a large number of workers, as is the case with the trench method of laying pipes.
- All-season use - piercing the soil for water supply can be done at any time of the year using various installations.
- Environmentally friendly - this method of laying a pipeline avoids disturbance of the soil structure, damage to tree roots, destruction of natural landscapes, artificial lawns and plantings.
- Low risk of damage to nearby communications (sewerage, communication lines, gas pipelines) - when a puncture occurs, the likelihood of damaging nearby communications is much less than when excavating soil with an excavator or trencher.
- Low cost - even when hiring specialists with special equipment, digging a sewer using the puncture method costs 30-40% less than traditional trenching.
Other pipe routing methods
There are 2 more types of equipment that can be used depending on the characteristics of the soil.
Both options are worth considering as they are effective and promise minimal time wastage. And serious savings, since even if you rent equipment and invite specialists, the puncture will cost less. They say that the difference can be very noticeable - from 30 to 40%.
Puncture under the water supply with your own hands step by step
You can make a puncture underground for a water supply yourself, without involving specialists and contractors, if its length is no more than 30 m. Such work, with the exception of purchasing materials, will not cost the performer a penny, allowing you not only to save money, but also to gain useful experience in laying communications puncture.
Materials and tools
When piercing a road for a water supply with your own hands, the only materials needed are a thick-walled steel pipe with a diameter of 40 mm with a welded sharp tip of a pyramidal or conical shape. It is better to make such a working body from durable tool steel - a fragile material, when encountered in the soil with solid inclusions and layers of clay, can quickly fail by becoming deformed.
The tools for this work will be required:
Piercing stages
A simple puncture technology under a road or other obstacle consists of the following steps:
- Digging two trenches on either side of the obstacle. In this case, the trench from which the puncture will be made should be dug 1.5-2 meters more than the distance that is planned to be pierced under the obstacle. This is necessary for the convenience of working in a trench with a heavy sledgehammer.
- Laying a punching pipe at the bottom - using a level and bricks, the pipe is laid exactly in the center of the trench, resting the tip of the tip against the wall of the soil thickness that needs to be punched.
- Punching the soil layer under an obstacle - by hitting the end of the pipe with a sledgehammer, it gradually goes deeper into the soil until its tip appears in the trench on the other side of the obstacle. After this, the tip and the end flattened by blows of a sledgehammer are cut off using a grinder.
The pipe is removed from the puncture directly when laying a water pipeline into it, so that the earth around the made channel does not collapse and fill it up.
Cost of work
The price per meter of puncture of the soil layer under an obstacle for laying a water pipe depends not so much on the volume of work, the type of soil, but on the length and diameter of the channel being punched. Thus, laying 1 meter of water pipe using horizontal directional drilling will cost the customer on average 1300 -1600 rubles. When installing water supply pipes under roads, buildings and other obstacles using horizontal drilling, hydraulic or vibration puncture, the cost of 1 meter will be slightly lower - from 1000 to 1200 rubles.
Learn the technology
There is a lot of advice on the Internet on how and with what you can get a puncture. We advise you first of all to turn to qualified educational and technical manuals on performing underground punctures, and only then look for additional information on thematic forums. Here are some books and scientific articles that can help you study this issue:
- Tyumen Industrial University. Institute of Transport - Horizontal directional drilling technologies educational material.
- Karl and Clausr Imhoff - Handbook of Municipal Wastewater.
- Kharitonovsity. V.A., Bakhareva N.V. — Organization and technology of pipeline construction using horizontal directional drilling.
- Lopatina A.A. Sazonova S.A. — Analysis of pipe laying technologies
- Suponev V.N. Oleksin V.I. — Justification of installation parameters for trenchless installation of utility distribution networks using the hydrostatic puncture method