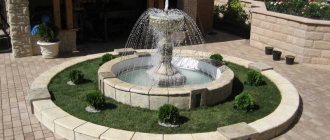
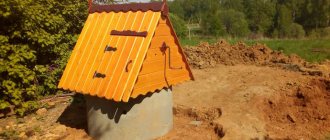
After purchasing a plot of land, the summer resident begins to solve the most important problems: you need to start somewhere in order to settle down. The most important thing is to provide yourself with water. Indeed, since life arose in water, without it, all living things cannot exist for a long time. You can bring water from somewhere, but only for personal needs. The watering problem cannot be solved using this method. It’s good if there is water at least close to the site. Any, even small, body of water will suit you: a river or at least a stream. The ideal option is a spring, but such luck is rare. All that's left is to get a pump. By the way, at first, a homemade water pump will do. Its use will alleviate the problem.
- 2 Option #2 – homemade wave pump
- 3 Option #3 - a furnace that creates a pressure difference
- 4 Option #4 – black grille for sunny weather
- 5 Option #5 – supercharger made from a plastic bottle
- 6 Option #6 – part from a washing machine
- 7 Option #7 – Archimedes and Africa
Option #2 – homemade wave pump
This pump also takes advantage of the river nearby. In a reservoir without a current, such a pump is unlikely to be effective. To make it you will need:
- accordion-type corrugated pipe;
- bracket;
- 2 bushings with valves;
- log.
The pipe can be made of either plastic or brass. Depending on the material of the accordion, the weight of the log must be adjusted. A log weighing more than 60 kg will fit a brass pipe, but a not so heavy load will be suitable for a plastic pipe. As a rule, the weight of the log is selected practically.
This version of the pump is suitable for a river and not with the most turbulent current, it is important that it is simple, then the “accordion” will contract and the water will be pumped
Both ends of the pipe are closed with bushings having valves. On one side, the pipe is attached to a bracket, on the other, to a log placed in water. The operation of the device directly depends on the movement of water in the river. It is its oscillatory movements that should force the “accordion” to act. The expected effect at a wind speed of 2 m/sec and with an increased pressure of up to 4 atmospheres can be approximately 25 thousand liters of water per day.
As you understand, the pump is presented in a simplified version. It can be improved by eliminating unwanted torque on the log. To do this, fix it in a horizontal plane by installing a ring stop on the lift using a bolt. The pump will now last longer. Another improvement option: soldered tips at the ends of the pipe. The bushings can simply be screwed onto them.
Particular attention should be paid to the preliminary preparation of the log. Don't forget that it will be placed in water. We prepare a mixture of natural drying oil and kerosene at a ratio of one to one. We impregnate the log itself with the mixture 3-4 times, and the cuts and ends, as the most hygroscopic, six times. The mixture may begin to harden during operation. When heated in a water bath, it will return fluidity without losing other properties.
Features of the manual method of raising water
In order not to regret the time spent on making a hand pump for water in the future, let's think about everything carefully.
If your system is still at the planning level and the well has not been drilled, then we recommend these materials for mandatory reading:
- How to find an aquifer,
- Well drilling methods and their features.
Advantages of a hand pump
I will try to describe the most “fat” and mostly important characteristics:
- The process of installing a homemade unit is simple and does not require the involvement of specialists;
- Thanks to the simple design of the homemade pump, it is possible to carry out quick installation;
- To pump water, only human power is needed, that is, a complete absence of electricity on the site;
- All parts can be changed separately, which extends the service life of the entire structure to an indefinite period;
- Of course, the cost of your homemade mechanical pump will be incomparably lower than that of its electric counterparts.
Disadvantages of a hand pump
The disadvantages of a piston pump for extracting water from a well include the following points:
- Mechanical human impact - don’t shake your hands, water doesn’t flow;
- Low productivity - everything depends on your physical strength;
As you can see, when pumping water manually, there are fewer disadvantages and more advantages, which is why many people choose hand pumps for wells.
Solar pump
In addition to the energy of fire, the energy of solar rays can be used to pump water.
Advice! Such a pump will help pump water into a storage tank or outdoor shower.
To make a solar powered pump, follow these steps.
- Find or make your own tube grill. There should be only one exit from the grate.
- Paint the grille black to better absorb sunlight.
- Insert the tube coming out of the grill tightly into the side of a container, such as a can.
- Install inlet and outlet valves on the can lid. Tire nipples can be installed as valves. The outlet valve must have a connection for connecting a hose to it.
- To the tube coming from the grille located inside the container, you need to attach a rubber balloon, which can be made from a piece of a car inner tube.
- Connect a hose connected through an outlet to the pipe to the outlet pipe, as shown in the figure above.
- Immerse the hose with the connected pipe into a pond, well or borehole.
- The pipe leaving the well is directed to a storage tank. In this case, you need to make a branch from the pipe and install a garden watering can at its end.
When the grille is heated by the sun's rays, the air in it expands and enters the rubber balloon. It, in turn, swells and pushes air out of the can into the outlet hose. The air passing through the hose reaches the lowest point and enters the pipe. As the air rises through the pipe, it carries with it the water in it. One part of the liquid enters the storage tank, and the second cools the grate. After the grate has cooled, the balloon is deflated, a vacuum is created in the can, as a result of which the inlet valve opens. A new portion of air enters the can and the cycle repeats.
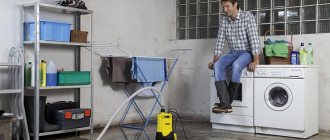
Option #6 – part from a washing machine
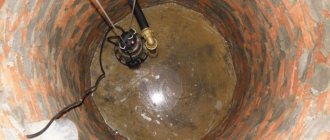
The habit of buying new things when there are old analogues is very ruinous. I agree that an old washing machine is no longer able to compete with new models, but its pump can still serve you well. For example, it can be used to pump out water from a drainage well.
The washing machine has served its purpose a long time ago. It was simply supplanted by new models with new capabilities. But her heart, the pump, is still capable of serving its owner.
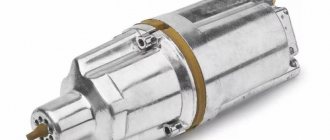
The motor of such a pump requires a 220V network. But it is better to use an isolation transformer with reliable insulation of the input and output windings to power it. Don’t forget about high-quality grounding of the core or metal body of the transformer itself. We compare the power of the transformer and the motor.
We use a centrifugal type of pump, so we put a valve at the end of a hose lowered into water, and fill the system with water. The check valve, which is shown disassembled in the photo, can also be removed from the washing machine. And the blue ground stopper just fit perfectly so that the extra hole would also be closed. Surely you have something similar in your supplies.
Literally from garbage, as it turns out, you can assemble a completely functional thing that not only works, but does its job well and quickly
The resulting homemade pump works very well, pumping water from a depth of about 2 meters at a decent speed. It is important to turn it off in time so that air does not get into the system and you do not have to fill it with water again.
Types of manual water pumps for wells
Hand-held well pumps can have different pumping mechanisms. Here are the types that exist today:
- Impeller: in the working chamber of this pump there is an impeller - a wheel with blades, which the user rotates using a handle. The blades force the liquid in the working chamber to move along a circular path, as a result of which it rushes into the outlet hole under the influence of centrifugal force.
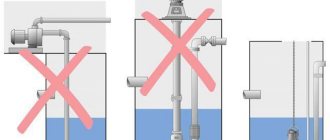
- Piston: in its design, such a pump resembles a bicycle one, only its piston has a check valve installed. By creating a vacuum, the device can draw in water from a certain depth.
- Rod pump: such a pump is almost no different from a piston pump, only the piston in it does not move along the entire sleeve, but only along its lower part. Feeding new portions of water into the sleeve with each cycle, the piston gradually fills it all and the liquid eventually begins to pour out of the outlet located at the top. To prevent water from returning to the well during idling, a check valve is installed in the sleeve immediately above the highest point of the piston stroke. Pumps of this type allow you to lift water from depths of up to 30 m.
- Diaphragm: liquid is pumped into a diaphragm pump, as in a piston pump, by changing the volume of the working chamber. But there are no elements rubbing against each other in this chamber - its volume changes by changing the shape of the elastic membrane, which is set in motion by the user.
Hand pump device
Diaphragm-type pumps are especially in demand when pumping liquids with a high content of abrasive particles: if there is no friction, there is no wear.
Purpose of manual models
A mechanical pump serves to supply water from any depth of a water source to the surface under pressure and is activated by physical force by pressing the handle. The device is characterized by low productivity compared to expensive electrical systems, so it is used when water consumption is low and there is no light.
Operating a well pump is most beneficial for summer residents. In private permanent residences with a regular power supply, a manual mechanism is needed as an addition to the automatic one, for example, in the event of a power failure or breakdown of the main system. In garden houses for occasional use, manual devices play the main role of water supply.
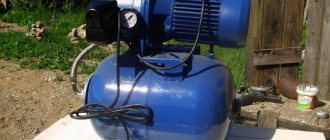
Electric pump
A simple pump with a 12-volt electric motor can lift water to a height of about 2 meters. An electric pump is manufactured as follows.
- purchase an electric windshield washer motor from a VAZ car;
- remove the cover from the washer and unsolder a couple of contacts from the electric motor;
- Next, you should solder the wires to the motor contacts and bring them out through the cover;
- apply sealant to the connection point of the cover and fit it tightly onto the engine;
- seal well the holes through which the wires exit;
- remove the remaining sealant from the pump body and cover and place a silicone tube on its nozzle.
The pump is ready for use. All that remains is to connect the electric water pump to a 12 V power source.
Advice! For these purposes, you can use a power supply from a television antenna with a regulator. The latter will allow you to regulate engine speed and, accordingly, water pressure.
How do rod units work?
This hand pump for a well or well, although it contains the principles of a piston device, is slightly improved. And this opens up the possibility of pumping liquid from a depth of a maximum of 30 m. The peculiarity lies in the special design of the piston, equipped with a special rod (and the name comes precisely from this modification).
Rod unit for pumping liquid from depth
As always, increasing the complexity of the design leads to a decrease in strength. The main disadvantage is the frequent breakdown of these same rods. Here, however, everything depends on the manufacturer, who is responsible for selecting high-quality materials and careful assembly. The second negative point is that the design of the pump itself is quite cumbersome, and this causes certain difficulties during installation.
This unit works in exactly the same way as a piston unit, but the difference is that it is not the pipeline through which water flows that is inserted into the well, but the entire pump body to the level of artesian waters. That is, the reservoir holds much more liquid than a simple piston pump, and water can be drawn from a greater depth. This means that the presence of harmful impurities entering the water at shallower depths is excluded.
Downhole piston pump
A manual piston pump is assembled from improvised means in the following order.
- Frame. Made from metal pipe. The length of the latter can be chosen within 60-80 cm. The diameter of the cylinder must be at least 80 mm. To ensure easier movement of the piston along the cylinder, it is recommended to turn the pipe on a lathe. A hole is made in the side of the body and a pipe is installed to drain water.
- Brackets. They are welded to the pump body to install a lever on them. You can make brackets from a corner.
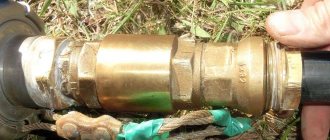
- Lid. The pump cover is made of sheet plastic or metal. A hole is made in it for the rod. You also need to make a bottom cover and install a check valve on it. It is necessary to weld or screw a pipe to the bottom cover to which the water intake pipe will be attached.
- Piston. The piston can be made of metal, plastic or wood. It has the shape of a plate and consists of two parts: a body 20-30 mm thick and a piece of rubber that covers it. Several holes with a diameter of 10 mm must be drilled in the piston body. These holes are covered with rubber, which will act as a valve. A hole is made in the center of the rubber for the rod. The piston itself is attached to the latter.
- Bottom valve. The intake valve can be made of thick rubber or other heavy material. The valve must be cone-shaped and close the inlet. A guide should be installed in the center of the valve, allowing it to return to its original place after opening. Below is a drawing showing the valve installation locations.
- Pump rod. Can be made from metal rod with a diameter of up to 10 mm. One end of the rod is attached to the piston, and the other to the lever.
- Lever arm. To make a lever, a pipe with a diameter of 3 cm is suitable. The upper part of the pipe should be flattened and a hole should be drilled in it for a bolt, with which the rod will be secured. A hole is also drilled in the middle part of the pipe. It is needed to secure the lever between two brackets using a long bolt.
When all the parts are ready, all that remains is to assemble the pump:
- connect the bottom cover to the body;
- insert the lower check valve into the housing;
- insert the piston with rod;
- close the top cover;
- install the lever;
- connect the water intake pipe to the bottom of the pump and lower it into the well or borehole;
- secure the pump to the platform.
Straight spout pump
Such a pump will greatly facilitate the process of pouring water from the well. Its advantages are as follows:
- high creation speed;
- low cost.
How to make this vacuum pump with your own hands? Prepare:
- PVC pipe with a coupling and two plugs with a diameter of 5 cm;
- PPR pipe with an outlet with a diameter of 2.4 cm;
- piece of rubber 5*5*0.4 cm;
- check valve with a diameter of 1.5 cm;
- silicone container with a volume of 0.33 l;
- clamp;
- fastenings
Let's look at the master class “making a water pump with your own hands”:
We assemble a check valve using a 5 cm plug as the starting material. For this purpose, we make holes of the appropriate size along its perimeter. In the central part we drill a hole for the rivet.
We lay out a rubber circle measuring 5 cm inside. We tighten the workpiece with a rivet.
Check it out here too!
Do-it-yourself barbecue from a gas cylinder: step-by-step instructions, choosing the optimal sizes and tips for choosing projects (110 photos)Do-it-yourself winter chicken coop: design, layout, insulation, heating. 80 photos of warm chicken coops
How to make a snow blower with your own hands: manufacturing methods, diagrams, drawings, construction options and application nuances (100 photos + video)
We prepare the sleeve. Insert the previously made valve into the PVC pipe on one side and secure it with self-tapping screws, and on the other side - a plug with a drilled hole of 2.5 cm.
We insert the rod into the sleeve and install the plug. We install a 2.4 cm outlet at the end of the rod. Connect the hose. The pump is ready!
The simplest pump made from plastic bottles
A simple pump for pumping liquid can be made from a plastic bottle in just a few minutes.
Advice! If possible, the bottle should be thick-walled, that is, rigid.
The manufacturing process of a simple pump is as follows.
- A hole should be made in the bottle cap that matches the diameter of the hose.
- A hole is also made in the side of the bottle. Air will be pumped out and water will flow out through it.
- Next, you need to insert the hose into the plug and seal it tightly using a glue gun.
- Screw the cap and hose onto the bottle.
- Place the free end of the hose in a container of water.
- With your left hand, squeeze the air out of the bottle, then close the hole on it with the finger of your right hand.
- After releasing the fingers of your left hand, the bottle will begin to level and suck water from the container. If the bottle is lowered below the container with liquid, it will flow by gravity.
This homemade pump can be improved if you do not make a hole in the side of the bottle, but insert a hose into the bottom of the bottle.
Only after squeezing the air out of it will you need to close (bend) the outlet hose to suck in the liquid.