You will learn how to use an indicator screwdriver, the rules for its standard use and how to use it in various ways from this article.
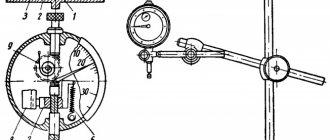
A regular indicator screwdriver is an insulated transparent handle through which a rod with a screwdriver blade at the end is passed.
There is a resistance resistor in the handle body that reduces the current strength to a minimum value that is safe for humans.
It is directly followed by an indicator lamp, a conductive pressure spring and a contact plate.
The principle of operation of the simplest indicator screwdriver is the passage of current through the tip and the indication element, followed by its exit through the body of the master, which is grounded.
In this case, a person closes the circuit with his finger, due to which the light bulb lights up.
This screwdriver is designed as simply as possible, but its scope of application is limited.
With such a tool you can only determine phase and zero, and even then the latter - by the method of elimination.
Options with built-in batteries have wider functionality.
They allow you to determine the presence of current in a conductor without touching it with a tip.
A screwdriver detector with a built-in battery is also suitable for searching for hidden electrical wiring.
As you know, a conductor under voltage emits an electromagnetic field.
It is this field that the detector detects, but the accuracy of the search leaves much to be desired.
How to check an indicator screwdriver
Before you start searching for a phase, you must make sure that the indicator screwdriver is working properly.
To do this, it is enough to touch the wire, which is obviously energized, with the sting.
Screwdrivers with batteries are easier to check - you need to touch the contact at the end of the handle and the tip at the same time.
If the tool is working, the indicator light on its front panel will light up due to induction.
To learn how to operate an indicator screwdriver, let’s consider the main types of testing.
Functionality check
Before you determine where the phase is and where the zero is, you need to check the functionality of the screwdriver itself, since it, like any other device, can be faulty. To do this, you should pay attention to the following nuances:
- The device body must maintain its integrity. Working with electricity requires good insulation without damage.
- For accuracy of readings, you should check the screwdriver. To do this, touch the conductor with the probe, which is 100% energized.
- If you use a battery-powered product, you need to replace them promptly.
Safety when using a screwdriver is extremely important, therefore, if a malfunction is detected, it is recommended to purchase a new device. The cost varies from 50 to 1000 rubles. depending on modification.
Contact method
To determine the phase in the AC network, you need to touch the probe of a screwdriver directly to one of the socket terminals.
If the LED lights up, this is a phase.
Otherwise, the selected terminal is zero.
Attention!
It should be remembered that if the wire is disconnected from the network, or the circuit is broken, the indicator will not light up on the phase wire.
Determination of phase, zero and ground wire
If the network is three-wire, but is made with wires of the same color, or you are not sure of the correct connection, you must determine the purpose of the conductors before installing each element of the network.
- Determine the phase wire using the method described above using an indicator screwdriver and mark it with a marker.
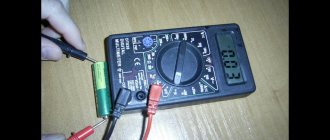
- To determine the neutral and ground wires, you will need a multimeter. As you know, due to phase imbalance, voltage may appear in the neutral wire. Its value usually does not exceed 30V. Set the multimeter to AC voltage mode. Touch the phase wire with one probe, and the other two wires in turn with the second. Where the voltage value is lower, the second wire will be the neutral conductor.
- If the voltage value is the same, it is necessary to measure the resistance of the ground wire. To do this, it is better to insulate the already defined phase wire to avoid accidental touching it. The multimeter is set to resistance measurement mode. Find a known grounded element, for example, a pipe or battery. If necessary, clean the paint and touch the metal with one multimeter probe, and the other one in turn to the conductors, the purpose of which is unclear. The resistance of the grounding wire in relation to grounded elements should not exceed 4 Ohms, the resistance of the neutral wire will be greater.
- The resistance measurement may also be unreliable if the neutral is grounded in the panel. In this case, you need to find the grounding conductor connected to the bus inside the panel and disconnect it. After this operation, you need to take a socket with a lamp and connected wires, strip their ends and connect one lamp wire to the phase wire, and the second - alternately to the other two. The lamp will light up when touching the neutral conductor.
If all of the above measures do not lead to the desired result, it is better to contact professional electricians who, using special devices, will call all circuits. Don't forget that this is primarily about safety.
When repairing electrical wiring or servicing it, it may often be necessary to determine which wire is connected to neutral and which to phase. This is required for installing switches or switching other electrical equipment. Before we tell you how to determine zero and phase, we will talk about the prejudices associated with this.
Contactless method
This method allows you to determine the presence of alternating voltage without direct contact with the conductor.
The screwdriver is taken by the tip and brought with the tip - the contact of the handle - to the socket.
The indicator lights up - there is voltage.
This option is suitable for searching for hidden wiring in the wall.
Remember!
Friction of the screwdriver body against any surface leads to the generation of static voltage, which can cause false positives.
The accuracy of searching for wiring in the walls of a house using a non-contact method is minimal, and is completely useless if there are fittings in the wall panels that distort the signal.
How to use an indicator screwdriver
In addition to options for working with household electrical networks, there are indicator screwdrivers for use in a car.
They are designed for troubleshooting wiring in DC networks from 6V to 24V, as well as for determining the polarity of wires.
Instead of a contact on the handle, a wire with an alligator clip comes out of its end.
To find all the positive wires in the car, you need to connect the battery terminals.
Having fixed the screwdriver clamp on the machine body, probe all the necessary wires one by one.
The indicator signal indicates a plus.
The search for negative terminals is carried out in a similar way, with the difference that when using car testers, the crocodile will be connected to the positive terminal of the battery or the positive wire.
There is a voltage switch on the body of the device (usually 6V, 12V and 24V).
It must be set to the position corresponding to the vehicle's network voltage.
Attention!
To avoid short circuits when working with car wiring, the positive terminal of the battery must be disconnected.
How to determine phase and zero with a multimeter
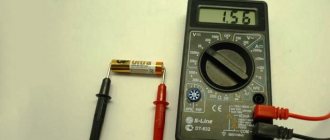
A device that measures voltage, current and resistance is called a multimeter. To identify the phase and neutral wires with its help, you first need to configure the device, for which you select the required measurement limit. In the case of digital instruments, set 600, 750 or 1000 “ ~V ” or “ ACV ”.
The phase is determined as follows: one of the probes of the device is connected to the contact of a socket or cable, and the second probe is touched by hand. If the display shows a value of about 200 V, this will indicate the presence of a phase. Indications may vary depending on floor finish, shoes, etc. If the device displays zeros or a voltage within 5-20 V, then the contact corresponds to zero.
Finding phase and zero
As for the household network, searching for phase and zero consists of simply checking the wires one by one by touching the tip of a screwdriver to their current-carrying parts.
If the indicator is on, this is a phase.
Therefore, the second wire is neutral.
Remember!
The indicator can show the phase on both contacts.
This happens when the neutral wire is broken.
If the glow is noticeably weaker on one of the conductors, this indicates the occurrence of an “induced” voltage from the phase.
As a rule, this happens when the zero is poorly grounded.
Concepts of zero and phase
Electrical energy in a residential building comes from a transformer substation, the main purpose of which is to convert high voltage, most often to 380 V. Electricity is supplied to houses underground or overhead to the input distribution board. Then the voltage is supplied to the panels of each entrance. Only one phase with zero enters the apartment from it, i.e. 220 V and protective conductor (depending on the design of the electrical wiring).
Thus, the conductor that supplies current to the consumer is called phase. Inside the transformer, the windings are connected in a star with a common point (neutral) grounded at the substation. It is connected to the load with a separate wire. The neutral, which is a common conductor, is designed to allow current to flow back to the source of electricity. In addition, the neutral wire equalizes the phase voltage, i.e. value between zero and phase.
Ground, often referred to simply as ground, is not connected to voltage. Its purpose is to protect a person from the effects of electric current at the moment of problems with the consumer, i.e. in case of breakdown on the body. This can occur when the insulation of the conductors is damaged and the damaged area of the device body touches. But since consumers are grounded, when dangerous voltage occurs on the frame, grounding attracts the dangerous potential to the safe ground potential.
Looking for a broken wire
If there is current at the entrance to a house or apartment, but there is no current in the sockets of the rooms, this indicates a broken contact.
An indicator screwdriver can approximately locate the location of the conductor damage.
To do this, the tip is placed at the place where the wire is laid, walled up in the wall.
At a break, the indicator will stop lighting.
To check an entire line of wiring, you need to take an indicator with a battery.
You need to de-energize the house, take the exposed wire in one hand, and run the tip of a screwdriver along the wire.
The indicator will stop lighting at the break.
Checking the extension cord
To check the performance of an ordinary household extension cord, you need to insert the tester into one of its holes, and then into the other.
If one has current and the other does not, then everything is working correctly.
The second test option is a little more complicated and for it, you need to turn off the power to the extension cord.
Then a piece of wire closes the contacts of one of the sockets.
Take one electrode of the plug with your fingers, and touch the second with a screwdriver.
The indicator lights up - the extension cord is working.
Additional possibilities for using the indicator
In addition to searching for phases in the electrical network, indicator screwdrivers also have non-obvious functions.
Mandatory check of the device
Before starting work, the device must be checked. To do this, you simply need to close the electrical circuit by holding the screwdriver probe with one hand and the contact pad (“patch”) with the other.
The presence of an indication indicates that the screwdriver is ready for use. If there is no indication, you need to check the functionality of the batteries (if this model has them) or the indicator itself. For example, a neon light bulb may simply burn out. In addition, if you handle the device carelessly, the electrical circuit in the screwdriver itself may be disrupted. Thus, it is not recommended to drop the device, as well as to tighten screws/screws/bolts with great force.
Checking the serviceability of incandescent lamps
In this way, you can check ordinary incandescent lamps right in the store.
You need to take the indicator screwdriver in your hand, touch the contact on the handle with your finger, and touch the central contact of the lamp with the tip.
With your other hand, grasp the lamp by the metal base. The lamp will be working properly if the indicator lights up.
Checking the heating element
It is very simple to check the heating element for serviceability without removing it from the heating device, having an indicator screwdriver at hand.
You need to place your finger on its end contact, touch one of the contacts of the heating element with your sting, and touch the other contact with your other hand.
The indicator lights up - the heating element is working.
Attention!
Before checking, you need to turn off the power to the equipment and disconnect all wires from the heating element.
Determining the correct switch position
When installing switches, for convenience, they are installed in such a way that in the “up” position they close the circuit, and in the “down” position they open the circuit.
The probe allows you to determine which position is responsible for what before installation.
With the tip of a screwdriver with a finger on the end contact, you need to touch one of the switch terminals, and with a paperclip in the other hand, touch the second terminal.
The indicator lights only when turned on.
Phase
The terms “phase”, “zero” and “ground” themselves are well known to professional electricians. But, for example, the phase is also found in physics - under this definition several states of water can be called:
- liquid;
- hard;
- gaseous.
In addition, phase can be understood as several stages of oscillation, which can refer to wave motion. In astronomy, this has a slightly different meaning, which can be understood by observing the moon.
A little higher we discussed how electricity is generated at stations. So, it is the working phase, which electricians simply call a phase, that receives voltage. To more accurately imagine what this means, we should expand on the following concept: zero.