Ties for shock absorber springs
Aggressive driving style and lack of high-quality road surface make it impossible to fully use the suspension.
Its elements fail prematurely. When engaged in independent restoration of shock-absorbing elements, the driver needs special tools. We are talking about ties, without which dismantling is almost impossible. Today we will get acquainted with shock absorber spring ties. Let's find out what compressors are. Let's figure out how to make it yourself. Let's look at the screeding process and its stages. We will focus your attention on safety measures and give useful tips. Traditionally, at the end, we will draw conclusions.
What is a puller
Shock absorber spring pullers are a special device that can be used to compress the springs of a shock absorbing element. After compressing the element, you can continue the dismantling activities that have begun. There are many options for the device in question. We may be interested in the simplest version of a removable device.
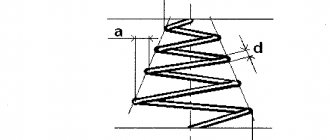
The object in question is two slats made of metal.
The entire length is threaded. There are hooks installed along the edges of the product, which, when turned, move towards each other. In other words, when you need to compress the spring element, you just need to turn the rack. At this moment, the hooks tighten the spring structure.
There is another option for tightening the shock absorber spring struts - a belt.
The design consists of 2 “frogs”, which are tucked into durable belts made of fabric. They are thrown onto the upper coil of springs. After this, you need to work with the “frogs”, alternately clicking on each of them.
The process of the movements performed involves gradual tensioning of the belts, tightening them into a spiral. After compression, the workflow continues.
A device for tightening shock absorber springs is sold in automobile stores and on the Internet. Its cost is high, as is its quality.
Photo: Factory version with left and right threads, pitch M-18.
The elements do not fly off and do not hit the car owner in the forehead during disassembly. But some drivers “with hands and head” make pullers with their own hands.
What to look for when choosing parts
There are several factors to consider when choosing springs.
This is interesting: What to do and what the fine is if the license plate light does not light up
Rigidity
Rigidity affects not only the comfort when driving in a car, but also when there is a load on other elements of its chassis system. It is more comfortable to ride on soft springs, especially on poorly paved roads. However, it is not advisable to install them on a car that often carries significant loads. Conversely, it is better to install stiff springs on cars designed to transport heavy objects. This is especially true for rear shock absorbers.
In the context of rigidity, another situation is relevant. Often, when purchasing new springs (especially for VAZ classics), a pair of identical springs included in one set may have different stiffnesses. Naturally, this leads to the car tilting to the right or left. It is almost impossible to check them when purchasing, so there are two ways to solve the problem.
The first is to install the spacers mentioned above. With their help, you can level the vehicle's ground clearance and achieve uniform suspension stiffness. The second way is to buy higher quality springs, usually from trusted manufacturers, usually foreign.
Stiffness is a physical quantity that in springs depends on the following parameters:
- Rod diameter. The larger it is, the greater the rigidity. However, here you need to take into account the shape of the spring and the diameter of the rod from which each coil is made. There are springs with variable overall diameters and rod diameters. More on them later.
- Outer diameter of the spring. All other things being equal, the larger the diameter, the lower the rigidity.
- Number of turns. The more there are, the lower the rigidity. This is due to the fact that the spring will bend along its vertical axis. However, additional parameters need to be taken into account here. In particular, a spring with a small number of turns will have a short stroke, which in many cases is unacceptable.
Length
The longer the springs are, the greater the vehicle's ground clearance will be. For each specific car model, the corresponding value is directly indicated in its technical documentation. In some cases, the length of the front and rear springs will be different. Ideally, the manufacturer's recommendations should be followed. Deviation from them is possible only for tuning or in the case of using the car for cargo transportation.
Turning parameters
The general name in this case refers to the diameter and number of turns. The overall spring stiffness depends on these two parameters. By the way, some spring models have an uneven shape with coils of different diameters. In particular, with narrow turns at the edges and wide ones in the middle.
However, such turns also have different diameters of the metal rod. Thus, the large-diameter coils located in the middle of the spring are made of a large-diameter rod. And the outer small turns are made from a rod of small diameter. Large rods work on large irregularities, and small ones, respectively, on small ones. However, due to the fact that small bars are made of thinner metal, they break more often.
Such springs are mostly original, that is, those that were installed from the factory. They are more comfortable to drive, but their service life is lower, especially when the car is constantly driven on bad roads. Non-original springs are usually made from a rod of the same diameter. This reduces the comfort of driving the car, but increases the overall life of the spring. In addition, such a spring will cost less, since it is technologically easier to manufacture. What to choose in this or that case is up to everyone to decide for themselves.
DIY puller
Those who are used to carrying out car repairs on their own know how to make shock absorber spring ties. For those who are new to this experience and encountering it for the first time, using the example of step-by-step work using photos, we will tell you how to build a spring puller with your own hands.
On the Internet or on a car forum, you can find information on how to make a spring puller. Also find a drawing of the shock absorber spring remover.
Although, this is not necessary. The design is quite simple. You just need to have the necessary tools on hand to make a shock absorber spring tie device.
It is necessary to prepare tools and accessories:
- Welding machine or grinder.
- Vise.
- A set of keys.
- Solid oil.
- Set of electrodes.
Making a spring tie in the garage is easy. This will only require a few hours of work.
Take an ordinary piece of metal pipe and cut it into 4 parts. The length of each piece is 40 mm. ¼ part is cut out.
Individual parts of the structure must be clamped in a vice.
Using a hammer, level one edge as shown in the photo.
As a result of the manipulations, you should get 4 hooks.
Next, select the corner of the desired size.
Cut into 4 pieces. They should be 10mm larger than the hooks.
On one wall of the corner, as shown in the photo, a hole is drilled for a threaded rod. Approximate size 14 mm. It is important that its movement through the hole is free.
By welding hooks and corners together, we get finished products: brackets.
Then the brackets are selected using a pipe, the diameter of which should be 16.5 mm.
Threaded rods with a diameter of 16 mm must be lubricated with grease. This makes it possible to avoid rapid failure of the nut. More precisely, her carvings.
Next, pieces of pipe are cut and welded. At this stage we use welding.
This is what comes out: a finished product for the spring tie.
So we consider the question of how to make shock absorber spring ties with your own hands, which can be used in the work process on the front and rear axles of a vehicle.
How does a spring remover work, and what types are they?
What is a puller used for? It overcomes the straightening force of the springs. The applied force on the puller brackets is commensurate with the weight of the car, but this does not mean that its design is too expensive and high-tech.
There are many options, but they are divided into only two types: mechanical and hydraulic drive.
Mechanical spring remover
Most often it has a threaded drive mechanism.
With a sufficient diameter of the pin (providing a good gear ratio on the thread), and a long handle of the key, you can compress the springs manually without excessive effort.
The technology is as follows: two pullers are symmetrically put on the rack. By turning the threaded rod, you bring the claws to the middle of the spring directly on the shock absorber, compressing it to the required size.
Installing one puller on a spring will cause it to break.
Pullers placed on both sides ensure uniform compression. When working with the suspension of trucks or heavy SUVs, experienced craftsmen install 3 or even 4 pullers.
Correct installation of pullers on the spring
Semi-permanent racks
Service stations often use semi-permanent struts to remove springs from shock absorber struts. The tool is quite universal and fits most pendants. Thanks to the drive mechanism gearbox, working with it is convenient and safe.
The only drawback is that it is not always possible to compress the spring directly on the car. After all, this is a bench device: the puller works with the suspension removed from the car.
Lever type
Lever type pullers have a similar “problem”. The mechanism is reliable and safe, but its dimensions do not allow it to fit into the space under the wing of the car.
Hydraulic puller
Can be portable or stationary. It works on the principle of a jack: there is a main and a working cylinder. By pumping liquid using a lever handle, the operator compresses the power brackets, between which there is a spring.
A compact two-section puller can also become a helper in a home garage, but a floor-mounted stationary machine is only suitable for a car service center.
The hydraulic system is pressurized using a foot lever. At the same time, the car mechanic’s hands are free, working comfortably and safely.
Of course, there are pullers with compressors, electric drives, and other devices that make life easier when servicing a car. This is all good until you see the price tag.
Sometimes it is more profitable to visit a car service center several times than to purchase an industrial puller for personal use. Which exit? Make your own instrument.
Some practical tips
When working with a factory product or a homemade device, you must:
- Threaded connections must be lubricated with grease or cyatim. Ciatim-201 lubricant is not cheap. Therefore, in order to save money, it is mixed with machine oil. The proportion is 50/50.
- When compressing the working structure, it is prohibited to remove the screed, even if additional fixation measures have been taken.
- While working, you must be constantly alert and careful. It is better to sacrifice body parts than your own health or even life.
At home, working with your hands, you can use various devices to compress springs. For example, clamping the work material in a vice. All methods to achieve the final result are good. The main thing is to follow safety precautions and not join the ranks of injured “home spill” specialists!
Analysis of the options will make it possible to choose the most appropriate method. This will allow you to fully enjoy the creative process and increase your own self-esteem. We are not talking about the obvious fact - saving the family budget.
Knowing how to make a spring remover, let’s consider the screeding process itself. Let's figure out what it actually is.
Drawings of universal threaded ties
Let's return to the question of how to make a device for tightening shock absorber springs yourself. Below is the appearance of the finished devices:
Factory-made threaded ties
On one side of the rod there is a left-hand thread, on the other - a right-hand thread. The standard thread pitch is M18. But buying threaded rods is not enough here. And to cut the thread yourself, you will need special equipment.
Read also: Pressure in the water receiver
Drawings of the components that make up the entire structure are shown here:
Threaded tie (3 parts)
To make parts, you need a lathe, drilling and, probably, milling machine. It may be easier to contact a workshop. Print the drawing by downloading it from the website.
Most likely, there are no other drawings of universal ties on the Internet. And what is shown above is taken from a book on repairing domestic cars. You can use it.
Let's say the ties were made according to the drawings and all the parts fit together. But even then the advice about using lubricant remains valid. You need to take solid oil or cyatim and apply this material to the threads of the nuts.
Packaging cyatim-201, 20 gr.
Cyatim-201 lubricant is a rather expensive material. You can reduce consumption by mixing it with machine oil in a 50/50 ratio. Good luck.
can I wedge in? If the puller is in the form of separate 2-3 staples, then it’s not fun. The staples have a bad tendency to slide along the coils of the spring all in one direction, the spring bends in an arc, like a shot, and where it will fly after that and on what fingers it will hit the head is unknown. I squeezed the spring and placed it next to the car, I turned behind the car, at that moment it shot and jumped above the roof of the house, I pressed my head into my shoulders and waited for where it would fall: on my head or the roof of the car, it fell on the barn.
I use this method: I make a hole in the ground 5-10 cm, put a stand in it, put on a spring, an upper cup and press it all down. drawbar from a loaded trailer (like “through a lever”). With a 10 year old boy, it takes 5 minutes.
Well, I’ll add))) I compressed it in a lathe. You press the spring against the cartridge, move the tailstock, lock it, and then use the lead screw to compress it. Then you tie it and remove it from the machine.
Read also: Width of metal profile for roof
But the seed tank is cheaper.
cool :)) The guy advised me to buy a puller for 100 rubles. I - get two Zhiglov jacks and wire. You find a trailer, load it with something, dig a hole in the asphalt and take an assistant.
Logically, the next advice would be to contact the service :))))
Screed process
The process of tightening springs is exactly the measure that drivers face. That category of enthusiasts and craftsmen who prefer to make shock absorber spring ties with their own hands from scrap materials rather than take their car to a service center knows what the tying process involves. For beginners, we will describe the algorithm of actions for familiarization.
It must be remembered that designs can be of different configurations: the factory version differs from a self-designed product. But in one case or another, you cannot do without a device. The work process will turn into a long nightmare with unpredictable consequences. However, enough of the horror stories. Let's take a look at the algorithm of actions.
- After placing the car on a lift, inspection hole, or placing the car on an overpass, you need to put the handbrake on and put shoes under the wheels.
- Remove the strut with shock absorber.
- Fix the puller on the upper and lower coils of the spring. Next, the compression process is performed by hand. It all depends on the design. This could be a frog or hooks.
How to replace a spring on a car
Many modern cars are equipped with a McPherson type front suspension, consisting of parts:
- shock absorbers (struts);
- hubs and bearings;
- steering knuckles;
- support bearings;
- levers;
- ball joints;
- front beam;
- springs;
- transverse stabilizer;
- stabilizer struts.
The spring is placed between the upper and lower cup (support) of the shock absorber and is held in place by a tightening nut screwed onto the shock absorber rod.
To remove the PP, it is necessary to dismantle the rack and disassemble it. The suspension on a passenger car can also be multi-link, with a slightly different design, but the principle of disassembling shock absorber struts is the same.
Currently reading
How to maintain and charge a maintenance-free type of battery for...
ZIL 130 engine: a legend of the Soviet automobile industry
The design of the chassis on the front axle is somewhat different in cars such as the VAZ classic, but independent suspension is also installed here. On rear-wheel drive VAZ cars, the shock absorber is also located in the center of the spring, the PP is pulled together between the upper and lower control arms. Replacing a spring on an old Zhiguli is not very difficult, but the procedure is slightly different.
Do-it-yourself suspension spring replacement
Do-it-yourself suspension spring replacement
Due to compression and stretching, the spring dampens unevenness, potholes on the road, as well as vibrations of the car body. Since the springs take the heaviest impacts, they often burst, although this is very difficult to detect until it is removed. Experienced drivers can guess the problem by bumps in potholes, car pulls, or noise in the chassis. Replacing a suspension spring with your own hands is not difficult if you follow the preliminary steps. With the appropriate equipment, it is accessible even to beginners.
Let's consider the stages of removing and replacing the front and rear suspension springs of a car. The procedure is similar for almost any car brand.
Causes and signs of broken suspension springs
There are four main signs that indicate the need to replace springs.
Rolling the car to one side
It is checked visually when the machine is standing on a flat surface, without a load. If the body is skewed to the left or right side, the springs need to be replaced. The same applies to forward/backward roll. If before this the car was standing level on the surface, but now its front or rear part in a calm state has dropped significantly downwards, then it is necessary to install new springs.
However, there is one nuance when the spring may not be at fault. In the design of VAZ classic cars (models from VAZ-2101 to VAZ-2107), a so-called cup or seat is provided in the upper part of the spring. The spring rests against it with its upper part.
Often in old machines, the glass collapses during long operation, which leads to distortion of the entire structure. To diagnose, it is necessary to remove the spring from the sagging side of the machine, remove the rubber cushion and inspect the glass itself. Most often, such a breakdown occurs on the side of the front wheels, especially the left one. However, this also happens on the rear suspension.
Extraneous noise in the suspension
The noise can be very different - clanging, rumble, dull knock. This noise appears at the slightest irregularities in the road, even small holes or bumps. Of course, ideally, you need to perform a complete diagnosis and check of balls, steering rods, and rubber bands. However, if the listed elements are in working order, then it is the shock absorber springs that need to be checked.
Often the cause of clanging or rattling sounds from the suspension is a broken spring. This usually happens at some turn. Less commonly, the spring splits into two parts. However, in the latter case, the car body will roll.
Metal fatigue
The concept of “metal fatigue” means that during operation the spring loses its properties and, accordingly, does not work normally. This is usually true for the outermost/extreme turns. Thus, the very end of the spring, with considerable effort, hits the penultimate coil. As a result of this, two working planes are mutually formed on their surface. That is, the rod from which the spring is made becomes not round in cross-section, but slightly flattened on one side. This can occur both above and below.
As a rule, such spring elements do not hold the suspension, and the car sags and also “bounces” very softly in the pits. In this case, it is advisable to install a new spring. And the sooner, the better. This will protect other suspension elements and make the ride more comfortable.
Replacing the front spring
The springs are replaced in pairs, as are the brake discs. This is due to the fact that they must be equal in height so as not to cause distortions in the front of the car.
Tools
• key head 21;
• hex key, 7;
Ties are the main element of the spring replacement procedure
We assume that the front shock absorber and spring assembly has already been pulled out of its socket. Removing the shock absorber is a painstaking procedure that involves dismantling the front plastic panel, wheel, and headlight.
Before starting replacement, the shock absorber assembly should look like this:
What are we doing
1. Place ties on both sides of the spring and secure them.
2. Tighten the ties, the spring compresses. There is no need to rush, we do everything carefully and alternately.
3. Unscrew the nut securing the shock absorber support using a 21mm wrench and a hexagon.
4. Remove the support.
5. When disassembled, the upper mount consists of four components: the nut, the lower shock absorber mount, the bearing and the spring support cup.
6. These elements are replaceable, they can be damaged, just like the spring. For example, the support cup may rust over time.
7. Easily remove the old spring with boot from the shock absorber rod. We don't touch the ties.
8. Lubricate the supporting hemisphere of the body with silicone or other thick lubricant in order to eliminate squeaking when driving.
9. Change the spring and assemble the shock absorber and support.
10. Remove the ties, freeing the natural movement of the spring.
11. Install the shock absorber assembly into its socket.
The procedure takes 25-30 minutes, and completely removing and installing the shock absorber and replacing the suspension spring with your own hands will take about 2 hours.
Toyota Sprinter Japanese tithe › Logbook › Replacing the springs and strut support in the front suspension
It's time for the front springs to sag. In addition, I have been haunted by a problem with the caster of the left wheel for two years. After an impact 2 years ago, the caster went inward, that is, in simple words, the longitudinal inclination of the left wheel was out of tolerance. This is affected either by the spar or the strut support. Since my support was all cracked, the rubber base itself was all cracked, so it was decided to change it when replacing the springs.
And so, it was ordered: 1. Front springs Kayaba RK 3801 2 pcs. — 2342 rubles; 2. Shock absorber support RBI T1332F 1 pc. — 1566 rubles; 3. Oil seal RBI T13U0001 2 pcs. - 154 rubles.
As it turned out, the oil seal comes with the shock absorber support, so I should have ordered one. I didn’t order two supports, since everything was fine on the right side, but during disassembly, play in the support bearing was discovered. In the future I will change the support on this side as well, but for now I limited myself to changing the lubricant.
Let's get to work. Dismantled the left pillar. There was an error with the spring tensioners. For the front ones they are too long and tightening the spring is quite a problem. I pulled the racks together with the cup, and later this cup hit the garage door when I dismantled the spring and began to remove the ties. In general, I used zip ties to tighten the springs on their sides, so that if the ties slipped, the support would not shoot at my jaw, but somewhere in another direction