The most difficult part of repairs for many craftsmen is working with all kinds of joints, protrusions, and connections. It is in these places that it is necessary to maintain special accuracy, tightness, and constantly monitor angles and dimensions. Construction corners are often used to decorate such interior elements. They are made from various materials and help solve many problems during wall repairs.
Which material is best for protecting corners?
To protect protruding wall corners and decorative finishing of window and door openings, corners made of PVC are best suited. The properties inherent in polyvinyl chloride provide the following advantages:
- Resistance to abrasion, deformation and corrosion, as well as the effects of chemical compounds;
- Long service life;
- Low price compared to products made from natural materials;
- Wide range of colors, fade resistance;
- Lack of sensitivity to temperature changes, which allows use for walls in unheated rooms (dachas);
- Easy care.
Materials for making profiles
Depending on the material that became the basis, devices for designing joints can be as follows:
- Galvanized steel. They are made of galvanized steel, which is practically not subject to rust, since it has a layer of zinc coating on top. But with prolonged use in rooms with high humidity, even such products can become rusty, resulting in unsightly red spots on the finish.
- Aluminum. They are considered lightweight, wear-resistant, and are not afraid of corrosion, but they are more expensive than galvanized ones. They do not tolerate the presence of copper in close proximity.
- Plastic. Most often, such products are made from PVC (polyvinyl chloride). They are very cheap, but have many advantages over their “brothers”. Plastic profiles are chemically inert, do not rot or rust, and do not deteriorate from water. They are produced in a wide range, have various shapes, sizes, widths, and can be equipped with a painting mesh or an adhesive layer under a removable film. Corners that are too thin can bend and become deformed, so it is better to immediately choose high-quality products.
What do manufacturers offer?
Buying a wall corner is quite simple. Manufacturers of finishing materials offer retail consumers products that meet European quality standards. Products are produced in widths from 10 to 50 mm. Standard length is 2,700 mm. The choice of colors is varied: pure white, painted to match the wood structure, plain.
Depending on the installation method, the decorative wall corner is available in three versions:
- Interior;
- External;
- Decorative arched: sides of different widths make it possible to bend the profile along a given radius.
All products offered by manufacturers are thoroughly tested for environmental safety.
Advantages of plastic corners
Basically, corners for finishing openings are made of polyvinyl chloride. This material is almost universal and a profile made from it has a number of advantages.
- Light weight;
- Wide selection of shapes, sizes and colors;
- Easy to install, both with screws and on an adhesive base;
- Durability;
- Acceptable price;
- Ease of subsequent maintenance.
The ability to choose plastic corners in the desired color allows them to fit organically into the overall design, without disturbing the harmony and creating a certain completeness. Plastic corners are not susceptible to ultraviolet radiation, therefore, do not change color during use. They are not affected by negative temperatures, and in addition to thermal insulation properties, they have sound insulation qualities. The corner is sold in a standard length, which allows you to optimally select the required size with a minimum number of joints.
The scope of use of polyvinyl chloride corners is quite extensive. They are used as decorative finishing of external and internal joints. These can be panels made of polyvinyl chloride, wood, lining, painted walls or walls with wallpaper pasted. In addition to aesthetics, they have a protective function, preventing arched and right corners of the room from damage.
When you need corner alignment
In the process of finishing or repairing premises, plastic corners are used in the following cases:
- When installing internal window slopes;
- When decorating windows externally, to hide traces of construction foam;
- When framing doorways;
- When decorating ceiling arches;
- To strengthen the corners of walls covered with wallpaper;
- For finishing corners when laying tiles;
- When forming joints of wall panels made of various materials.
PVC corners are quite flexible; using them, it is possible to mask small irregularities in the interior elements being processed.
Purpose of painting corners
The joints between the walls and the floor or ceiling are easily covered with skirting boards and cornices. Unfortunately, finishing the corners cannot be done so easily - here you have to put in a lot of effort to ensure the perfect evenness of the coating. To facilitate the master's task, a paint corner for putty is provided. This product allows you to beautifully design corners between walls, windows, slopes, ledges and niches.
A perforated corner is often called not only a painting corner, but also a plastering corner, because it is placed during puttying or plastering of corners, or immediately before decorative finishing. Installation of putty corners is important. They perform the following functions:
- Reinforcement of joints. After installation of the product, the joint becomes more durable and resistant to various damages. This is especially true for outside corners, which are susceptible to contact, impact, and scratching from furniture and heavy objects.
- Improved aesthetics. The painting profile makes the joint of the walls smooth and clear. Without it, it is quite difficult to achieve the same level of aesthetics.
- Making work easier. If you have a corner, you won’t have to spend a lot of time straightening blocked corners. It will also be much easier to carry out decorative finishing.
Plastic corners for protecting wall corners, installation options and rules
In the apartment, plastic structures are installed in various places. Internal corners require less protection from damage, but their finishing is required to mask aesthetic flaws, irregularities, and traces of seam sealing. Sometimes the sticker of corners on the internal corners is due to design decisions for interior decoration.
Wallpaper corners on external corners are mainly used to protect walls from mechanical damage. A wide corner is best suited to perform this function. However, you need to remember that in small rooms with low ceilings it will look unsightly and visually reduce the height of the wall. In this case, a narrower option is used. It will also help to use a corner whose color is as close as possible to the color of the wallpaper. In this case, it becomes invisible.
Types of corners and why they are needed
Perforated corners for drywall not only allow you to beautifully seal a corner joint, but also give even greater strength to the structure, preventing gypsum board sheets from making even minor movements and vibrations.
On sale you can find 4 types of corners. There are perforated corners for right angles and even arched models. So:
- Perforated metal corner
This is the most famous and used model. The structure is made of thin perforated metal and has a rib that creates rigidity. But, despite this, the configuration of the corner is often disrupted during transportation, which threatens the impossibility of using it to create perfectly even corners. Therefore, it is always necessary to check their quality in the store.
Jpg» alt=»how to attach a corner to drywall» width=»300″ height=»300″ srcset=»» data-srcset=»https://remontcap.ru/wp-content/uploads/2017/08/table_pic_att14973586932- 300×300..jpg 150w, https://remontcap.ru/wp-content/uploads/2017/08/table_pic_att14973586932-300×300-200×200.jpg 200w" sizes="(max-width: 300px) 100vw , 300px">
- Plastic corners
The material is the main difference from the previous version. This results in low strength and low resistance to shape changes. Advantages – not afraid of water and moisture, not afraid of corrosion. The big plus is the low price.
Jpg" alt="how to attach a corner to drywall" width="298″ height="300″ srcset="" data-srcset="https://remontcap.ru/wp-content/uploads/2017/08/table_pic_att14973586943- 298×300..jpg 150w, https://remontcap.ru/wp-content/uploads/2017/08/table_pic_att14973586943-298×300-200×200.jpg 200w" sizes="(max-width: 298px) 100vw , 298px">
- Arched corners
Everything is clear from the name - it has the ability to bend quite well. This is the main advantage over other types. What gives it this opportunity is the material from which it is made – flexible plastic.
Jpg" alt="how to attach a corner to drywall" width="300″ height="225″ srcset="" data-srcset="https://remontcap.ru/wp-content/uploads/2017/08/table_pic_att14973586944- 300×225..jpg 174w, https://remontcap.ru/wp-content/uploads/2017/08/table_pic_att14973586944-300×225-70×53.jpg 70w" sizes="(max-width: 300px) 100vw , 300px">
- Corners shaped like a grid
They are usually used where it is necessary to protect the corner from mechanical damage and provide additional rigidity. Often such places are the outer corners of buildings. But you and I use them in the apartment. This will be useful if the corners are quite uneven and have questionable strength.
Jpg" alt="how to attach a corner to drywall" width="300″ height="225″ srcset="" data-srcset="https://remontcap.ru/wp-content/uploads/2017/08/table_pic_att14973586955- 300×225..jpg 174w, https://remontcap.ru/wp-content/uploads/2017/08/table_pic_att14973586955-300×225-70×53.jpg 70w" sizes="(max-width: 300px) 100vw , 300px">
We looked at the main corners made of plasterboard; it’s up to you to decide which is better. You should choose based on where the perforated corner will be installed on the drywall and what purpose will be pursued: will it be a significant strengthening of the corner or just a design idea. Also pay attention to the price.
Important: if you just need to fasten the sheets at an angle of 90 degrees, you need not a corner, but a connector. This frame element does not belong to the corners.
Installation of corners
Fastening the corners is the final stage of finishing work. They can only be used on sufficiently aligned joints. Otherwise, a gap will form between the corner and the wall, which will not look aesthetically pleasing. Therefore, even during the repair process when plastering, puttying, painting or wallpapering, you need to pay attention to the corners, doing everything possible to align them.
You can determine the likelihood of cracks appearing by holding a long ruler or a flat board to the wall. It should be taken into account that the material from which the corner is made has a certain flexibility, so it can level out small smooth irregularities in the corners.
Fastening for a shelf to a plasterboard wall
Today, very often in houses or apartments there are partitions or walls made of plasterboard. With the help of this simple material, your home can be transformed beyond recognition. Accordingly, it is possible to attach the shelf to a plasterboard wall.
Before attaching shelves to corners or brackets, you should pay attention to:
- Shelf weight. Heavy shelves are hung directly on the frame, and light ones are hung on drywall.
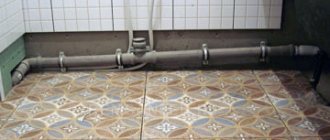
- Availability of communications. Be sure to check whether there are water pipes or electrical wires in the intended location. If there are communications, it is better to attach the shelf in another place.
- Mounting height. Based on the height of all family members, you need to determine how to properly attach any shelves to the wall in this case.
- The location of the frame for drywall. It can be made of either a metal profile or wood, and the slats can be at different heights.
Fastening the shelf to a plasterboard wall is carried out in the same way as to a concrete one.
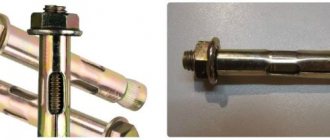
The shelf must be attached to the plasterboard wall using special butterfly dowels
How to properly attach plastic corners to wall corners
Before finishing the surface with a PVC product, you need to measure the required length and cut the required piece using a special knife or hacksaw. It is better to choose one that is used for metal, with fine teeth. Otherwise, the surface of the plastic will crumble. Important! The prepared corners should be thoroughly cleaned of dirt, degreased with special compounds and wiped .
Corners on the wallpaper can be glued using liquid nails or special glue. It must be applied evenly to both adhesive surfaces. In this case, special care should be taken to prevent the glue from penetrating beyond the plastic and spreading on the wallpaper. In this case, it will be impossible to clean the surface.
How to attach a perforated corner to drywall?
To work we need some tools and materials:
- The corner itself
- Putty. It is this that will ensure reliable fastening of the corner to the drywall (the best composition for this work is Vetonit, it is reliable and easy to work with)
- A primer with which we will strengthen the gypsum board sheets, and then carry out the final processing
- Scissors for working with metal (if you are going to attach not a plastic corner to drywall, but a metal one)
- Surface primer brush
- Two spatulas: one wide, the other narrow (wide ones are more convenient to smooth out uneven surfaces, and narrow ones are more convenient to apply the composition and distribute it)
- Sanding block. It will help you make perfectly even corners, removing all the unevenness.
Now let’s take a closer look at how to secure a corner to drywall:
- We prime each sheet of corner, drawing a strip of about 30 cm. After this, we take measurements to know how much length of the corner is required. A distance of 20-30 mm to the floor can be left without a corner, since everything will be covered by the plinth anyway;
- Based on the measurement results, we cut the corner. After making cuts, the metal corner can be easily and neatly broken;
- Using a narrow spatula, apply putty to the joint itself. The layer thickness is small (about 3-4 mm);
- We press the corner so that the putty penetrates outward through the perforation;
- Apply a thicker layer of putty on top;
- Using a wide spatula, we level everything and remove excesses, while you need to hold the tool at an angle to the sheet and press a little on it;
- Grind the corner with a block;
- Then apply a second coat of primer. The width of the strips should be 20-30 cm. This method allows you to remove the sharp transition between the layer and the plasterboard wall;
- Now we finally level the angle: first with a spatula, and then, using dry putty, with a block;
- Before you putty the rest of the wall, apply an additional coat of primer to the joint.
To properly take care of your interior design, it is important to pay attention to every detail. The decoration of windows and doorways is no exception in this regard. Decorates openings and gives them an aesthetic appearance
decorative plastic corner.
It will not only emphasize the clarity of the corner lines, but also hide the imperfections of the plaster,
if it was used as a finishing material.
What glue to use
The following substances are used for fastening PVC products:
- Liquid Nails. When they come into contact with plastic, they do not damage the surface. It is better to apply in a dotted manner or in a zigzag pattern. They have very high adhesive strength and can hold glued surfaces for a long time. For hanging on wallpaper, it is better to choose a colorless option. Liquid nails are acrylic, water-based. Their advantage is the absence of odor and quick drying. Neoprene solvent-soluble liquid nails retain their properties in high humidity and also provide more reliable adhesion than acrylic ones. They are preferably used in the bathroom or when installing curved structures.
- Silicone sealant. You need to choose neutral, rather than acidic, brands that interact better with plastic. Setting occurs in 5 minutes, and complete drying occurs in 5 days.
- Polyurethane glue. It has several composition options, not all of them interact well with plastic. When choosing it, you should first carefully read the instructions. It is good to use the Supercontact brand when working with corners. After applying the glue to the plastic, you need to wait 20–30 minutes until it hardens and only then press the plastic against the wallpaper. Complete drying occurs after 2 days.
Features of finishing arched openings with colored corners
Arched openings require the most careful finishing, because this interior detail usually attracts increased attention. Special versatile plastic corners are produced that can be glued to a smoothly curved wall surface without cuts.
The color for such PVC profiles is usually chosen to be slightly richer than that of the interior decoration: wallpaper or painted walls. In this case, the arch, supporting the overall color scheme, looks clearer and gives a complete look to the entire room. In some design projects, a corner painted to imitate a wooden surface is used for the arch.
To determine the profile width it matters:
- The total volume of the entire room;
- The thickness of the interior walls in which the opening is made;
- Ceiling height.
A trim strip that is too narrow will simply get lost in a large space, and a strip that is too wide will look awkward and rude in a small apartment. Corners for walls are available in standard lengths, which are not enough to cover the entire arch. The joints must be placed on the side surface, as far as possible from the top edge and always symmetrically.
Important! If the bend angle of the arch is large enough, it is better to buy a corner with cuts along the inner edge . Before gluing, it can be heated with a hair dryer and given a curved shape.
How to make a sheathing
From slats
The sheathing is a frame used for installing slabs. Using it, you can avoid such preparatory issues as leveling the surface to be finished. But it all begins with the procurement of material for the structure.
Lathing materials
Traditionally, the frame is made of slats with a minimum shape of 20x20 mm. The slats are chosen with smooth surfaces, without any flaws. It will be almost impossible to remove broken components from the assembled structure and replace them. Having prepared the slats, you can begin the step-by-step installation of the frame:
- First, the slats are conscientiously impregnated with antiseptic material;
- Then they are placed around the perimeter of the surface to be finished. A quadrangle of slats forms the basis for the frame;
- The plates are fixed perpendicular to the guides, placed at a distance of at least 50 cm from each other. Self-tapping screws are usually used for installation. The fastening pitch is no more than 400 mm.
Important! Using a special level, the frame slats are aligned parallel to the boundaries of the walls. To allow the rail to be fixed at a certain distance from the wall, you can use a butterfly mount.
Making the sheathing
Made from plastic components
A frame made of plastic boards is slightly more expensive than wooden sheathing for PVC panels. Its advantages include absolute immunity to fungi, quick assembly and impeccable design. Ready-made standard strips are equipped with a double-sided groove-to-groove lock. This makes assembly easy and gives a graceful beauty when finished.
Starting bar
Plastic is not subject to antiseptic treatment, so installation begins immediately with surface cladding. At the first stage, a plastic profile is installed, which is called “latten molding”, also known as “PVC mounting strip”. To increase the strength of the structure, in addition to plastic guides, side racks are mounted around the perimeter of the room. The strips must be perpendicular to the installed panels.
According to the technology, the clip-latches do not work at the slightest deviation of the panel - in this case, the entire structure must be redone. Such a frame is mainly installed in small wet rooms such as a bathhouse, steam room, where, due to high humidity, wood is not used for the frame.
Important! The quality of the plastic covering of the panels depends on several factors, including the installation of the sheathing. A rash decision or an unsuccessfully mounted frame should not be finished with plastic panels - such installation is subject to rework
PVC profile
Made of metal
Metal lathing under PVC panels can be mounted on any surface, including those with roughness and defective slopes. Metal profile battens for fastening plastic panels in wet rooms are considered very popular. Metal lathing under PVC panels is made in the same way as from wood:
- Install a starting profile along the walls or ceilings;
- Perforated metal guides are inserted into it;
- Plastic fittings are installed.
After installing the frame, proceed to the main installation as follows:
- the frame is attached to hangers, the optimal number of which for each profile is approximately 3-4 pieces;
- maintain a distance between profiles of at least 600 mm;
- level the frame with a building level;
- panels are attached.
At the corners of the walls, one profile is attached, installing them strictly according to the level. Then a strong twine is pulled between them and the remaining profiles are installed, focusing on the beacon threads and checking with a level.
The first panel is a little more difficult to insert than the next ones, because it is necessary for the panel to fit into all corners and baseboards at the same time. Correct and level the panel with a regular spatula. When the panel goes all the way, a characteristic click is usually heard.
Frame installation
Colored corners for tiles
In rooms decorated with ceramic tiles, corners are installed to protect the ends of the tiles from chipping and improve the overall appearance. They draw up:
- Doorways;
- Various recesses and niches in the walls;
- Podiums on which a bathtub or shower is fixed.
Only metal corners can protect the corners of walls covered with ceramic tiles. They are usually aluminum. Using chemical processing, varnishing and lamination, structures with a variety of colors and surface qualities are produced.
Such corners are a complex profile, the flat working side of which is attached to the wall. The decorative part has a narrow protrusion of standard size from the inside. The side of the tile fits tightly into it.
Fastening with corners
This method of installing logs can hardly be called correct, but it is quite reliable and working. Allows you not to “take away” the required height from the premises. The timber is fastened to the concrete using mounting angles. You need solid corners, made of good steel with drilled holes. They are located on both sides of the beam, perhaps in a checkerboard pattern, or one opposite the other.
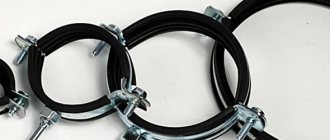
You can secure the logs to the concrete floor with corners
But setting the level will be quite problematic. We'll have to tinker. First, the corners are secured to the floor along the line. Then the timber is fastened along the edges, aligned with the level. Then the middle is leveled. And this is the hardest thing. Most likely you will have to either lift the beam or press it down. When you secure it in the middle, setting the intermediate ones will not be so difficult. But this is provided that the timber is smooth and not twisted. Otherwise, there will be difficulties on every fastener.
When you have placed it on one side, you can already put the corners on the other. There are no more problems here. It is only important to give stability. The level has already been set. Control wouldn't hurt though.
In order to properly attach the shelf to the wall, you can use the following guidelines:
- both the bracket and the corners for the shelf must be securely fastened;
- each bracket for a removable system must be wide to firmly hold the shelf;
- all screws and other fasteners for various shelves to the wall must be correctly selected when purchasing;
- each purchased bracket must match the type of racks and shelves;
- fasteners for various shelves to the wall must correspond to the depth, width and height of the shelves themselves, as well as the weight of what will stand on them;
- Before ordering a wall mount for each shelf, you need to double check all measurements.
Fixed bracket and shelf mounting
The bracket is available in a wide variety of types. First of all, you need to understand how many of them you will need. Then it is determined how each bracket will be located on the bottom surface of the shelf. Holes are drilled and any fixing devices are inserted into them. After this, you need to screw the shelf using self-tapping screws.
Attaching the timber to the wall is done in different ways. In this case, the following parameters must be taken into account:
- wall material and decoration (aerated concrete, concrete, plastered, brick, plasterboard, etc.);
- beam section;
- the weight and scale of the structure that the beam must support.
These parameters determine which tools and fasteners need to be used to secure the beam to the wall. The following can be used as fastening elements:
- screws;
- nails;
- self-tapping screws;
- anchor bolts;
- metal and plastic dowels;
- U-shaped brackets;
- metal corner;
- wooden cotter pin.
Secure the timber to the concrete wall
Before attaching a beam to such a wall, it is worth assessing its dimensions, as well as the weight of the structure that it must support. If the beam is small and the structure is quite light, you can use technology using gypsum or alabaster mortar:
- a screw of the required diameter is tightly wrapped along its length with wire (it’s good if it’s copper);
- prepared holes in the wall must be filled with gypsum or alabaster mortar;
- quickly, without waiting for the solution to set, it is necessary to screw a screw wrapped in wire into the hole;
Universal flashings for windows and doors
When installing plastic doors and windows, the installation seam between the wall and the structure is treated with special foam. It looks unpresentable, so it needs to be decorated. At the same time, protect the foam from the damaging effects of sunlight. The best finishing method is the so-called strips - one of the types of plastic corners for walls.
They are available in two types:
- Rigid, representing 3 or 6 meter strips with a width of 20–100 mm. You can attach them to the wall using glue or self-tapping screws.
- Flexible ones with a width of 20–70 mm are wound into rolls 30–50 m long. Self-adhesive tape or liquid nails are used for their installation.
Flexible strips are easier to transport and install. However, they can only be used once; if for some reason such a strip comes off, it will no longer be possible to attach it to the wall again.
How to attach heavy objects to the wall
Often you have to attach heavy objects to the wall. To successfully solve this problem, it is necessary not only to take into account the base material and the characteristics of the fixing elements, but also to correctly perform the preparatory and installation work.
It’s worth noting right away that only heavy objects can be tilted against solid walls. It is advisable to take this aspect into account during the design of the building. Lightweight plasterboard partitions can be a good option for dividing the kitchen and living room, but only if you don’t need to hang cabinets and shelves on one side of the wall and a TV on the other. The situation is similar with frame structures made of chipboard or SIP panels.
In principle, you can hang “weights” on them, but this approach is associated with a lot of nuances. It is necessary to compare the location and load-bearing capacity of the frame, use additional elements to create the frame, and use special fixing parts. In addition to the fact that such work is quite problematic, there remains a considerable probability of the entire structure collapsing. And this will not only lead to expenses for repairing or replacing a “fallen off” boiler, TV, or cupboard with dishes. This situation can cause serious injury.
Frame walls and plasterboard partitions should be used as a basis for small mirrors, photo frames, towel hooks, etc. You can hang heavy (up to 50 kg) objects on porous bases made of ceramic block, foam concrete, shell rock, etc., but using special fasteners or reinforcing frame. Almost anything can be hung on brick and concrete walls.
Tools
To hang heavy objects you will need:
DETECTOR. When planning and preliminary marking, you need to use a special detector that will help detect plastic, metal, and live cables hidden in the wall. The tools differ in the sensitivity of the sensor, that is, the ability to scan the wall to different depths. There is also a gradation according to the type of material that the system recognizes - not all devices are suitable for a comprehensive test; some are designed, for example, only for detecting metal.
PERFORATOR OR IMPACT DRILL. A regular tool that only has a drilling function can also be used, but working with it will be more labor-intensive. If we are talking about brick, then in principle you can limit yourself to a drill. But for concrete walls you will have to additionally use a hand chisel and a hammer, punching a hole from time to time. The hammer drill itself not only rotates the drill, but also performs impact translational movements, so it is excellent for solid, heavy structures.
BITS AND DRILLS. They are selected taking into account the wall material, the diameter of the required hole, and the type of chuck of the drill used. If you drill in concrete with a light brick drill, it will take more effort and time. In addition, the drill tip will quickly wear out, and the rotary hammer motor will work under increased loads.
LEVELS. To hang any object evenly, you must use a level. And this requirement is caused not so much by aesthetic issues, but by a practical component. Firstly, if one corner of the shelf is higher than the other, then a large load will be placed on the place where it is fastened. Secondly, uneven placement of, for example, a kitchen hood can cause an imbalance in the motor, which will operate at an angle.
The simplest and most popular are spirit levels, which help to “level” objects up to 2 m long. If we are talking about large distances, as is the case with kitchen shelves, then you need to use devices with a laser beam or water levels that work on the principle of communicating vessels.
SCREWDRIVER. If a relatively simple cordless screwdriver is suitable for working with wood and aerated concrete, then for heavy walls you need a powerful screwdriver. When purchasing fasteners, it is better to take a set of replacement bits with you to check whether they fit the selected heads exactly.
USEFUL THINGS. Glasses, gloves, pencil, marker, electrical tape, hammer, pliers, wrenches, oilcloth.
An impact drill can handle all materials except concrete and stone. For the latter, you need to use a powerful hammer drill. Through the hole in the detector, places that are safe for drilling are marked. In order not to damage the wall finish, when hammering in dowels, it is better to use a rubber hammer. Most measuring work is carried out at the usual level, but maximum accuracy can only be ensured by a laser. The more complex the shape of the dowel, the more reliable there will be fasteners
Type of load It is important to understand that there are dynamic loads and there are static ones. In the latter case, everything is relatively simple - you need to compare the weight of the same boiler or air conditioner with the load-bearing capacity of the wall and select the appropriate fasteners. For example, a boiler with a capacity of 100 liters requires anchors that can support 150 kg. But for a horizontal bar or parallel bars suspended on a wall, it is not enough to add up the mass of the structure and the weight of the heaviest athlete. If the frame itself weighs 10 kg, and the person exercising on it weighs 90 kg, then the total value of 100 kg does not mean at all that the same anchors are needed for 150 kg. Since the load will not be constant, but jerky (tearing out), it is worth ensuring a greater margin of safety by choosing fasteners with a load-bearing capacity of 200 kg.
The ends of the fastening elements can be made in the form of a cap or hexagon (for simple fixation of the supporting frame), a ring (for fastening a lamp), or a corner (for hanging some parts).
Fasteners
Hanging of structures is carried out using fixing parts, which can be divided into internal and external. The former are driven into the wall, the latter remain completely or partially outside - suspended objects are attached directly to them.
The type of internal sleeve, as well as the diameter and length of the fixing elements, are selected in accordance with the wall material and the weight of the structure (plus margin). To avoid mistakes, you need to use manufacturers' catalogs, which provide calculation tables for each product. However, consultants from construction supermarkets can also solve this problem. It is enough to provide them with the following data: - material and thickness of the wall; — weight of the suspended structure; — number of points for fixation.
Despite the fact that the final and exact choice of fasteners depends on the individual situation, it is possible to distinguish general subtypes of mounting elements used for fixing heavy objects on walls made of different materials.
Installation work
When preparing the workplace, you need to create the most convenient conditions so that the drill enters the wall strictly perpendicularly. That is, when making holes, the drill should be at chest level - otherwise it will be difficult to control. To minimize the spread of dust and debris, attach a cardboard with a bag under the drill.
In hollow bricks and aerated concrete, holes for anchors and dowels are made only in the “drilling” mode. In harder walls (for example, made of solid brick), holes are made in the “drilling and chiselling” mode (with a high frequency of light blows). When working with concrete, use the “perforating” mode. In order not to damage the wall finishing material, you need to take into account its type. If it is a tile, then in any case it must be “passed” by simple drilling without impact. Otherwise it may crack.
To prevent the drill from slipping, the “drilling” area must first be nailed or sealed with electrical tape. The spacer sleeve must fit completely into the wall, that is, be recessed deeper than the tile or at least flush with it, but not come out in any way.
Bases covered with plaster require special care. To prevent it from crumbling and cracks, they first also drill with simple drilling. When hammering in a dowel, you need to be careful not to hit the fragile coating with the hammer.
When the hole is ready, dust and pebbles are blown out of it. Then the spacer sleeve is driven in. It is important that it fits tightly and does not “hang out”. Finally, a screw or bolt is tightened, which “expands” the dowel or anchor and makes the fixing element solid and strong.
Profiles perforated for internal and external corners
When plastering or finishing walls with plasterboard, special attention should be paid to aligning the corners. For this purpose, plastic products with perforated edges are used in interior construction or repair work. They are installed directly into the solution and serve to form a smooth, clearly defined surface at the corner joint. With their help, the fastening of drywall sheets is regulated.
For exterior work, metal profiles are used that can withstand temperature changes. Plastic ones are used only when it is necessary to finish an indirect corner.
How to cut finishing corners
Almost always, corners have to be cut to protect the corners of walls. They are sold in strips from 2 to 3 meters long. The cutting tool is selected depending on the type of material. For wood and metal, thick plastic, you will need a hacksaw, but the blade is different - for wood, and with a fine tooth for metal or thick-walled plastic.
Thin plastic can be cut with a construction or stationery knife or sharp scissors. If you need to cut perpendicularly, it is easier to use scissors. We use them to cut to the corner on both sides, bend the corner, and cut the remaining millimeters with a stationery knife. If there are flaws, they can be easily corrected with the same knife or very fine-grain sandpaper (polishing).
How to cut protective plastic corner (PVC)
If the plastic corner needs to be cut along the fold, cut it along the inner corner using a stationery knife. There is no point in cutting through the entire thickness. You just need to leave a noticeable stripe. Then we bend the piece that needs to be removed. It comes off at the cut site. We remove irregularities with a knife or sandpaper.
How to properly glue a corner: simple secrets
Every householder who takes care of his home makes it beautiful and well-groomed. Often in apartments there is a need to protect the outer corners of walls or arches from damage, cover wallpaper pasted on the corners, and so on.
Plastic corners are used for these purposes, but the question arises of how to glue a plastic corner so that it aesthetically emphasizes a window or arch, covers minor repair defects and protects external corners from accidental damage.
Now we have the widest selection of PVC corners available in various sizes and colors. Designers advise choosing corners that best match the design of your room and match the wallpaper, walls, floor, furniture and other interior. How to glue plastic corners, knowing the simple installation steps, you will learn below.
Simple technology for fastening PVC corners
First, let's decide on the tools we need:
- Knife, fine-toothed hacksaw or scissors;
- Adhesive composition:
- Dragon glue (the corner is pressed to the surface 3 minutes after application);
- universal polyurethane glue;
- transparent silicone sealant - suitable for tiles in the bathroom/kitchen or areas with low traffic;
- Masking tape.
You should know that white glue is best suited for white corners, and colorless glue for colored corners.
To glue a corner to the wallpaper, you first need to measure the required number of corners. You will most likely purchase the angles cut into rods, so they will need to be cut to the required size.
One corner is usually used for a vertical corner, which is trimmed quite a bit. To cut the plastic evenly, you need to heat the knife over gas. One of the sides of the corner should be left 4-5 centimeters longer in order to adjust it in place.
If the wallpaper protrudes beyond the edge of the corner, it must also be carefully trimmed.
The adhesive is carefully applied in a dotted line to the inside of the corner using a mounting gun or sealant. Then the corner needs to be glued to the surface and pressed along its entire length using a napkin. Excess composition is removed with a napkin.
If there is no danger of damaging the wallpaper, then the corner should be secured with masking tape. Afterwards, we let the glued corner securely fasten and the adhesive base dry. Having studied this simple installation method, you will also know how to glue a ceiling corner.
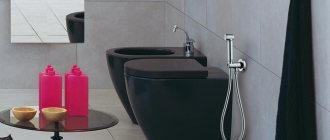
Windows and doors are interior elements that are also decorated using corners. Transparent silicone sealant is well suited for gluing plastic corners to slopes.
Most often, corners are glued to new windows, but you should still make sure that the surface is even, because no corner can hide large irregularities.
There should be no nails, screws or other foreign objects on the surface, and it must also be degreased. Gluing is carried out in the same manner described above.
Inner corners
This type of corners is not widespread, the interior does not suffer without them, but there are lovers who prefer this particular design. Such corners consist of three parts:
- Grooves;
- Perforated rib;
- Facial concave part.
You adjust the layout to the tiles and cover one of the walls. It is best to cut off the back of the corner and stick it with silicone.
A finishing element such as an arched corner is used to decorate curved structures. Such corners, like ordinary straight ones, protect corners, prevent paint from falling off and rubbing off, and clearly highlight the shape of structures.
The corner on the arch can be attached in the following ways:
- Glue with glue - the gluing pattern is similar to vertical corners;
- Secure with self-tapping screws;
- Secure with nails without heads.
The last two options slightly spoil the appearance of the corner, as they are noticeable and can leave cracks or bend the corner.
In addition to PVC arched corners, there are also perforated ones. They are attached as follows:
- The tightly pressed corner is adjusted to the surface with staples;
- Next, a solution of gypsum plaster is applied to it with a spatula, which is pressed tightly;
- After the plaster has dried, it is sanded with a mesh or sandpaper.
Ceramic corners and tile corners
A ceramic corner is most often used in the bathroom, where water mercilessly destroys building materials. This corner provides sealing and maintains the attractiveness of the interior. When buying this necessary part, probably everyone wondered how to glue the corner to the bathtub.
The ceramic corner ensures reliability and quality due to the following properties of ceramics:
- Environmental friendliness of the material;
- Deformation resistance and hardness;
- High resistance to tearing;
- Resistant to temperature changes and moisture.
The only drawback of ceramic corners is that they easily crack if there is serious mechanical damage, in other words, you should not drop anything heavy on them.
Among modern ceramic borders there are:
- “pencil” - a thin convex strip of ceramic that covers cracks well, perfect for edging mirrors and dividing rooms into zones;
- “corner” - has a triangular cross-section, conveniently applied to the surface of the bathtub and wall;
- “Frieze” is a low border, its length is equal to the width of the tile.
Well-chosen ceramic elements blend perfectly with the design of the tiles and the entire bathroom.
How to glue a ceramic corner
Installing ceramic corners is quite a labor-intensive and complex job, similar to laying tiles. This way you can attach the corner to the tile or under it.
- First, you clean the entire surface of dust and dirt;
- A layer of sealant is introduced into the gap using a gun, the joints are leveled with a spatula or a wet hand;
- Then you prepare the adhesive composition offered by the manufacturer; it should stick well to the spatula and not spread;
- Adjust the paired corners, leaving the smallest gap;
- Start laying from the corner, covering the back side of the corner with glue;
- The corner is attached to the joint, excess glue is removed;
- The next day, the corners are doused with plenty of water to fix the glue.
The use of corners: PVC, ceramic, arched and others will effectively protect the vulnerable areas of your apartment, and also create a unique atmosphere of comfort and tidiness. In fact, it is not so difficult if you understand a little about the properties of the material and the attachment method.
Source: https://RoomPlan.ru/sovety/kak-prikleit-ugolok/