Modern construction technologies have significantly expanded the possibilities for landscaping gardening areas and personal plots. One such innovation in landscaping is stamped concrete.
In addition to the main operational properties and technical characteristics of the material, detailed recommendations for the independent production of printed concrete will be given, the advantages and disadvantages of the material will be analyzed, and examples of finished work and customer reviews will be given.
Scope of application
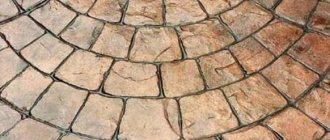
The main feature of printed (stamped) concrete is the presence of decorative relief embossing on the front surface, obtained using special stamps. Such a surface can imitate with a high degree of accuracy the texture of natural stone, paving stones, wood, paving slabs and other natural and artificial materials.
Due to wear resistance, versatility, the ability to create any texture and affordable cost, printed concrete can be used both for laying exterior coatings and for interior work. Most often it is used for:
- paving pedestrian paths and sidewalks.
Durable monolithic coating ensures long service life and attractive appearance; - arrangement of relaxation zones in parks and squares.
The variety of textures and colors allows you to implement any design solutions; - creating flooring
in various gazebos and terraces. Floors made of printed concrete are resistant to temperature changes and atmospheric influences, and retain their decorative properties for a long time; - restoration work
. The fact is that with the help of PB it is possible to imitate materials that are not used in modern construction; - arrangement of car parkings
. The high mechanical strength of the coating allows it to withstand significant mechanical loads for a long time without breaking.
Variety and Application
More often, press shapes imitate expensive materials used in construction and design, which significantly reduces the cost of work.
These are paving stones, different types of stones, bricks, boards, skins. They successfully embody more subtle patterns - plant patterns, cobwebs, openwork, animal tracks. Accordingly, the scope of application for printed concrete is wide:
Concrete stamps are widely used for laying garden paths or sidewalks.
- interior and exterior decoration;
- garden paths, sidewalks;
- large areas and playgrounds;
- parking lots, gas stations;
- floor coverings for terraces, gazebos, restaurants, centers;
- flights of stairs.
Decorative concrete is of particular interest to restorers. It is much easier to replace an antique surface or artifact with a modern material using a stencil. In addition to the uniqueness of the texture, the technology is valuable in its ability to convey a rich range of colors thanks to special pigments, their combination and application methods. The list of materials where stamping is applicable is also impressive - different types of plaster (gypsum, cement), glue, concrete, putty.
Types of stamps
There are 2 types of pressing molds: hard (made of hard plastic) and soft. Rigid ones are good for large geometric patterns, but have a number of disadvantages:
- do not impart a glossy or matte appearance to the finished product;
- have a short service life;
- require preliminary preparation;
- the print does not show the fine details of the design.
Innovative relief prints are created by pouring liquid polyurethane into the simulated material in silicone. The excellent flexibility of the stencils allows them to be easily removed after stamping. They require a more precise and careful approach to work, but the drawing turns out clear and extraordinary. From a practical point of view, the polyurethane mold is resistant to abrasives and chemicals, elastic, and reusable.
Advantages and disadvantages
The popularity of stamped concrete pavement is due to a number of significant advantages, which include:
- the monolithic structure eliminates the presence of gaps that are inevitable when laying piece material, which significantly increases the service life of the coating;
- the composition does not contain any toxic elements, allergens or other compounds that pose a danger to humans and the environment, so the material can be used both for landscape design and for interior finishing work;
- the coating is not susceptible to mechanical stress and abrasion, has high hardness and strength;
- if the technology is followed, moisture practically does not penetrate into the concrete structure, the material is resistant to temperature changes and retains its decorative properties even under intense exposure to ultraviolet radiation;
- if the recipe and operating rules are followed correctly, a printed concrete coating can last from 15 to 25 years, depending on the intensity of the load;
- Thanks to the peculiarities of the technology, the use of stamped concrete allows you to reliably imitate any texture, and the wide range of colors makes the similarity almost absolute.
- In some cases, the performance properties of the coating exceed those of the simulated material. For example, paving slabs will last much less than their imitation.
Despite all the advantages, there are some objective difficulties in the manufacture of decorative coatings, primarily these include:
laying stamped concrete on your own is a rather lengthy and labor-intensive process that requires certain skills;
the technology requires the presence of a number of special devices, without which the creation of high-quality material is impossible;
the high price of decorative coatings, so paths made from ordinary paving slabs will cost 2–3 times less.
Despite these disadvantages, stamped concrete is widely used in landscape design and individual construction.
Stamped concrete: advantages
In addition to wide application possibilities and beautiful appearance, decorative concrete coating has many other advantages related to its performance characteristics.
The advantage of stamped concrete is that it can easily withstand heavy loads
Related article: Activator-type washing machine
So, the main advantages of stamped concrete include:
- The ability of the material to withstand high loads. Printed concrete for domestic use can withstand a load of 400-500 kg per cubic meter.
- Resistance of the coating to moisture (corrosion), exposure to UV radiation.
- Concrete resistance to sudden changes in temperature (up to -40 to +40 degrees Celsius).
- Frost resistance. The coating can easily withstand more than 300 seasons.
- The ability of the coating to withstand the effects of acid-base and oil industry products, fats without changing the appearance.
- Durability. The service life of the concrete base is at least 25 years.
At the same time, decorative concrete has a rich color palette and a wide selection of textures (if necessary, a textured print in the form of plants, graphic images, or complex designs can be applied to the coating).
Types of stamps
Since it is with the help of stamps that printed concrete acquires a unique texture, let us consider their varieties in more detail.
Currently, there are two types of dies for concrete pavement: cast aluminum and made of polyurethane.
Aluminum dies
The aluminum matrix is a massive form with special handles. Using cast aluminum stamps, brick and stone ornaments, various slabs and other relatively simple textures are imitated. The main advantages of aluminum matrices are strength and long service life.
Polyurethane matrices
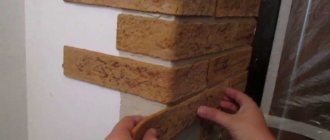
The manufacturing technology of a polyurethane stamp involves casting on existing materials, the texture of which will be imitated. This method allows you to achieve absolute accuracy in conveying all the nuances characteristic of natural material. The most widespread types of polyurethane matrices are:
- brickwork;
- ship flooring (deck);
- skins;
- old pavement;
- fan;
- masonry.
There are other textures that are widely used in landscape design and landscaping of garden and park areas.
Variety of stamps
The method of printing decorative concrete involves a large selection of different shapes. The stamp of the first ones are heavy forms with handles; they perfectly imitate patterns of brick and stone. But to copy more complex textures, modern polyurethane stamps are used. They cope better with such complexity and are more profitable to operate. Polyurethane stamps can be poured over samples whose texture needs to be imitated. The result is stamps with natural textures.
Ready-made forms can be purchased at building materials stores. You should always pay attention to their rigidity. Choose stiffer and denser stamps, as they make it much easier to create visible designs on products.
Laying technology
As mentioned above, the process of laying decorative printed concrete is long and labor-intensive, however, despite all the difficulties, it is quite possible to make it yourself. First of all, you need to carefully study the manufacturing technology and stock up on the necessary tools and devices.
Preparation of necessary materials and tools
Before you begin installation work, you need to have the following set of tools and special devices on hand:
- in the case of preparing concrete yourself, you cannot do without a concrete mixer, bayonet and scoop shovels, and galvanized buckets;
- aluminum or polyurethane matrices for applying the selected texture. For effective masonry, the number of stamps available must be at least 6 pieces; in addition, a special tamper may be required;
- grinder and disc for concrete. With its help, possible stamping defects are eliminated and expansion joints are opened;
- leveling the concrete surface is done using a special metal scraper;
- the coloring strengthening agent is rubbed in with a magnesium floating strip;
- the formation of the required corner configuration is carried out using a manual edge bender;
- when carrying out any work related to concreting, an ordinary steel trowel is indispensable;
- uniform distribution of the solution and removal of air is carried out using a vibrating screed;
- rustication can be used to process joints;
- additional processing of die joints is carried out using a texture roller.
In addition, you will need a roller, a set of brushes and several plastic buckets. Having all this tool available, you can start working.
Stages of work
When starting to install a stamped concrete pavement, you should keep the following in mind:
- To work effectively, you must have at least basic skills in handling the construction tools and devices listed above;
- to obtain a clear texture, it is necessary to carry out stamping in a timely manner, since high-quality molding of an excessively hardened concrete surface is impossible;
- the layout of the matrices must be treated extremely carefully and responsibly, since errors made during the “printing” process are quite difficult to correct.
Preparatory work
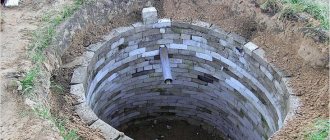
- The area intended for concreting is fenced with a cord and driven stakes.
- In the selected area, the top layer of soil is sampled to a depth of 18 to 20 cm, after which the bottom is leveled and compacted.
- A cushion of crushed stone with a height of 10 to 13 cm is placed in the resulting recess and compacted thoroughly.
- The surface is waterproofed using thick polyethylene film. Laying should be done with an overlap of 15 - 20 cm.
- To clearly define the boundaries of the pour, formwork is installed from edged boards or other available materials.
- A frame made of metal or polymer reinforcement is mounted at a distance of 3–5 cm from the waterproofing.
- At this point, the preparatory stage can be considered complete.
Concrete works
- Any concrete work begins with the preparation or purchase of the required amount of concrete. To produce printed concrete, a concrete mixture of grade M400 and higher is used.
- The concrete mixture is evenly poured into the area enclosed by formwork. During the pouring process, special attention must be paid to the safety of the reinforcement frame.
- The surface of the poured area is leveled using a rule and compacted using a vibration lath.
- A trowel or wide spatula is used for final leveling and smoothing. At the end of the work, the concrete surface should be smooth and uniform.
- The colored hardener is applied by spreading in an even layer over the entire site, after the initial setting of the concrete. Colored fine powder compositions are used as a hardener for PB, providing not only high wear resistance, but also appropriate coloring.
- After 10–15 minutes, smooth the top layer using a magnesium floating strip, after which the coloring powder hardener is reapplied.
- Using a manual edge bender, give the corners the appropriate shape;
- To prevent the embossed surface of the matrix from sticking to the concrete, its surface is coated with a special release agent. To apply the product, use a paintbrush or a wide paint brush.
Molding
The appearance of printed concrete depends on the accuracy and quality of stamping. To obtain a high-quality print, first of all, you need to make sure that the plasticity of the concrete allows for high-quality printing. This is done as follows: press on the hardening surface with your finger. If the depth of the resulting print is 6-7 mm, you can begin applying the selected texture, for this you need:
- The matrices are laid out on the surface in a predetermined sequence. The laid forms are pressed into the concrete base using a tamper or their own weight. The texture obtained in this way should sit for 24 hours.
- No matter how carefully the printing is done, it is impossible to completely avoid defects. To eliminate existing imperfections and give the surface a finished look, rustication is used.
- To relieve internal stresses and compensate for the thermal expansion of the material, expansion joints are cut with a grinder. At the end of the work, dust and remnants of release agents are washed off the surface with running water.
- The final neutralization of release agents and hardener residues is carried out with a solution of hydrochloric acid.
- At the final stage, a special sealant is applied to the finished surface using a roller. This composition can significantly increase the surface's resistance to abrasion and creates the effect of wet stone, emphasizing the texture features.
Once the sealant is completely dry, the surface is completely ready for use. If all technology requirements are strictly observed during the pouring process, the coating will last at least 15 years.
How to make a concrete stamp with your own hands
Increasingly, technologies are appearing in construction that can create works of art from familiar coatings and materials. Such a transformation is possible even with such an ordinary material as concrete.
By using polyurethane or metal stamps, dull concrete surfaces can be made to look like stone pavers, wood decking or slate slabs. This type of concrete is called stamped, printed or pressed concrete.
We’ll talk about it now, as well as the possibility of creating a printed surface yourself.
The essence and possibilities of using this technology
Stamped concrete is ordinary concrete, onto the surface of which decorative embossing is applied using special stamps. The relief pattern can imitate any material: brick, paving stones, boards, animal skins, weathered stone, cracked earth. You can choose stamps with leaf patterns, dinosaur footprints, and animal figures.
Stamped concrete is especially popular when decorating terraces, patios, areas near swimming pools, garden paths, sidewalks, gazebos, floors in restaurants and exhibition halls. This technology becomes indispensable for complex restoration work.
For example, when it is necessary to recreate a destroyed part of an ancient pavement. It is often not possible to find exactly the same materials that have aged naturally.
And with the help of stamped concrete technology, exact copies of existing old brick or half-erased stone can be easily created.
Variety of stamps for printed concrete
The first stamps for stamped concrete were made of cast aluminum and were massive molds equipped with handles. Such matrices are well suited for simulating ordinary brick or stone patterns.
But they are unable to copy complex textures. Modern polyurethane stamps are a completely different matter. They are cast on real materials, the texture of which must be copied.
As a result, incredibly authentic textural effects can be achieved using polyurethane molds.
Ready-made stamps can be purchased at many construction stores or centers. When choosing, you should pay attention to the degree of rigidity of the shape. The denser the stamp, the easier it is to create a clearly visible design. Forms that are too soft and pliable are more difficult to work with and require more effort during the printing process.
Self-production technology
The technology of stamped concrete is quite simple, but you should only take it on if you already have some skills in working with concrete. Otherwise, the result may not be what you expected. Problems may arise for the following reasons:
- concrete hardens quickly, after which the use of stamps does not produce clear embossing on the surface;
- To perform embossing using stamps, you need to apply physical force;
- errors in embossing a concrete surface are difficult to correct;
- stamped concrete technology requires the worker to be able to use special tools to form and smooth the surface.
Once you are confident that you can handle the potential problems, you can begin creating the concrete pad and performing the stamping work.
Step 1. Preparing the concrete site
The basis for stamping is a regular concrete platform with reinforcement, made of concrete grade M350 and higher.
https://www.youtube.com/watch?v=VFqaZTJ_398u0026t=96s
Technology for creating such a platform:
- using pegs and a cord, mark the boundaries of the area where stamping will be carried out;
- remove the top layer of soil (depth 15-20 cm), compact the soil bottom;
- pour a crushed stone cushion (10-15 cm thick) onto the bottom of the excavation and tamp it down;
- formwork made of boards is installed along the border of the site;
- lay a reinforcing mesh in the formwork, raising it above the ground level by at least 3-5 cm (by placing stones and bricks under the mesh);
- concrete is mixed manually, using a concrete mixer, or ordered ready-made;
- concrete is poured into the formwork, a metal rule is used to obtain the required level of the site;
- compact the concrete with a vibrating screed;
- The top layer of concrete is smoothed with a trowel, achieving a smooth and uniform surface.
Step #2. Application of color hardener
A colored hardener is applied to still fresh concrete, which simultaneously colors the surface and increases its strength.
A colored hardener is a powder that contains coloring pigments, a binder filler and ground particles of granite and quartz sand. Due to the dispersion of the mixture, its particles penetrate into the pores of concrete and fill them.
The concrete surface becomes more dense and durable. At the same time, the particles give the concrete a lasting color (about 30 tones to choose from).
Work on applying a colored hardener begins after the initial setting of the concrete surface. You can focus on the moment when all the water that appears from the surface has evaporated.
Colored hardener powder is scattered over the concrete surface manually, from the center of the site to the edges. At the same time, they perform movements similar to throwing a bowling ball. Scoop up a portion of the powder, move your hand back and with a sharp movement throw the mixture forward from waist level. This principle of applying powder minimizes the number of particles flying through the air.
The first layer of hardener should be absorbed into the concrete, which takes 5-10 minutes. During this time, the surface of the concrete is smoothed by rubbing the dye into it using a magnesium smoother. Corners are also processed using corner smoothers to make them curved and neat.
Then a second layer of colored hardener is applied. It is necessary to paint the surface more evenly and compact it. The powder is applied in exactly the same way as in the first case. After application, the surface is leveled with a steel trowel.
Step #3. Application of the release agent
The release ink prevents the concrete from sticking to the dies during the printing process. In addition, it additionally colors the surface of the concrete, giving it subtle shades of color. The release agent is available in the form of a dry powder or liquid. Most often, powder is used, applying it to the surface of the concrete with a wide brush (brush).
The brush is immersed in a bucket with a separating component so that the bristles are evenly covered with powder. Then, holding the brush at waist level, throw your hand forward and “spray” the powder over the surface of the concrete.
After painting, the corners of the area are treated with textured sandpaper.
Step #4. Surface stamping
Before you start stamping, you need to make sure that the concrete has acquired the required degree of plasticity and has become similar in consistency to plasticine.
If you start stamping too early, the concrete surface will not be able to support the weight of the workers and maintain the print lines. If you are late, you will have to put more effort into the stamps to print clearly.
In addition, the texture of the stamps may not be imprinted at all on concrete that is too dense, especially at the end of the job.
If all tests pass successfully, you can begin stamping. The stamps are laid out on the concrete surface, one after another. Manufacturers often number the stamps (1, 2, 3... or A, B, C...) to indicate the desired sequence of their placement in the printed design.
To imprint the texture of the stamps into the concrete, you can often simply step on them. Sometimes light hand tampers are used for this.
After the prints are made, the concrete surface is left to cure for 12-24 hours.
Step #5. Elimination of defects
On the concrete surface, where the dies meet, a slight displacement of the cement mortar often occurs. Sometimes, due to insufficient compaction, the seams of the printed pattern may appear blurry and indistinct. To correct surface defects, a hand roller is used along the seams and joints, and uneven surfaces are smoothed out with textured sandpaper.
Step #6. Cutting shrink joints
Several cut seams in the slab provide stress relief and prevent cracks. Such joints can be made in still fresh concrete using a special cutter. Or cut the seams with a grinder after the concrete has dried.
Step #7. Surface washing
The next day, wash the surface. Use a hose to wash off excess release agent. Afterwards, an acid wash (with hydrochloric acid) is performed to obtain the desired effect of a combination of two colors on the surface. During this process, the pores of the concrete also open, which promotes better interaction of its surface with the sealant.
Step #8. Applying sealant
The next day, a sealant varnish is applied to the concrete. It performs a number of functions:
- protects the surface from abrasion and wear, as well as from the penetration of oils and chemicals;
- gives the surface a shine of varying saturation (from barely noticeable satin to rich varnish);
- enhances the color saturation of concrete;
- simplifies the care of the treated surface.
The sealant is applied with a roller, rolling it over the surface. But, if the stamped texture has deep imprints, when applying sealant it is advisable to combine rolling with a roller with additional processing with a brush. Typically 2-3 coats of sealant are required.
After the sealant has dried, the stamped surface will be completely ready for use.
A few tips for quality stamping
I would like to note a few points:
- If you are using a stamp for the first time and have no idea what the stamp will look like on concrete, do a test stamp on compacted sand.
- Avoid repeating the printed pattern on the surface, especially if the stamps imitate natural materials (stone, wood, etc.). Random compositions will look more realistic.
- To achieve an antique effect on the surface, apply a small amount of dry release agent (in powder form) to the still liquid concrete. Spray a liquid release agent over it. The liquid will dissolve a light layer of powder, after which color accents will remain on the surface, similar to scuff marks.
- Make sure that the release agent particles are well pressed into the concrete when printing. Otherwise, it will simply be washed away with water when washing the surface.
- Make sure that the person walking on the dies while compacting wears clean shoes free of traces of construction debris and dust. Inevitably, these contaminants will transfer to the fresh concrete and disrupt the desired texture of the stamped surface.
What is the difficulty in stamping decorative concrete?
When making it yourself, you may encounter the following difficulties:
- rapid hardening of the concrete surface and, as a result, a decrease in its ductility can lead to a decrease in print quality. This circumstance should be taken into account when determining the pouring area;
- when working with printed forms, significant physical exertion cannot be avoided;
- It is quite difficult to eliminate defects identified after removing the stamps; it will require a lot of patience and hard work;
- It is not advisable to start producing stamped concrete without basic skills in the use of construction tools and devices.
Composition of printed concrete, what it contains, proportions
The stamped concrete recipe includes Portland cement, sand, and crushed stone. The binder component is chosen from durable grades M400 or M500. Fine filler only pure with an average fraction of 2.5 mm. Gravel is taken with irregular edges (not rounded, like pebbles) of small sizes. The proportion of grain ingredients in relation to cement looks like this: 3:3:1.
Additionally, you will need to add plasticizers and polypropylene fibers to the composition. The former are sold in powder or liquid form, the dosage is observed in accordance with the instructions on the package. The reinforcing filler is calculated based on 600 grams per cubic meter. meter of finished solution.
The mixture is prepared in stages with constant stirring. First sand and cement, then add water and gravel. Additives are poured with quartz or crushed stone, it depends on the powder or liquid version. For better distribution throughout the working mass, the fibers can be pre-soaked in water and poured into a container.
The binder component is added to the dry mixture or in the form of cement laitance. Both approaches are correct. The main thing is that the preparation of a homogeneous mass does not take long. The reason for this is the limited working time of the solution.
Why does printed concrete fail?
Destruction of the decorative coating is possible for two reasons: the technology was violated or low-quality materials were used.
Most common violations
- No polyethylene film was laid during the preparatory work. Such an omission leads to the fact that the concrete mass begins to absorb moisture from the soil. With a significant decrease in temperature, concrete freezes and, as a result, its destruction.
- The work was carried out in violation of the temperature regime (low ambient temperature, high humidity).
- The fixatives were applied late. After the concrete mixture has set, the hardener does not penetrate into the concrete structure, but is concentrated in the upper layers. Such a violation of technology will most likely lead to peeling of the decorative layer.
- The surface slope is less than 1.5 cm/m. p. With such an omission, stagnation of rain and melt water is observed on the surface of the printed concrete, gradually penetrating into the structure of the concrete coating, which, with a decrease in temperature, leads to its destruction.
- With insufficient reinforcement or its complete absence, deformation of the concrete slab occurs, which inevitably leads to its cracking and subsequent destruction.
Poor quality concrete mix
- When using liquid concrete, excess water accumulates on the surface, which causes a deterioration in the operational and strength characteristics of the concrete and a significant decrease in surface strength.
- The use of thick concrete significantly reduces the hardening time, which makes it difficult to obtain a high-quality impression. In addition, rapid setting prevents the hardener from penetrating into the concrete structure.
- Use of concrete whose grade does not meet the requirements. To obtain a high-quality printed coating, the grade of concrete must be M300 or more.
Punching
If you make stamped concrete yourself, now is the stage when you can start stamping directly. Check whether the concrete is flexible enough to continue working with it. After all, if the material is too dense, the pattern will not be able to be imprinted on it. And such a plane will not support workers.
READ ALSO: Metal gratings and areas of application
Press your finger into the concrete at different points - this will allow you to set the degree of density. If the depth of the prints does not exceed 6 mm, you can start stamping. To begin with, place stamps over the entire surface of the concrete, then you need to step on them for the texture to be imprinted. Sometimes manual compaction may be necessary. Next you need to let the surface harden. This process takes from 12 to 24 hours.